wayouteast
Sr Member
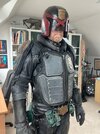
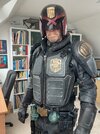
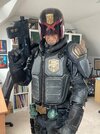
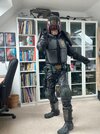
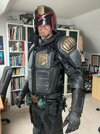
I think - after what has now been several years of time and effort - I'm finally ready to call my Judge uniform from the 2012 movie done. It's been a bit of a journey involving me learning several new skills, techniques and materials! There will probably still be a few tweaks and refinements to come, but in general I'm happy with the result. I'm looking forward to joining my fellow Judges out on the mean streets sometime in the future!

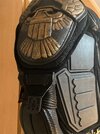
So the basic suit is from Leather Next, who do probably the most accurate 'off-the-peg' replica. I bought their jacket, trousers and armoured vest. The quality is excellent, with quality materials, attention to accuracy and detail, and good workmanship. I did a fair amount of weathering and distressing with scouring pads, acrylic paint and fuller's earth to mimic the street-used, lived-in, worn look of the originals. In fact, looking at the state of the screen-used uniforms, I could maybe even have gone a bit further! I re-finished the moulded bars and eagle on the shoulder pads with matt black paint and European Gold rub'n'buff to give the designs a bit more sharpness and definition. I also added a couple more elastic straps to the inside of the vest to hold the shoulder pads in position a bit better.
The knee and elbow pads needed painting a dark, flat green (Tamiya XF-11). The colour is barely noticeable in the movie as the uniforms are so worn and used-looking so I opted to sponge the colour on irregularly as if it was being worn away. I also actually did wear some of it away with a final round of scuffing of the whole uniform against the stone flagstones of my patio!
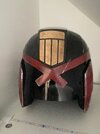
The helmet was the first item I bought, several years ago. It was a raw, unfinished fiberglass casting from eBay and required a fair bit of trimming, filling, sanding and finishing before painting with automotive paints - Rustoleum 'Painter's Touch' gloss black and 'Balmoral' - and weathering with acrylics and silver leaf rub'n'buff. More European Gold was used for the shield. Padding was added inside with car headliner material over foam. The visor wass made from a dark smoke motorcycle visor, trimmed and mounted upside down inside the helmet with chicago screws.
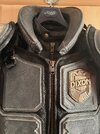
I created the name badge from a customisable set of STL files from CG Trader. The letters are all separate files, and there are three variations of the badge to match the ones in the movie. This combination allows the creation of a badge with any length of name in any 3D program able to read the STL files. I used Meshmixer for ease and simplicity. The badge was printed in resin and finished with European Gold rub'n'buff to match the belt buckle and shoulder pads before weathering with acrylic paints.
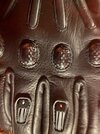
The gloves and boots are both also from Leather Next. I didn't need to do much to the gloves as the details on them are pretty accurate (although I intend to add an illuminated 'comms screen' to the left glove at some point as seen in the movie.
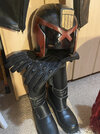
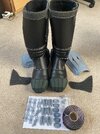
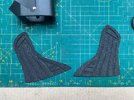
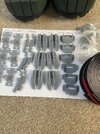
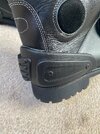
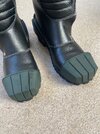
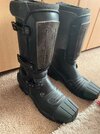
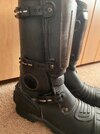
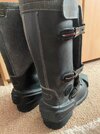
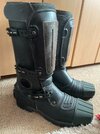
The boots, while accurate in style, need a lot of additional items to make them more accurate to those in the movie. I bought the basic boots. The heel and toe armour and the shin guards are all 3D-printed ABS-like resin (much tougher and less brittle than standard resin) from STL files offered by p00bunk13 on CG Trader. I had to print each shin guard in 2 pieces to fit them on my tiny Elegoo Mars build plate! The armour pieces are attached first with contact cement and then any voids between the inner surface and the boots are filled with black hot-glue. The shifter guards are made from 2 layers of 2mm high-density EVA foam, each individual piece of the pattern added to the underlying shape. They are finished with matt black Plastidip to give them strength and a nice authentic texture, and attached with contact cement. Finally, I found it almost impossible to get hold of authentic SIDI callipers for the straps, at least at a price within my budget, so I settled for making non-functional ‘fakes’. The retainers and all the components of the latches are 3D-printed, again in ABS-like resin, and the straps are made from 2 layers of EVA foam in the same way as the shifter guards. Each strap is securely fixed together with contact cement and hot-glue as one piece attached to the shin guard/boot at the retainer end. Once the boot is on Velcro holds the calliper end securely in place.
The heel armour is painted flat black with some metallic highlights on the (fake) bolts. The toe armour is the same dull green as the knee and elbow pads. The shinguards are satin black with gunmetal fronts, heavily weathered with raw umber and black. The SIDI clips are satin black with chrome latch-levers and pins.
The final touch was to give the boots some weathering and wear with fine-grit sandpaper, acrylic paints and fullers earth to match similar wear and tear on the rest of the uniform.
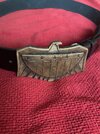
I bought a black leather 1.75" belt (as used in the movie) and 3D printed a replica buckle in resin. To attach it to the belt I bought a 'loop and hook' buckle, flattened it in a vice, trimmed it to size with a hacksaw and fastened it securely to the back of my resin eagle buckle with epoxy and JB Weld. Then I turned my attention to all the items of equipment on the belt.
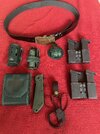
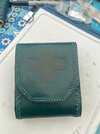
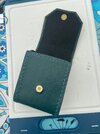
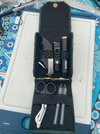
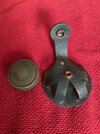
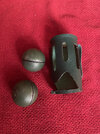
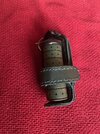
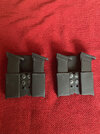
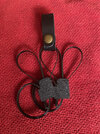
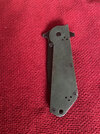
There's a separate thread going into some detail about how I put together some of the belt items. I used 3D-printing for the mag holders and spare magazines, the breach mine, gas grenade, flashbangs (which I added simple electronics to so that they have working switches and indicator lights like those in the movie), Lawgiver holster and the contents of the med pouch. The grenade, mine and flashbangs are painted NATO green. I hand-stitched or glued all the various leather pouches, holders and straps from dark green leather (also heavily distressed) and added all the buckles, magnetic catches, velcro and snap fasteners where needed. The med-pouch was made from a combination of leather and heat-formed kydex to give it the 'drop-down' functionality seen in the movie, using a cut-down piano-hinge, and lined with the same black felt I used on the inside of the holster. The holster straps were made from 1" webbing, a 1" cobra buckle and two quick-release fasteners. The zip-cuff holders were scratch-built from kydex and plasticard and the cuffs themselves are just ordinary 14" black plastic zip-ties!
The Lawgiver is the incredible interactive one created by Chris and Craig at Props3D, which I printed on my resin printer (again ABS-like resin). The electronics were kindly put together for me by Paul (BeakZ ). I've detailed the building of this fantastic replica in this post.
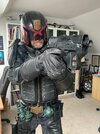
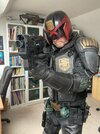
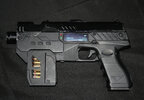
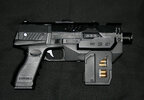
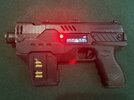
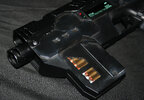
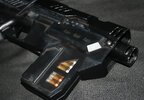
I'm really happy with the way the uniform has turned out. As I said, there're probably still a few more things to iron out - the belt tends to 'sag' at the sides, and I still have to do some working on the internal webbing that holds the shoulder pads consistently in the right place, but it's surprisingly wearable (though hot!) and (perhaps surprisingly) robust given the amount of resin-printed elements. Most importantly, it feels right - when I put it on my face automatically assumes the 'Dredd scowl'! Time to join my fellow-Judges in 'the meat grinder' of Mega City One - as Dredd himself memorably observed: 'It's all a deep end'!
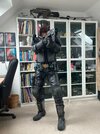
So the basic suit is from Leather Next, who do probably the most accurate 'off-the-peg' replica. I bought their jacket, trousers and armoured vest. The quality is excellent, with quality materials, attention to accuracy and detail, and good workmanship. I did a fair amount of weathering and distressing with scouring pads, acrylic paint and fuller's earth to mimic the street-used, lived-in, worn look of the originals. In fact, looking at the state of the screen-used uniforms, I could maybe even have gone a bit further! I re-finished the moulded bars and eagle on the shoulder pads with matt black paint and European Gold rub'n'buff to give the designs a bit more sharpness and definition. I also added a couple more elastic straps to the inside of the vest to hold the shoulder pads in position a bit better.
The knee and elbow pads needed painting a dark, flat green (Tamiya XF-11). The colour is barely noticeable in the movie as the uniforms are so worn and used-looking so I opted to sponge the colour on irregularly as if it was being worn away. I also actually did wear some of it away with a final round of scuffing of the whole uniform against the stone flagstones of my patio!
The helmet was the first item I bought, several years ago. It was a raw, unfinished fiberglass casting from eBay and required a fair bit of trimming, filling, sanding and finishing before painting with automotive paints - Rustoleum 'Painter's Touch' gloss black and 'Balmoral' - and weathering with acrylics and silver leaf rub'n'buff. More European Gold was used for the shield. Padding was added inside with car headliner material over foam. The visor wass made from a dark smoke motorcycle visor, trimmed and mounted upside down inside the helmet with chicago screws.
I created the name badge from a customisable set of STL files from CG Trader. The letters are all separate files, and there are three variations of the badge to match the ones in the movie. This combination allows the creation of a badge with any length of name in any 3D program able to read the STL files. I used Meshmixer for ease and simplicity. The badge was printed in resin and finished with European Gold rub'n'buff to match the belt buckle and shoulder pads before weathering with acrylic paints.


The gloves and boots are both also from Leather Next. I didn't need to do much to the gloves as the details on them are pretty accurate (although I intend to add an illuminated 'comms screen' to the left glove at some point as seen in the movie.


The boots, while accurate in style, need a lot of additional items to make them more accurate to those in the movie. I bought the basic boots. The heel and toe armour and the shin guards are all 3D-printed ABS-like resin (much tougher and less brittle than standard resin) from STL files offered by p00bunk13 on CG Trader. I had to print each shin guard in 2 pieces to fit them on my tiny Elegoo Mars build plate! The armour pieces are attached first with contact cement and then any voids between the inner surface and the boots are filled with black hot-glue. The shifter guards are made from 2 layers of 2mm high-density EVA foam, each individual piece of the pattern added to the underlying shape. They are finished with matt black Plastidip to give them strength and a nice authentic texture, and attached with contact cement. Finally, I found it almost impossible to get hold of authentic SIDI callipers for the straps, at least at a price within my budget, so I settled for making non-functional ‘fakes’. The retainers and all the components of the latches are 3D-printed, again in ABS-like resin, and the straps are made from 2 layers of EVA foam in the same way as the shifter guards. Each strap is securely fixed together with contact cement and hot-glue as one piece attached to the shin guard/boot at the retainer end. Once the boot is on Velcro holds the calliper end securely in place.
The heel armour is painted flat black with some metallic highlights on the (fake) bolts. The toe armour is the same dull green as the knee and elbow pads. The shinguards are satin black with gunmetal fronts, heavily weathered with raw umber and black. The SIDI clips are satin black with chrome latch-levers and pins.
The final touch was to give the boots some weathering and wear with fine-grit sandpaper, acrylic paints and fullers earth to match similar wear and tear on the rest of the uniform.


I bought a black leather 1.75" belt (as used in the movie) and 3D printed a replica buckle in resin. To attach it to the belt I bought a 'loop and hook' buckle, flattened it in a vice, trimmed it to size with a hacksaw and fastened it securely to the back of my resin eagle buckle with epoxy and JB Weld. Then I turned my attention to all the items of equipment on the belt.
There's a separate thread going into some detail about how I put together some of the belt items. I used 3D-printing for the mag holders and spare magazines, the breach mine, gas grenade, flashbangs (which I added simple electronics to so that they have working switches and indicator lights like those in the movie), Lawgiver holster and the contents of the med pouch. The grenade, mine and flashbangs are painted NATO green. I hand-stitched or glued all the various leather pouches, holders and straps from dark green leather (also heavily distressed) and added all the buckles, magnetic catches, velcro and snap fasteners where needed. The med-pouch was made from a combination of leather and heat-formed kydex to give it the 'drop-down' functionality seen in the movie, using a cut-down piano-hinge, and lined with the same black felt I used on the inside of the holster. The holster straps were made from 1" webbing, a 1" cobra buckle and two quick-release fasteners. The zip-cuff holders were scratch-built from kydex and plasticard and the cuffs themselves are just ordinary 14" black plastic zip-ties!


The Lawgiver is the incredible interactive one created by Chris and Craig at Props3D, which I printed on my resin printer (again ABS-like resin). The electronics were kindly put together for me by Paul (BeakZ ). I've detailed the building of this fantastic replica in this post.


I'm really happy with the way the uniform has turned out. As I said, there're probably still a few more things to iron out - the belt tends to 'sag' at the sides, and I still have to do some working on the internal webbing that holds the shoulder pads consistently in the right place, but it's surprisingly wearable (though hot!) and (perhaps surprisingly) robust given the amount of resin-printed elements. Most importantly, it feels right - when I put it on my face automatically assumes the 'Dredd scowl'!


