I have never collected a Blade Runner prop before, but this one has me jonesin'.
You are using an out of date browser. It may not display this or other websites correctly.
You should upgrade or use an alternative browser.
You should upgrade or use an alternative browser.
Blade Runner Snub Nose Blaster Project
- Thread starter DaveG
- Start date
Moldmaking
Since there's been some interest (or at least I perceive there's some interest!) in the way I make molds, here's a step-by-step on how I made the two part mold for the frame assembly of the Snubby.
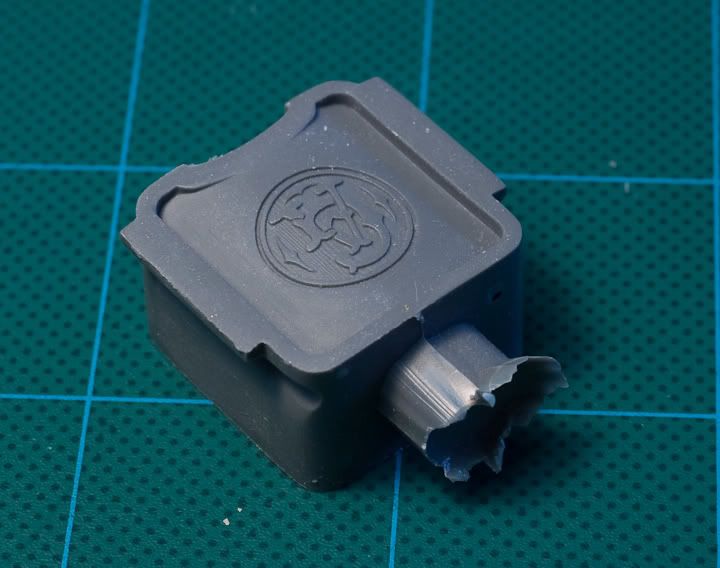
Here's the part to be molded. It's sitting on a piece of clear 1/4" thick plexiglas which will form the bottom of the mold box. I like using plex (and as you'll see later, sheet styrene) for the mold box because it glues easily, is dimensionally stable and I have a ton of scrap pieces lieing about the shop. You could use MDF or another flat sheet material but I've found using plastics the easiest and cleanest materials for small to medium sized mold boxes. The piece of plex is about an inch bigger all the way around than the part to be molded.

Here water based modelling cllay is roughly formed arouns the part to just above the planned parting line and bigger all the way around than the anticiplated final size of the mold. I use WED Modeling Clay from Laguna Clay. It's very smooth, easy to form but firms up nicely as it's worked. Water based clays are also cheap, and easy to clean off. I use platinum based silicone rubber for most of my molds which can be inhibited by contact with oil based clays like plasticine, so I avoid using them.

The clay is then worked smooth and neat to the parting line. Getting the clay trimmed nice and sharp to the side of the part will make for little or no flash and a very easy to clean up seam on the casting. The clay is also trimmed all the way around the casting leaving about a 1/2" wide border.


I've found half-dome dimples to be the mode effective and easiest to produce keys for aligning the mold halves. I use a 1/4" diameter spiral cut ball end mill rotated gently with the fingers to cut the dimples into the clay. This usually takes a couple of passes to get nice clean dimples. I cut them all the way around then use a cotton swab to gently tamp down the little ridge of clay around the lip of the hole. Then I let the mold sit for 15 to 20 minutes, the clay will firm up a bit as it drys out. Then go around and clean up the holes with the end mill again. Some times even a third pass is needed.


For the sides of the mold box I use white sheet styrene, .030" or .040" thick. The styrene is bonded to the plexiglas base and itself with solvent cement. I just work my way around, overlapping the corners so I don't have to precisely cut the sides to length. For this particular mold, I've made the styrene sides the same height as the desired amount of rubber. There are times when i'll make the molds sides abot two times taller than the final size of the mold, more on that later.


Silicone rubber is really expensive, so accurately estimating the amount mix up is important to avoid waste. I fill the mold box with short grain rice. representing the amount of rubber to be used. Short grain rice is dust free, very smooth and rounded and won't leave marks in the clay (as long as you don't tamp it down). The rice is then dumped into a disposable paper paint mixing bucket and the heigh marked with a pencil. The rice can be saved and used over and over, but don't eat it! Use a mixing bucket with at least four times the volume of the amount of rubber to be mixed.


Most mold making silicones are mixed 10 parts rubber to 1 part catalyst by weight. Weigh the empty bucket, then add the silicone rubber up to (or slightly below) the pencil marks). Weigh the bucket again and subtract the weight of the empty bucket to get the weight of the rubber. Devide that number by 10 to get the amount of catalyst to add. Throughly mix in the catalyst until the rubber is a homogenous color (usually the catalyst is a darker color than the base rubber).
The bucket of rubber is then put into a vacuum chamber to de-air the mixture, pulling out most of the bubbles. During this process the rubber with foam up and expand to four times it's original volume as the trapped air bubbles expand, float to the top of the mixture and pop. After a few minutes in the vacuum chamber the mass of rubber will collapse down, indicating that most of the air bubble have been pulled out. Let the rubber sit under vaccum for an additional 10 to 15 minutes. There may still be bubbles visible, even after this time, that's okay. Most silicone rubbers have an 'open time' of at least a half an hour (or more) before they start to thicken and set.
The rubber is then poured into the mold box and left to cure for 12 to 24 hours, depending on the type of rubber, temperature and humidity. You'll notice the rubber doesn't come all the way to the top of the mold box. After building the box I decided I had allowed for too thick of a mold thickness so I just mixed a little less rubber than indicated.

If the pattern have a lot of intricate details or deep recesses there is a risk that the rubber may not flow into every crack and crevice. In that case, I'll build the styrene mold sides twice astall as the finished pour. De-air the rubber in the mixing bucket and pour it into the mold box, then put the mold into the vacuum chamber for a second de-airing. Care must be taken that there are no air pocket in the clay which might expand and burst, possibly ruining the mold.
One the rubber has cured I pull off the styrene mold box sides and carefully pry the mass of rubber and clay off the plex base. It's important not to pull directly on the mold as the pattern may start to come loose from the cured rubber, which will make it difficult to get a good mold.


The clay is then carefully removed, again being careful not to dislodge the pattern. Residual clay can be cleaned of with water, a soft brush and cotton swabs (as long as the patttern isn't made of wood, plaster, or another material that might absorb moisture.

The first half of the mold is put back on the plexiglas base and styrene sides added, as before. I usually don't reuse the styrene from the fist pour, just cut new clean pieces.

Silcone rubber will stick to itself so a parting or release agent should be used on the cured rubber from the first pour. I use a commercial liquid parting agent which is sprayed from an airbrush, but a very thin layer of vasilene, applied with a cottom swab and wiped off with a rag works just as well.
Mix, de-air and pour the rubber for the second half of the mold.
Here's the finished mold and the first casting. The opening in the mold for pouring the resin and some vent channels to prevent trapped bubbles were cut into the rubber with a very sharp scalple blade.


And that's how I make a two part mold.
Since there's been some interest (or at least I perceive there's some interest!) in the way I make molds, here's a step-by-step on how I made the two part mold for the frame assembly of the Snubby.
Here's the part to be molded. It's sitting on a piece of clear 1/4" thick plexiglas which will form the bottom of the mold box. I like using plex (and as you'll see later, sheet styrene) for the mold box because it glues easily, is dimensionally stable and I have a ton of scrap pieces lieing about the shop. You could use MDF or another flat sheet material but I've found using plastics the easiest and cleanest materials for small to medium sized mold boxes. The piece of plex is about an inch bigger all the way around than the part to be molded.
Here water based modelling cllay is roughly formed arouns the part to just above the planned parting line and bigger all the way around than the anticiplated final size of the mold. I use WED Modeling Clay from Laguna Clay. It's very smooth, easy to form but firms up nicely as it's worked. Water based clays are also cheap, and easy to clean off. I use platinum based silicone rubber for most of my molds which can be inhibited by contact with oil based clays like plasticine, so I avoid using them.
The clay is then worked smooth and neat to the parting line. Getting the clay trimmed nice and sharp to the side of the part will make for little or no flash and a very easy to clean up seam on the casting. The clay is also trimmed all the way around the casting leaving about a 1/2" wide border.
I've found half-dome dimples to be the mode effective and easiest to produce keys for aligning the mold halves. I use a 1/4" diameter spiral cut ball end mill rotated gently with the fingers to cut the dimples into the clay. This usually takes a couple of passes to get nice clean dimples. I cut them all the way around then use a cotton swab to gently tamp down the little ridge of clay around the lip of the hole. Then I let the mold sit for 15 to 20 minutes, the clay will firm up a bit as it drys out. Then go around and clean up the holes with the end mill again. Some times even a third pass is needed.
For the sides of the mold box I use white sheet styrene, .030" or .040" thick. The styrene is bonded to the plexiglas base and itself with solvent cement. I just work my way around, overlapping the corners so I don't have to precisely cut the sides to length. For this particular mold, I've made the styrene sides the same height as the desired amount of rubber. There are times when i'll make the molds sides abot two times taller than the final size of the mold, more on that later.
Silicone rubber is really expensive, so accurately estimating the amount mix up is important to avoid waste. I fill the mold box with short grain rice. representing the amount of rubber to be used. Short grain rice is dust free, very smooth and rounded and won't leave marks in the clay (as long as you don't tamp it down). The rice is then dumped into a disposable paper paint mixing bucket and the heigh marked with a pencil. The rice can be saved and used over and over, but don't eat it! Use a mixing bucket with at least four times the volume of the amount of rubber to be mixed.
Most mold making silicones are mixed 10 parts rubber to 1 part catalyst by weight. Weigh the empty bucket, then add the silicone rubber up to (or slightly below) the pencil marks). Weigh the bucket again and subtract the weight of the empty bucket to get the weight of the rubber. Devide that number by 10 to get the amount of catalyst to add. Throughly mix in the catalyst until the rubber is a homogenous color (usually the catalyst is a darker color than the base rubber).
The bucket of rubber is then put into a vacuum chamber to de-air the mixture, pulling out most of the bubbles. During this process the rubber with foam up and expand to four times it's original volume as the trapped air bubbles expand, float to the top of the mixture and pop. After a few minutes in the vacuum chamber the mass of rubber will collapse down, indicating that most of the air bubble have been pulled out. Let the rubber sit under vaccum for an additional 10 to 15 minutes. There may still be bubbles visible, even after this time, that's okay. Most silicone rubbers have an 'open time' of at least a half an hour (or more) before they start to thicken and set.
The rubber is then poured into the mold box and left to cure for 12 to 24 hours, depending on the type of rubber, temperature and humidity. You'll notice the rubber doesn't come all the way to the top of the mold box. After building the box I decided I had allowed for too thick of a mold thickness so I just mixed a little less rubber than indicated.
If the pattern have a lot of intricate details or deep recesses there is a risk that the rubber may not flow into every crack and crevice. In that case, I'll build the styrene mold sides twice astall as the finished pour. De-air the rubber in the mixing bucket and pour it into the mold box, then put the mold into the vacuum chamber for a second de-airing. Care must be taken that there are no air pocket in the clay which might expand and burst, possibly ruining the mold.
One the rubber has cured I pull off the styrene mold box sides and carefully pry the mass of rubber and clay off the plex base. It's important not to pull directly on the mold as the pattern may start to come loose from the cured rubber, which will make it difficult to get a good mold.
The clay is then carefully removed, again being careful not to dislodge the pattern. Residual clay can be cleaned of with water, a soft brush and cotton swabs (as long as the patttern isn't made of wood, plaster, or another material that might absorb moisture.
The first half of the mold is put back on the plexiglas base and styrene sides added, as before. I usually don't reuse the styrene from the fist pour, just cut new clean pieces.
Silcone rubber will stick to itself so a parting or release agent should be used on the cured rubber from the first pour. I use a commercial liquid parting agent which is sprayed from an airbrush, but a very thin layer of vasilene, applied with a cottom swab and wiped off with a rag works just as well.
Mix, de-air and pour the rubber for the second half of the mold.
Here's the finished mold and the first casting. The opening in the mold for pouring the resin and some vent channels to prevent trapped bubbles were cut into the rubber with a very sharp scalple blade.
And that's how I make a two part mold.
Last edited:
Daddy Solo
Active Member
these tutorials/build pics are fascinating, and are like prop porn!:love thanks Dave for sharing!!
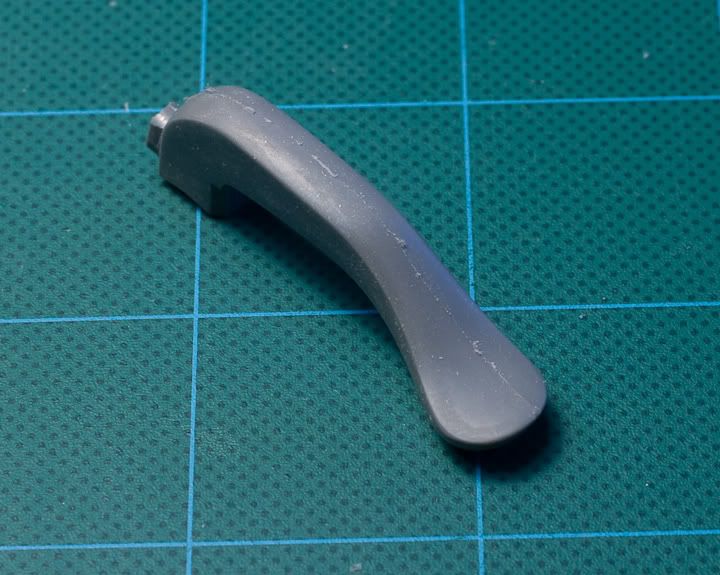
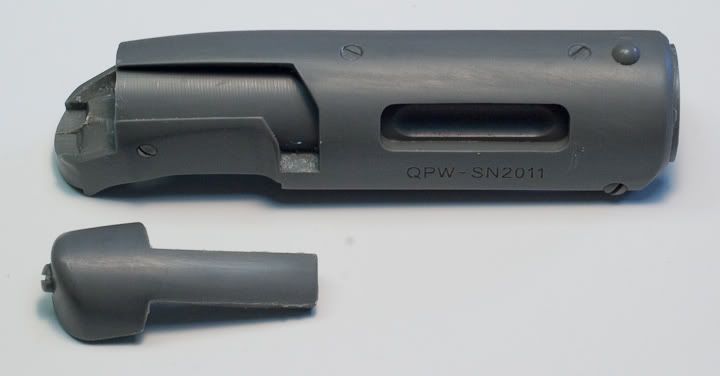
The barrels were cast slightly longer than the desired final length. Using a jig, I'm trimming the castings to length on the table saw, which leaves a nice clean end.

Then every casting get's chucked up in the lathe and bored out to .357", the correct I.D. for a .38 csliber.
Here's a before and after shot of the barrel casting.
Then every casting get's chucked up in the lathe and bored out to .357", the correct I.D. for a .38 csliber.
Here's a before and after shot of the barrel casting.

Darth Brass
Sr Member
Holy smokes. That's totally awesome. All of it.
HeroWorship
Well-Known Member
Lovin' the awesome How-To clinic you're putting on for us Dave! Keep up the good work.
Laser Brain
Sr Member
Lovely project Dave. Very, very nice indeed
Engraving
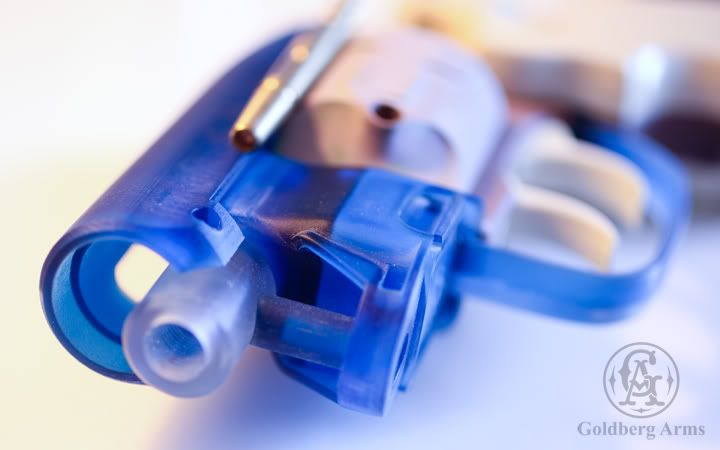
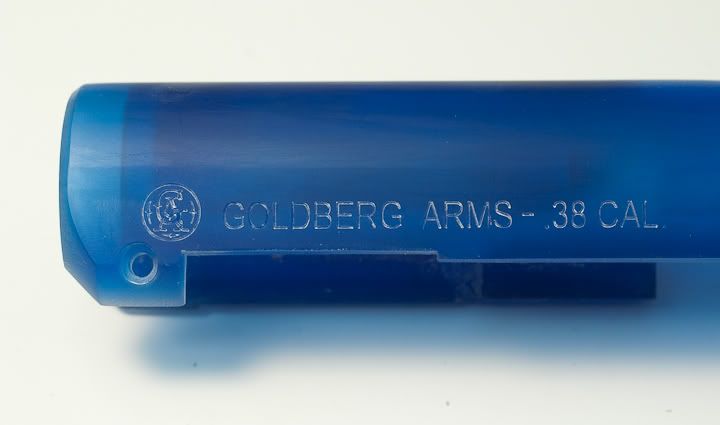
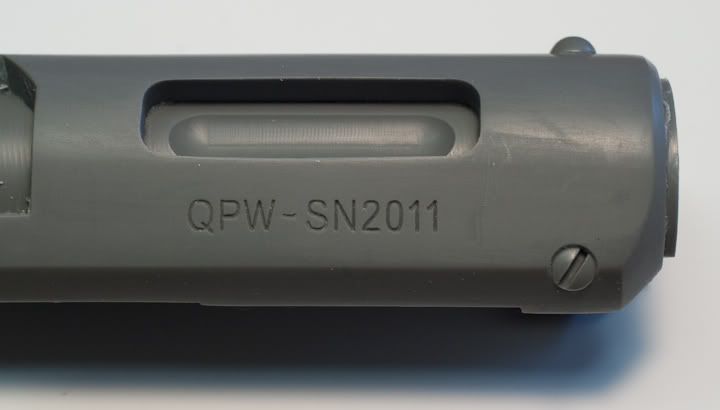
I finally got up the nerve to engrave the receiver. One chane, didn't want to mess it up and have to start all over! But it came out okay. Did it with the CNC router, pretty nice detail for a machine with a 24 x 48 capacity! The translucent blue material and slight whitish surface left by the engraver make the lettering difficult to see. I'll post some pics of a casting as soon as they are available.
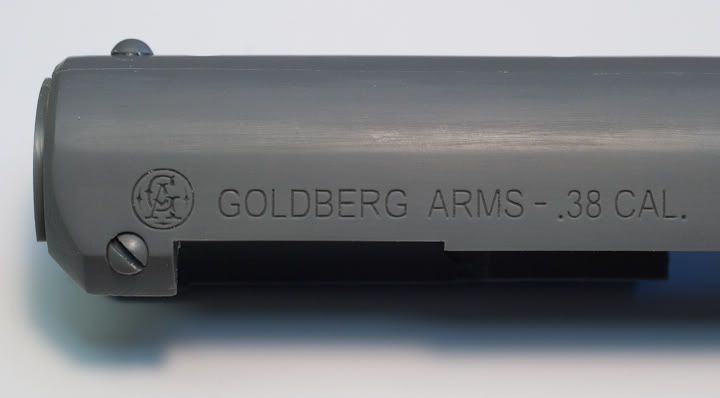
The left side has the Goldberg Arms Logo, name and caliber.
I debated what to use for the model number for a long time. Rick Ross graciously consented to the use of PKD and I was sorely tempted as those letters have become synoymous wit blasters. But in the end I decided to leave those letters representing just his wonderful designs and label mine something else. I settled on QPW for Quantum Particle Weapon.
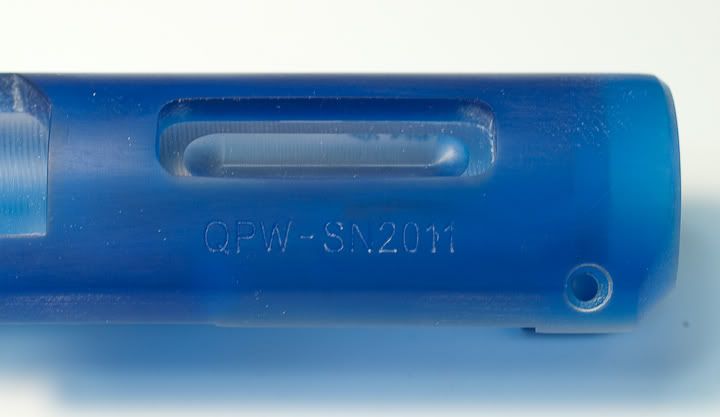
I finally got up the nerve to engrave the receiver. One chane, didn't want to mess it up and have to start all over! But it came out okay. Did it with the CNC router, pretty nice detail for a machine with a 24 x 48 capacity! The translucent blue material and slight whitish surface left by the engraver make the lettering difficult to see. I'll post some pics of a casting as soon as they are available.
The left side has the Goldberg Arms Logo, name and caliber.
I debated what to use for the model number for a long time. Rick Ross graciously consented to the use of PKD and I was sorely tempted as those letters have become synoymous wit blasters. But in the end I decided to leave those letters representing just his wonderful designs and label mine something else. I settled on QPW for Quantum Particle Weapon.
MrSinistar
Well-Known Member
Dare I say, this looks better than my Coyle Resin Blaster! ") Sir, you are truly creating a masterpiece!
Sir, you are truly creating a masterpiece!
Sir, you are truly creating a masterpiece!Similar threads
- Replies
- 24
- Views
- 1,879
- Replies
- 2
- Views
- 811