Big Trouble in Little China

Hey man can you send me the parts list and decals you used o build this?

Jim,

Sorry for the late reply, that pesky Life thing got in the way again, LOL. The first thng you'll need is the Italeri kit #3859, Freightliner FLC 120.
124_US_Superliner_Power_Truck__Italeri_3820_Model_Kit_50539.jpeg

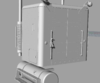
Most of the kit is correct except for a few big items. The fuel tanks need to be extended to around twice the size of the kit one.
I haven't been able to find any aftermarket tanks that fit the bill so you'll probably need to bash a couple together as I am doing.
P1N marked 1.jpg

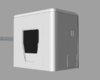
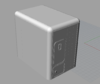
Next is the sleeper. The kit comes with a single wide sleeper but the PCE has a taller double wide sleeper as shown here,
Sleeper duo.jpg

Again, I haven't found an aftermarket version for this either so it's going to have to be kitbashed. You'll also need extra lights to mount on the sleeper as well.

I have found the rectangular lights on this site, http://www.kitformservices.com/tq.html ; Scroll about half way down the items # TQ158, TQ159 and TQ160.
KFS Trio.jpg


I also found these as well. http://www.b-n-lresins.com/shopping...cast-1-24-1-25-scale-model-model-KC-Light-Bar
B-N-L resin Lights-850x850.JPG

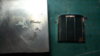
There is also the decorations on the radiator,
mudflap-girl.jpg

There is a photoetch fret that has both the girl and 'Haulin' Ass' on it and can be found here, http://www.kitformservices.com/photoetch.html
Scroll down about 3/4s of the page for part #PE85. The great thing about this fret is that you can use the smaller ladies on the back mud flaps.
Mudflaps.jpg


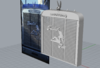
There is the hood ornament to find as well, it is basically a 1930's Packard Winged Swan hood ornament but with blue plastic wings very similar to this full sized version,
LostFile_jpg_56658112.jpg

the olnly one I have been able to find in 1/24-1/25th scale is a white metal one from https://www.auslowe.com.au/shop/swan-mascot-/WM44. There are two others I have thought abpit as well. One is from a 32nd scale Lindberg kit, 1930 Packard Roadster and the ICM 35th scale Packard Twelve kits.
Swan quad.jpg

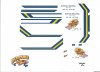
AS for the decals, I was given the file fellow RPF member Chromiumdioxide made for his PCE and have his permission to share it. He lost the completed file but was able to send me a photo of the missing part.
97831a5b.jpgDecal duo.jpg

I sent the file to https://cameronsdecals.com/ and he was able to size them for the scale of the kit. Sorry for the watermarks,
Cameron Decals PorkChop watermarked.jpg


There are other small conversion that need to be made but I haven't gone through all of them yet so I can't list them. If you have any questions, please feel free to drop me a line and I'll help in any way I can.

Don
 

Attachments

  • Cameron Decals PorkChop.jpg
    Cameron Decals PorkChop.jpg
    756.7 KB · Views: 591
Hello, I'm from Italy and I'm also building the Pork Chop Express model. I would like to thank you all for the ideas you are giving me and I would like to show you what I have created for the writing on the hood (sorry for the quality of the pics but my smartphone is shabby!)
IMG_20190125_185823.jpg 50613549_10215842430567517_5805522060100763648_n.jpg
 
Last edited:
Since I didn't find correct logos on the web (wrong size, wrong characters and colors or simply bad...) I decided to draw the Pork-Chop Express logo and the "Jack" written on the doors. I think they have correct dimensions and colors:

jack.png maiale1.png maiale2.png

I also noticed that the Pork-Chop Express written on the right side of the truck is oriented exactly like the one on the left side (slightly from bottom-left to top-right).
You will see it only in one moment during the entire movie:

vista dx.png
 
Last edited:
In keeping with resurrecting some of my long term projects now that the schedule is opening up a smidge, I am back on the Pork Chop Express with a vengeance, and this time I will print a lot of the new parts on a Form 2 so they will be crazy accurate.

First up, I am 3d scanning the exact model hood ornament, and will integrate it with the grille which will also sport the raised "Freightliner" logo, clips for the blue windscreen, and the Haulin' Ass placard. It'll be all one part - so it will be strong, and easy to paint will allclad or your metallic paint of choice.

Smoke stacks, exhaust underside, perforated screens, extended tanks, and of course the extended sleeper are on the list.

67347824_10157454970178156_6186817827731668992_o.jpg
 
It grows far cleaner with a solid back. That can be sanded down for slats you can see through. When you print them that way, they can get wavy and the uncured resin was collecting in weird ways... the support lattice was trapping it. Still dialing it in...

IMG_8242.jpeg


IMG_8228.jpeg
 
It grows far cleaner with a solid back. That can be sanded down for slats you can see through. When you print them that way, they can get wavy and the uncured resin was collecting in weird ways... the support lattice was trapping it. Still dialing it in...

View attachment 1045114

View attachment 1045116

Just out of curiosity and admiting I have very little knowledge of the requirements for 3D printing but can the grill display and hood ornament be printed separately? Noting the lack of striation lines, are you using a resin 3D ptinter?
 
This thread is more than 4 years old.

Your message may be considered spam for the following reasons:

  1. This thread hasn't been active in some time. A new post in this thread might not contribute constructively to this discussion after so long.
If you wish to reply despite these issues, check the box below before replying.
Be aware that malicious compliance may result in more severe penalties.
Back
Top