Baylan Skoll / Shin Hati Dark Jedi Costumes - Ahsoka (Series) Star Wars

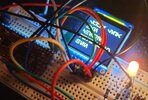
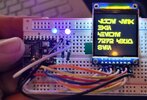
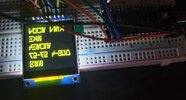
Finally got the display working. Currently a static BMP image. Plan to make a slideshow to change the images and prevent screen burn-in. I would love to be able to do an animated GIF of some Star Warsy maps and stuff. Like the screen showing the decoding of the map to Thrawn on the ship. Baby Yoda steps though. New to Raspberry Pi.

Running on RP2040 and an ST7789 1.54 inch display 240x240. Image created in Coreldraw.

Next steps - attempt to get it running on a RP zero and do a test fit in the gauntlet. Also got an 1100 mAh rechargable battery to power it. Need to wire that up for testing as well. If my math is correct, it will run the display for about 15 hours nonstop.

Happy to share the code if anyone is interested. Took me a while to get it right.
 

Attachments

  • 20231025_213126.jpg
    20231025_213126.jpg
    974.5 KB · Views: 52
  • VID_260320120_055248_411.mp4
    5.5 MB
Last edited:
I've ordered 1.44", 2.2" and 2.8" TFT screens with attached MicroSD card readers and I'll power/control them via breadboard, for the forearms.

Tracking on a similar path as your own.

Looking good so far!! Keep at it!
Hey man, I finally got my screen to show static bitmaps. Running on RP2040 and an ST7789 display utilizing onboard memory. Let me know if you want my script. It took me way to long to figure it out and get it working. Using CircuitPython.

 
Thank you, I'll happily take it, yes!

I'm in a holding pattern while working on Halloween costumes for/with my boys, but hopefully within the next few weeks (by the end of November, really) I'll be able to focus on Baylan!
 
Alright, my cosplay is as done as I think it can be. Thought I’d share pictures of the build as well as modeling it. I’m sure my process are not what one would consider conventional, so feel free to ask any and all questions if you have them on how any particular part was assembled/finished. Oh and the smokeshow standing next to me in the last picture is my wife, who has put up with my perseverating and perfectionism for over a month and is a saint. She also sewed the underlayment and the modified turtleneck by removing the sleeves and sewing the quilted ones in their place.
IMG_3374.jpeg
IMG_3375.jpeg
IMG_3376.jpeg
IMG_3377.jpeg
IMG_3378.jpeg
IMG_3379.jpeg
IMG_3380.jpeg
IMG_3381.jpeg
IMG_3382.jpeg
IMG_3383.jpeg

IMG_3384.jpeg

IMG_3386.jpg

3B388634-8219-4587-89AF-E1D49CAA9117.jpeg

IMG_3387.jpeg
 

Attachments

  • IMG_3386.jpeg
    IMG_3386.jpeg
    1.4 MB · Views: 90
Last edited:
Thank you, I'll happily take it, yes!

I'm in a holding pattern while working on Halloween costumes for/with my boys, but hopefully within the next few weeks (by the end of November, really) I'll be able to focus on Baylan!
Here is the code - running on MicroPython. Hardware is RP2040 and ST7789 display 1.54" 240x240. Dependencies adafruit_imageload and adafruit_st7789. Just place your images in memory as 0.bmp, 1.bmp, etc. Image slide refreshes in about 1/3rd of a second. Not ideal. My next steps is to get this working on a RP2040 Zero and use the Arduino framework to make it snappier.

Also, does anyone have cool Star Warsy gifs or videos? I'm hoping to enhance the display with a "mapping" graphic or something else.

**********************************************************************************************************************************************
import board
import busio
import terminalio
import displayio
import adafruit_imageload
from time import sleep
from adafruit_st7789 import ST7789

# Release any resources currently in use for the displays
displayio.release_displays()

tft_cs = board.GP17
tft_dc = board.GP16
spi_mosi = board.GP19
spi_clk = board.GP18
spi = busio.SPI(spi_clk, spi_mosi)

display_bus = displayio.FourWire(spi, command=tft_dc, chip_select=tft_cs)

display = ST7789(display_bus, width=240, height=240, rowstart=80, rotation=0)

bitmap = displayio_OnDiskBitmap("/0.bmp")
bitmap1 = displayio_OnDiskBitmap("/1.bmp")
group = displayio.Group()
display.show(group)

while True:
tile_grid = displayio.TileGrid(bitmap, pixel_shader=bitmap.pixel_shader)
group.append(tile_grid)
sleep(3)
tile_grid = displayio.TileGrid(bitmap1, pixel_shader=bitmap.pixel_shader)
group.append(tile_grid)
sleep(3)
 
Got LEDs working alongside the LCD panel. Might have to switch to neopixel though. Not sure everything fits. Testing electronics with 3d prints tomorrow.

Also got the RP2040 tiny in the mail today! This board is small! Smaller than a postage stamp! Yet it should be able to run all the electronics for 15+ hours on a lipo battery.

Lastly, saw this on Youtube. Thought it was brilliant.


Attachments

  • 20231102_224539.jpg
    20231102_224539.jpg
    982.8 KB · Views: 59
Last edited:
Got LEDs working alongside the LCD panel. Might have to switch to neopixel though. Not sure everything fits. Testing electronics with 3d prints tomorrow.

Also got the RP2040 tiny in the mail today! This board is small! Smaller than a postage stamp! Yet it should be able to run all the electronics for 15+ hours on a lipo battery.

Lastly, saw this on Youtube. Thought it was brilliant. electronics in general.

Got the 2040 Tiny up and running! This this is.. uh, tiny. Thumb for scale. Also threw in 2 leds for grins.
Printing test buttons tonight. Happy to share all schematics. It took me about 6 weeks to get to this point, granted, I've worked with raspberry pi or
 

Attachments

  • 20231103_163010.jpg
    20231103_163010.jpg
    973.4 KB · Views: 68
Found some more info on Shin's tunic clasps. It's manufactured by JHB International and the style with a jewel in the circle was commercially available at one point, bronze color item number #1253. Image is from a blog that is not updated anymore and I haven't had any luck finding them for sale online.
 

Attachments

  • ShinClasp_JHB.jpg
    ShinClasp_JHB.jpg
    63.1 KB · Views: 80
Hi Bob,

Can I ask how wide your belts are?

The 3D file I have for the 'belt buckle' in 44mm high. In Aus, standard belts are 38mm, then there's a few larger sizes that seem more 'custom'. Thinking 45mm might be the best, based purely on my eye!
Yeah, so the default print had the buckle measure out at 38.1mm(1 1/2") tall. So I simply found matching dark brown leather strapping of that height. We were in a rush though. Doing it over again, I would have gone thicker, at least 44mm (1 3/4") thick, may be even 50.8mm (2") on both buckle and leather straps. It felt too narrow on me and Im not even a large guy.
 
Hello everyone,
Heres my reseach so far on both characters starting with Baylan:

I have made a close up of Baylan's cloak out of a high res screen grab. I've replaced his face with a mannequin to not take too much focus from the cloak. The image has been enhanced past 4K and sharpened to make sure details are visible. Here, you can see the piping's knots alongside the mentioned leather part around the hood's opening and the pleated seam that goes down his arm. On the hooded leather "hem", you can see there's maybe around 1/4" of where its stitched. Seam down the middle of the hood as well.

The texture of the fabric is very nicely visible on this image too. Onto his tunic, I noticed that the second pleat from top to bottom seems to be of a different fabric. For whatever reason, this seems to be the only panel that has this texture (as noted by the 1 and 2). Something else I noticed was that some of the piping areas look to resemble Shin's where frayed edges are stitches in a zig zag, except this time the pattern is tighter and more interwoven. Also, the ribstop sections seem to be the other fabric apart from the suede. Some panels look to have either a textured leather or waxed over suede look, almost flakey.

After some discussion and research, I have come to the conclusion that Byalan does indeed have rocks intertwined in his piping. 3 are present on his vest, cloak, and the back of the vest, for a total of 9. The reason it was originally hard to tell was people where using the promo picture, which has been edited for publicity's sake and make it more appealing to the eye (as obvious by the missing gauntlet rectangle. The rocks seem to be either white or translucent in appearance.

lJHB0JH.jpg

GiGLiBC.jpg

nximCtk.jpg
3aUlEfa.jpg
 
As for Shin, heres the stuff I have so far from other discussion boards:

"Remember that cameras, displays, and post make colors look off than what they really are. Her undersuit is made of twill and a fabric similar to that of sport's fabric and is of a blue-grey color. The color you picked for her vest looks good. With what I had spoken with Shawna about (may she rest in power) her vest is a suede material similar to that of Baylan's. Here's a reference I created that I need to update."

"Here's a closer look at the fabric, specially that of her pants. I tried my best to color correct to try and get rid as much filtering used and have it as close to natural light as possible, its not perfect though. Instagram also compresses image quality a lot. You can see the twill texture as well as seeing the inner sides being smooth, which leads me to believe its 2 sets of fabric. Here, my earlier suspicions of only 2 of the D-Rings being functional also seems to be confirmed. double D-rings are way more visible too. Seems Shin and Baylan's costumes have a lot of similarities which makes sense."

"Both Baylan's and Shin's cloaks are made out of a coating weight wool or melton fabric (or similar), this is even more apparent in the high res image. They both are lined with a lightweight cotton fabric or a stretch liner (EDIT: upon closer look, Shin's liner seems to have a ribbed texture). Baylan's cloak is visibly a more weighted fabric as light doesn't seem to shine through alongside it being more heavy looking/thicker. His hood has a "hem" made out of leather around the edges aside from the lining. For Shin, as mentioned by others, her cloak is much lighter and allows for light to shine through. I would have to get samples of different wool fabrics and see if any are lightweight enough to allow for light to shine through. Something to note is her pleats on the vest are not piped and rather appear to be wide zig zag stitches over frayed edges. Some areas have larger clumps of stitching."

jVJQswe.jpg
chbuK71.jpg
nGWVH8U.jpg
TGNmb2v.jpg
qD2JkCT.jpg
5WKzBSZ.jpg
arlXS3K.jpg
 
Alright, my cosplay is as done as I think it can be. Thought I’d share pictures of the build as well as modeling it. I’m sure my process are not what one would consider conventional, so feel free to ask any and all questions if you have them on how any particular part was assembled/finished. Oh and the smokeshow standing next to me in the last picture is my wife, who has put up with my perseverating and perfectionism for over a month and is a saint. She also sewed the underlayment and the modified turtleneck by removing the sleeves and sewing the quilted ones in their place.View attachment 1756278View attachment 1756279View attachment 1756280View attachment 1756281View attachment 1756282View attachment 1756283View attachment 1756284View attachment 1756285View attachment 1756286View attachment 1756287
View attachment 1756289
View attachment 1756298
View attachment 1756292
View attachment 1756293
Wicked nice job
 
I didn’t realize this.. but talking with a friend late last night he brought up the green crystal in his belt could be a kyber crystal
 
Awfully large chunk of kyber that would be. What about the ones on his ring? He also has a total of 9 stoned sewn into his soft parts. 3 on the front of his vest, 3 more on the back of the vest, and 3 on the cloak. Shin also has 3 crystal orbs sewn into her rat tail
 

Your message may be considered spam for the following reasons:

If you wish to reply despite these issues, check the box below before replying.
Be aware that malicious compliance may result in more severe penalties.
Back
Top