ANH-Star Destroyer

Ktaylor

Sr Member
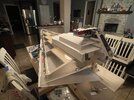
Decided I need to start a build thread to help me collect my thoughts, share info, and be able to remember this stuff in 5 years!

I started the plans for this build after seeing all the impressive work Ringa did on his build here, it was a true inspiration and fantastic set of information to make me feel comfortable diving into this model, so massive thanks Ringa!!

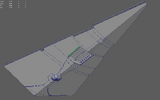
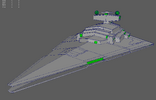
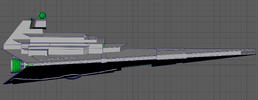
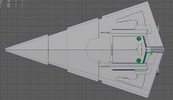
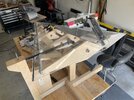
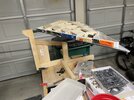
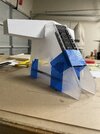
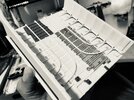
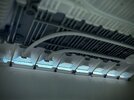
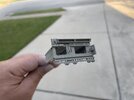
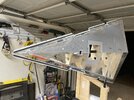
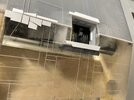
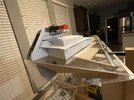
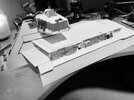
I did a 3D mock up off of what pics from chronicle I could find then started measuring known kit parts to help fine tune the dimensions until everything started to feel right and fit together.

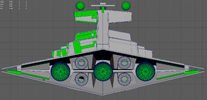
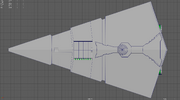
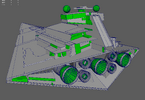
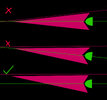
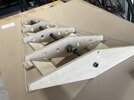
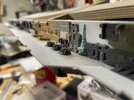
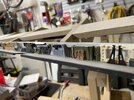
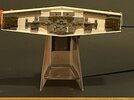
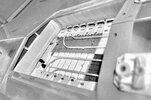
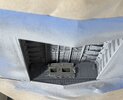
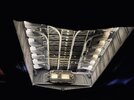
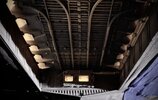
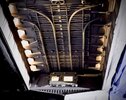
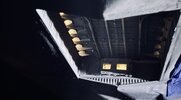
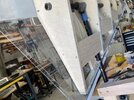
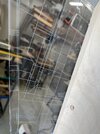
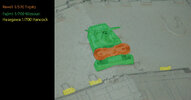
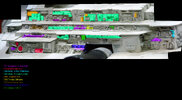
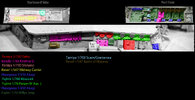
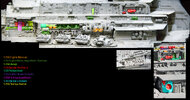
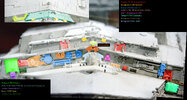
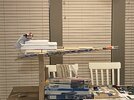
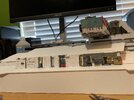
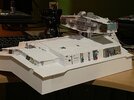
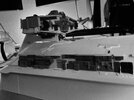
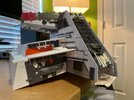
There is some interesting geometry happening on this seemingly simple design. Choices had to be made! I decided to go with a level top deck and rear engine design after looking at tons of pics from this model being on tour. hard to say from pics but I feel relatively confident about this, less so on the engine orientation but I went with what I felt I was seeing in pics, and what would make the most sense. Here are some pics illustrating the various ways this model can be interpreted, I when back and forth between the middle and bottom one, but ultimately I chose for the top deck AND engines to run parallel with the ground plane. Also attached are my final 3D mock ups and greeble dimensions used to dial the proportions in.

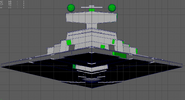
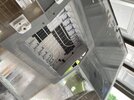
I should also note I decided to make the overall form symmetrical for ease of plans and building even though actual studio model seems to be slightly asymmetrical from the top view. Using pics to judge this which isn't great due to shooting angle and lens distortion but it seems to be off a bit, but hard to say for sure.
 

Attachments

  • back.PNG
    back.PNG
    365.4 KB · Views: 293
  • bottom.PNG
    bottom.PNG
    133.2 KB · Views: 292
  • Dimensions001.PNG
    Dimensions001.PNG
    165.1 KB · Views: 250
  • Front.PNG
    Front.PNG
    208 KB · Views: 262
  • Dimensions003.PNG
    Dimensions003.PNG
    52.8 KB · Views: 243
  • Dimensions002.PNG
    Dimensions002.PNG
    54.8 KB · Views: 268
  • side.PNG
    side.PNG
    128.1 KB · Views: 256
  • Top.PNG
    Top.PNG
    132.1 KB · Views: 286
  • SymetryPlane.jpg
    SymetryPlane.jpg
    338.9 KB · Views: 218
I used the 3D file to build out plans for the frame, which are cut from plywood, mounted with a steel rod and aluminum sides, (these pics still had plexi sides which were later replaces with 1"aluminum bars. I added routing holes as I wasnt sure if I was going to run fiber through this model or not. The Studio model didn't so I eventually opted not to as well. I'll be adding same hanger and engine lighting as the studio model.

I should add that early on I decided that would not meticulously build this accurately to the studio model in terms of little details and greebles, but would capture the overall proportions and details that really stick out as best I could. I wanted this to be more of 1 year or less project instead of 5 year meticulous part of part project like the reconstruction of the 32" deago falcon ended up being haha. That being said I'm being pretty faithful to the greebles, I had a lot of the kits on hand from the Falcon build and have purchased around 20 more to get what I felt were key parts that needed to be used.
 

Attachments

  • IMG_1105.jpg
    IMG_1105.jpg
    1.9 MB · Views: 178
  • IMG_1104.jpg
    IMG_1104.jpg
    1.1 MB · Views: 177
  • IMG_1062.jpg
    IMG_1062.jpg
    3.1 MB · Views: 192
  • IMG_1057.jpg
    IMG_1057.jpg
    2.8 MB · Views: 182
I built a production stand that will allow me to mount the model in right side up, upside down, and on its side positions which is very handy! I Etched the bottom plexi glass surfaces and started on the tower structure, using Plexi and .08' sheet styrene. I started adding the side trench details, this area is very much made up and not following the studio model at all, I used some key 8 Rad pieces that you can really see, but the rest is pretty buried inside there so I just had fun with it and used what pieces I could make out from picks. I'd still be Id'ng parts though and buy kits if I were to try and match it 1/1 and with limited pics of that stuff it would be pretty difficult.
 

Attachments

  • IMG_1371.jpg
    IMG_1371.jpg
    2.5 MB · Views: 326
  • IMG_1337.jpg
    IMG_1337.jpg
    2.2 MB · Views: 300
  • IMG_1306.jpg
    IMG_1306.jpg
    3 MB · Views: 277
  • IMG_1305.jpg
    IMG_1305.jpg
    1.6 MB · Views: 253
  • IMG_1279.jpg
    IMG_1279.jpg
    2.1 MB · Views: 236
  • IMG_1207.jpg
    IMG_1207.jpg
    2.9 MB · Views: 250
  • IMG_1177.jpg
    IMG_1177.jpg
    1.1 MB · Views: 270
  • IMG_1174.jpg
    IMG_1174.jpg
    1 MB · Views: 269
  • 67158521909__216F3C3B-0660-47C6-B265-95E75FD45A84.jpg
    67158521909__216F3C3B-0660-47C6-B265-95E75FD45A84.jpg
    2.7 MB · Views: 271
  • IMG_1095.jpg
    IMG_1095.jpg
    1.8 MB · Views: 219
  • IMG_1097.jpg
    IMG_1097.jpg
    1.3 MB · Views: 219
  • IMG_1098.jpg
    IMG_1098.jpg
    1.3 MB · Views: 220
  • IMG_1156.jpg
    IMG_1156.jpg
    3.1 MB · Views: 287
Some Hanger bay work and eventual Lighting tests!
 

Attachments

  • IMG_1589.jpg
    IMG_1589.jpg
    2.5 MB · Views: 256
  • IMG_1592.jpg
    IMG_1592.jpg
    499.9 KB · Views: 236
  • IMG_1599.jpg
    IMG_1599.jpg
    2.2 MB · Views: 214
  • IMG_1619.jpg
    IMG_1619.jpg
    2.5 MB · Views: 214
  • IMG_1674.jpg
    IMG_1674.jpg
    1.5 MB · Views: 211
  • IMG_2374.jpg
    IMG_2374.jpg
    3.4 MB · Views: 219
  • IMG_2386.jpg
    IMG_2386.jpg
    1.9 MB · Views: 233
  • IMG_2408.jpg
    IMG_2408.jpg
    934.5 KB · Views: 249
Some more pics, I have all the LED lights hooked up to a dimmer control so each lights intensity can be dialed in for final photography. I might look into a set up that allows me to control color temp of each light as well, that would be ideal.
 

Attachments

  • IMG_2411.jpg
    IMG_2411.jpg
    1.3 MB · Views: 147
  • IMG_2417.jpg
    IMG_2417.jpg
    896.1 KB · Views: 145
  • IMG_2413.jpg
    IMG_2413.jpg
    427.9 KB · Views: 147
  • IMG_2417.jpg
    IMG_2417.jpg
    896.1 KB · Views: 133
  • IMG_2413.jpg
    IMG_2413.jpg
    427.9 KB · Views: 127
  • IMG_2411.jpg
    IMG_2411.jpg
    1.3 MB · Views: 144
  • IMG_2394.jpg
    IMG_2394.jpg
    3.1 MB · Views: 156
Here are some part maps I started for areas I haven't found ID'ed yet. will continue to update these throughout the build
 

Attachments

  • TopView001.jpg
    TopView001.jpg
    612.8 KB · Views: 318
  • StarboardLowerWall.jpg
    StarboardLowerWall.jpg
    3.7 MB · Views: 211
  • LowerStructure.jpg
    LowerStructure.jpg
    903.1 KB · Views: 219
  • PortSideWall.jpg
    PortSideWall.jpg
    3.1 MB · Views: 213
  • FrontSuperStructure_001.jpg
    FrontSuperStructure_001.jpg
    2.4 MB · Views: 251
More progress... This pretty much gets this build up to date, Ive done some greebles on the sides of the super structures but have a few kits on the way and will be redoing areas to be more accurate soon.
 

Attachments

  • IMG_1862.jpg
    IMG_1862.jpg
    1.7 MB · Views: 292
  • IMG_1863.jpg
    IMG_1863.jpg
    2.2 MB · Views: 266
  • IMG_1864.jpg
    IMG_1864.jpg
    2.4 MB · Views: 233
  • IMG_1865.jpg
    IMG_1865.jpg
    2.4 MB · Views: 221
  • IMG_1868.jpg
    IMG_1868.jpg
    2.5 MB · Views: 240
  • IMG_1869.jpg
    IMG_1869.jpg
    1.8 MB · Views: 325
Something I was thinking about. If you ever do a Super Star Destroyer...use sheet plastic for the arrowhead-but an early 3D printer for the cortex. At that scale-each layer is a deck tall, right? The artifact is now a feature-not a bug.
 
Good job nailing that symmetry/shape (first post).

Looks awesome!
Thanks, it was a real head scratcher though to figure out how the engines orient, which meant knowing how the ribs need to orient since the engines stick straight off that back rib. I should call that out actually. How the ribs are done and line up with the center pipe matters a lot.
 
Got these guys (cabinet door knobs, ha who would have known!?) finally molded and cast up. I bought the 35mm ones first but those are too large, these are the 30mm which if I remember correctly are actually 33mm when you measure them. I’ll pull out the calipers later and confirm.
9D0A54C5-180F-47A3-8BEB-7289D9D2C04A.jpeg
 
More greeble work. Not shooting for 100%accuracy on those side walls but tried to get everything correct on the tower/bridge. I have some more kits coming soon and will redo that port side rear side wall area to be more accurate. The Starboard walls are about half right and half made up.
 

Attachments

  • 091C4668-3F74-4C47-ACAE-6C3961934AE2.jpeg
    091C4668-3F74-4C47-ACAE-6C3961934AE2.jpeg
    3 MB · Views: 288
  • C4244C09-BEC8-40C0-B2A1-8780AC45232E.jpeg
    C4244C09-BEC8-40C0-B2A1-8780AC45232E.jpeg
    2 MB · Views: 269
  • 53333351-DDAC-45B0-9427-6B6B1A4924B3.jpeg
    53333351-DDAC-45B0-9427-6B6B1A4924B3.jpeg
    2.8 MB · Views: 270
  • F4D8F50A-42B7-458B-A114-543EBCD312BD.jpeg
    F4D8F50A-42B7-458B-A114-543EBCD312BD.jpeg
    2.2 MB · Views: 313
  • 2CBC069A-D5E6-40B3-9567-90B2CAC34FF6.jpeg
    2CBC069A-D5E6-40B3-9567-90B2CAC34FF6.jpeg
    2.8 MB · Views: 280
: O What an amazing build! I'm now reexamining a LOT OF AREAS hehehehehe

 
Got these guys (cabinet door knobs, ha who would have known!?) finally molded and cast up. I bought the 35mm ones first but those are too large, these are the 30mm which if I remember correctly are actually 33mm when you measure them. I’ll pull out the calipers later and confirm.
View attachment 1591437
I'm having trouble finding the knobs with the exact shape. Where did you buy these?
Also, if you don't mind my asking, where do the greeblies that detail the perimeter come from?

Fantastic build, by the way!
 

Your message may be considered spam for the following reasons:

If you wish to reply despite these issues, check the box below before replying.
Be aware that malicious compliance may result in more severe penalties.
Back
Top