Advice/Tips for getting better photos against a black background?

Analyzer

Master Member
I want to improve my photo skills. I have a Canon EOS Rebel XSI. I have been toying around more with trying out the manual settings instead of auto but still have lots to learn.

This is what I have tried so far...

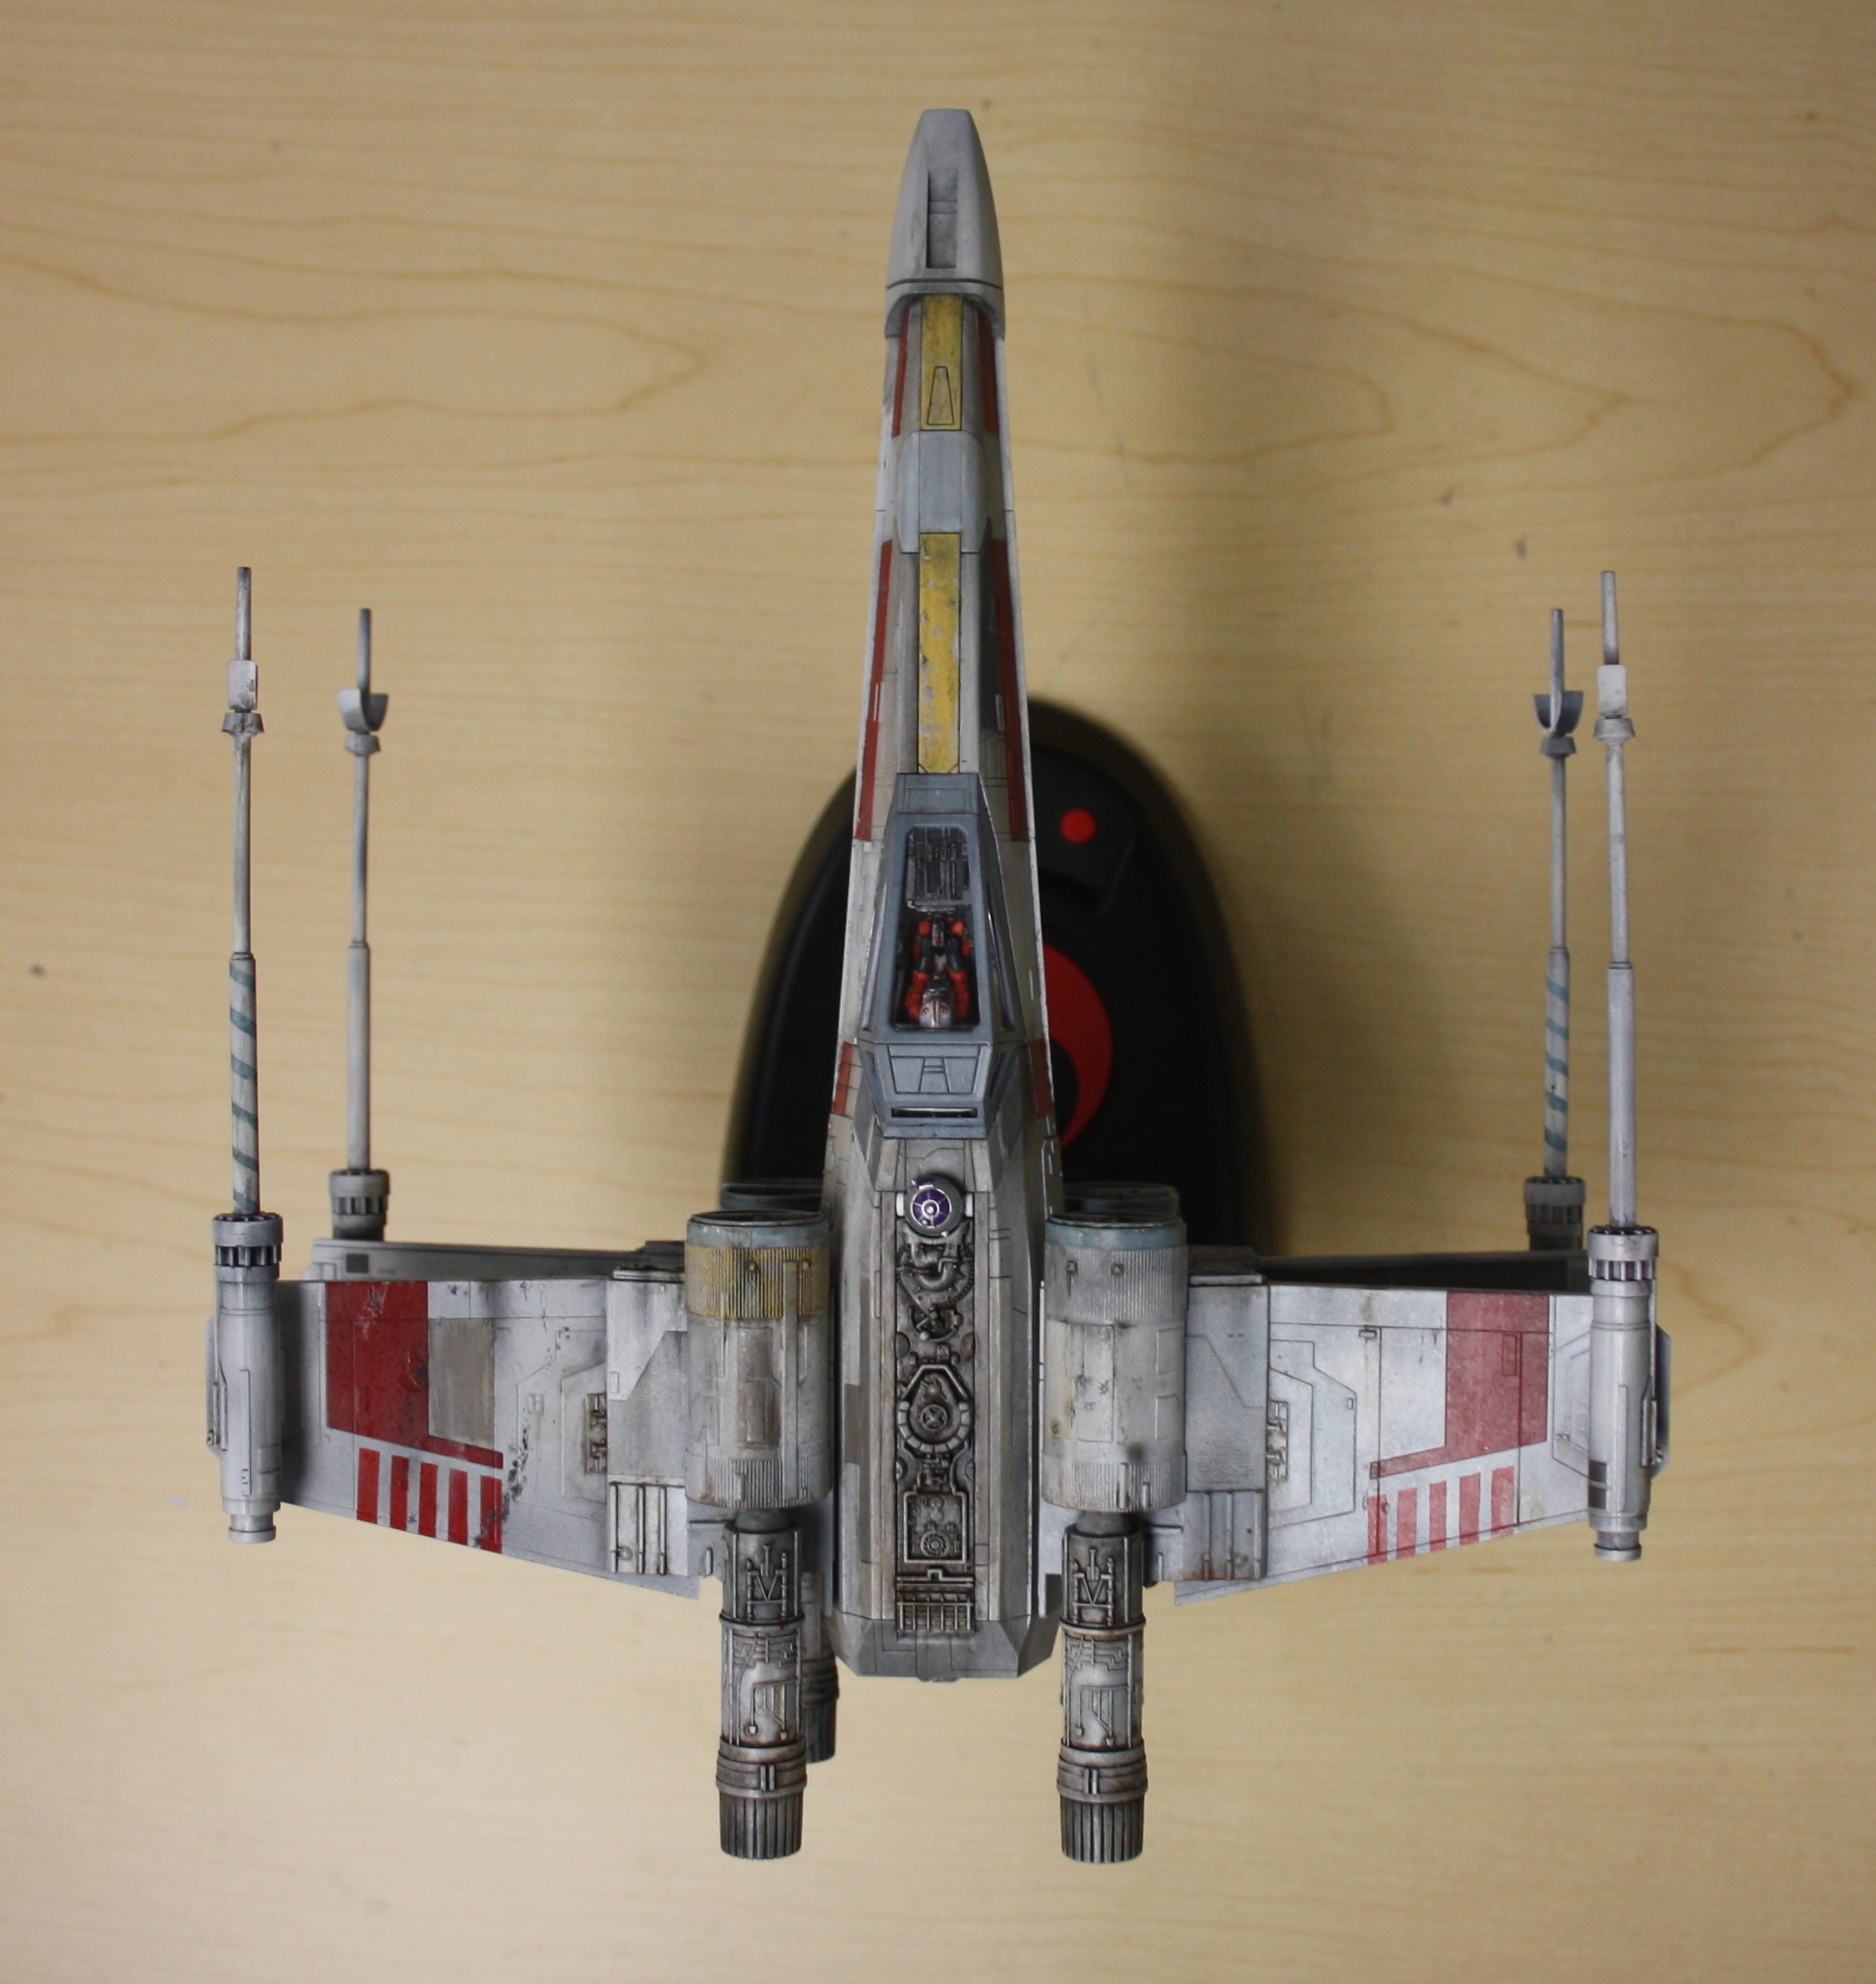
For a period I had been trying to digitally replace the backgrounds in photos after the fact. That was very time consuming and in many cases since I was using crappy software like MS Paint so it was not very convincing as far as the edges of things. Mostly the curved parts

This picture for example, the nose area of the X-Wing is a mess along the edges which ruins the illusion. I am sure with newer version of Photoshop or other software this might be easier and it would probably help doing the photo against a green screen type background
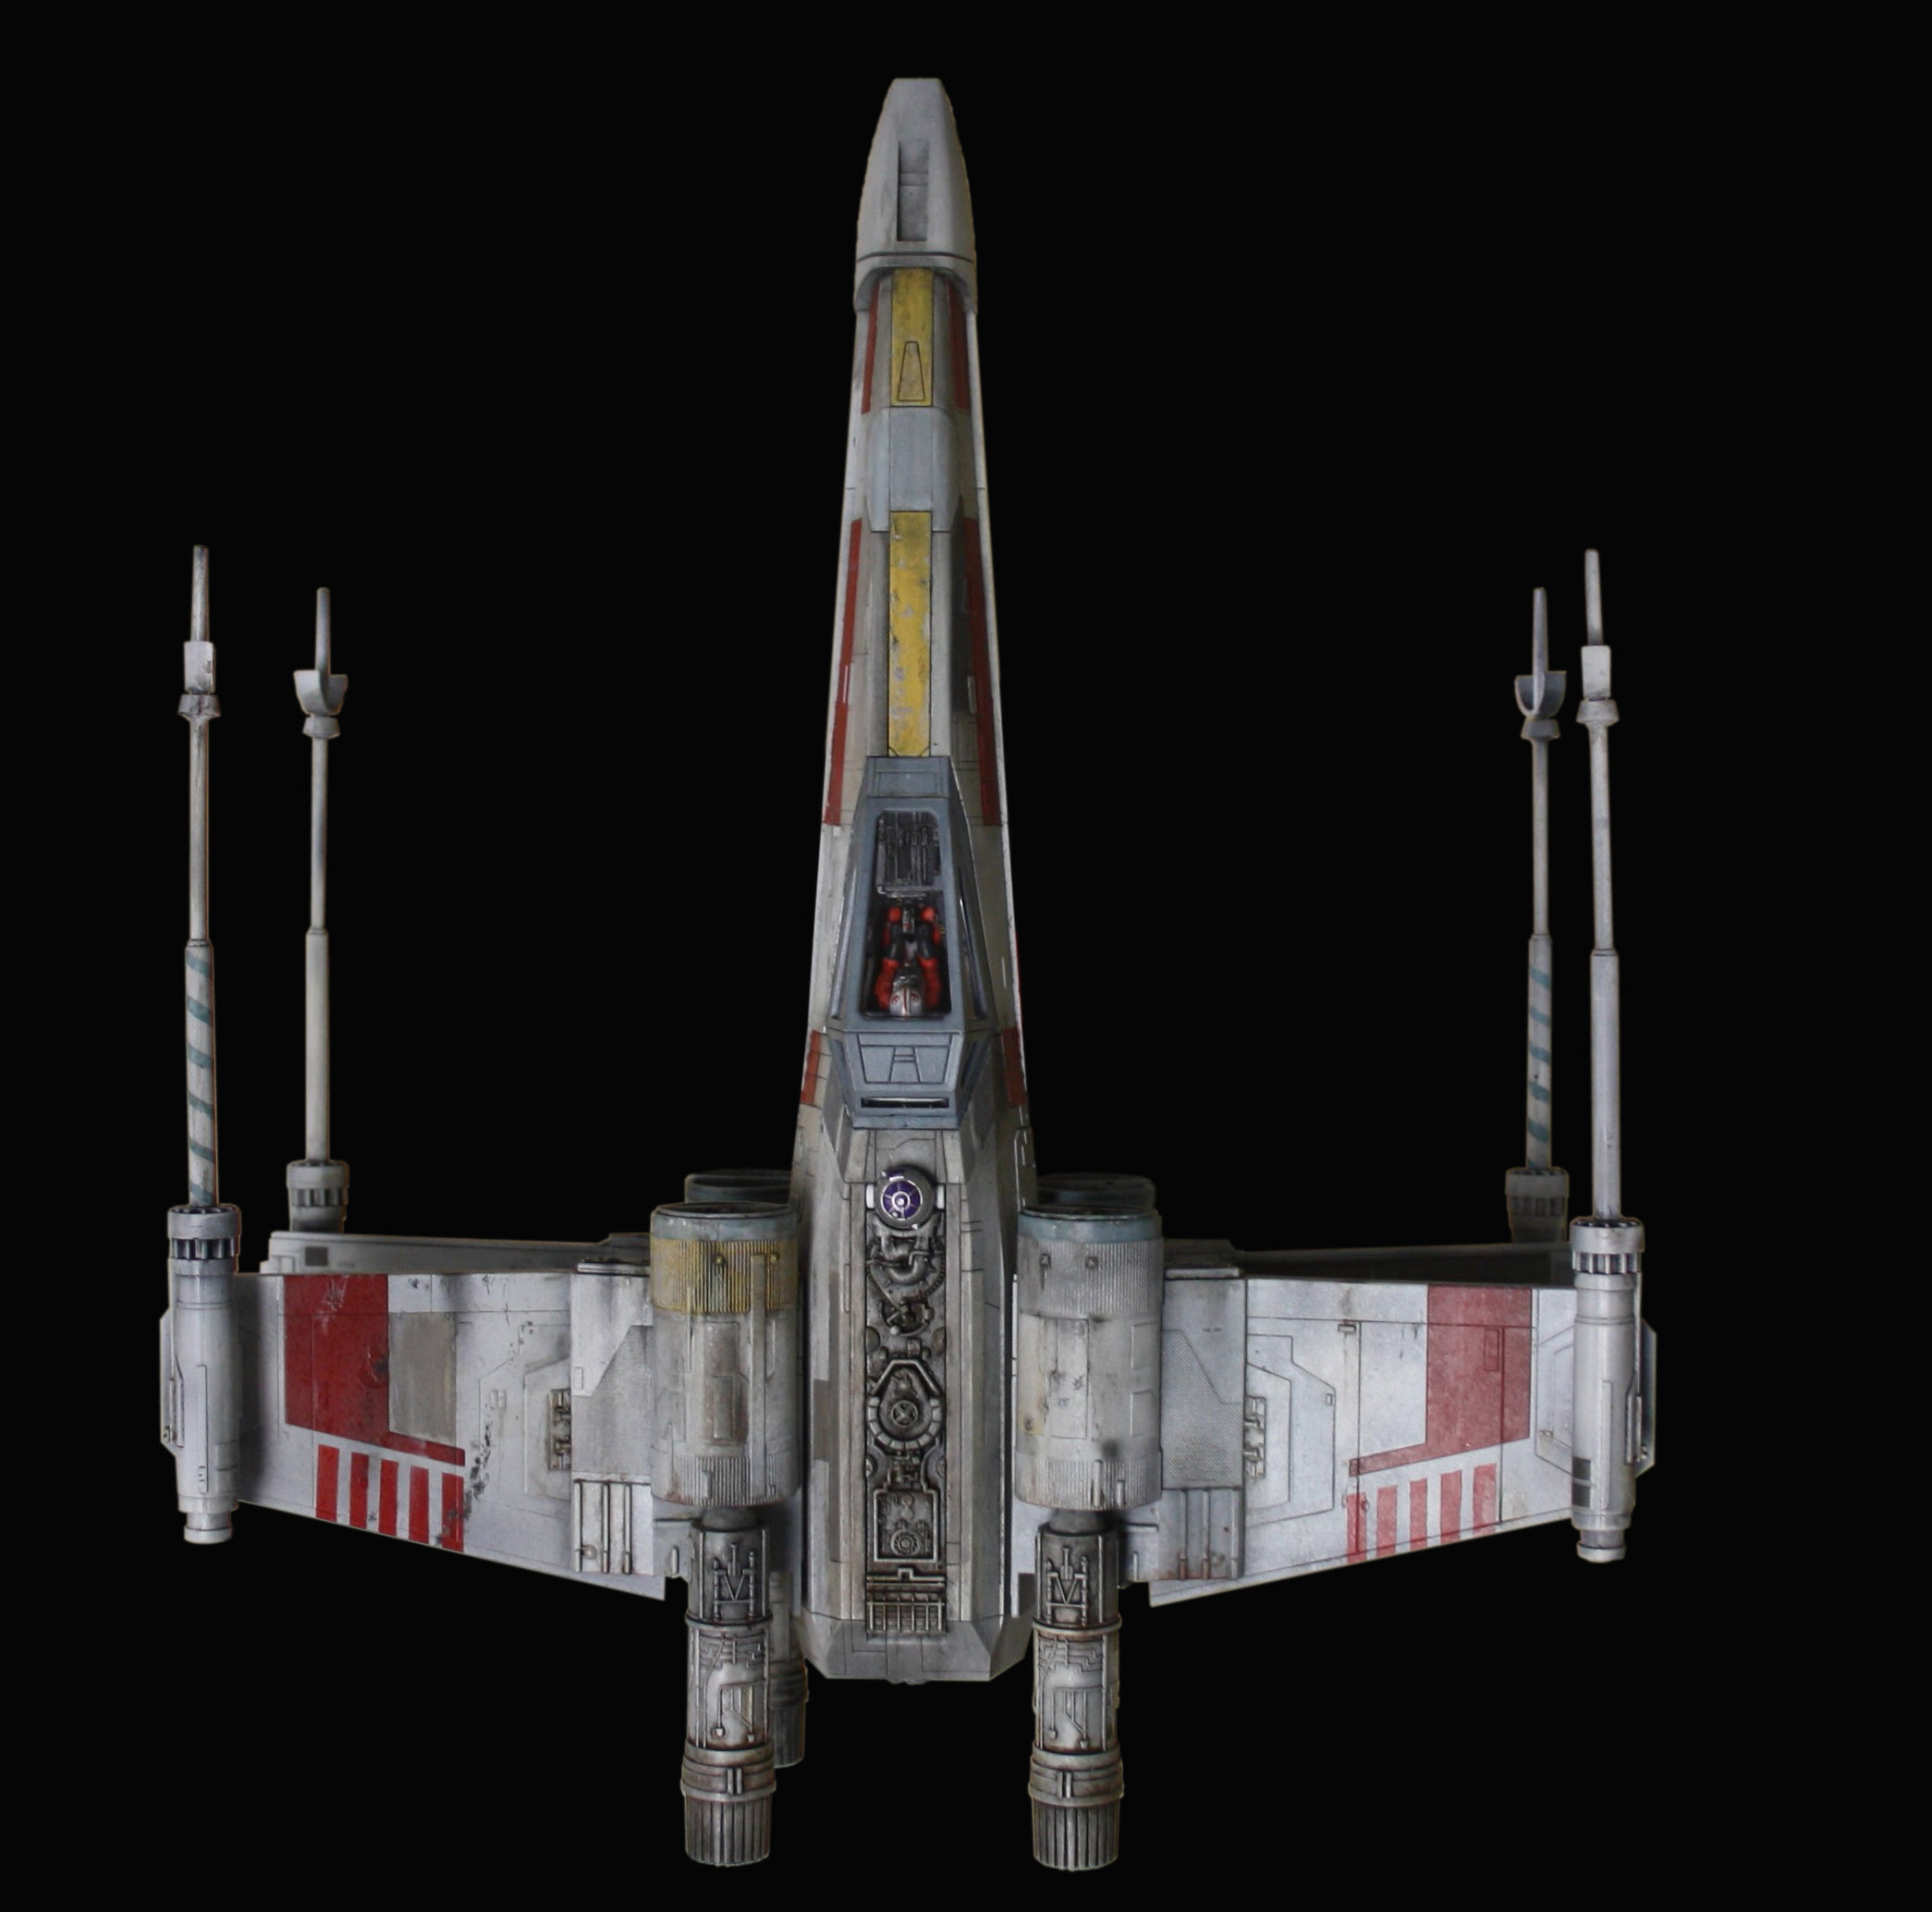
46304378561_f322b2ddce_o.jpg


Here is the original

IMG_4444 (2).JPG


However, I really would prefer an in camera solution

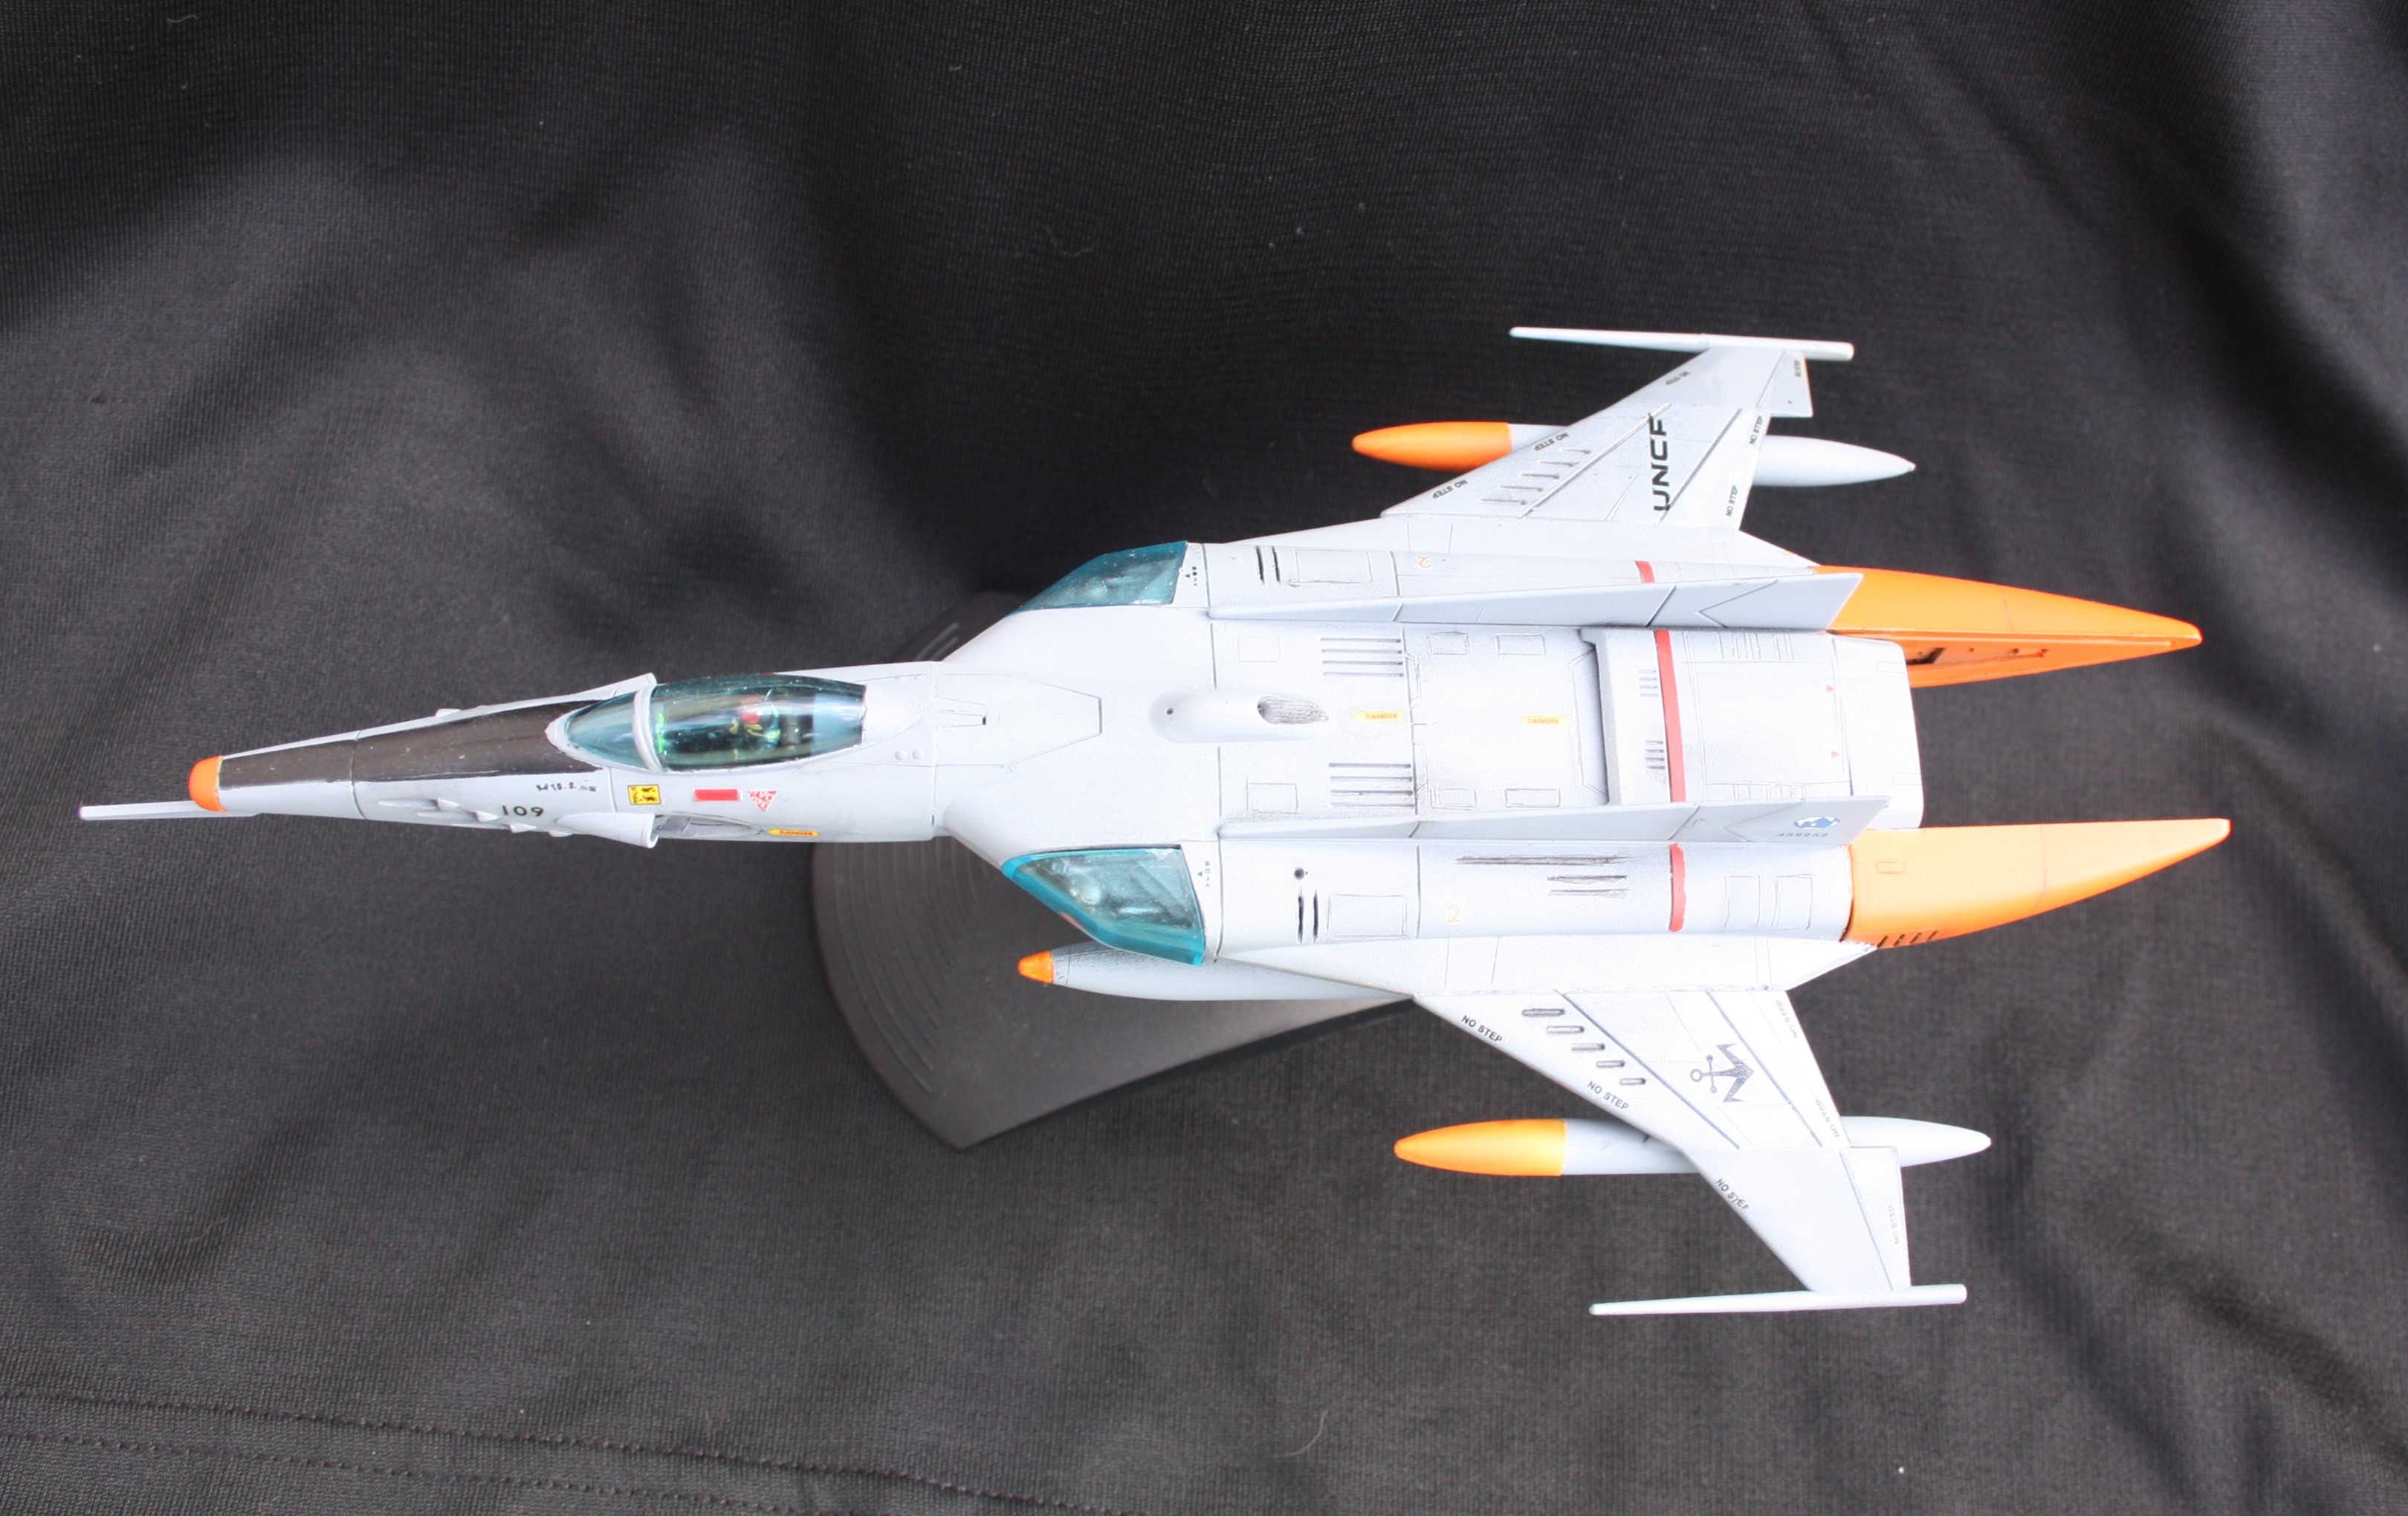
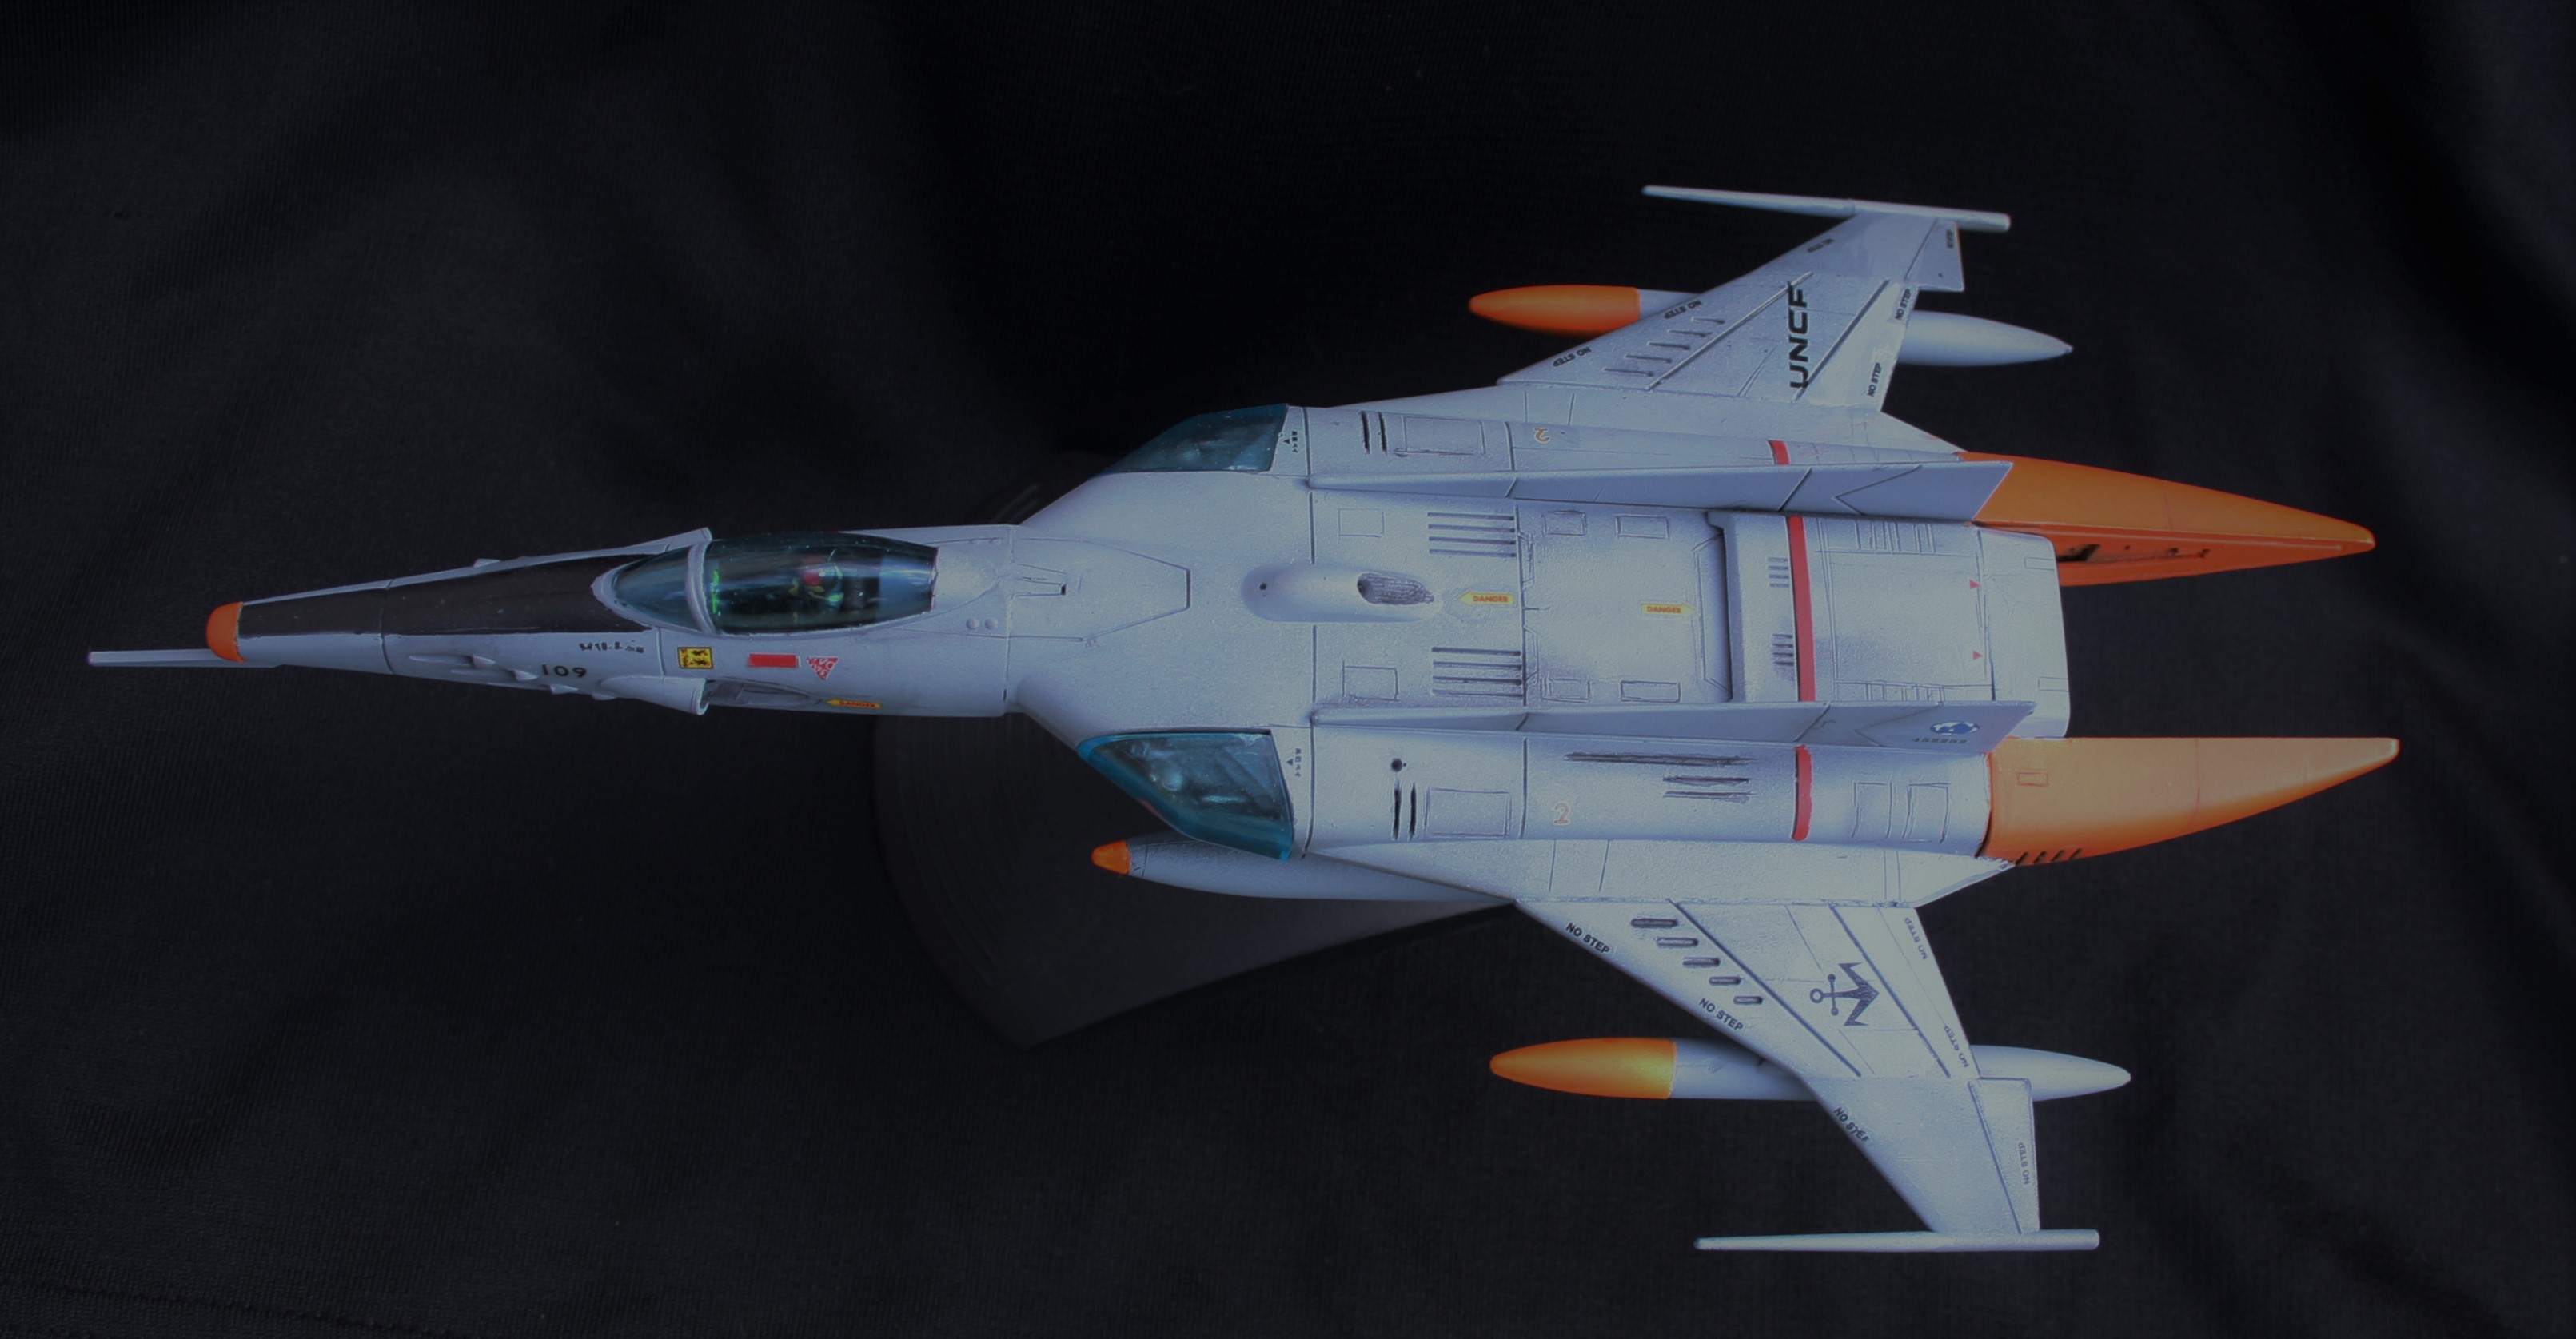
So then I figure just try taking a picture of something against a black back drop. The problem here was the picture was always way overexposed. I could try darkening after the fact in the photo editing software that comes with windows, but that was inconsistent at best and never often did not show the colors or details accurately

Here is an example of that post processing "fix" of fiddling with exposure , shadows, and contrast
IMG_1649 (3).JPG

IMG_1649 (2).JPG


So I figured maybe instead of lighting everything like out doors I would try a dark background but make sure that the light only fell on the model.

At first I still had the same problem as above where the picture was way too overexposed.

But then I stumbled upon a trick where I could hold up a white paper before pressing the button halfway down where it does it's auto stuff. Then without depressing it, I then pull that away and fully click to then snap the pic (I have it on timer).

That seems to get much more accurate colors and for the most part captures the weathering, but sometimes it still loses it or the pic comes out a bit grainy.

The biggest benefit is no post fixes beyond cropping is needed

While this has been the best in camera options so far, There has to be a better solution

It gets to be a pain to constantly be holding something white in front first, especially since I sometimes skip that step and it takes the crappy over exposed version instead

Here is an example of the same setup, but the first pic I forgot to use the white paper, the second one nothing else change expect using the white paper during the process. I made no other post processing color/light adjustments to the pictures beside cropping them
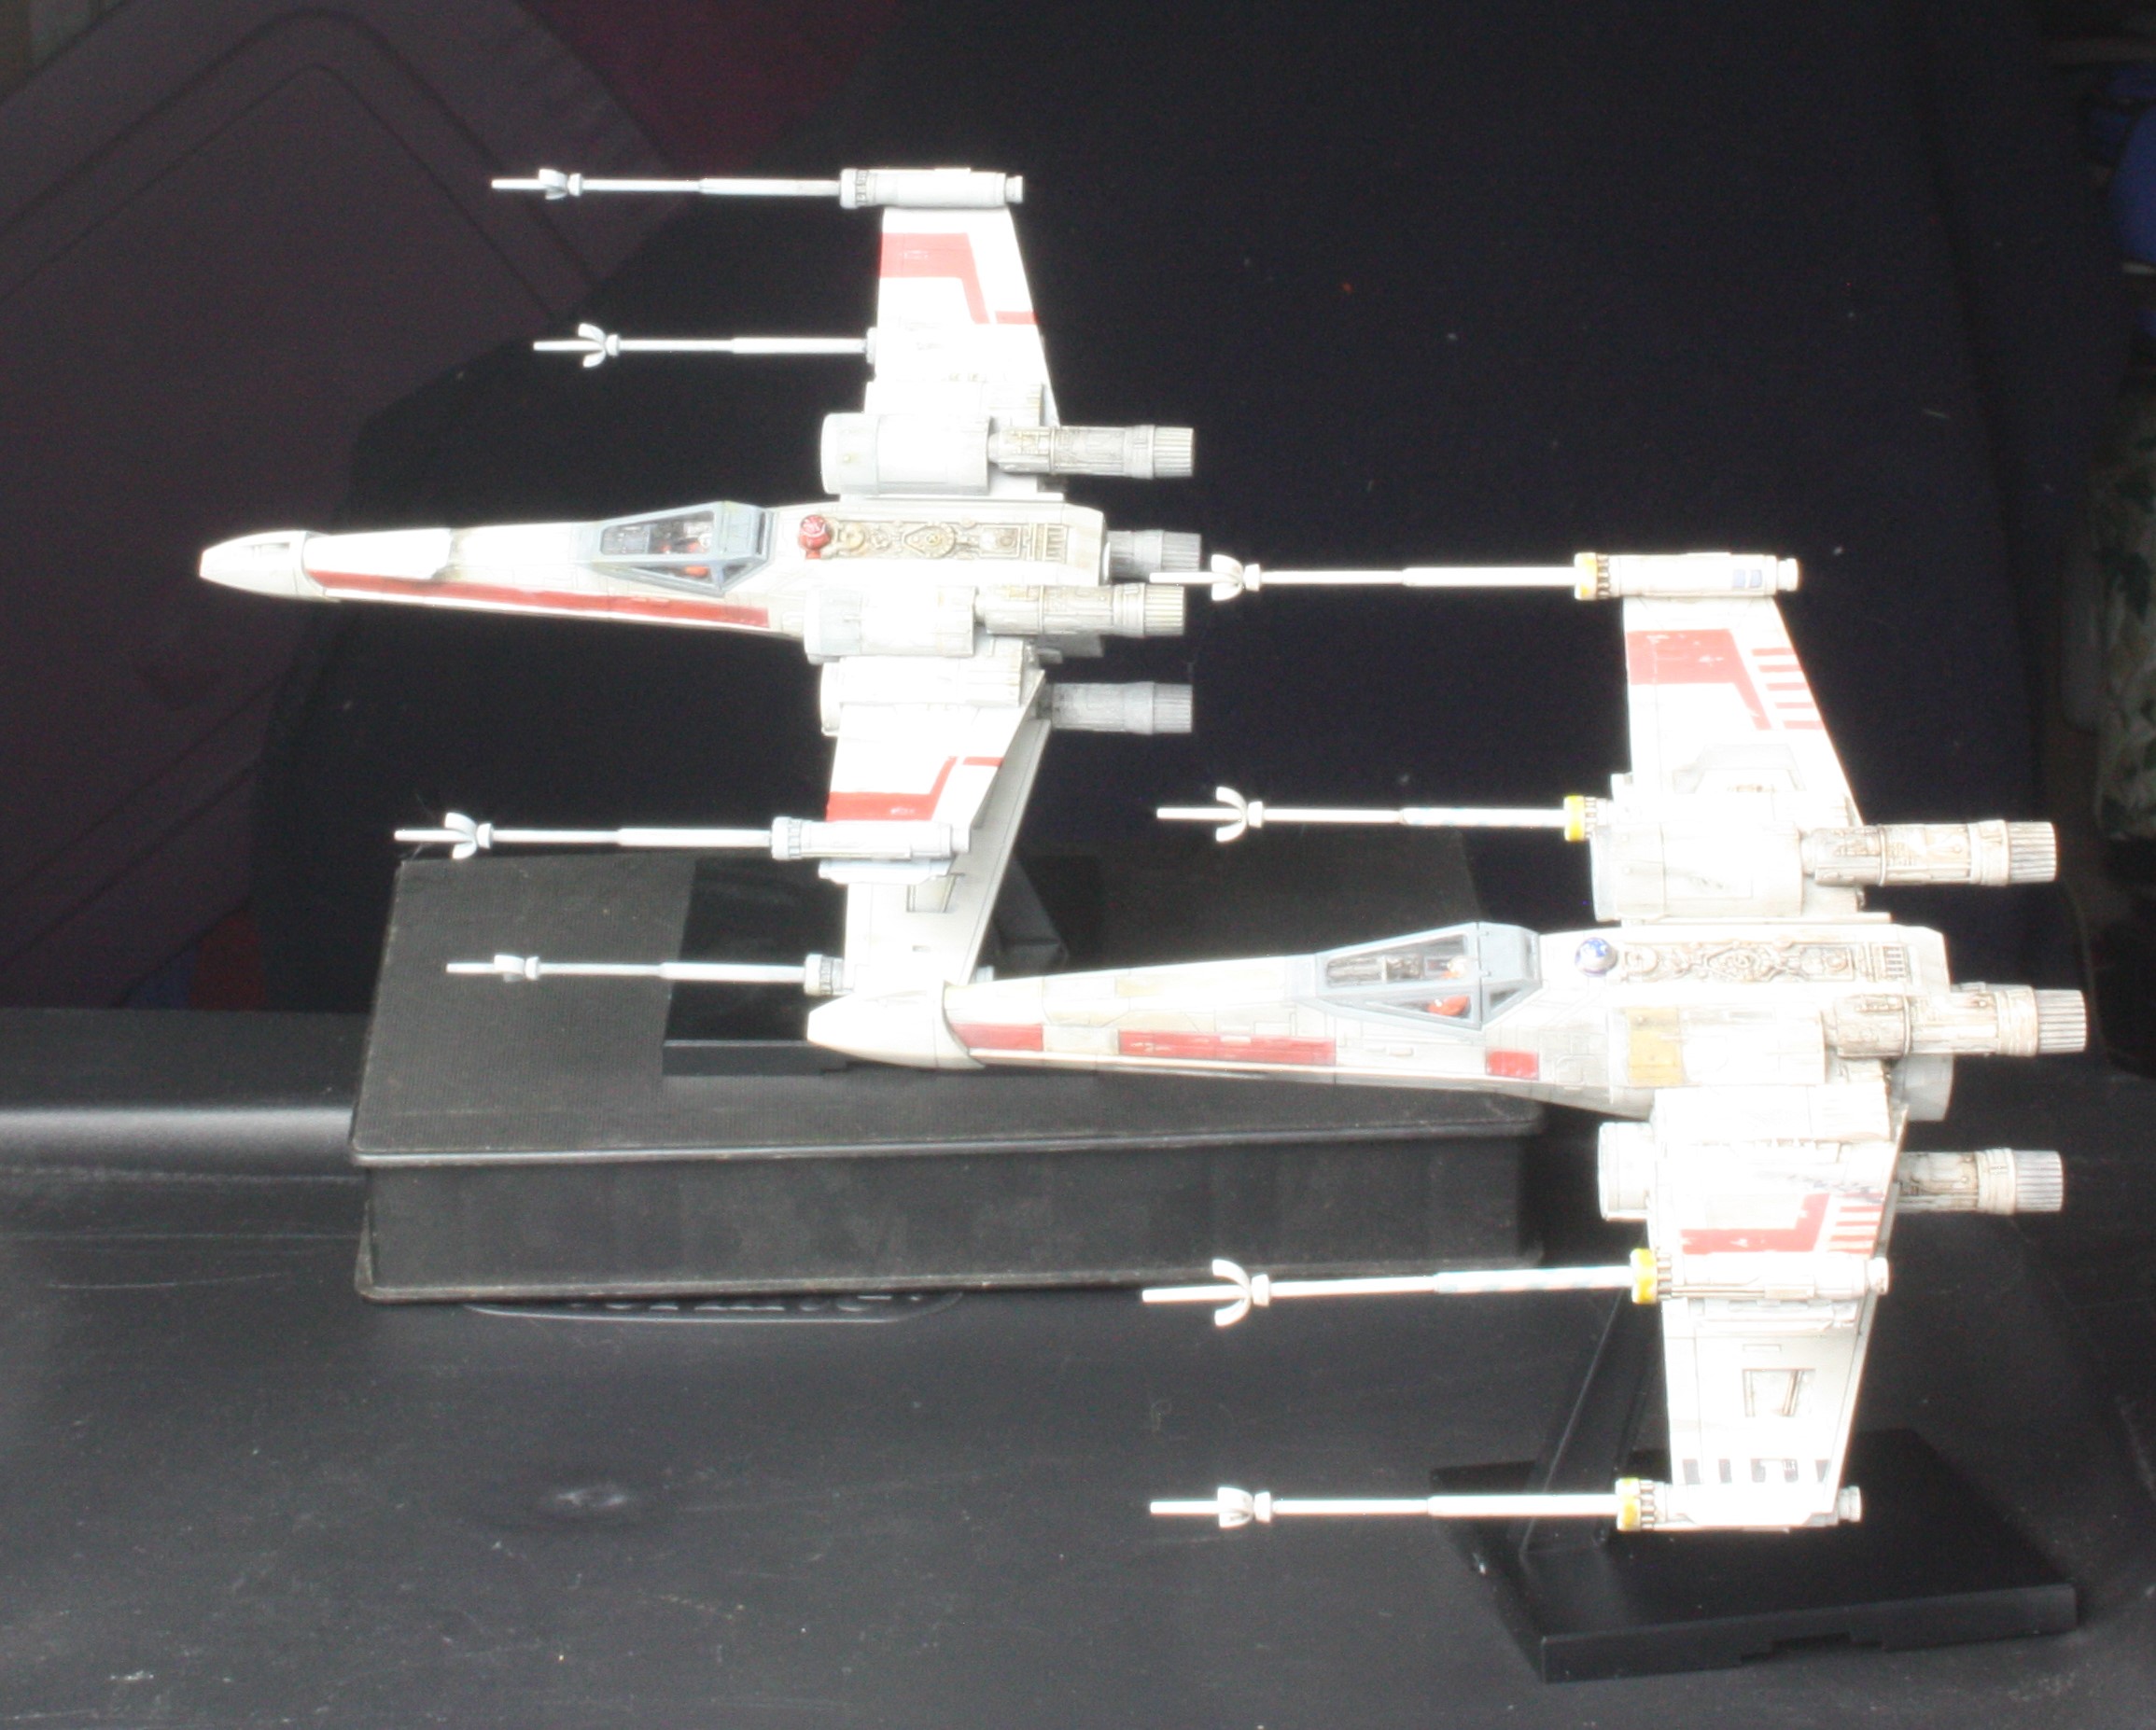
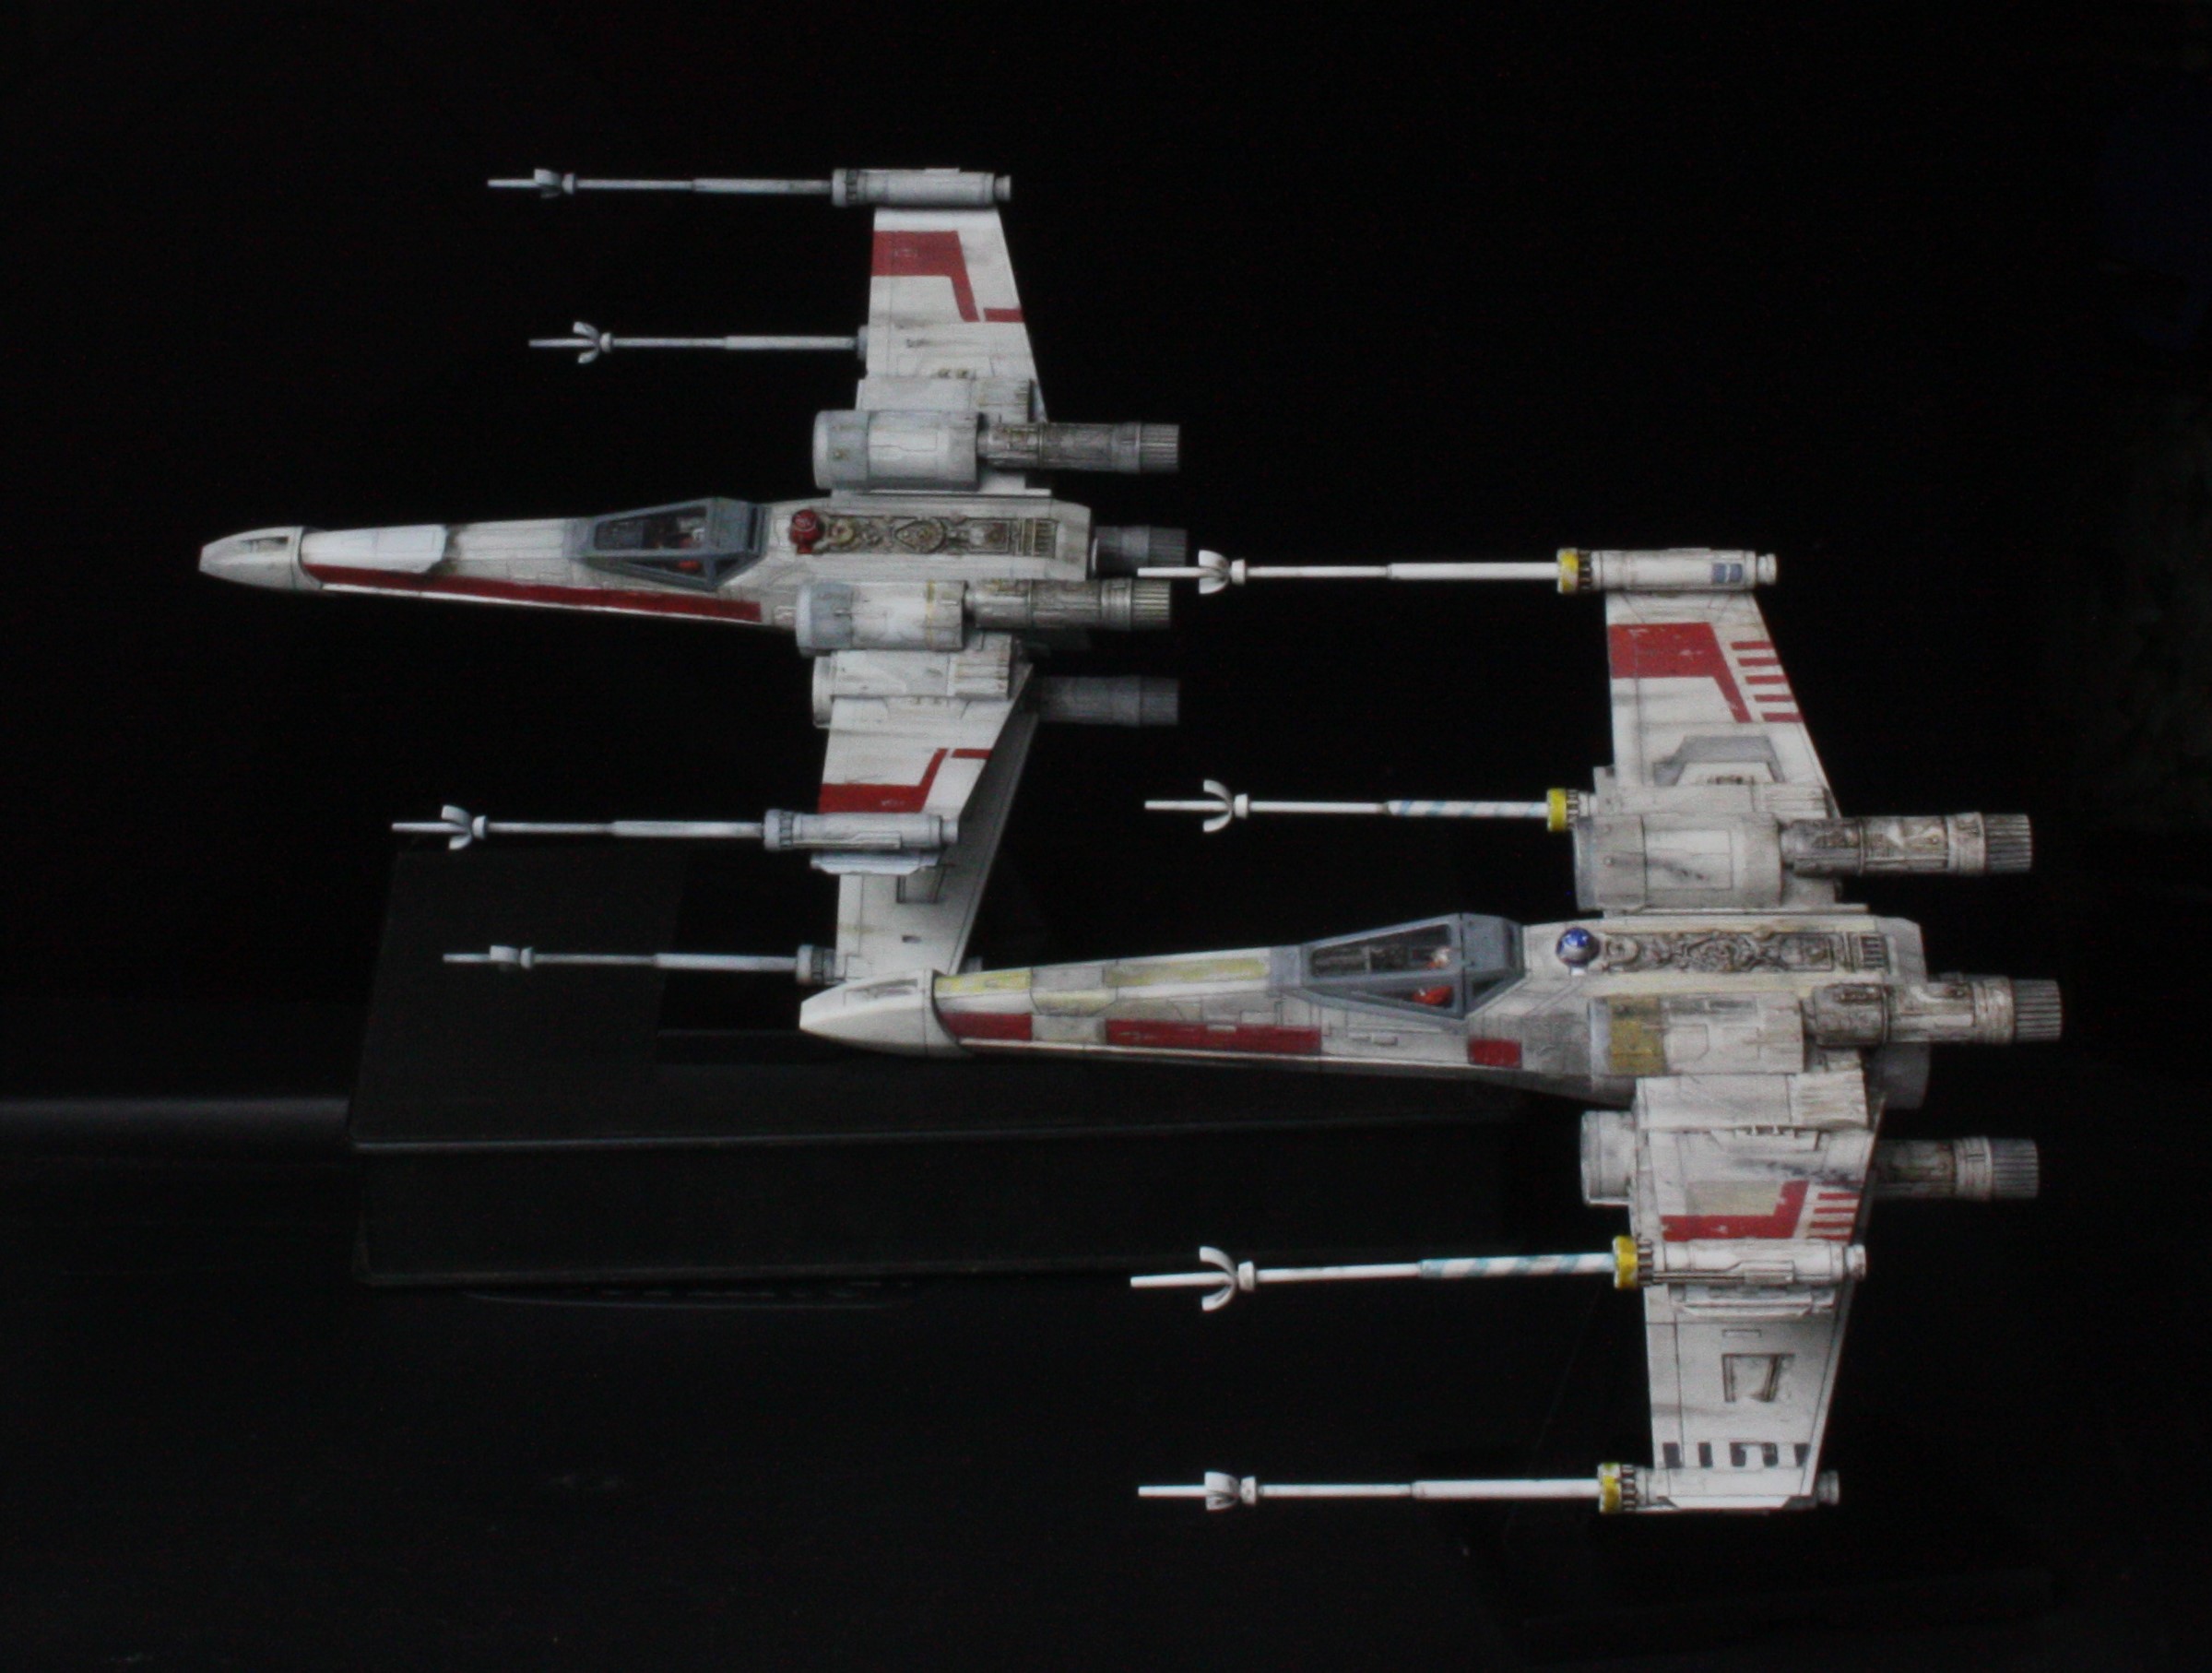
IMG_1816 (2).JPG

IMG_1817 (2).JPG


So any suggestions/advice/wisdom would be helpful
 
This is a great topic. I would really be interested in what others have done to get those great black backgrounds with their models and not have to use expensive equipment or software to manipulate it.
 
This is a great topic. I would really be interested in what others have done to get those great black backgrounds with their models and not have to use expensive equipment or software to manipulate it.

Same here. I spend enough on models without needing to go out and buy other stuff :lol:

As I mentioned, the best trick seems to be to shoot against a dark doorway or hallway or open garage etc... and use a white card/paper while doing the auto settings, then removing it right before the picture goes off when the timer is counting down.

Looking at the info in Flickr for the ones that turned out good it looks like the ISO was at 800, the exposure time around 1/12 to 1/15 and I had the f Stop set manually to f-22. I guess I should be able to go fully manual and set the exposure time and ISO manually and skip the white paper thing?

Although for those stuck with full auto then the white paper trick is the way to go?

I'd love to see/hear what other people have tried. I've seen some beautiful photos from others on here

I have taken these pictures using those black foam boards on the back bottom and sides and have light coming from the top at an angle not to reflect off the boards. These was taken with a Galaxy s9 phone. They are decent but a little overexposed. The weathering is more pronounced in real life. I want to see what other do.
20190203_232542smaller.jpg20190203_232554smaller.jpg20190203_232600smaller.jpg20190203_232606smaller.jpg20190203_232754smaller.jpg20190203_232947smaller.jpg20190203_232958smaller.jpg20190203_233142smaller.jpg20190203_233452smaller.jpg20190203_233510smaller.jpg20190203_233608smaller.jpg20190203_234011smaller.jpg20190203_234909smaller.jpg20190203_235003smaller.jpg20190203_235007smaller.jpg

The trick for these pictures is not to have your light source reflect off the black boards. It shows a brownish color not black
 
Last edited:
I have taken these pictures using those black foam boards on the back bottom and sides and have light coming from the top at an angle not to reflect off the boards. These was taken with a Galaxy s9 phone. They are decent but a little overexposed. The weathering is more pronounced in real life. I want to see what other do.
View attachment 1259786View attachment 1259787View attachment 1259788View attachment 1259789View attachment 1259790View attachment 1259791View attachment 1259792View attachment 1259793View attachment 1259794View attachment 1259795View attachment 1259796View attachment 1259797View attachment 1259798View attachment 1259799View attachment 1259800

The trick for these pictures is not to have your light source reflect off the black boards. It shows a brownish color not black

Some camera phones seem to get better pics than most cameras. It looks like your camera might handle the balance better. For me, if I shoot against a dark background, the light colored model gets completely washed out as the camera tries to overcompensate for the majority of black background.

Do you get close up or do you setup farther back and then crop the pic?

I usually have been stay back instead of zooming in to try to get everything in focus
 
You're black background really needs to be further back for starters, so you can light the model only in the foreground, leaving the black background in the dark. I also typically shoot my models at night or early in the morning, so there's no light but what I focus on the model. You don't want any light to spill on the black backdrop. I have a rather large black backdrop of duvatyne that I use and set up on my kitchen table, then duvatyne as a base as well. You can see how my photos turn out here on my Flickr page. Christopher Olson’s albums | Flickr There is still some work done in photoshop raw to crush the black background a little, but other than that, they pretty much turn out like this in camera.
 
Some camera phones seem to get better pics than most cameras. It looks like your camera might handle the balance better. For me, if I shoot against a dark background, the light colored model gets completely washed out as the camera tries to overcompensate for the majority of black background.

Do you get close up or do you setup farther back and then crop the pic?

I usually have been stay back instead of zooming in to try to get everything in focus

For those I was just close enough to get the model on the screen.....no cropping. I think I focused on some of the darker areas then moved to where I wanted to take the picture. My light source was an incandescent bulb dimmed down hanging from the ceiling behind my right shoulder. The light would be shinning towards the side and back of the model. I played with the white balance on a few of those shots. Not sure if I had it on automatic or night mode. Some of the weathering is washout in the pictures. I should try focusing on the dark areas in manual mode and also play with the ISO settings to see if I can minimize the wash out effect.
 
For those I was just close enough to get the model on the screen.....no cropping. I think I focused on some of the darker areas then moved to where I wanted to take the picture. My light source was an incandescent bulb dimmed down hanging from the ceiling behind my right shoulder. The light would be shinning towards the side and back of the model. I played with the white balance on a few of those shots. Not sure if I had it on automatic or night mode. Some of the weathering is washout in the pictures. I should try focusing on the dark areas in manual mode and also play with the ISO settings to see if I can minimize the wash out effect.

If using a camera phone, use pro mode if you have it, where you can manually adjust the iso and f-stop. Then you can get appropriate brightness on your model, letting the black fall off. I use a 35mm. I also have some small real studio lights that I use to light my models.
 
Use all of the techniques mentioned here, plus dig into your camera settings. The basic auto function assumes all the black is a dark scene and tries to compensate by over exposing. The Rebel XSI has a spot meter mode which reads a tiny spot in the center and disregards everything else, this should solve the problem. There are also exposure compensation controls, the +/- adjustment which shifts the light meter's bias up or down.
 
As a photographer I'm an evangelist for Manual.

The simplest ways to think about manual:

Higher shutter number = brighter image.
Lower shutter number = darker image.
(remember if your camera shutter is "4000" that it really means 1/4000, which is a very small number)

Higher F/stop number = darker image.
Lower F/stop number = brighter image.

High ISO number = brighter image.
Lower ISO number = darker image.

Set your white balance according to the lights you are using or set to auto.

Also:

Lower shutter number = movement frozen
Higher shutter number = movement blurred, or blur from camera shake

Higher F/stop number = more parts of the image in focus (foreground vs background)
Lower F/stop number = the area where things are in focus is small, sometimes resulting in out of focus backgrounds or visa versa

High ISO number = image will appear noisy/grainy, especially when zooming in
Lower ISO number = image appears less noisy/grainy


Tips:


Position your background as far away as possible to avoid light spilling on it. If your advanced, you can have black foam board attached to stands to block light, putting the background in shadow.

For the ILM look, avoid soft lights (lights with a large surface area), and position your lights so they are hitting from the side, while you are shooting from the front.

The ratio of how bright your model is vs how bright/dark your background is only controllable with your placement of lights, shadows, or software.


You can't really trust someone else's exact camera settings, for instance:
This shot is Exposure 15 seconds, F/22 ISO 100. 15 seconds is a looong shutter time and only works because of the details of this particular setup. Except for white balance adjustment, this shot is right out of the camera.

example0Z0A0283.jpg


I have a black t-shirt covering the stand, and two pieces of black foam board behind it. The foam board is too close, and the lights aimed at the falcon are also hitting the foam board, so it appears brighter than the t-shirt. I don't have enough room to move the background farther out, but in my case this was an easy software fix so I didn't worry about it.
Your X-Wing looks awesome, Good luck!
 
You're black background really needs to be further back for starters, so you can light the model only in the foreground, leaving the black background in the dark. I also typically shoot my models at night or early in the morning, so there's no light but what I focus on the model. You don't want any light to spill on the black backdrop. I have a rather large black backdrop of duvatyne that I use and set up on my kitchen table, then duvatyne as a base as well. You can see how my photos turn out here on my Flickr page. Christopher Olson’s albums | Flickr There is still some work done in photoshop raw to crush the black background a little, but other than that, they pretty much turn out like this in camera.
If using a camera phone, use pro mode if you have it, where you can manually adjust the iso and f-stop. Then you can get appropriate brightness on your model, letting the black fall off. I use a 35mm. I also have some small real studio lights that I use to light my models.

Very nice work
I had come across this article where they were saying the background doesn't have to be pure black, you just need to avoid it catching/reflecting any flash/light and make sure it all hits your model instead. The Invisible Black Backdrop - Photography Technique - Glyn Dewis

Not having flash equipment like that, I kind of improvised using my garage as the dark backdrop and an overcast daylight to light the models propping them up in front of the open garage door. Other times I put the model right under a light in my basement and shot against the darkened background

A black backdrop obviously makes it easier though and more portable. I will also try distancing the background more

Do you shoot in RAW mode and then convert it it do you shoot it as a jpeg?

For those I was just close enough to get the model on the screen.....no cropping. I think I focused on some of the darker areas then moved to where I wanted to take the picture. My light source was an incandescent bulb dimmed down hanging from the ceiling behind my right shoulder. The light would be shinning towards the side and back of the model. I played with the white balance on a few of those shots. Not sure if I had it on automatic or night mode. Some of the weathering is washout in the pictures. I should try focusing on the dark areas in manual mode and also play with the ISO settings to see if I can minimize the wash out effect.

That's what I find. I lose some of the subtler weathering. I can see why the Star Wars stuff was so over weathered when you see them on display

I'll try getting it more in frame without needing to crop/zoom after the fact

Use all of the techniques mentioned here, plus dig into your camera settings. The basic auto function assumes all the black is a dark scene and tries to compensate by over exposing. The Rebel XSI has a spot meter mode which reads a tiny spot in the center and disregards everything else, this should solve the problem. There are also exposure compensation controls, the +/- adjustment which shifts the light meter's bias up or down.
thanks!
I do recall seeing the +/- display. That might be the key to skipping the step of using the white paper before committing the shot
I'll have to dig out the manual and read up on setting those
 
Last edited:
As a photographer I'm an evangelist for Manual.

The simplest ways to think about manual:

Higher shutter number = brighter image.
Lower shutter number = darker image.
(remember if your camera shutter is "4000" that it really means 1/4000, which is a very small number)

Higher F/stop number = darker image.
Lower F/stop number = brighter image.

High ISO number = brighter image.
Lower ISO number = darker image.

Set your white balance according to the lights you are using or set to auto.

Also:

Lower shutter number = movement frozen
Higher shutter number = movement blurred, or blur from camera shake

Higher F/stop number = more parts of the image in focus (foreground vs background)
Lower F/stop number = the area where things are in focus is small, sometimes resulting in out of focus backgrounds or visa versa

High ISO number = image will appear noisy/grainy, especially when zooming in
Lower ISO number = image appears less noisy/grainy


Tips:


Position your background as far away as possible to avoid light spilling on it. If your advanced, you can have black foam board attached to stands to block light, putting the background in shadow.

For the ILM look, avoid soft lights (lights with a large surface area), and position your lights so they are hitting from the side, while you are shooting from the front.

The ratio of how bright your model is vs how bright/dark your background is only controllable with your placement of lights, shadows, or software.


You can't really trust someone else's exact camera settings, for instance:
This shot is Exposure 15 seconds, F/22 ISO 100. 15 seconds is a looong shutter time and only works because of the details of this particular setup. Except for white balance adjustment, this shot is right out of the camera.

View attachment 1259822

I have a black t-shirt covering the stand, and two pieces of black foam board behind it. The foam board is too close, and the lights aimed at the falcon are also hitting the foam board, so it appears brighter than the t-shirt. I don't have enough room to move the background farther out, but in my case this was an easy software fix so I didn't worry about it.
Your X-Wing looks awesome, Good luck!

wow 15 seconds is a long time. Usually longs exposures for me result in the washed out image but as you said, the key is getting the other settings appropriate

The focal length looks great in that shot and the black looks very uniform. Very professional looking both with the model and the picture

I definitely have some things to try out
 
I use photoshop on mine so I can find the background I like. I would download PS Express and Photoshop Mix.

I'll have to look into those.

I do love the idea of putting in some other backgrounds to resemble movie shots

for example turning my backyard into a shot above Tatooine

I love outdoor lighting and the shadows it gives, but had to figure out better backdrops :lol:

44048226245_d9bb04d61c_o.jpg

32237684517_26f81e111f_o.jpg
 
Thanks to all for some great tips for the camera settings and placing the background further away. I will try these tips with my 1/350 Klingon K'tinga that I'm finishing up hopefully by end of next week.
 
Last edited:
Definitely move the backdrop way back and use something light absorbing like black velvet. You'll need more material the further it is away though. The whole point is ensure that whatever you use to light the model can't easily illuminate the background.
 
Last edited:
JoelISG wrote some really nice pointers. I just wanted to add a very basic tip of using a stand/tripod. You can shoot nice photos on potato cams too. I have a better cam now, but I solved my issues with a simple stand and using the timer (no remote trigger) so I could have a longer exposure for my 28mm minis without blurry results.

Simple level adjustments or color correction in any free photo app takes care of the rest if your camera doesn't play nice. You could potentially make a greyish black bground all black by adjusting levels without even needing to mask anything.

Having moved away from almost all proprietary software I find that "Krita" is the best allround photo/painting app that is opensource. I used photoshop for half my life before that. You can even do animations in it and there are plenty of resources and tutorials online. Gimp has been around for a long while and it will do the job, but Krita is just insanely polished and just that much better imho.

Another tip is a photo tent. I bought a cheap one and some extra cheap lamps from Ikea to get indirect lighting. Totally worth the spend of €30 imho. Given how some models are larger, you can just use some side lamp action and tape some thin white copy/printing paper in front of the lamp.

"Miniac" made a pretty good guide over a few videos on youtube on the subject of photographing miniatures. Very applicable to this. It will give you practical examples of what everything does, what not to do and even demonstrate stacking which is an amazing way of doing things. It used to be something mineral people did with microscopes to get a larger depth of field - NVM it will all make sense if you watch the videos
 
When attempting to photograph against a black background, where you want the background to essentially "disappear" (that is, be as plain black as possible), then you'll want to do a couple of things.

1. You'll want the smoothest backdrop you can create. When you use black cloth for a background, the wrinkles will catch ANY light and potentially create visible elements you'll have to edit out. When I'm shooting portraits (I'm a professional photographer), the trick to creating a seamless, smooth background is a curved backdrop, and this is exactly what you want, on a smaller scale, for model shooting. A large piece of black construction paper or flexible black foam can be used to create a smooth, curved, seamless background.

2. You'll want the background far enough away from your model so that as little light as possible is hitting the backdrop. Don't worry about whether or not you're filling the entire frame of your camera with the backdrop. Just make sure the backdrop is wide enough to extend past the edges of your model -- you can "extend" the backdrop as necessary in post production.

3. Light your model appropriately and expose for the model. Use a higher F-stop (smaller aperture) to eliminate depth of field blurriness as much as possible. This higher F-stop will also help to underexpose your backdrop and make it more black. But again, the key here is to properly light your model in the first place. Continuous lights can work well, as long as they are bright enough and the same color temp (for example, avoid using both an incandescent and an LED light source, as the variation in color temperatures will be a pain to fix). But just keep in mind that continuous lighting tends to appear "brighter" to our eyes than it does to a camera -- especially when you are using smaller apertures. So you may need to lengthen your shutter speed accordingly.

When it comes to exposure, it would be better to *very* slightly overexpose your model than to underexpose. If you underexpose the model and have to brighten the image up in post, you run the risk of also bringing up the brightness of your background (making it more grey than black). Correcting a slight overexposure will also further darken the background. But you do want to be careful not to overexpose too much or you risk losing detail in your model, particularly when dealing with models that already have a lot of light / white areas.

In post production, don't be afraid to play with your settings, especially the contrast. A lot of cameras take "flat" images. This is even more true if you shoot in RAW. Boosting the contrast a bit will not only help to make details and colors of your model pop, but will also help to darken your background.

One side note: When lighting your models, think about what kind of light / shadows you want to create. For example, do you want nice, even lighting to show off he model, or do you want harsh lighting (such as how the Star Wars models were photographed to appear as though lit by a star in space)? Generally speaking, the closer and larger the light source is, the SOFTER the light will be on the subject -- that is, even, soft shadows. The farther away and smaller the light source is, the HARDER the light will be -- harsh, well defined shadows.
 
JoelISG wrote some really nice pointers. I just wanted to add a very basic tip of using a stand/tripod. You can shoot nice photos on potato cams too. I have a better cam now, but I solved my issues with a simple stand and using the timer (no remote trigger) so I could have a longer exposure for my 28mm minis without blurry results.

Simple level adjustments or color correction in any free photo app takes care of the rest if your camera doesn't play nice. You could potentially make a greyish black bground all black by adjusting levels without even needing to mask anything.

Having moved away from almost all proprietary software I find that "Krita" is the best allround photo/painting app that is opensource. I used photoshop for half my life before that. You can even do animations in it and there are plenty of resources and tutorials online. Gimp has been around for a long while and it will do the job, but Krita is just insanely polished and just that much better imho.

Another tip is a photo tent. I bought a cheap one and some extra cheap lamps from Ikea to get indirect lighting. Totally worth the spend of €30 imho. Given how some models are larger, you can just use some side lamp action and tape some thin white copy/printing paper in front of the lamp.

"Miniac" made a pretty good guide over a few videos on youtube on the subject of photographing miniatures. Very applicable to this. It will give you practical examples of what everything does, what not to do and even demonstrate stacking which is an amazing way of doing things. It used to be something mineral people did with microscopes to get a larger depth of field - NVM it will all make sense if you watch the videos

I have been using a tripod with the camera on a timer and it does make a huge difference.

I have been looking for some free image stacking software. It's something I had heard about through Model Railroader that they use to extend the depth of field across the whole scene to help make mini dioramas look more life size. In the Astronomy field they use it to combine many different timed exposures of deep space objects so you you get more faint details

Does Krita do image stacking?

When it comes to exposure, it would be better to *very* slightly overexpose your model than to underexpose. If you underexpose the model and have to brighten the image up in post, you run the risk of also bringing up the brightness of your background (making it more grey than black). Correcting a slight overexposure will also further darken the background. But you do want to be careful not to overexpose too much or you risk losing detail in your model, particularly when dealing with models that already have a lot of light / white areas.

For me I run into the over exposure issue and losing the details. If I let the camera do it's auto settings while holding up a white card it adjusts so it doesn't overexpose. I guess I just have to figure out what settings it ends up using when that happens.

Nothing else beyond cropping was done with this photo and looking at the details in FLICKR, this is what it shows

Aperture ƒ/29.0
focal length 27 mm
exposure time 1/15
ISO 800


49561836646_44c1100a42_o.jpg
Red 3
 
Last edited:
This thread is more than 4 years old.

Your message may be considered spam for the following reasons:

  1. This thread hasn't been active in some time. A new post in this thread might not contribute constructively to this discussion after so long.
If you wish to reply despite these issues, check the box below before replying.
Be aware that malicious compliance may result in more severe penalties.
Back
Top