Looking for terrain tips

Solo4114

Master Member
So, I'm coming to this angle of the hobby from a sort of roundabout approach.

Among other things, I'm a GM and planning to run some West End Games d6 Star Wars. I know it can all be run "theater of the mind," but I think it's also fun to have miniatures. Towards this end, I've been scooping up X-wing miniatures auctions on ebay, buying lots, parting out the stuff I don't want, and hanging on to the rest. (I may keep the rules, too, in case I ever wanna play, but that's a separate discussion.)

ANYWAY, I'm planning on running an adventure set around destroying an asteroid base with some huge guns on it that is locking down all approach to a planet the Rebels want to free from Imperial control. The base is located in an asteroid field, and is set on an especially large asteroid. I plan to open the game in media res with the players attacking the base in a hopeless attack using X-wing and Y-wing miniatures. So, off the bat, we're talking ~1:270 scale here. (I know the X-wing models aren't 100% accurate to that, but it's...eh...close enough.)

So I'm trying to figure out how to build an Imperial base set into an asteroid that will feature a bunch of anti-starfighter and ship defenses. Facilities, turbolaser turrets, the works, plus two huge guns capable of destroying pretty much any larger ship that might approach the planet.

For the guns, I'm debating using two HobbyBoss 1:72 2S19-M2 self-propelled artillery guns where I'm basically just using the turret/cannon assembly. Alternatively, I'd use a single 1:35 Takom 2155 VT 1-2 tank. I lean towards the Hobby Boss because I'm concerned the Takom would be a little too big for my purposes, whereas at 1:72, the HobbyBoss models will be the right size to seem like incredibly imposing, heavily armored cannons.

My first question is, for those of you who are experienced modelers...am I on the right track re: the choice of which model forms the basis for the super-duper cannons?

Second question is...how the hell do you make an asteroid base large enough to work for this? I know some have used rocks, and others have used wood, but rock seems impossible to work for building a base into the asteroid, and wood seems harder to work with unless I end up investing in a bunch of tools that could carve it more effectively than a basic cordless Dremel. Any suggestions on how to do the terrain here?
 
These are good tutorials for doing landscapes.


The nice thing about using foam is it's easy to change it right up to the point you want to paint it or hard coat it. Also you can get some interesting textures using acetone to melt the foam. You can use a baint brush to get big gnarly texture or a toothbrush to get fine little pits.
 
If you want a technique I use to make craggy, cooled-lava rock that looks good for asteroids, I just take a chunk of XPS foam and then spray paint it directly with a layer of whatever cheap paint I have on hand. The solvents in the paint melt and fuse the surface of the foam, and if you want it to look more craggy, just spray more paint. I used it to make this (unfinished) Federation refueling port:

MKcID6D.jpg
 
Last edited:
1:270-scale fighters?

I agree with the feeling about using 1:72 guns rather than 1:35s.

King Kong looks scary when he's swatting at airplanes, but if he was swatting at mosquitoes he would look like a dork. In the OT movies the Imperials didn't waste Death Star shots on individual rebel fighters. There's a goldilocks size mismatch for making a threat look scary. When it goes too far it starts getting cartoonish and that undermines the threat of the big guy.
Yeah, apparently, the X-wing game's miniatures are "1:270-ish." Not everything is a perfect 1:270. Like, the A-wing is apparently too big for that scale. And the capital ships (the CR-90 Corvette, for example) are too small for that scale. But it's all kinda mostly sorta within that range.

With that in mind, I figure 1:72 is about as big as I want to get to give the impression of "Whoa! Look at the size of that thing!" to quote Wedge.

I'm doing all this for an adventure where we'll use some minis. The main idea is that the Rebels have to destroy (by commando mission) a massive gun emplacement on an asteroid base that the Empire has built to keep ships off of a planet they've taken. The asteroid belt that surrounds the planet makes a large gun emplacement more convenient than stationing a small fleet, and the asteroid in question was a former mining base converted into a fortress (tentatively called the Star Fist). The fortress will have a small facility on the surface, several normal turbolaser towers (like, Death Star style double-barrel towers), and then these two enormous, sensor-guided cannons that are meant to be able to take down almost any capital ship at long range. The shield that surrounds the base (which only drops briefly when the main guns fire, due to power consumption issues) protects it from starfighter assaults, so the place is basically impenetrable.

Right now, for the surface of the base, I'm thinking it'll be some Imperial-style buildings (typical concrete "brutalist" architecture) including a tower, some other facilities, a large communications dish, the aforementioned turbolaser towers, and maybe a docking bay built into the facility from which TIE fighters could launch. Not sure on that last one, though. That might require too big of an asteroid.

Also, thanks to everyone here who've had some excellent suggestions. I'm already thinking I'll likely whittle down a couple of stuck-together polystyrene bricks, carve out the space for the base, spraypaint, and then add the base facility and such.
 
Update on this project:

Got the 2S19 model and 1/72 is indeed the ideal size, I think. Definitely smarter than going with the 1/35 version.

My next question:

When you guys put stuff together, do you:

1. Paint, and then assemble?

2. Assemble, and then paint?

or

3. Assemble some, paint, assemble the rest, and finish painting? And this one, depending on the model itself?
Number 1: NEVER:p:p;) You'll always have to fill some seams or other pieces or some details will not be easy to access/paint.

Number 2/3: ALWAYS (y)(y)(y) Assemble, then paint or assemble some, paint and assemble the rest + finish painting is basically the same; you'll have to see what has to be assembled first (looking at the building instructions) and then fill any seams or problem areas. Paint inner pieces/details of the engines into the already assembled/painted wings for example. Same with cockpit: paint/details first, then insert into a already prep fuselage.
 
If you want a technique I use to make craggy, cooled-lava rock that looks good for asteroids, I just take a chunk of XPS foam and then spray paint it directly with a layer of whatever cheap paint I have on hand. The solvents in the paint melt and fuse the surface of the foam, and if you want it to look more craggy, just spray more paint. I used it to make this (unfinished) Federation refueling port:

View attachment 1795912
Make sure it is a solvent based paint (enamel, lacquer...) and test the process first. Acrylic paints normally don't interact with the plastic of the foam, and a lacquer based paint might just dissolve the foam into 'goo'. As always, good idea to test your materials first! (How do I know this?)

Foam has another benefit when used as your substrate: it is light weight! So you can built big and it doesn't weight a ton.

I typically use a product called 'Durhams Rock-Hard Water Putty' as a 'hard shell' layer and which is a product aimed at patching holes in walls and other materials. It mixes with water, so easy to clean up, but the water - powder ratio controls the viscosity and how much it might shrink as it cures. You can mix in paper fibers (I use stuff from my shredder...) to provide reinforcement and texture. You might not be able to find it where you are, but should find something similar in the range of fine grained, water based 'plasters'... easily fills the gaps when laminating ("layer caking") foam sheets for height.

It can be painted with acrylic paints when dry, and 'sculpted' to a certain degree if mixed thick enough. I've used it successfully to make water effects, too. I've even used it to 'cast' display bases using leftover food packaging, the plastic shells often have great shape and details included. And the putty is 'cheap', always a plus!

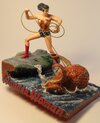
I've included the below pix to illustrate some of what is possible. (I may have shared previously elsewhere however though it fits here great...)
Both the 'rock' and the 'water' was made using Rock-Hard Putty over foam. The 'splashed' water was made using (again, with the food packaging!) cut-up chunks of clear polystyrene produce 'clam shells' (recycle mark #6) that were heated in a 275 over so the pieces shrunk up and distorted, then incorporated into the base with the 'octopus' parts. It works well, but make *lots* of pieces so there are plenty of chances to find something that 'fits'!

Cheers! Robert
 

Attachments

  • IMG_1875.jpg
    IMG_1875.jpg
    219.1 KB · Views: 86
  • RBeach_closeup.jpg
    RBeach_closeup.jpg
    390.9 KB · Views: 91
Last edited:
Back
Top