3D Printed (Saturn 12K Ultra) 1/24 Scale TIE and X-Wing **WIP**

skahtul

Sr Member
RPF PREMIUM MEMBER
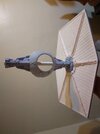
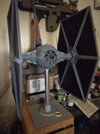
There have been some new editions to my family of printers, a Neptune 3 Plus and the new Elegoo Mars 12K Ultra. So, what can you do with 5 printers going full out for 10 days, well, one option is to really put them through paces and print both a 1/24th Scale X-Wing and TIE, which is exactly what I did :)

Technically, the TIE is not all the way printed as I am still running through the wings as there are 24 panels that need to be printed and only one of my printers is large enough for that. There are at least 3 or 4 more full days to finish those up.

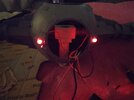
I plan to light both kits and build up some custom bases.

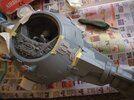
About 3 years ago when I first got into 3D printing my first project was a 1/24th scale X-Wing which ended up with an okay paint job (it's posted here). That kit was all PLA with no resin parts. This time round I plan to print resin where it makes sense and PLA for the rest. I really like the way both of these files turned out as they both have a very 'model kit' feel to them as all the small parts are separate.

Well, let's see what I have learned over the last few years and get these things built!

IMG_20230820_141939026.jpg


IMG_20230820_171032883.jpg
 
Let's meet the printers.
  • Elegoo Jupiter which gets pulled in when something truly large needs to be printed.
  • Trusty Pursa Mini.
    • This printer continues to be an absolute workhorse with literally zero issues. This printer is used to print most of the X-Wing hull and small parts.
  • Origional Elegoo Saturn
  • Neptune 3 Plus
    • This new edition has been great and enables me to print much larger items in PLA. So far I have not had any issues.
  • Elegoo Saturn 12K Ultra
    • This new printer is just fantastic and worth every penny.

IMG_20230728_192818661.jpg


The new dual filter setup is fantastic, this printer is in a sealed 'cold storage' room and when you open the door there is zero odor, and the resin I use smells very strong otherwise.

IMG_20230819_143614918.jpg


IMG_20230819_213816769.jpg
 
There have been a few changes and additions to my process over the last few months that have really helped. First heated vats are a must for higher resins like Siraya Tech Sculpt and Blu Nylon Black.

Not only do the prints turn much better, the speed increase is pretty crazy.

Below is the Vat heater on my Jupiter, I need to get one ordered for the Saturn.

IMG_20230819_235149788.jpg


Tuning the printers saves a lot of time and things in general just work so much better. Typically the issue with PLA is layer lines, which of course brings the dreaded sanding. I find that when I crank my Prusa down to .07 or even .05 there really just is not that much sanding needed.

This is an example of a print that only had one layer of primer and then paint added as a test:

IMG_20230820_102412071.jpg


Also, the new Saturn really turns out amazing prints at about 1/3 the time when compared to the Jupiter and my other Saturn.

IMG_20230820_090804614.jpg


My favorite resin for a long time has been Siraya Tech Sculpt mixed with about 20% of their Tenacious. For this project, I ordered a bottle of their newer Blu Nylon Black and this might just be my favorite new resin... It's even less brittle than the Sculpt (though I normally offset that with mixing in the Tenacious) and it prints really quickly. It's also one of the first resins to be certified for human contact once cleaned and cured. It's also has a very high impact rating so we will see how it holds up.

Enough about printing, let's get to the build :)
 
12k?!? Man, I'm over here still rockin' the 4K mono screen and feeling like a rock star! :lol:

That X-Wing is NerdMaker's files, but whose files are the TIE? Can't wait to see all the parts printed and the build underway!

Also, are you using the wifi for sending files to the Saturn 3? That would be a game-changer for me for sure.

SB

Don't worry, you are still a rock star :)

The TIE is from GEEK1138 here on the forums :) No, not yet. I keep meaning to get it set up and try it out, but I have been too busy sending prints through it. Once I get it configured I will let you know.

The engineering on NerdMakers files is top-notch and will make it so easy to put together. The TIE files are awesome but will require more engineering for sure.
 
The files for the X-Wing might be a bit on the high side (IMO) but what you get are beautifully engineered parts. There are a good number of really good 3D modelers out there, but I have seen few who know 'how' a kit is going to be built. Every part in this kit has locator pins and tolerances are perfect. Often people just slice up the files without taking the actual assembly into account.

It's build time.

The lower rod goes from the nose cone to the cockpit, the one on top is cut down and is just a locator pin. What I don't know at this point is that I am about to switch to a threaded rod.

IMG_20230820_205121981.jpg


IMG_20230820_210449514.jpg


This will makeup both the rear mount and the center mount. I want the option to mount this from behind and from under.

IMG_20230826_160702118.jpg


And here we see the swap to the threaded stainless rod. It does not run the length of the entire ship if you plan to install the pilot as it interferes with the chair.

IMG_20230826_151810321.jpg


Time to break out the clamp ship yard.

IMG_20230826_164306054.jpg


All glued up and ready for assembly, or not. What I don't know at this point is that I am about to re-print the entire lower half :) The rod ended up going in a bit crooked and it was not going to work as it was putting way too much pressure on the hull when I straightened it and the wings were dropping a bit.

IMG_20230827_113004254.jpg


Here it is from the rear and shows the tensioning nut which allows the wing to be locked in place. Watching Adam Savage run through his builds has inspired me to ensure there are mechanical connections. This allows for easy transport, and access to electronics if something goes out. The rear section will be removable and the wings will be removable.

IMG_20230827_134738594.jpg
 
The advantage of doing it twice is that you have already worked out most of the issues, saw room for improvement and other than waiting for the parts to print, it goes much faster.

IMG_20230828_103041204.jpg


IMG_20230828_103046760.jpg


Also, though it's not much this is the first 3D part I ever designed, yeah, I have a long way to go :) I wanted a way to hold the LED in place. I also plan to make something similar for the guns so that they are removable.

Engine_v3.PNG


IMG_20230827_140316415.jpg


IMG_20230827_140330487.jpg


IMG_20230827_140628062.jpg


Speaking of LED's, testing some fiber for R2's head :)

IMG_20230826_224211891.jpg


IMG_20230826_224736379.jpg
 
Yo skahtul any updates on these models?

SB

Sure thing :)

Flexing my clamping skills..

IMG_20230828_205715912.jpg


IMG_20230830_230404850.jpg


I still think the marriage of resin and FDM is where it's at for some of these builds. I just would never trust that this does not sag over time if it was all resin, at least not without a lot more internal structure.

IMG_20230831_102812545.jpg


Mocking up the engines before final assembly.

IMG_20230905_134928922.jpg


IMG_20230905_140258128.jpg


Some fiber optic testing for the cockpit, I really think having the cockpit and R2 will really set this build off.

IMG_20230905_143629509.jpg


IMG_20230905_143632799.jpg


All the major components are printed and ready for final assembly and the build-out of the base. I really hope to dig in and get pretty far on the X-Wing this weekend.

The main fuselage has received its final light sanding and is primed and ready for paint once the cockpit is fully installed.

IMG_20230905_214859760.jpg


IMG_20230907_211523765.jpg


I have some clear PLA that should be here tomorrow as I want to experiment with making some "lenses" for the rear engines to help both light block and disperse light.

IMG_20230907_211533982.jpg
 
I decided to take a different direction on the TIE. Resin printing being what it is, flat shapes are very difficult to get correct (meaning even and not warped). It's also why I opted to FDM print the X-Wing fuselage, it's just so much easier to get shapes like that (flat, blocky with crisp edges) from an FDM printer.

As you can see there are a few issues here, one is that the hemispheres just don't line up and even if they did it would take a ton of filling and sanding to get that seam to completely disappear. Second I am just not sure about the longevity of this kit without an actual internal structure. The kit as-is does not allow for any kind of rods to be passed through the interior to hold up the wings, which are freaking huge (about 19" tall).

So, instead, I loaded up the entire shell as one part and printed it off on the new Saturn, wow, that new printer is super quick (the entire ball was a 5-hour print) and looks so nice and clean. This will save a ton of time.

IMG_20230907_204908916.jpg


IMG_20230907_204916686.jpg


Now, because this kit's original interior which is super nice does not fit once you print this as one entire part, I will be using the interior from my next build which is a X1 TIE to build out a diorama using two of the new Round 2 TIE's. This interior is meant to slide in from the front and is much shorter which allows for a metal or wooden interior to hold up the kit.

I will probably save the original interior files for this TIE as one of these days I would love to do some 1/12th scale (or maybe a bit larger) builds that are just the cockpit of an X-Wing, TIE, and maybe a Y-Wing. The idea would be to just print part of the ship (think mounted head, that's about the best way I can describe it) and then really detail up and fully light the interiors. Anyway, that's for a future build :)
 
Nice update! Are you using the new fast resin with the Saturn Ultra? How many seconds per layer was that TIE ball?

Looking forward to more!

SB
 
Nice update! Are you using the new fast resin with the Saturn Ultra? How many seconds per layer was that TIE ball?

Looking forward to more!

SB

No, I have not tried their fast resin yet. I have the Siraya Tech so dialed in that I am afraid to swap out resins and re-learn it all :) I also wonder if the fast resin is very robust. In watching a few videos it's very "watery" which I assume is why it can be printed so quickly.

But, for my setup, as long as the resin is warm I can hit 2.75 seconds easily. I think what really speeds it up though is that it just moves fast. When I watch my old Saturn or even the Jupiter print, this new one just 'moves' up and down very quickly.

Looks like I am on a roll modeling my own parts for this project, which are really just cylinders, so not very impressive :) Here is what I came up with for an LED diffuser for the engines. It was printed in clear PLA and diffuses better than anything I have ever tried.

IMG_20230909_103827907.jpg


IMG_20230909_102945087.jpg


Also started on the base by unearthing one of my favorite processes for smoothing PLA prints, especially one like this where I kind of want that 'cast look'.

IMG_20230909_095819150.jpg


Comes out nice and shiny, a bit of sanding to make sure the paint sticks (this is a self leveling resin so it has a very high gloss to it).

IMG_20230909_140058827.jpg
 
And my last bit of "3D Modeling" for this build was to make a sleeve for the cannons so that they fit really tight into the tubes.

IMG_20230910_145723970.jpg


For some reason, I really, really enjoy making these!

IMG_20230910_150211772.jpg


IMG_20230910_151711296.jpg


IMG_20230910_164007743.jpg


My last trick here was to embed some magnets into the wings to ensure they closed completely.

IMG_20230910_133747082.jpg
 
I decided to take a different direction on the TIE. Resin printing being what it is, flat shapes are very difficult to get correct (meaning even and not warped). It's also why I opted to FDM print the X-Wing fuselage, it's just so much easier to get shapes like that (flat, blocky with crisp edges) from an FDM printer.

As you can see there are a few issues here, one is that the hemispheres just don't line up and even if they did it would take a ton of filling and sanding to get that seam to completely disappear. Second I am just not sure about the longevity of this kit without an actual internal structure. The kit as-is does not allow for any kind of rods to be passed through the interior to hold up the wings, which are freaking huge (about 19" tall).

So, instead, I loaded up the entire shell as one part and printed it off on the new Saturn, wow, that new printer is super quick (the entire ball was a 5-hour print) and looks so nice and clean. This will save a ton of time.

View attachment 1737527

View attachment 1737528

Now, because this kit's original interior which is super nice does not fit once you print this as one entire part, I will be using the interior from my next build which is a X1 TIE to build out a diorama using two of the new Round 2 TIE's. This interior is meant to slide in from the front and is much shorter which allows for a metal or wooden interior to hold up the kit.

I will probably save the original interior files for this TIE as one of these days I would love to do some 1/12th scale (or maybe a bit larger) builds that are just the cockpit of an X-Wing, TIE, and maybe a Y-Wing. The idea would be to just print part of the ship (think mounted head, that's about the best way I can describe it) and then really detail up and fully light the interiors. Anyway, that's for a future build :)
I did the same model and was able to get a pipe across the back of the model through the pylons but you would have to ditch the cockpit that comes with it and use another one or modify it so that way it can be more narrow and clear the armature pipe.
 

Attachments

  • 20230720_161610 (1).jpg
    20230720_161610 (1).jpg
    1.2 MB · Views: 101
  • 20230811_174130.jpg
    20230811_174130.jpg
    2.5 MB · Views: 82
  • 20230821_105512.jpg
    20230821_105512.jpg
    3.1 MB · Views: 91
  • 20230823_145435.jpg
    20230823_145435.jpg
    984.6 KB · Views: 94
I did the same model and was able to get a pipe across the back of the model through the pylons but you would have to ditch the cockpit that comes with it and use another one or modify it so that way it can be more narrow and clear the armature pipe.

Correct, I have an alternative cockpit that is designed to allow the armature in there.

How did you attach all the panel pieces to themselves, just epoxy? I did mine in PLA so that they would be light and perfectly flat.
 
Correct, I have an alternative cockpit that is designed to allow the armature in there.

How did you attach all the panel pieces to themselves, just epoxy? I did mine in PLA so that they would be light and perfectly flat.
Yeah I just used epoxy done in PLA also.
 
Time to wrap up the first of these two builds.

Added a few details to the cockpit as there was no way I was going to try and 3D print these.

IMG_20230916_091508268.jpg


And, with those last few bits, it's time for final assembly, break out the glue!

IMG_20230916_161314710.jpg


Oh, and the paint, lots of different colors here :)

IMG_20230916_210324112.jpg


While I end up messing up part of the pain job here in a few, without killing myself in getting all the details just right, I am going for an overall Red 5 paint scheme. Time to break out the masking tape.

IMG_20230917_114629849.jpg


I realize after all the tape is off that I did not quite get those strips right though it does get corrected :)

IMG_20230917_150322712.jpg


IMG_20230917_151641602.jpg
 
Here is a shot of the new 1/32 Studio Series TIE next to the 1/24th X-Wing in case anyone wants to see the two togehter for some reason.

IMG_20230918_194158994.jpg


Well, what I don't realize here is that I messed up the wings and basically I painted them upside down. That yellow part on the cowling should be up top, not at the bottom. And I basically reversed the inner parts of the wings... While I did fix the cowling I did not feel like re-doing all the inner parts.

IMG_20230918_101220867.jpg
 
Final piece is in place, no turning back now :)

IMG_20230920_162216981.jpg


The rear is also magnetic. The way I did the rear section is that you can both tension the wings with that nut, and you can also remove the entire back half and then slide the wings out if needed.

IMG_20230920_163319033.jpg


IMG_20230920_163331301.jpg


Other than gluing on the cockpit, it's fully assembled.

IMG_20230922_192029937.jpg


Here you can see how well the diffuser works, as stated above, this is for sure the way I do it from now on. The diffusion is just as good in person as it is on camera.

Without the diffuser:

IMG_20230922_193525081.jpg


With:
IMG_20230922_193502942.jpg


It's also at this point I realize that the base is too small and the ship weights too much, time to make a new one.

IMG_20230925_103929399.jpg
 

Your message may be considered spam for the following reasons:

If you wish to reply despite these issues, check the box below before replying.
Be aware that malicious compliance may result in more severe penalties.
Back
Top