What's that? 1:24 you say? Why isn't this thread in the Studio Scale forum, then? Well, that's because it's just that: studio scale, and that's about as close as this is going to get to being "studio accurate." ")
Over the years I've seen many amazing builds of Red 3 (I mean, look at this AMAZING build by VFX Freak, and Guy's SS Red 3 build here, for example). This will not be one of those builds, but hopefully I can build and paint something up that will be worthy to be photographed for my ongoing photo project, which you can see here.
This X-Wing is 3D printed in FDM and resin. The STL files come from Dominic's wonderful model, which can be found here. Granted, it is his Mk. I version, as he is releasing a more accurate Mk. II version soon, but I was already well underway by the time I learned he was making another one. Just an excuse to build another! I am no stranger to 3D printing kits, as I've printed a few models over the years. Some of you may remember my 1:48 Y-Wing build thread. It was a rollercoaster of education, and I learned a lot.
This model was printed on my Elegoo Saturn (the OG 4K model), and the Elegoo Neptune 4 Plus. I started printing this model back in January of 2023, but life got busy and this got put on the shelf until just recently. I also purchased a few Archive-X paints, and this will be my first time using those as well (any pointers here would be greatly appreciated!).
Anyway, enough faffing about. On with the build.
I originally printed the entire kit in resin, but, unfortunately, parts warped and such to the point where it would have just been a massive headache to put together. Here are a few photos from the early days.
Some resin parts on the printer. Printing on the plate introduces a few flaws into the parts, most notably something called "elephant's foot," where the first few mms are squished onto the plate.

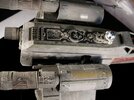
Resin printing gives you incredible detail!

Primed cockpit with a temporary canopy (you can see some layer shifting on the canopy in this shot)

Front fuselage test fitting. I was pretty happy how this was turning out at this point, but it was very heavy, and the business end of this bird was going to be massive and heavy. I wasn't sure if the resin would be able to support its weight with the wings and engines, etc... You don't really appreciate how big these models were until you start dry-fitting the parts together like this! I'm so used to the small Bandai and Fine Molds kits; this thing is huge!

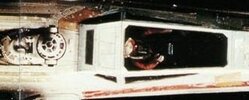
Pilot, courtesy of Alain Rivard. I chopped off his visor, which I plan on making from some clear plastic of some sort later. Also notice that he is already seated in a chair. I like this chair more than the chair that's in the X-Wing model, so I will break out my dremel and do some surgery to the cockpit part. The pilot- should I start calling him Biggs?- will probably need his feet/legs chopped in order to fit, but we'll cross that bridge when we get there. Poor Biggs.

A resin-printed wing. There's a bit of warpage around the whole wing, and they won't close flat. I would later reprint the wings in FDM, making them lighter as well as stronger.

More to come in the next post!
Thanks for looking!
SB
Over the years I've seen many amazing builds of Red 3 (I mean, look at this AMAZING build by VFX Freak, and Guy's SS Red 3 build here, for example). This will not be one of those builds, but hopefully I can build and paint something up that will be worthy to be photographed for my ongoing photo project, which you can see here.
This X-Wing is 3D printed in FDM and resin. The STL files come from Dominic's wonderful model, which can be found here. Granted, it is his Mk. I version, as he is releasing a more accurate Mk. II version soon, but I was already well underway by the time I learned he was making another one. Just an excuse to build another! I am no stranger to 3D printing kits, as I've printed a few models over the years. Some of you may remember my 1:48 Y-Wing build thread. It was a rollercoaster of education, and I learned a lot.
This model was printed on my Elegoo Saturn (the OG 4K model), and the Elegoo Neptune 4 Plus. I started printing this model back in January of 2023, but life got busy and this got put on the shelf until just recently. I also purchased a few Archive-X paints, and this will be my first time using those as well (any pointers here would be greatly appreciated!).
Anyway, enough faffing about. On with the build.
I originally printed the entire kit in resin, but, unfortunately, parts warped and such to the point where it would have just been a massive headache to put together. Here are a few photos from the early days.
Some resin parts on the printer. Printing on the plate introduces a few flaws into the parts, most notably something called "elephant's foot," where the first few mms are squished onto the plate.
Resin printing gives you incredible detail!
Primed cockpit with a temporary canopy (you can see some layer shifting on the canopy in this shot)
Front fuselage test fitting. I was pretty happy how this was turning out at this point, but it was very heavy, and the business end of this bird was going to be massive and heavy. I wasn't sure if the resin would be able to support its weight with the wings and engines, etc... You don't really appreciate how big these models were until you start dry-fitting the parts together like this! I'm so used to the small Bandai and Fine Molds kits; this thing is huge!
Pilot, courtesy of Alain Rivard. I chopped off his visor, which I plan on making from some clear plastic of some sort later. Also notice that he is already seated in a chair. I like this chair more than the chair that's in the X-Wing model, so I will break out my dremel and do some surgery to the cockpit part. The pilot- should I start calling him Biggs?- will probably need his feet/legs chopped in order to fit, but we'll cross that bridge when we get there. Poor Biggs.
A resin-printed wing. There's a bit of warpage around the whole wing, and they won't close flat. I would later reprint the wings in FDM, making them lighter as well as stronger.
More to come in the next post!
Thanks for looking!
SB