You are using an out of date browser. It may not display this or other websites correctly.
You should upgrade or use an alternative browser.
You should upgrade or use an alternative browser.
1:1 Millennium Falcon Cockpit Replica - Group Build
- Thread starter SteveStarkiller
- Start date

RALLYING CRY !!! Sound the Trumpets !!!! Shout from the roof tops !!!!
***** RPF members, we need your help. ******
Star Wars Celebration 2015 in Anaheim, April 16 - 19. The Falcon Cockpit was supposed to be there on display. Chris and Greg were just told that there is no room for them and that they were dropped from the event. We at Real Movie Toys were also going to display the Landspeeder, and the Snowspeeder - that we are building especially for SWC. As of today, I have not yet heard anything from the organizers about if we are still on or are also being dropped. I have an email and phone messages left for the staff to let me know our current status.
I'm afraid if they won't make room for something as truly awesome as the Falcon Cockpit, then they won't give up the square footage for my two land hogs either. And our three vehicles are just the only ones I personally know about. What if other cool things that are fantastic, but too inconvenient, are being dismissed. We want more from our Celebration than just isle after isle of comic books and T-shirt booths. (no offense guys.) We want the incredible. We want to celebrate Star Wars!
We as a community of the most devoted fans in the world should CRY OUT over this injustice. We should join together and let the promoters know just how much we want to see in person, to touch, to sit in, to photograph, and to talk face to face about how it was made, these most wonderful of fan built reproductions of movie magic history. I'm no rabble rouser, but if we don't act together now, we will all sorely miss out in April.
How about a petition drive. An email campaign. A phone brigade. A march on Washington. A huger strike. Burning and pillaging. What shall do??? What will we do for our Celebration?
This is a copy of the post that I also made on my own thread "T-47 Snowspeeder 1:1 build" , but I thought it would get more attention over on Greg and Chris's thread. Since they were the first ones effected by the bad.
RPF moderators, if this is innapropriate and you want me to simmer down and knock it off, then please let me know and I will. I don't want to miss use this site, and I beg your forgiveness.
Operascot
Active Member
It certainly saddens me that the cockpit and quads won't be able to show at Celebration, but I do have to admit to a bit of a sigh of relief at the extension of my deadline for getting Quad v2 up to snuff. Working backstage like I do, I'm not used to being "just another audience member out of 70000." It will certainly be different. Maybe the Mouse will relent, but if not, there will be other events that will let me sit in Sofa's amazing work. I look forward to them.
Alright, me, get back to playing with plastic!
Alright, me, get back to playing with plastic!
seriously!!!??? The cockpit was one of the MAIN reasons I'm going!!
Amazing DJ
Well-Known Member
Why keep rebuilding the cockpit consoles and other parts? Three of them, huh? I'm anxious to see a landing gear built. Or the cockpit hallway built. Or a gangplank ramp thing. Or the Falcon engine bay. Is this going to be part of a whole ship? Who builds the rest of the ship?
Operascot
Active Member
Alright, where were we before the whole Celebration news?
Oh, right! Building cool stuff!
Much of the next couple of posts was done before this last week, while still operating under my self imposed March 1 deadline to be able to ship to Anaheim, so there were some corners that had been cut. I will pay those J-walking tickets and start using the crosswalks again soon.
That said:
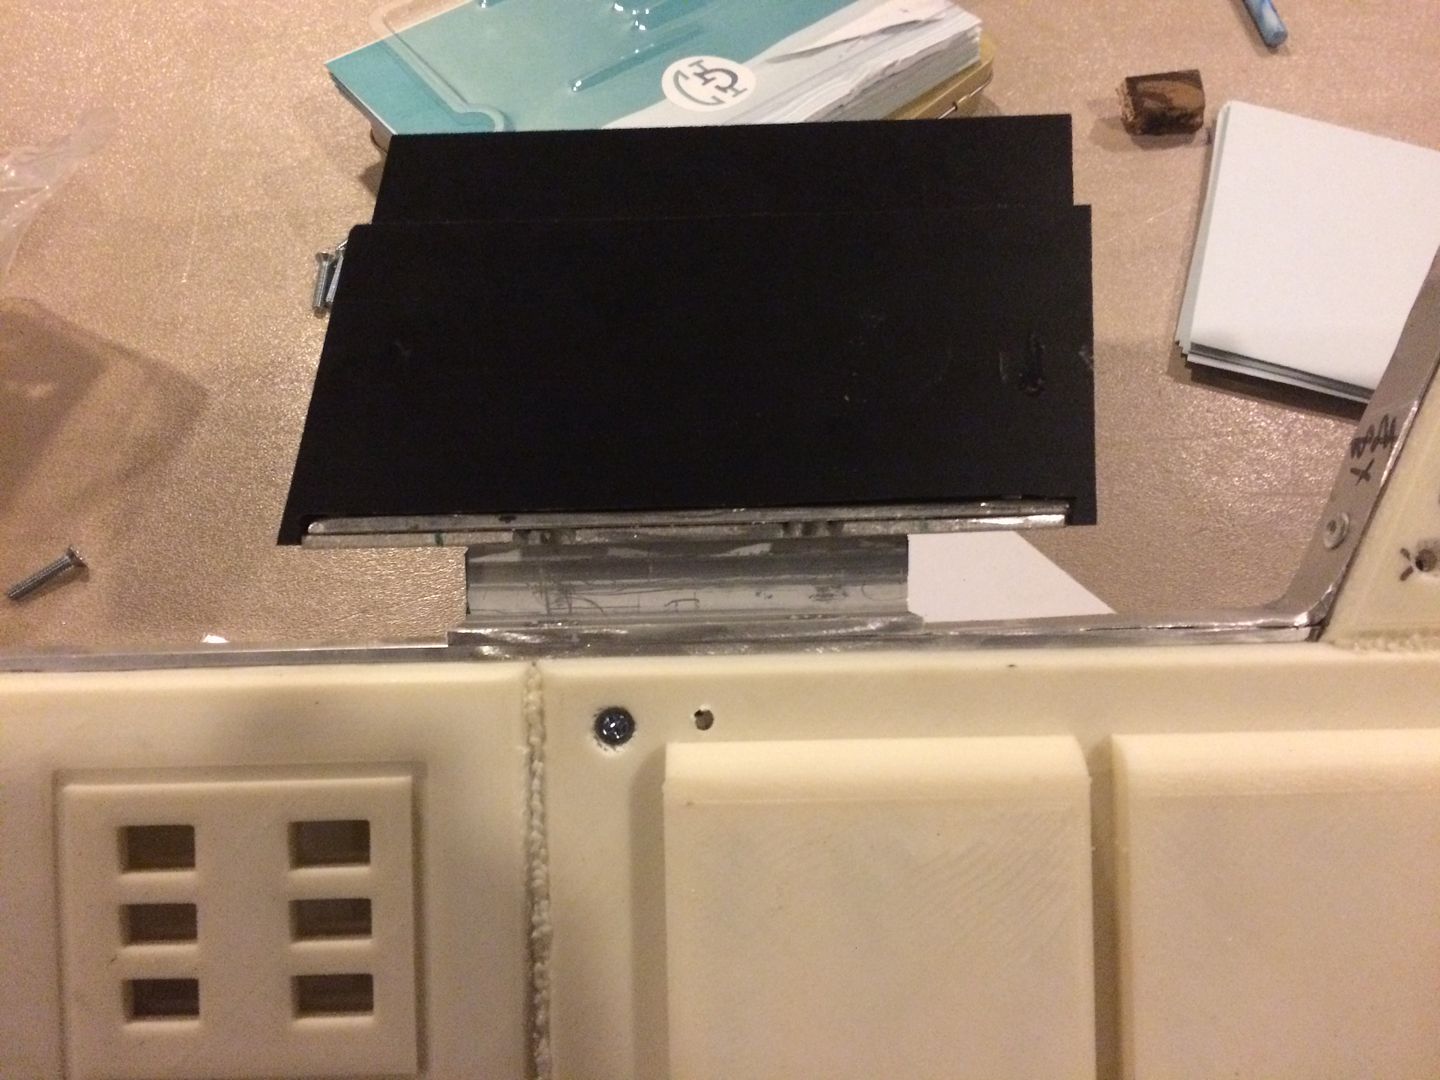
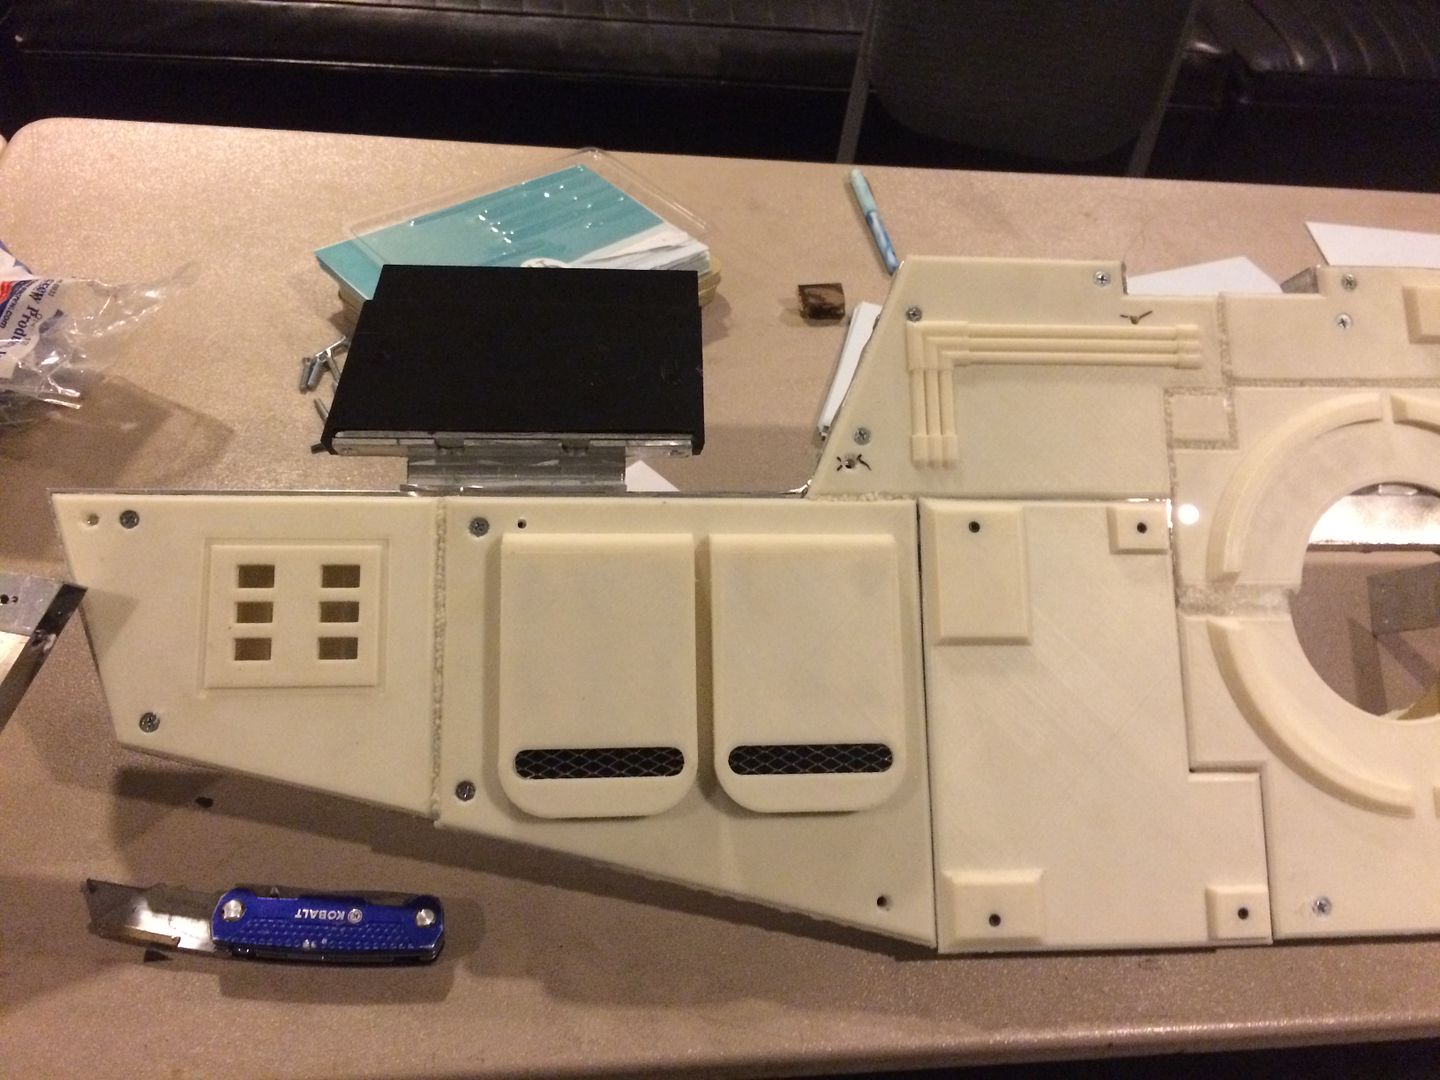
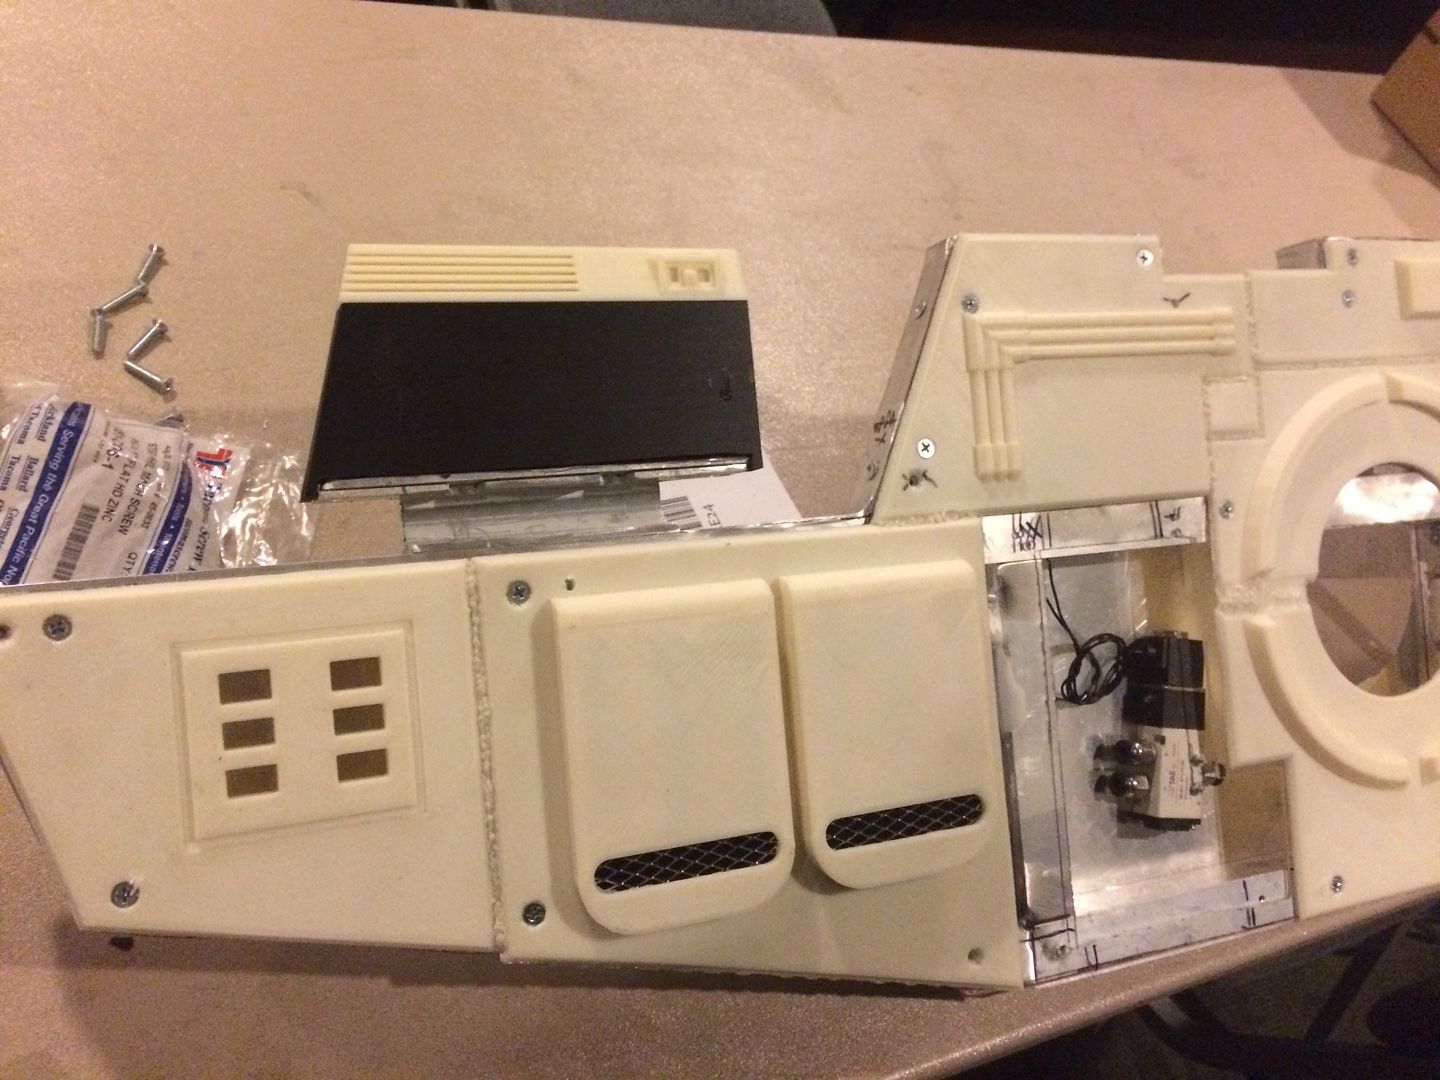
I hadn't given much thought (that's a lie, I'd been unsuccessfully thinking about) the litt;e panels on the front end of the side walls, so it was time to just start and come up with a pretty fix later. The side walls I've built are about 1" think, so I took some 1/2" sintra (spelling? It was some scrap we had laying around) and cut out the pieces, notching for the supporting brackets and a printed piece up at the top. Weight had already been on my mind, so I also hollowed it out a bit.
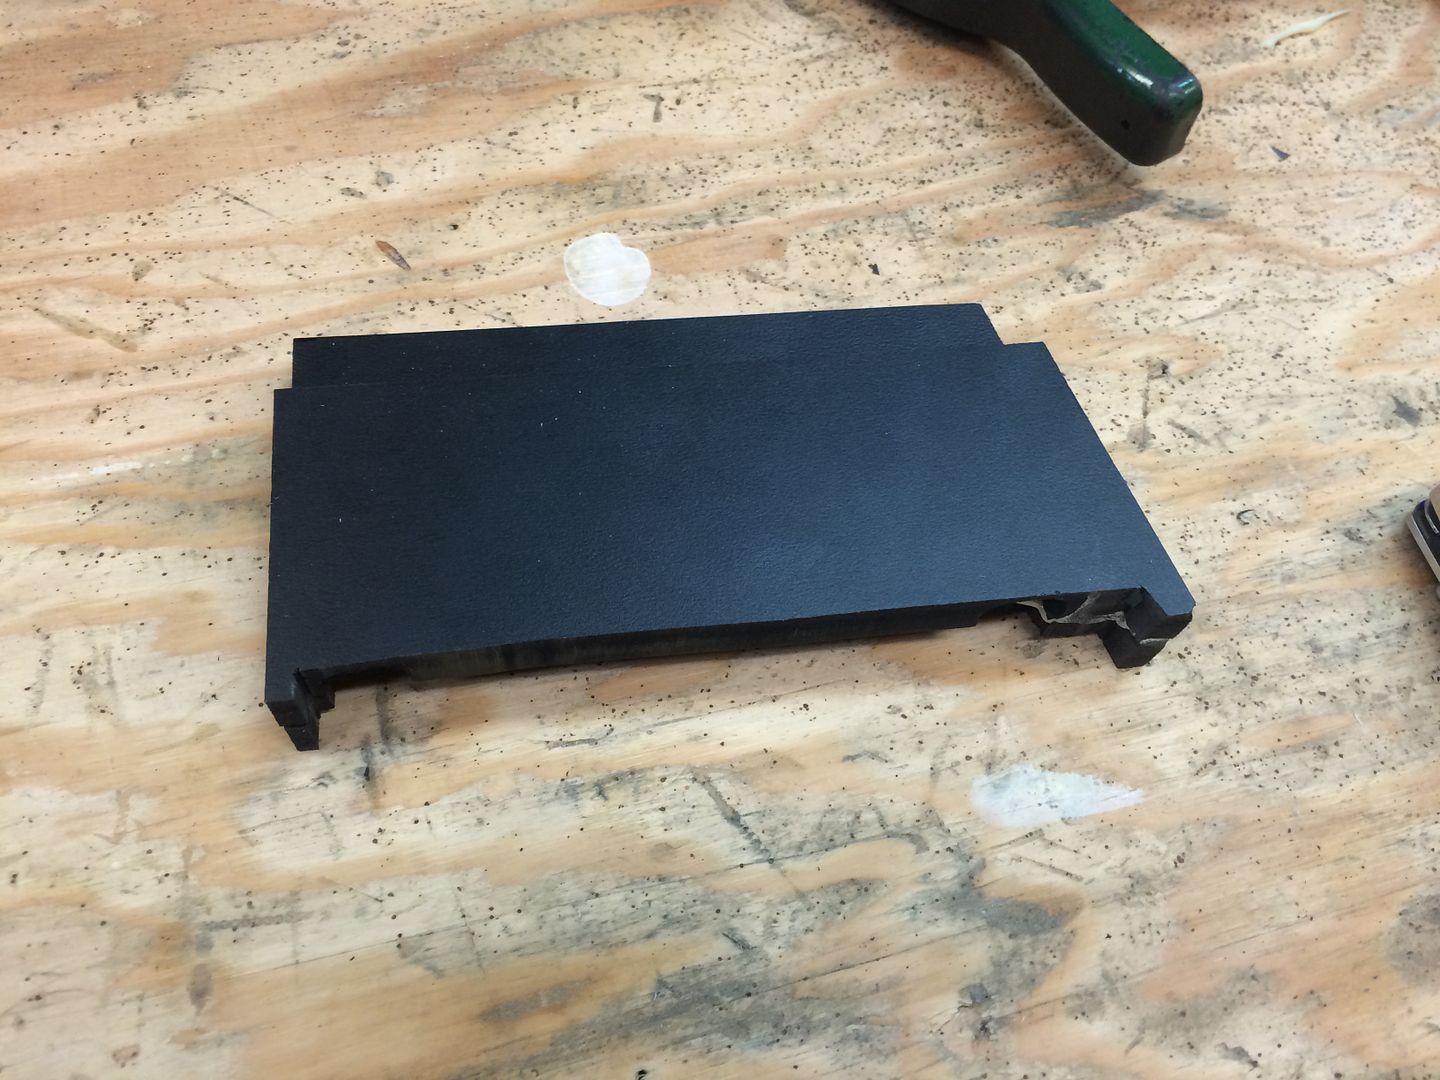
A test fit
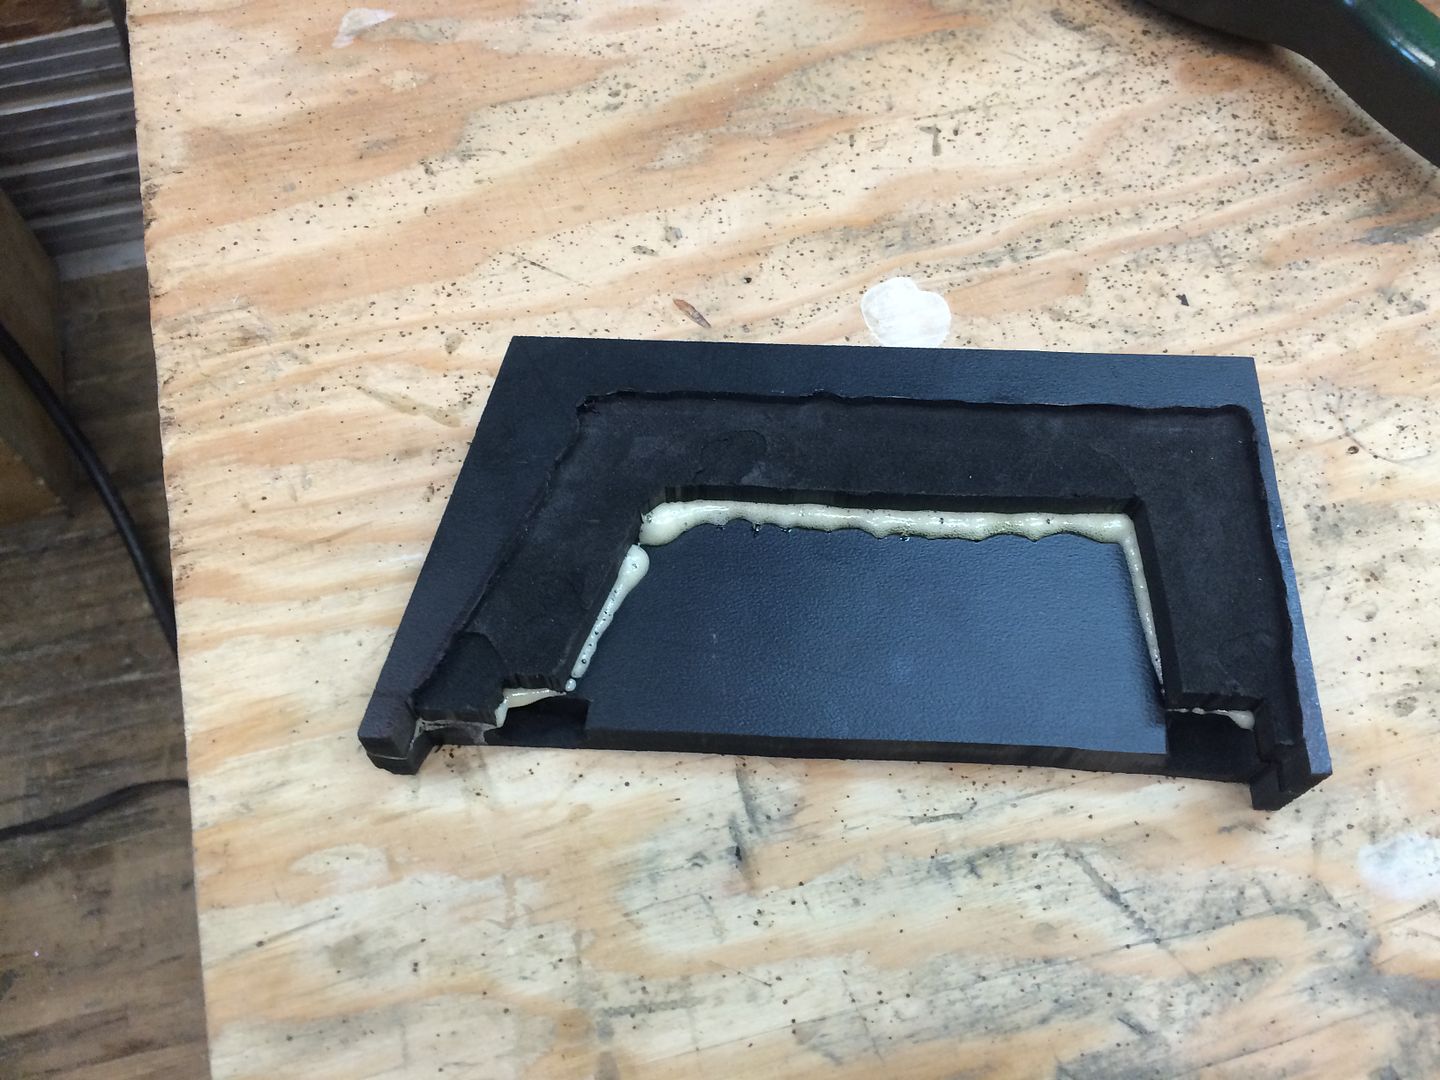
Some of those cut corners ( or in this particular case, non cut corners)
And with the printed greeblie at the top
Oh, right! Building cool stuff!
Much of the next couple of posts was done before this last week, while still operating under my self imposed March 1 deadline to be able to ship to Anaheim, so there were some corners that had been cut. I will pay those J-walking tickets and start using the crosswalks again soon.
That said:
I hadn't given much thought (that's a lie, I'd been unsuccessfully thinking about) the litt;e panels on the front end of the side walls, so it was time to just start and come up with a pretty fix later. The side walls I've built are about 1" think, so I took some 1/2" sintra (spelling? It was some scrap we had laying around) and cut out the pieces, notching for the supporting brackets and a printed piece up at the top. Weight had already been on my mind, so I also hollowed it out a bit.
A test fit
Some of those cut corners ( or in this particular case, non cut corners)
And with the printed greeblie at the top
Last edited:
Operascot
Active Member
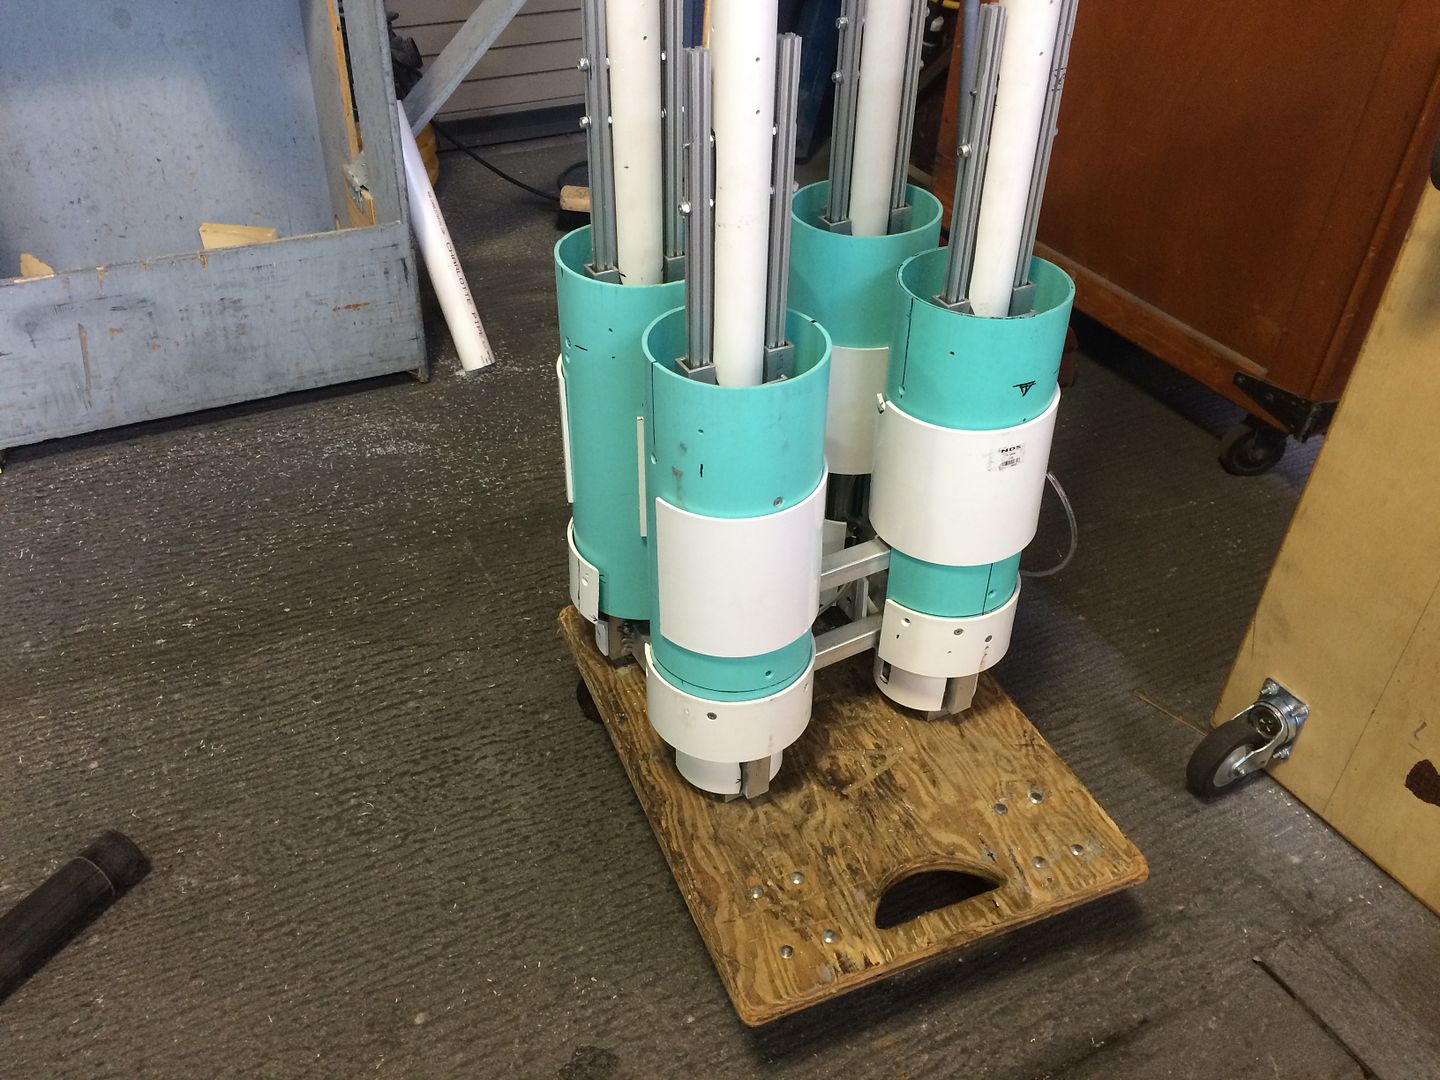
Quad 2 ctd
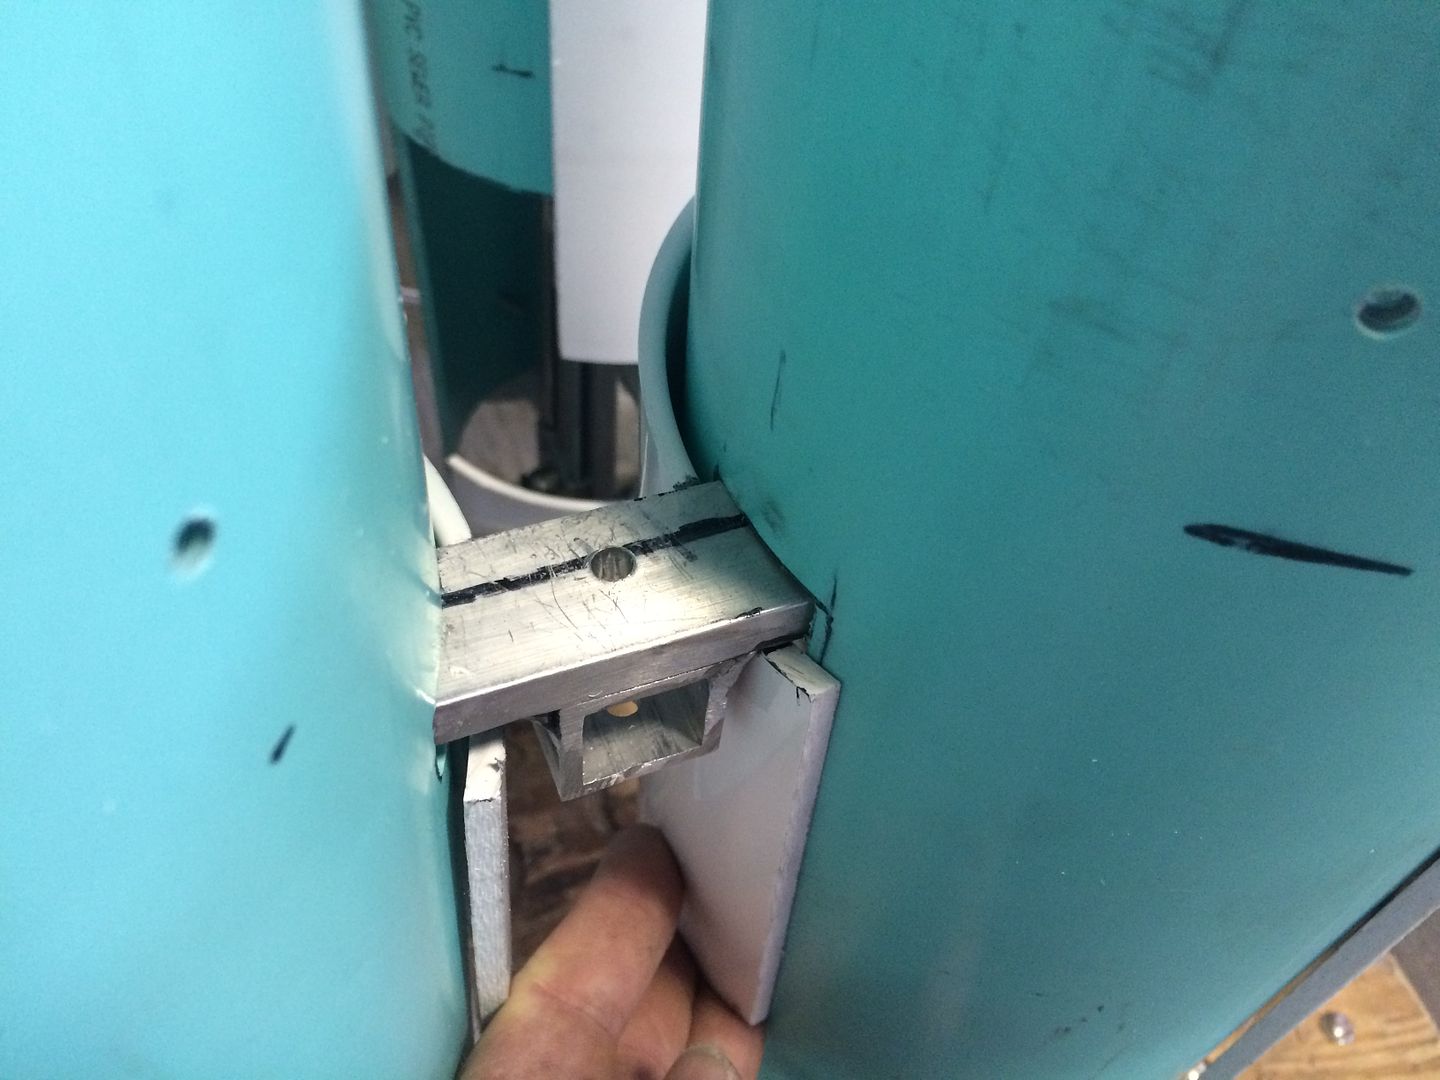
We got into early January and I stripped down the quad again for some more cosmetic work. One of the problems with having the structure for the pistons is that the 6" PVC tubes need long chunks removed. I also figue I can't glue too much of it, since there might be problems that would require going down to the framework again (eek). How to close up the holes...
I decided to go closer to Starkiller's sketchup model than to Sofa's (Greg was fine with this- "They'd have different model years.") On the model, the blast chamber (my reference name for it) is more broken up in differing diameters rather than the long tube. I decided to use a coupler to cover the hole.
The hole described, as well as the solution
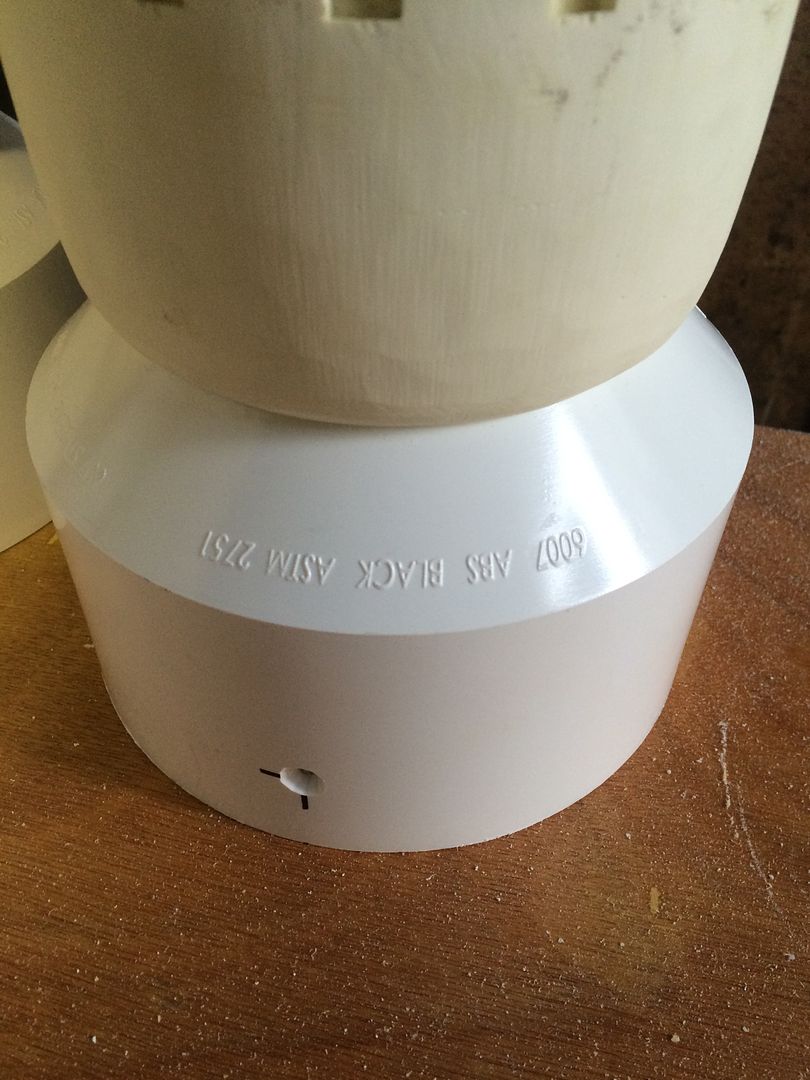
Then it was time to permanently join the cone and rounded cast pieces. I am starting to relly like Gorilla Glue. It filled in a couple of voids I had, in addition to it's primary job
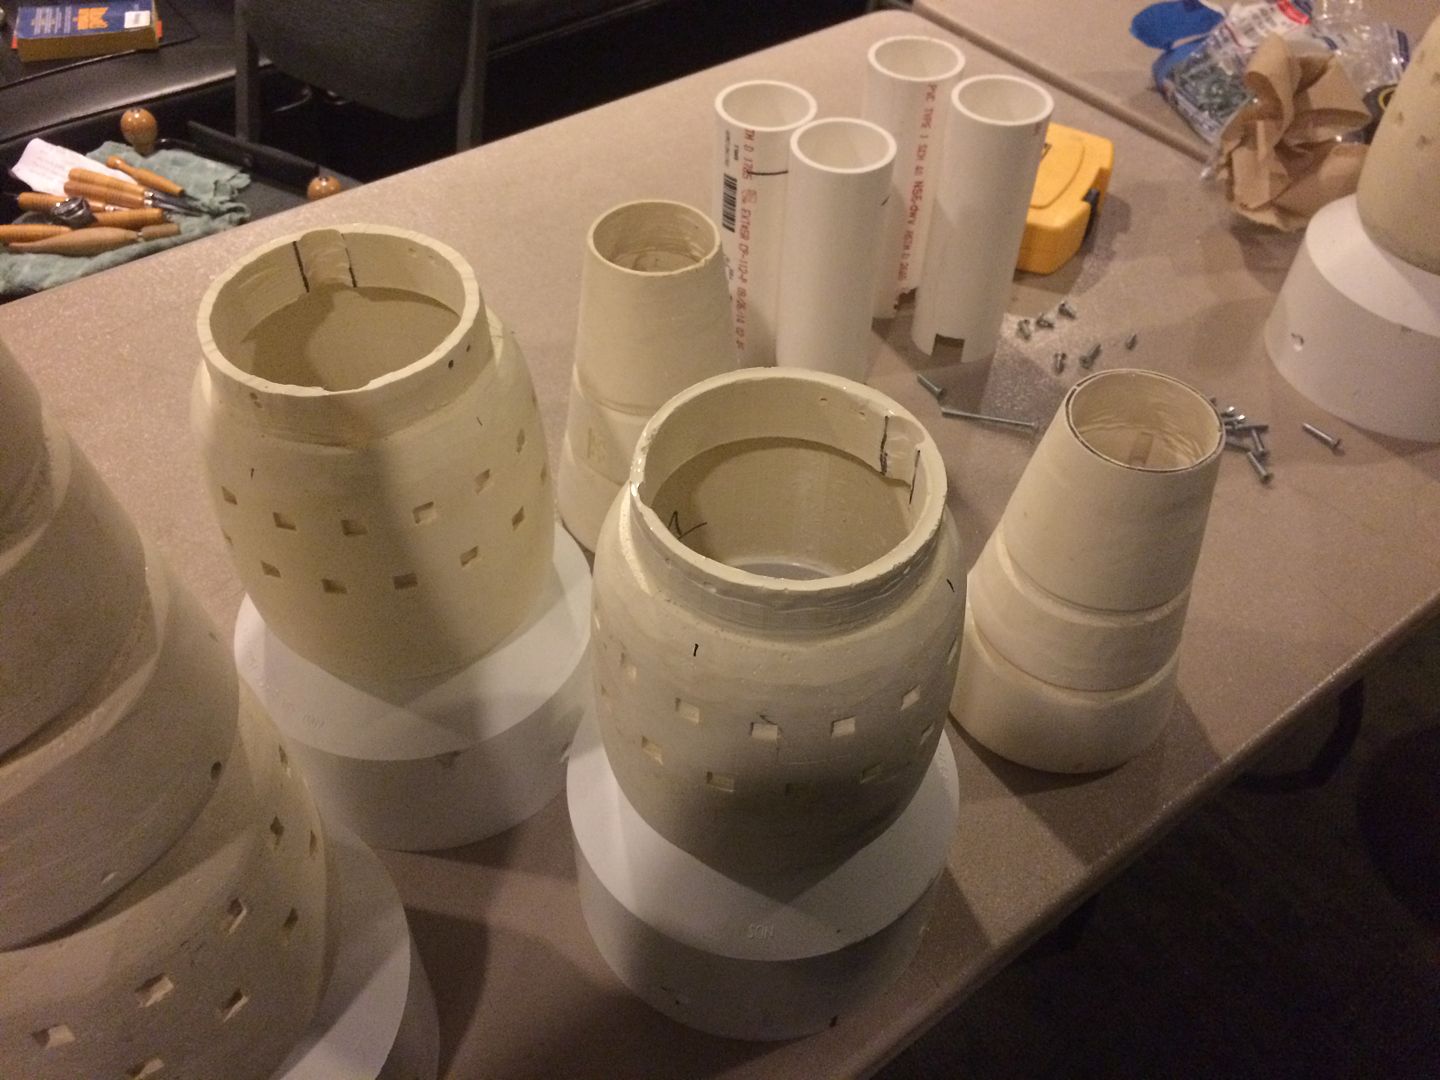
The little doles in the cone sectios are for #6 cap screws, which helped me align the pieces as the glue set up. These will all get a good sanding later on
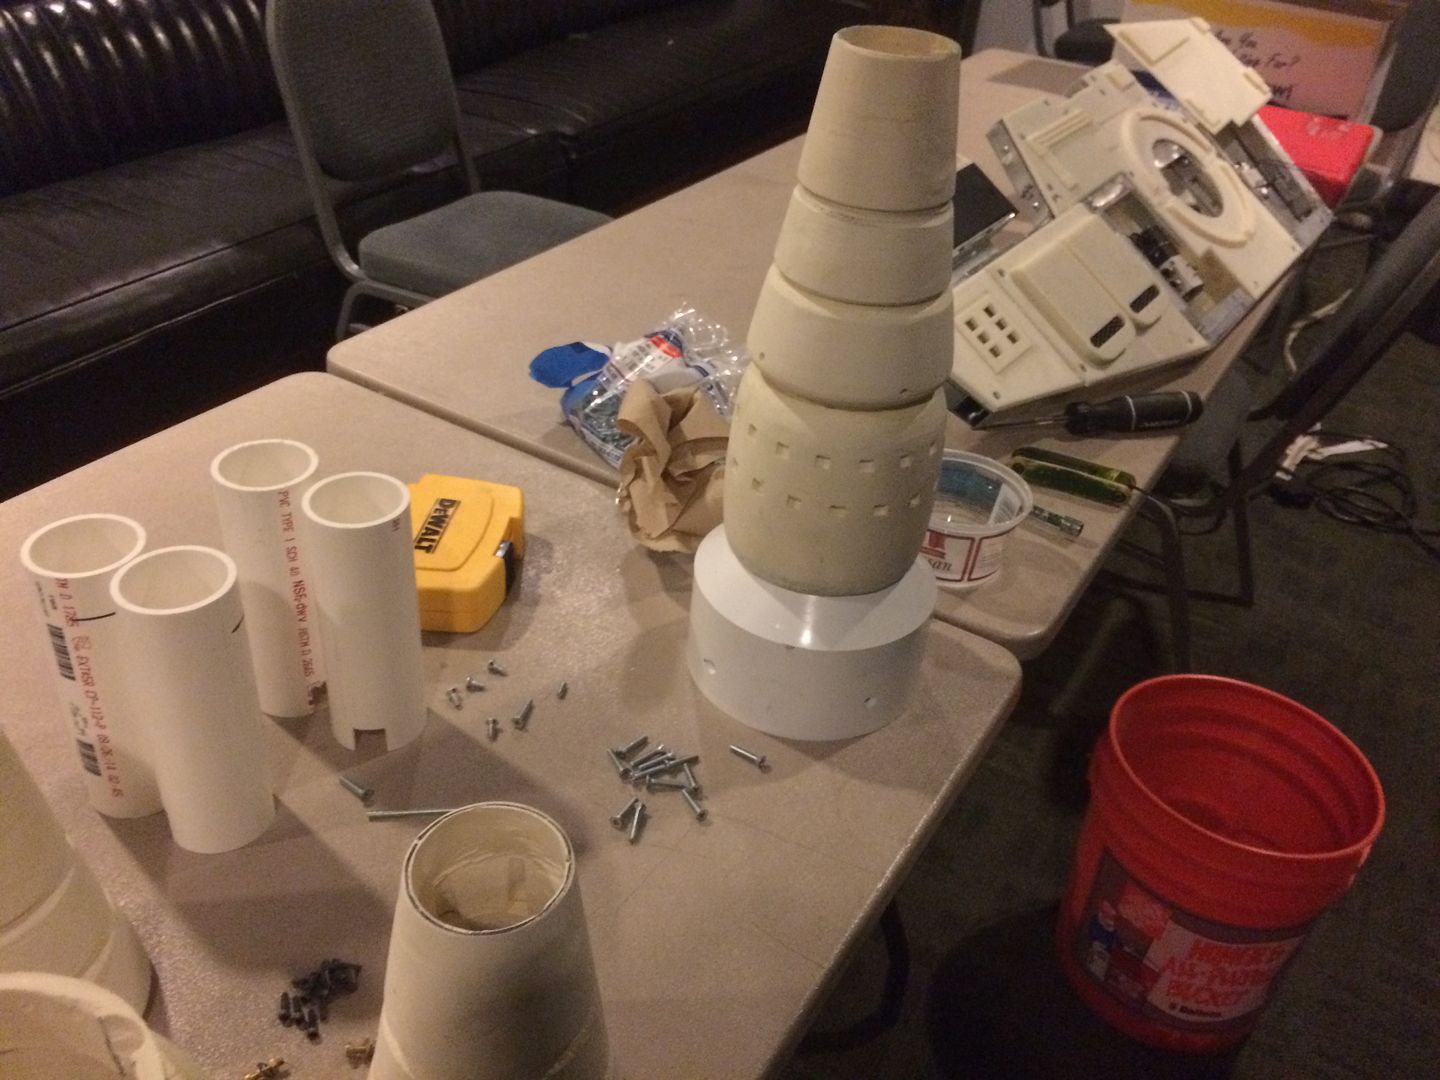
Speaking of sanding, I took an orbital sander to the PVC to put some tooth on it prior to paint, and also to remove the factory markings like these.
We got into early January and I stripped down the quad again for some more cosmetic work. One of the problems with having the structure for the pistons is that the 6" PVC tubes need long chunks removed. I also figue I can't glue too much of it, since there might be problems that would require going down to the framework again (eek). How to close up the holes...
I decided to go closer to Starkiller's sketchup model than to Sofa's (Greg was fine with this- "They'd have different model years.") On the model, the blast chamber (my reference name for it) is more broken up in differing diameters rather than the long tube. I decided to use a coupler to cover the hole.
The hole described, as well as the solution
Then it was time to permanently join the cone and rounded cast pieces. I am starting to relly like Gorilla Glue. It filled in a couple of voids I had, in addition to it's primary job
The little doles in the cone sectios are for #6 cap screws, which helped me align the pieces as the glue set up. These will all get a good sanding later on
Speaking of sanding, I took an orbital sander to the PVC to put some tooth on it prior to paint, and also to remove the factory markings like these.
Operascot
Active Member
Quad 2 ctd
As I have mentioned, weight is an issue here. I found out back when I had the whole thing together that the cast muzzle pieces cause the barrels to droop.
So some material had to be removed.
One of the four (the one on the left) has had the modifications done to it. The white block in the middle of it is UHMW to be used as a mounting bracket for the lasers, so I can remove the cast aluminum body of the laser unit.
Not the smoothest use of a Dremel, I'll admit, but it's on the inside (so the audience won't see it. Theatre rat, guilty)
I actually punched through one of the muzzles. It is curing as I'm typing right now.
A friend of mine soldered up the wiring for the lasers, and I installed them. I don't know if it was quality control or what, but I couldn't get a uniform intensity from them. The one lit here was the brightes set, and even this pair is uneven.
After some serious consideration (and much lament), It was decided that there will no longer be lasers shining in the quad laser gun. (But the idea was a fun one) I have some nice (REALLY BRIGHT) LED arrays coming sometime in the near future. (Near is a relative term. Again, glad that the March 1 deadline is no longer in effect)
Another angle, and you can definitely tell it isn't just the aim of the laser, either
Alright, back to the blast chambers
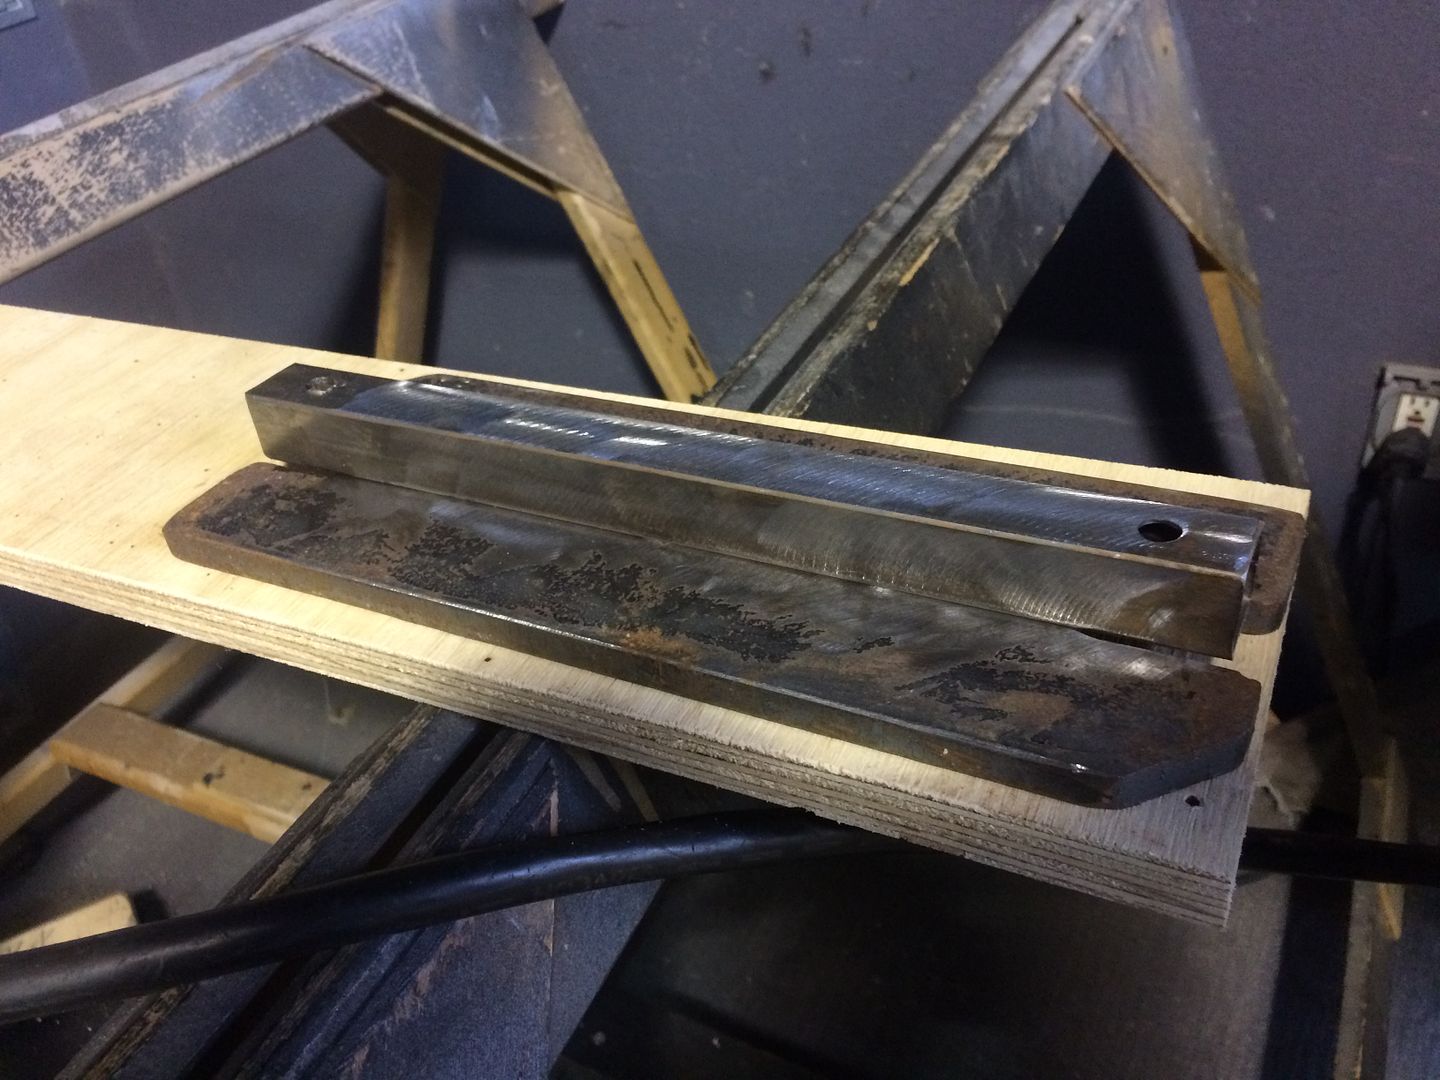
Here is the first one, with hardware installed. 10-24 x 1/2" flat heads, countersunk in and threaded into the 6" tube.

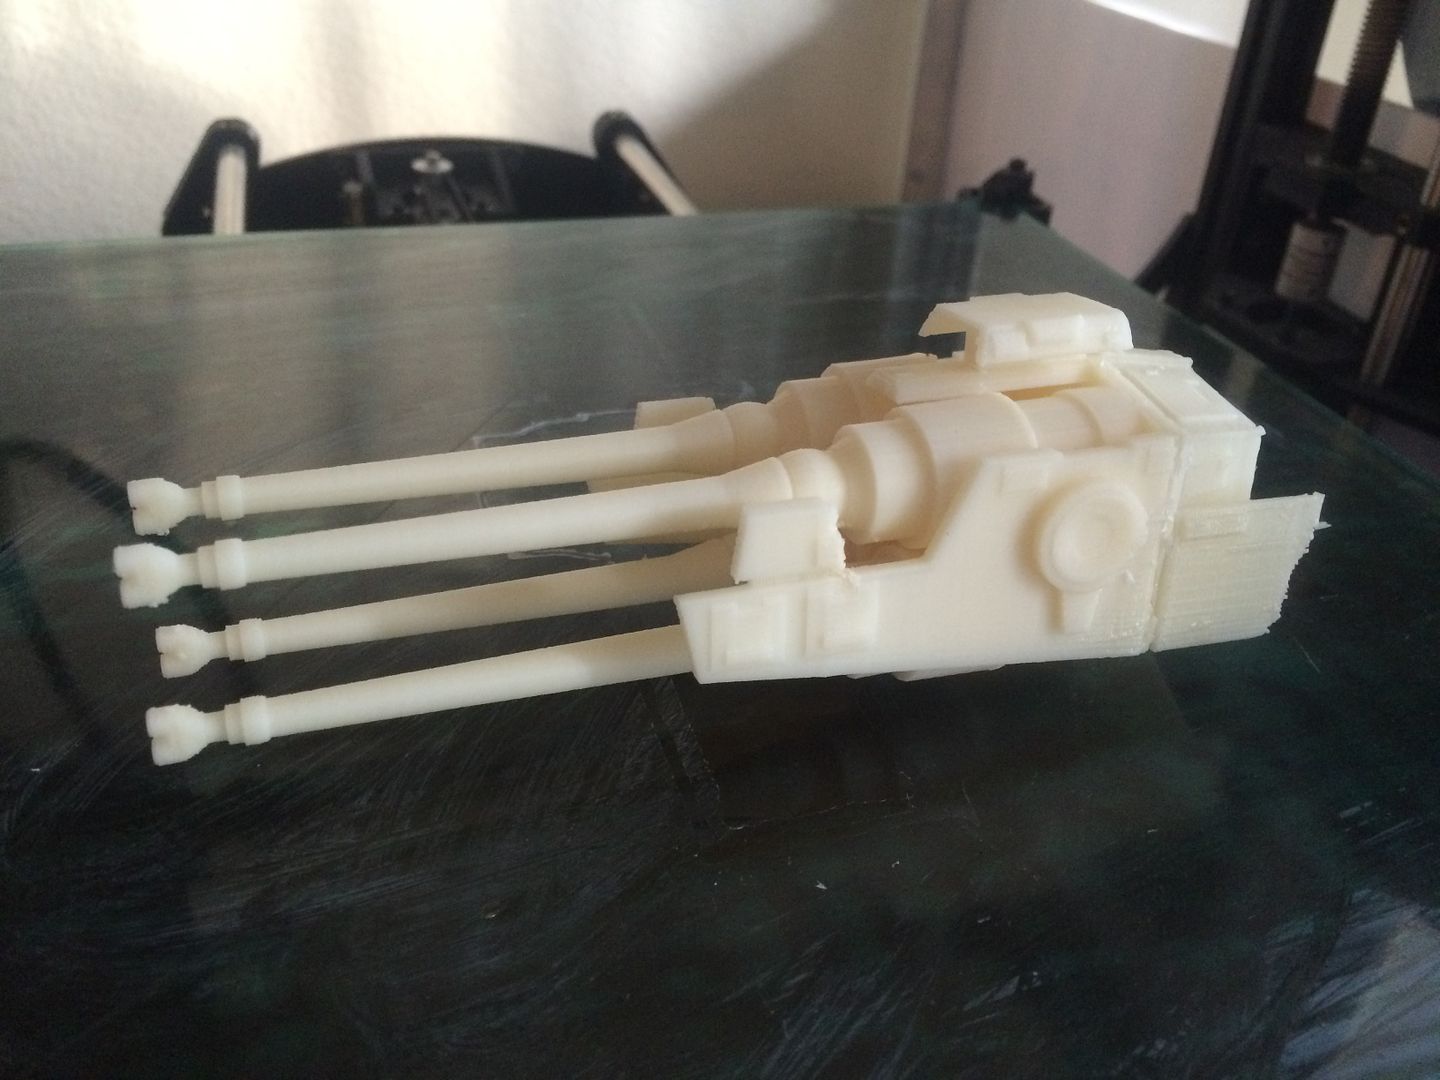
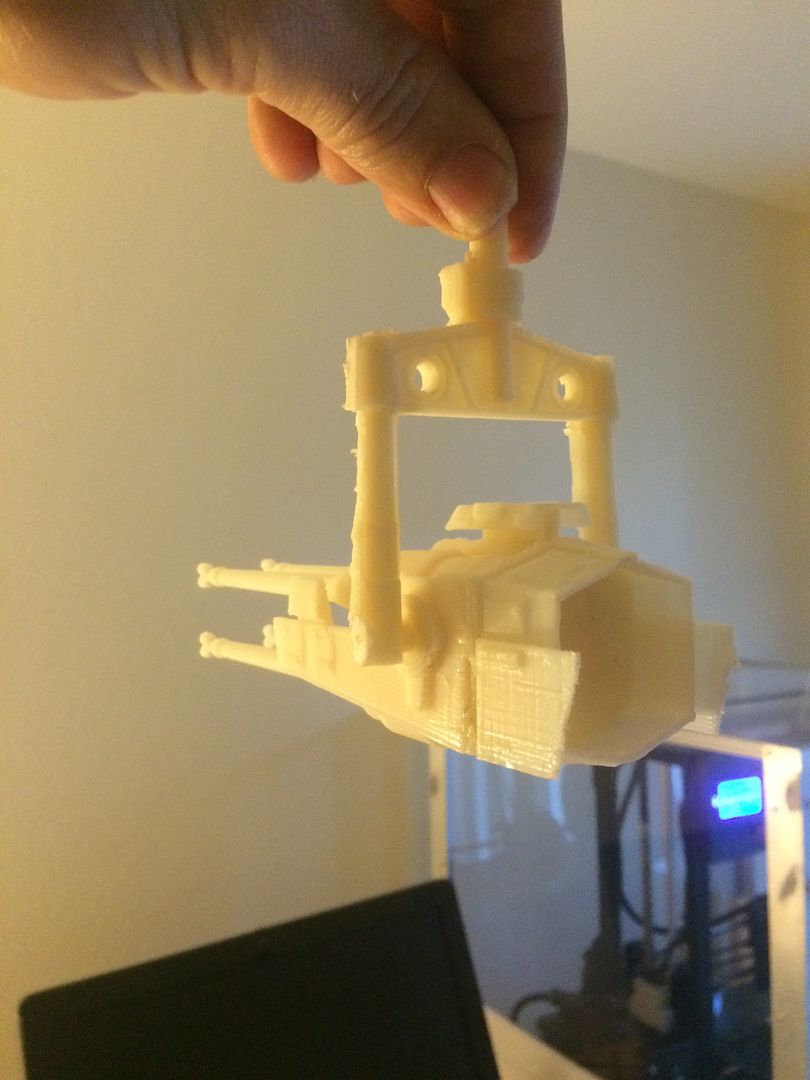
OK, I had to take a break on one of our days off, and print this out. This is fromStarkiller's model,
As I have mentioned, weight is an issue here. I found out back when I had the whole thing together that the cast muzzle pieces cause the barrels to droop.
So some material had to be removed.
One of the four (the one on the left) has had the modifications done to it. The white block in the middle of it is UHMW to be used as a mounting bracket for the lasers, so I can remove the cast aluminum body of the laser unit.
Not the smoothest use of a Dremel, I'll admit, but it's on the inside (so the audience won't see it. Theatre rat, guilty)
I actually punched through one of the muzzles. It is curing as I'm typing right now.
A friend of mine soldered up the wiring for the lasers, and I installed them. I don't know if it was quality control or what, but I couldn't get a uniform intensity from them. The one lit here was the brightes set, and even this pair is uneven.
After some serious consideration (and much lament), It was decided that there will no longer be lasers shining in the quad laser gun. (But the idea was a fun one) I have some nice (REALLY BRIGHT) LED arrays coming sometime in the near future. (Near is a relative term. Again, glad that the March 1 deadline is no longer in effect)
Another angle, and you can definitely tell it isn't just the aim of the laser, either
Alright, back to the blast chambers
Here is the first one, with hardware installed. 10-24 x 1/2" flat heads, countersunk in and threaded into the 6" tube.
OK, I had to take a break on one of our days off, and print this out. This is fromStarkiller's model,
Operascot
Active Member
Quad 2 ctd
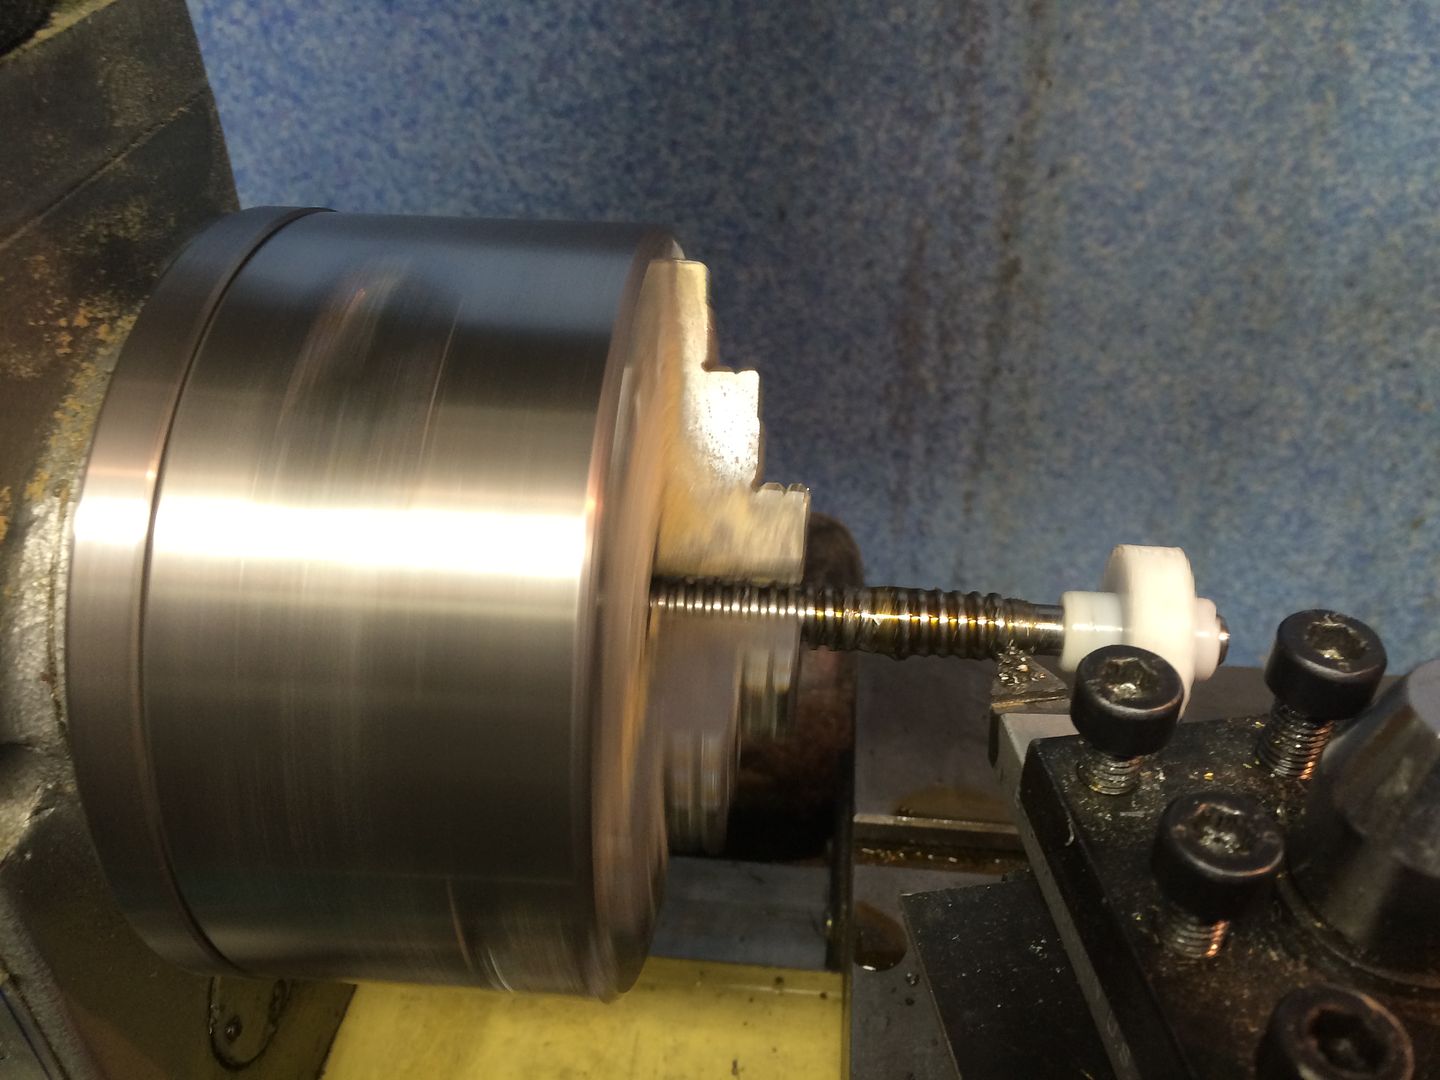
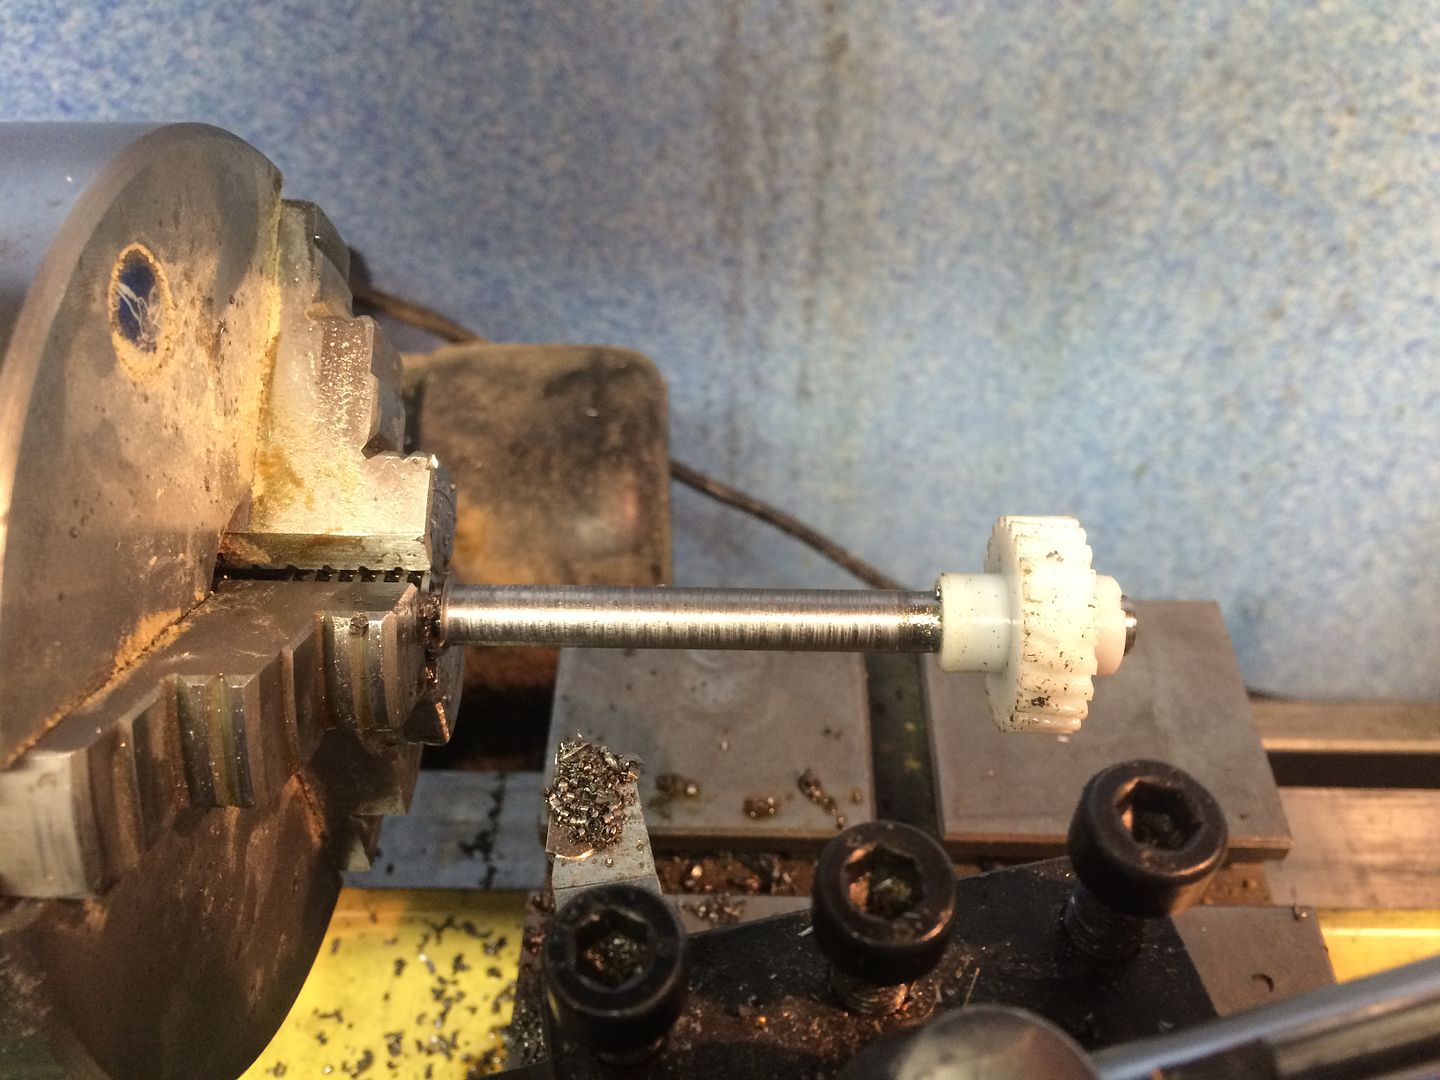
I have been avoiding things I don't really know yet. One of these things has been the actual motor stuff. I had picked up a car seat motor with a 7/16" diameter,non-standard threaded worm gear shaft. It runs at 190 rpm. After much gnashing of teeth, a gear ratio of 20:1 was arrived at for elevation, and a consultation with McGuire Breaing here in Seattle got me to take this in two steps- a 12 tooth spur gear on the motor to a 60 tooth (5:1), which has a 15 tooth on the same shaft going to a 60 tooth on the main gun axle (4:1). Great!
Except-
The 12 tooth can only have a 3/8" bore in it.
Grr.
Cool, right?
Wrong. I overshot. It is now too narrow. I have another one coming sometime next week. Then I get to try again. The kicker is, I can't chuck it up so I can test the gear as I go, because the white plastic gear on the shaft a)won't come off (a good thing in general), and b) won't fit inside the chuck of the lathe.
Heavy sigh
Alright, back to cosmetics
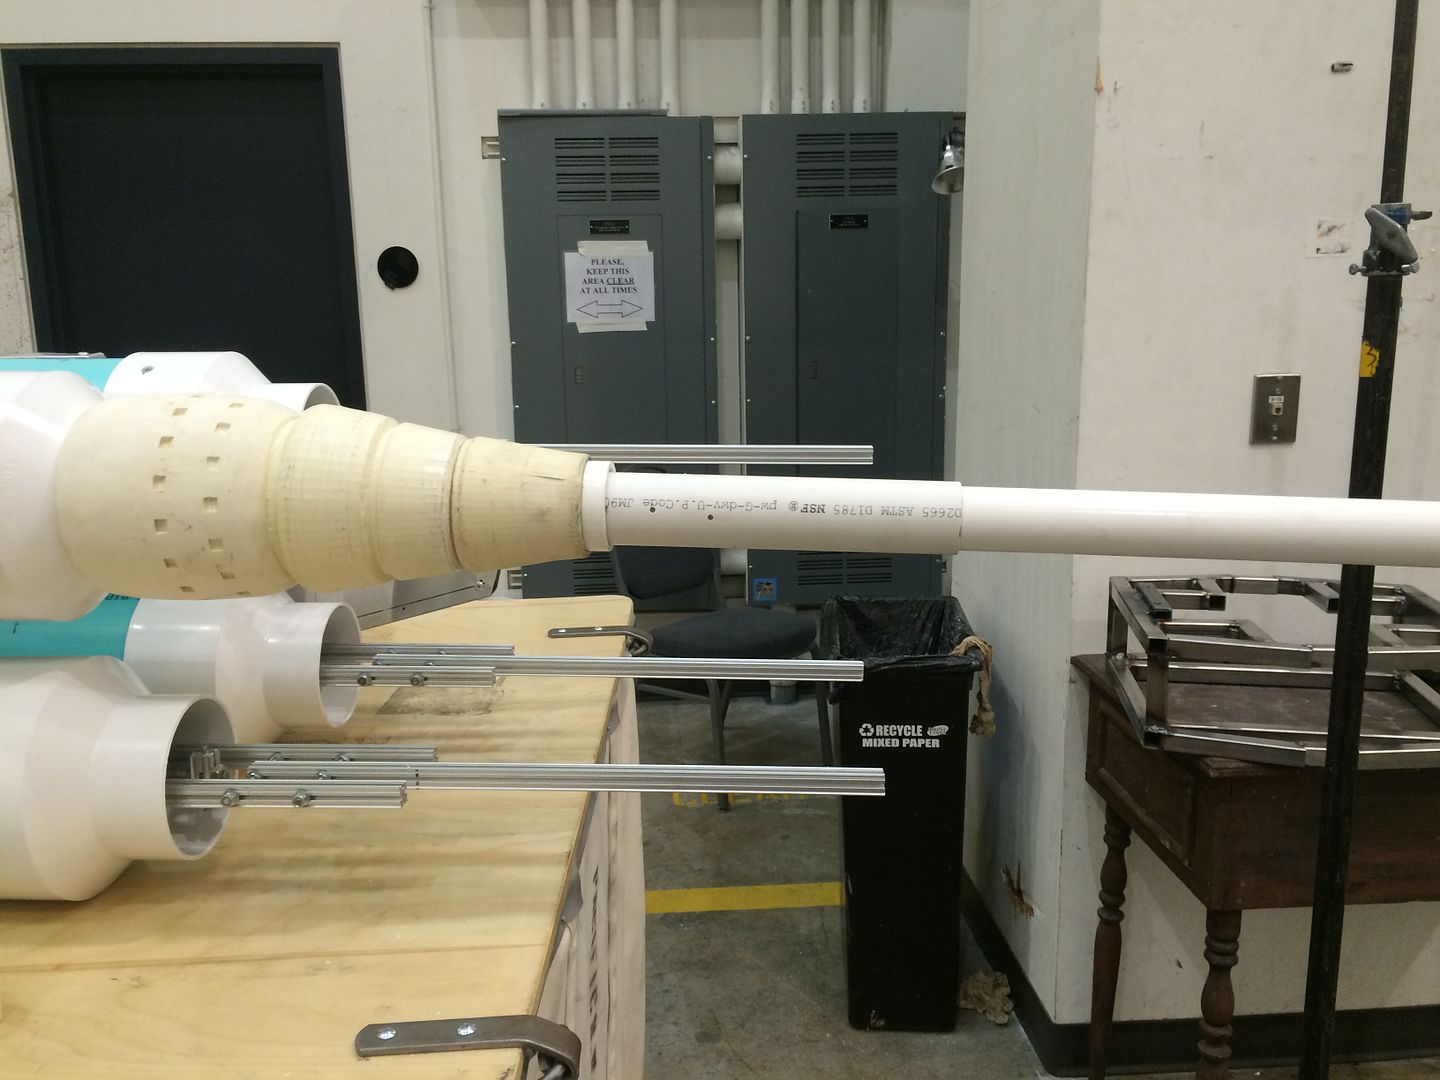
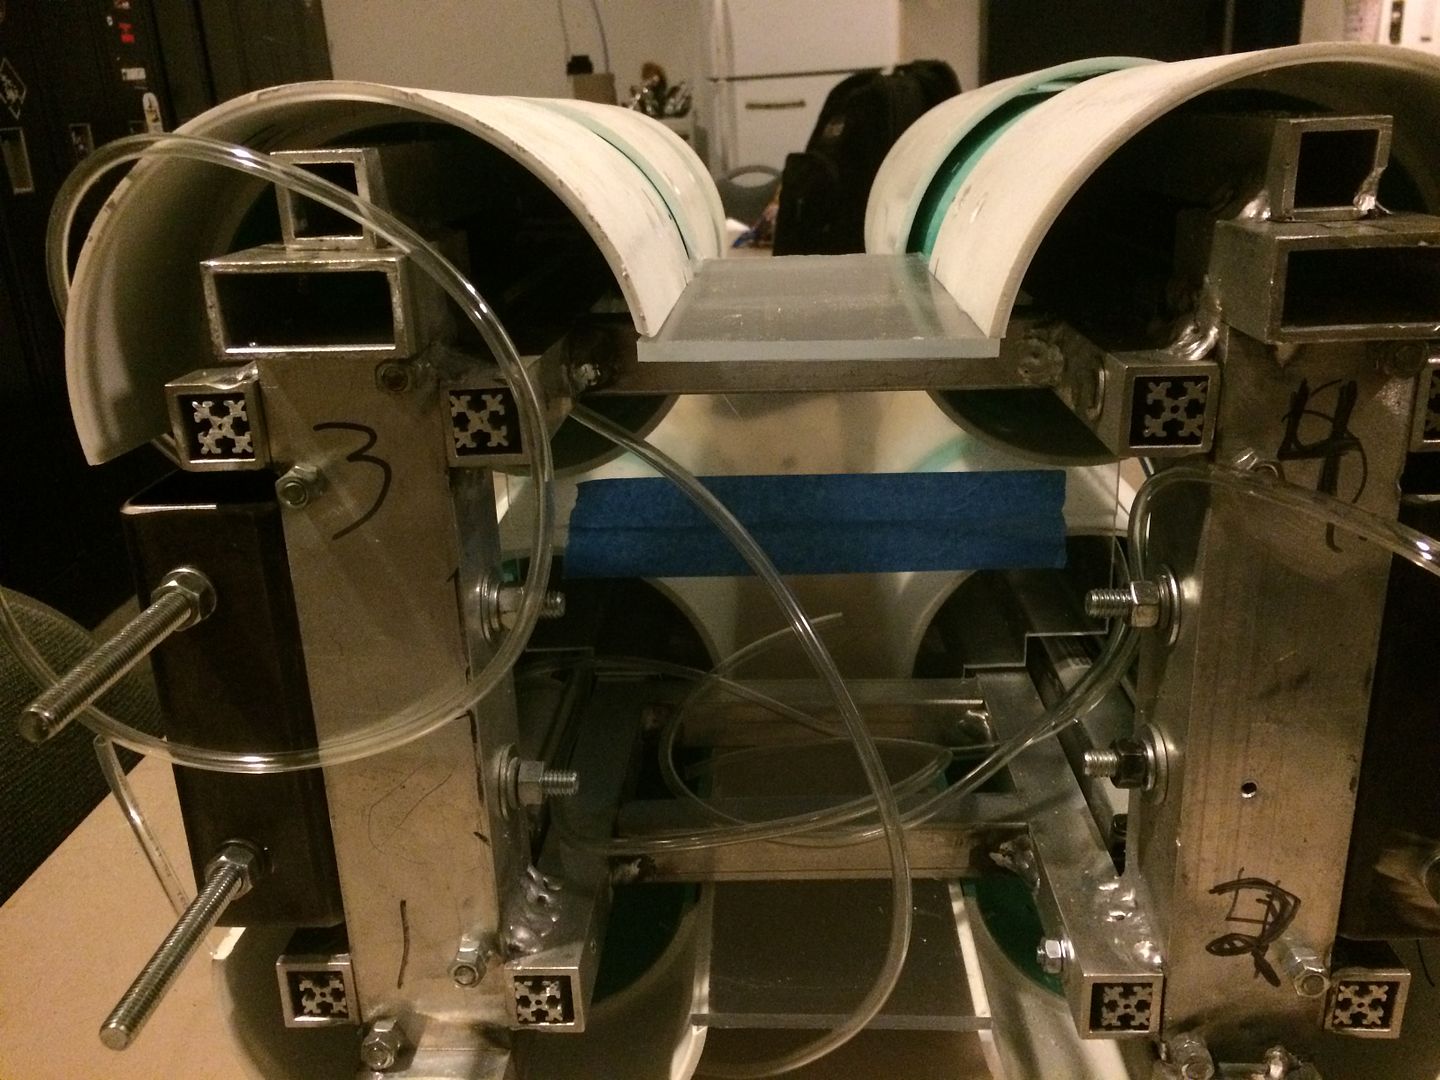
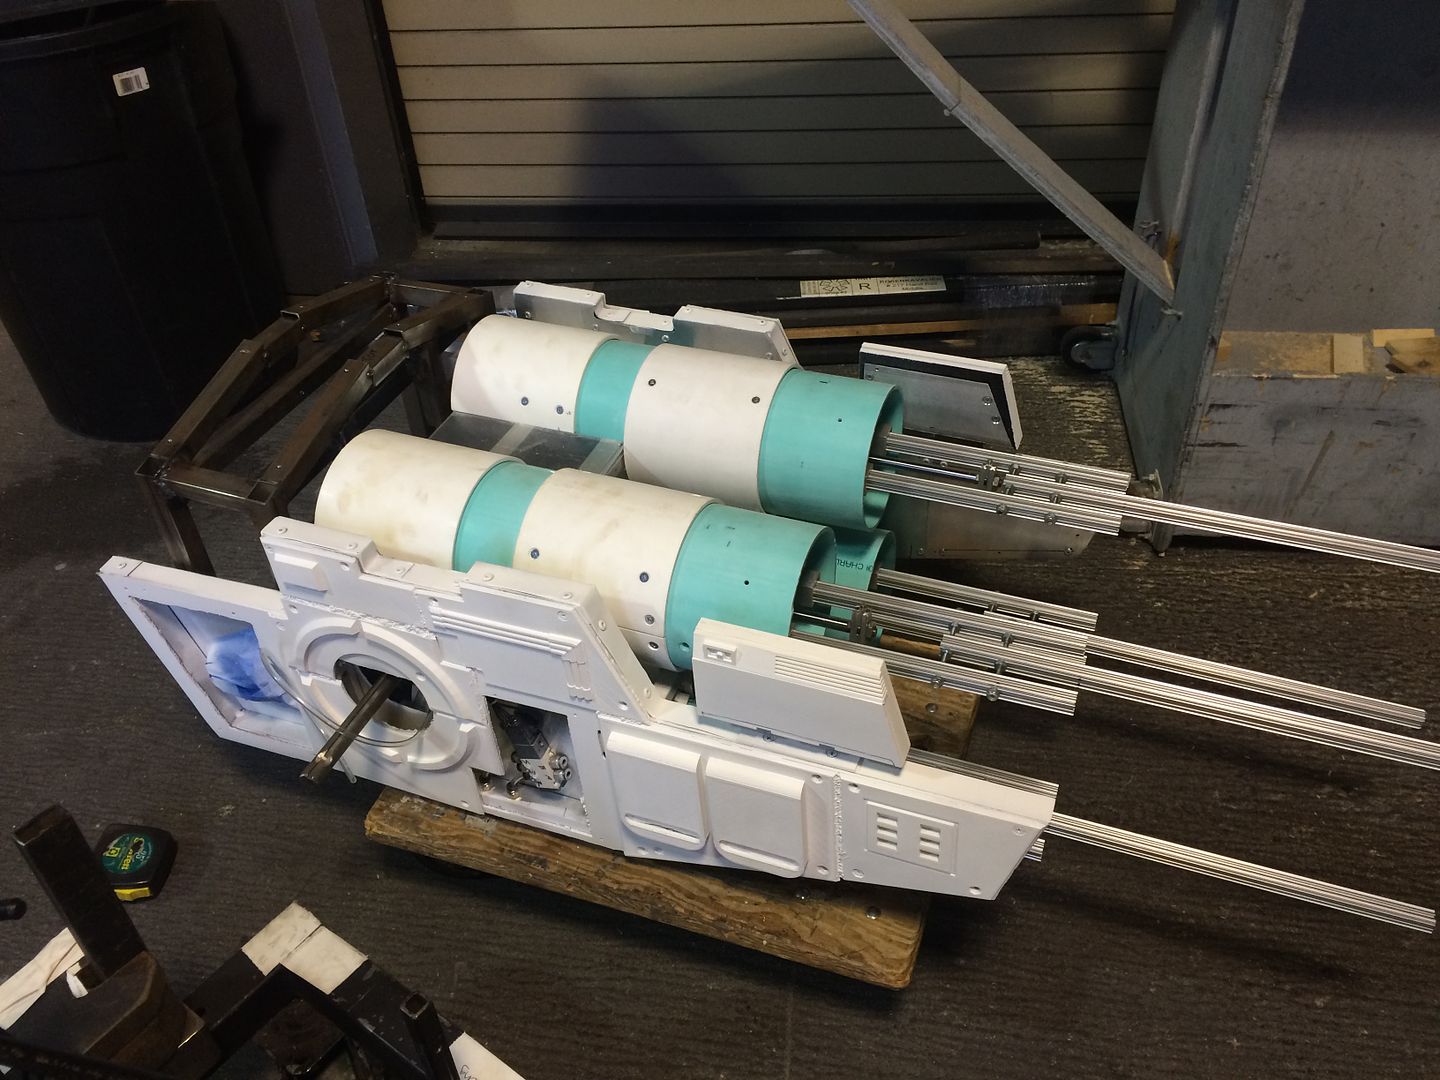
I started building an enclosure for in between the blast chambers so the workings of the gun are hidden. I will find a way to greeblie it up so it doesn't just look like a plexi box, but for now...
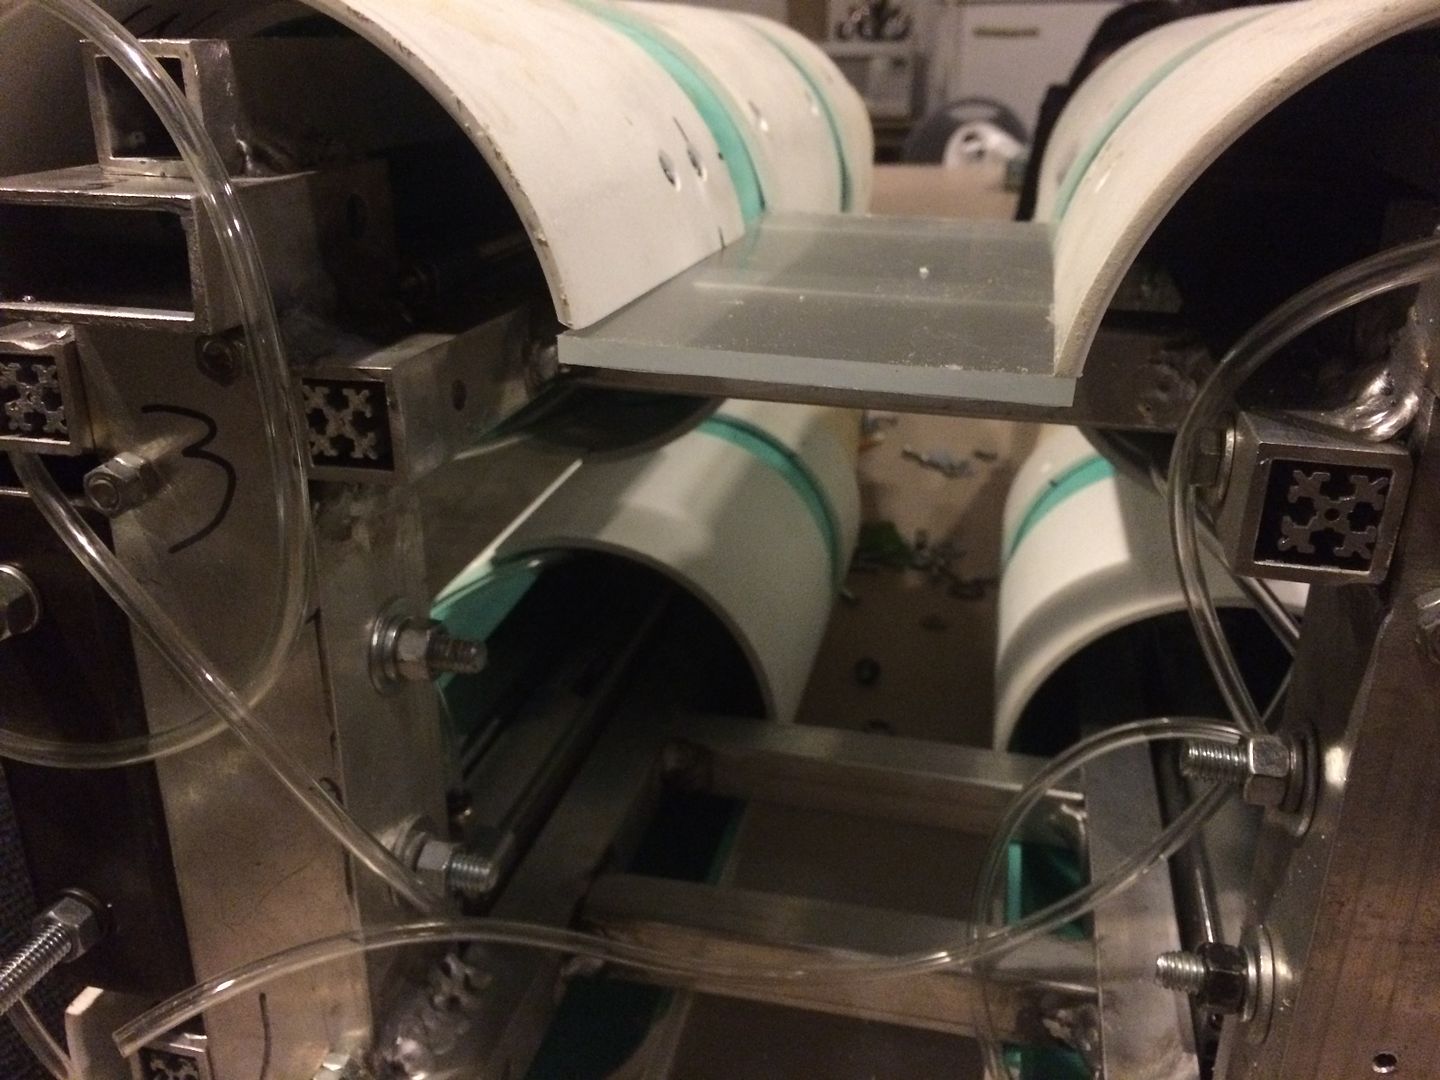
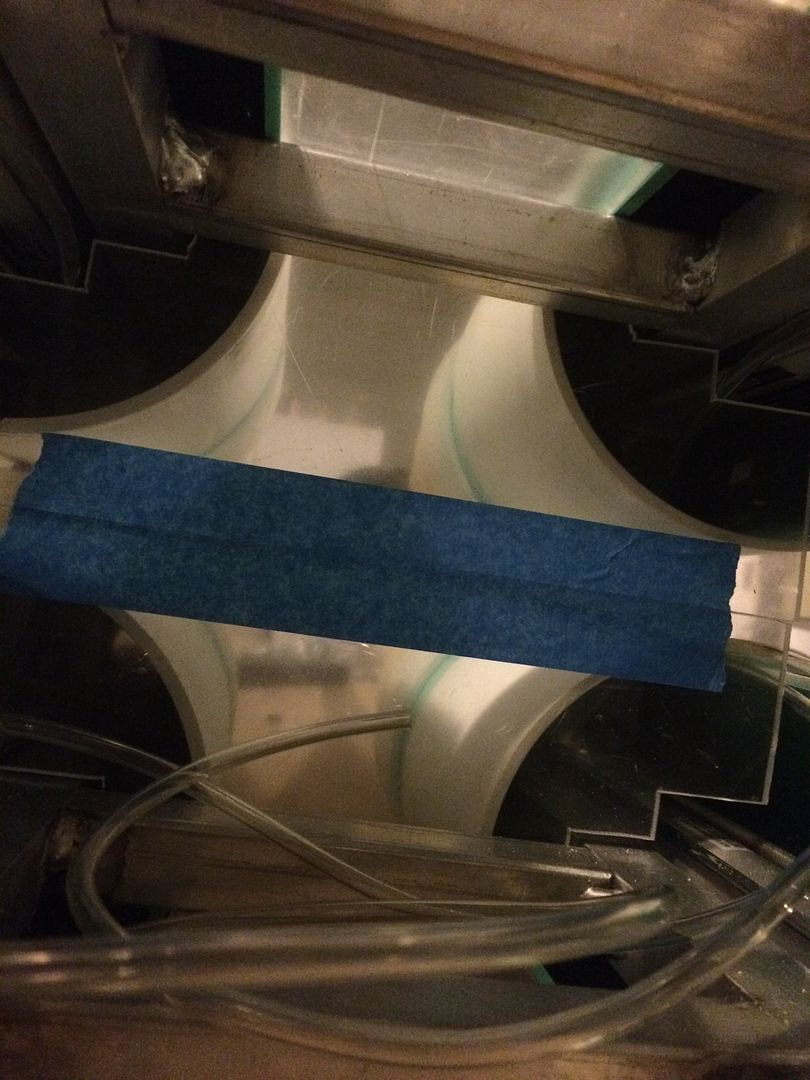
I also changed from the 6:4 PVC reducers in the back to 6" couplers. It makes this look cleaner.
This is the point when the Celebration news came down, just for continuity's sake. This last Wednesday night, instead of working on the quad during down time, messed with a different project. It was frustrating.
But, after a couple of conversations with the folks on the project, we all agreed that the show would go on.
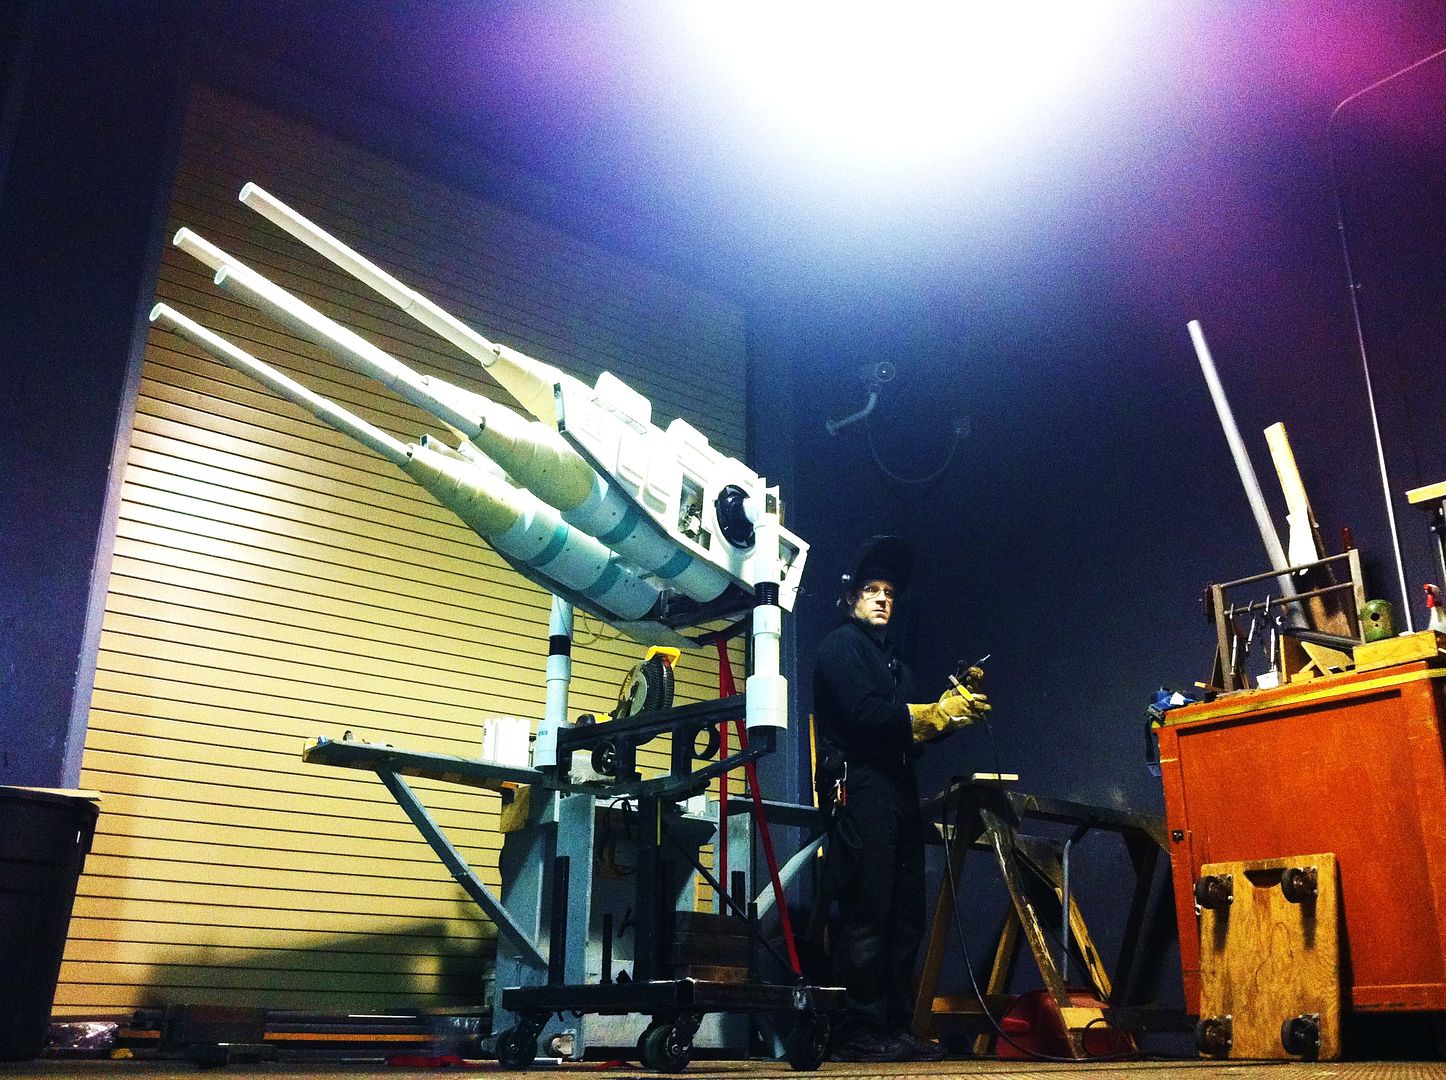
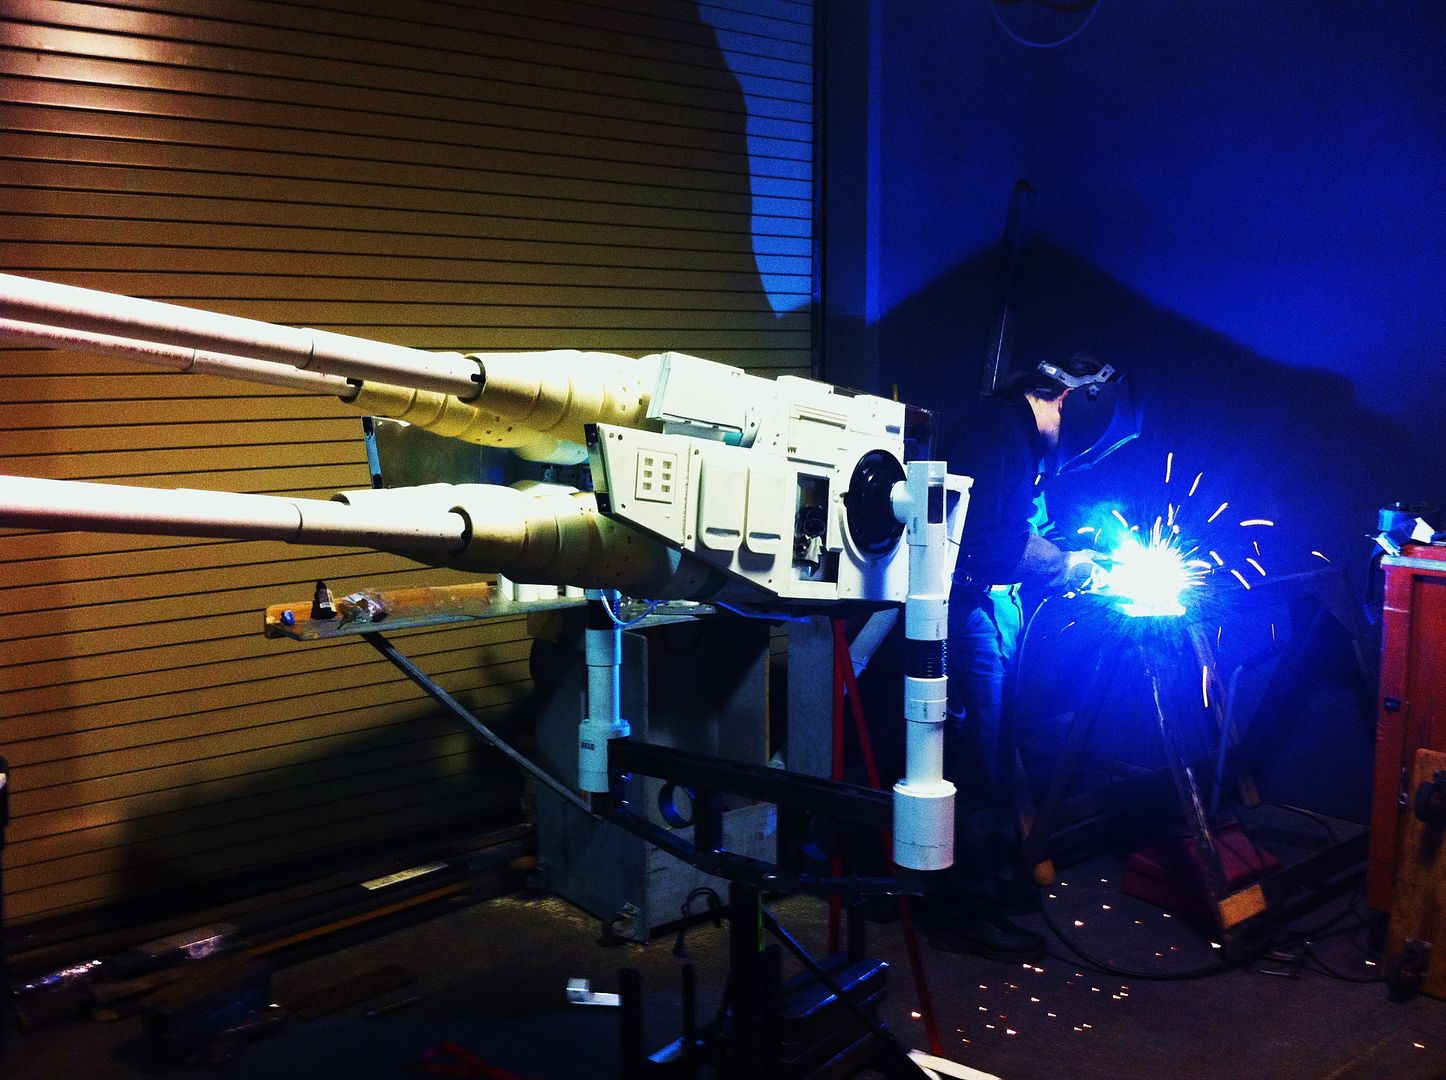
So, yesterday I started tackling the issue of ballast. First thing was to make a cradle for weight. I may have mentioned before I am a stagehand, and on stage we use "bricks" (stageweights ,pigs choose your nomenclature) to counter the weight of flying pieces.
A brick (actually a quarter brick, about 7 1/2 pounds in this case- it varies all over the place)
A 1"x 1" tube about to become a retaining device on the brick
That got welded into the ballast section, to be used later.
In the meantime, reinstall the axle (yes it will have to come out again to install a gearbox, don't remind me)

Attach the ballast section

Side walls
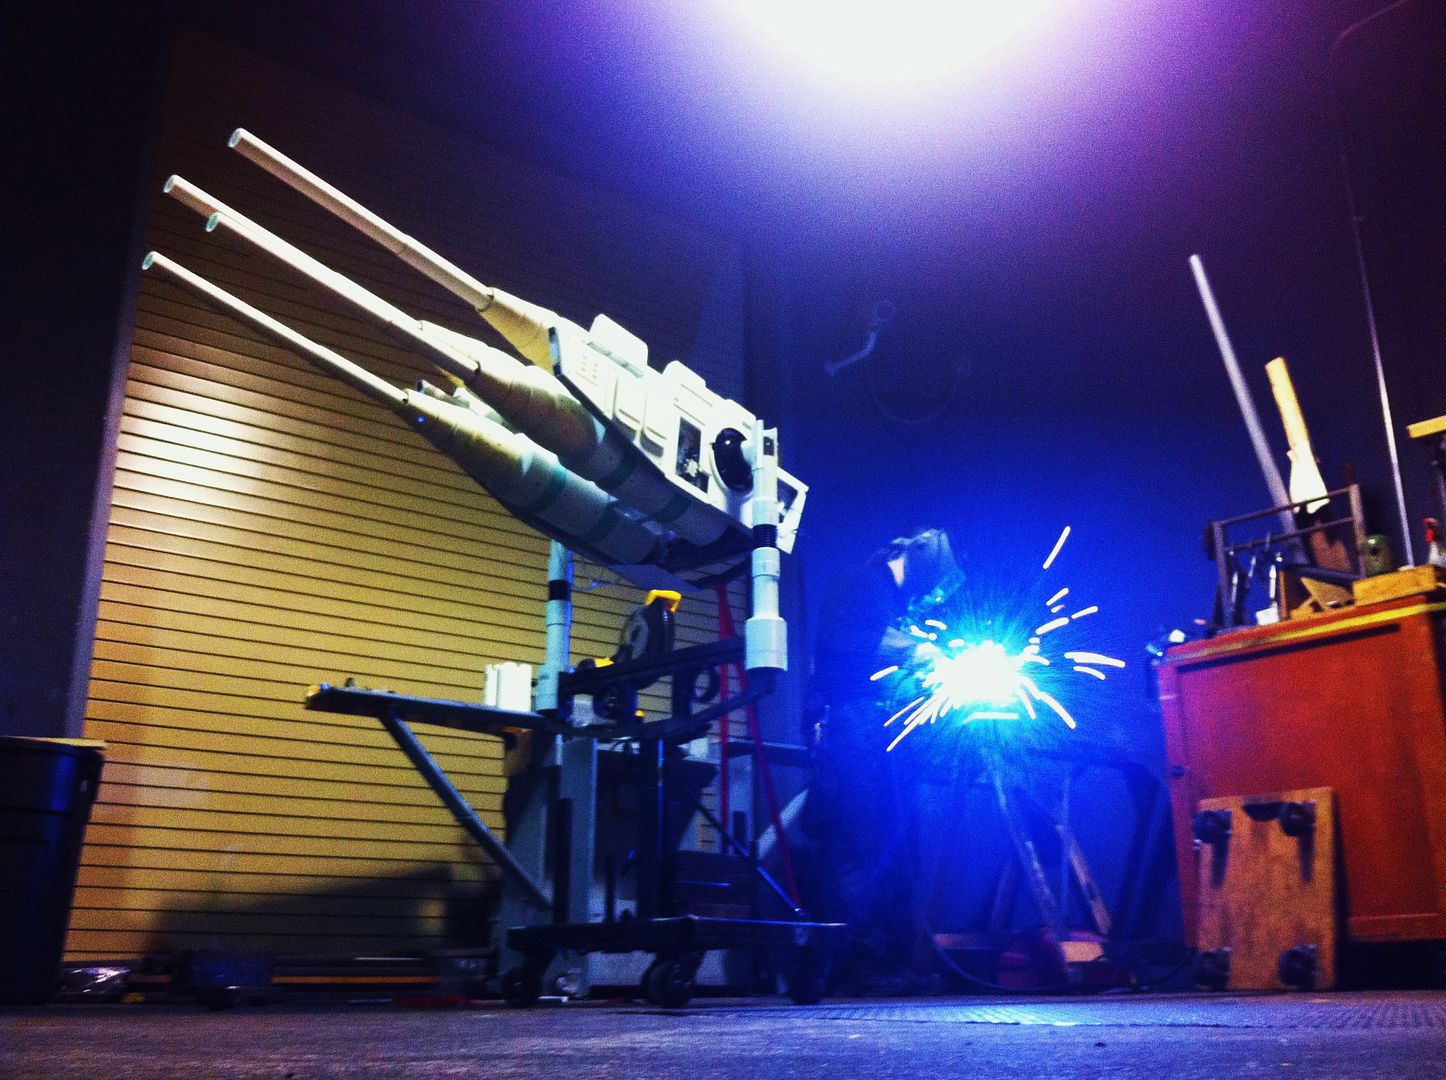
And realize at this point that, your idea to not have to lift as much weight by leaving the barrels and blast chamber cones off won't work, because of this little screw here on all four of the reducers.
Yeah, that one, that's so out of focus and hidden behid the aluminum. It's there.
OK, take off the side walls.
Screw on the barrels. (tiny little screws
Install the cones
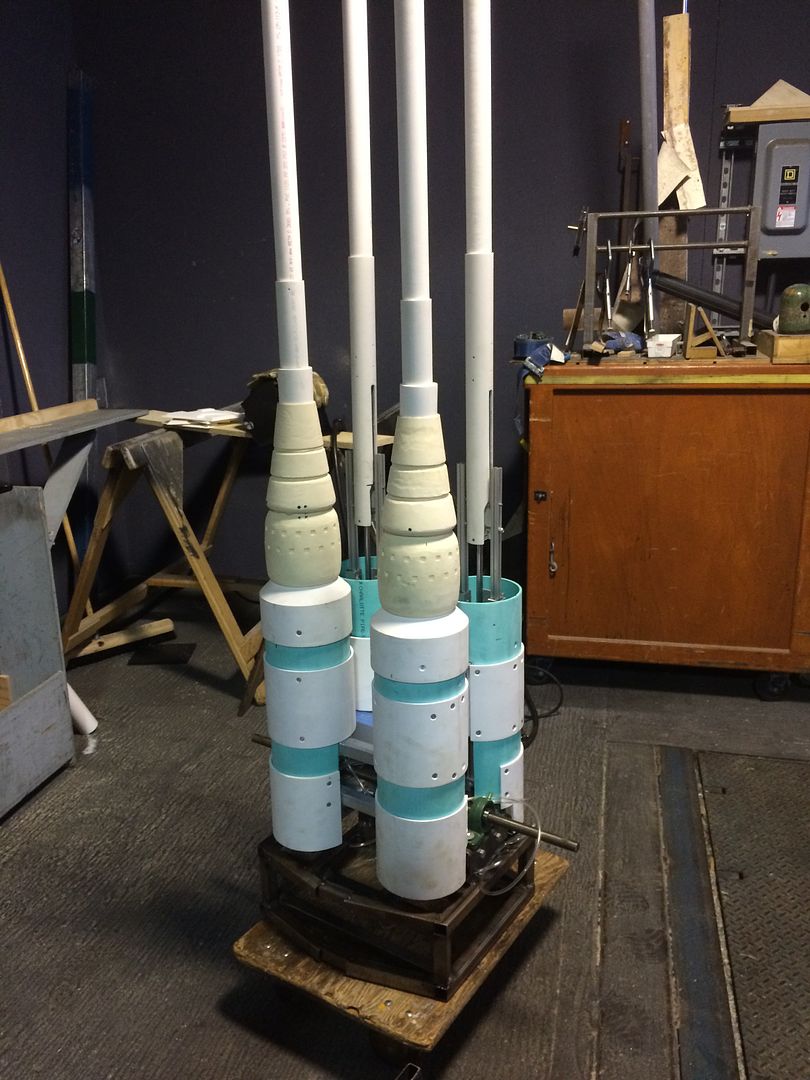
THEN put the side walls on. Put the yoke on (no pictures, sorry)
Get a friend to help you lift, because this thing is now well over 100 pounds and more than a little awkward.
Put on the aft shell
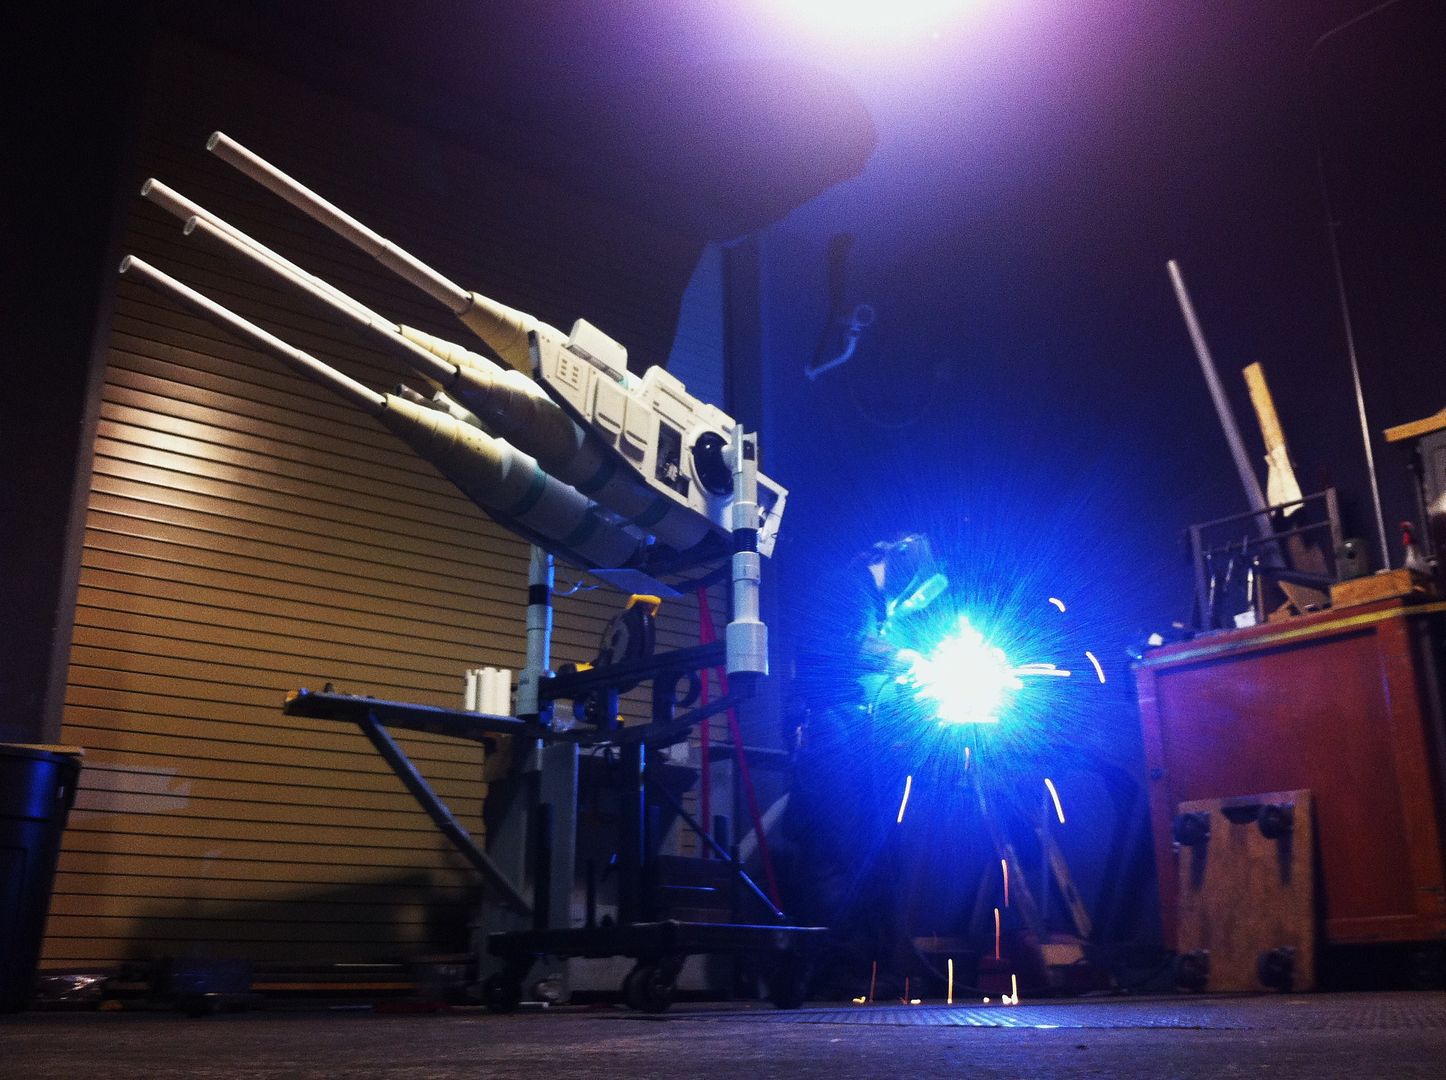
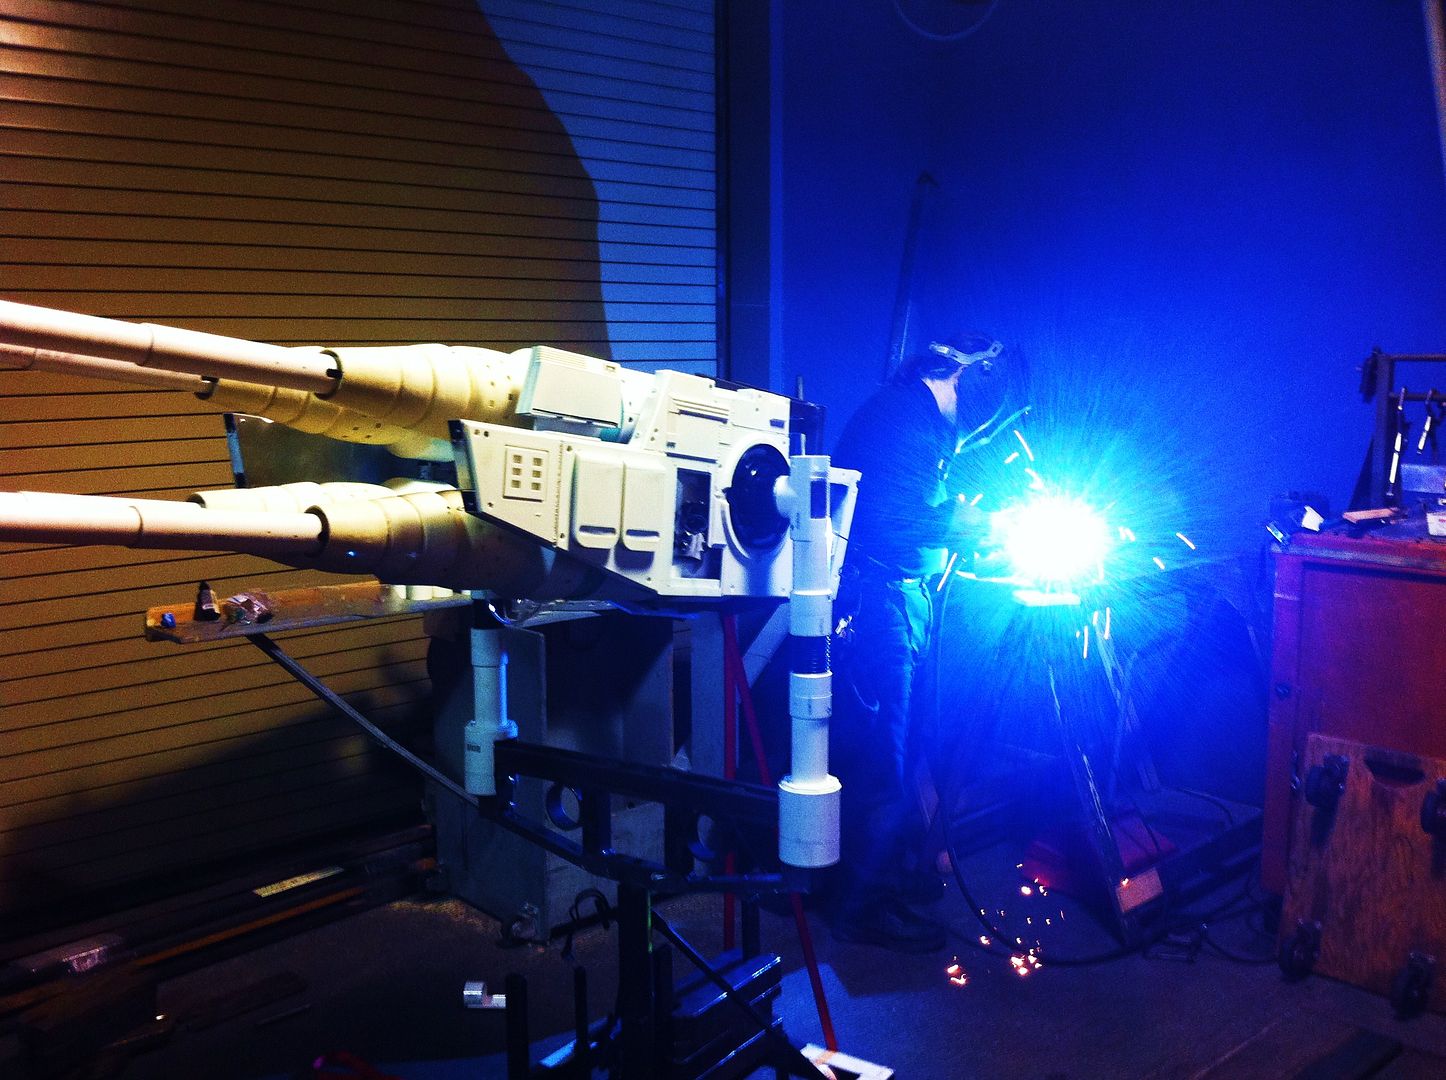
AND....
 .
.
At this point, only the side walls have any primer on them. The HIDs (the lights) kind of wash the rest out, so it doesn't look too bad, all things considered.
This is what the ballast section inside looks like, without the shell on
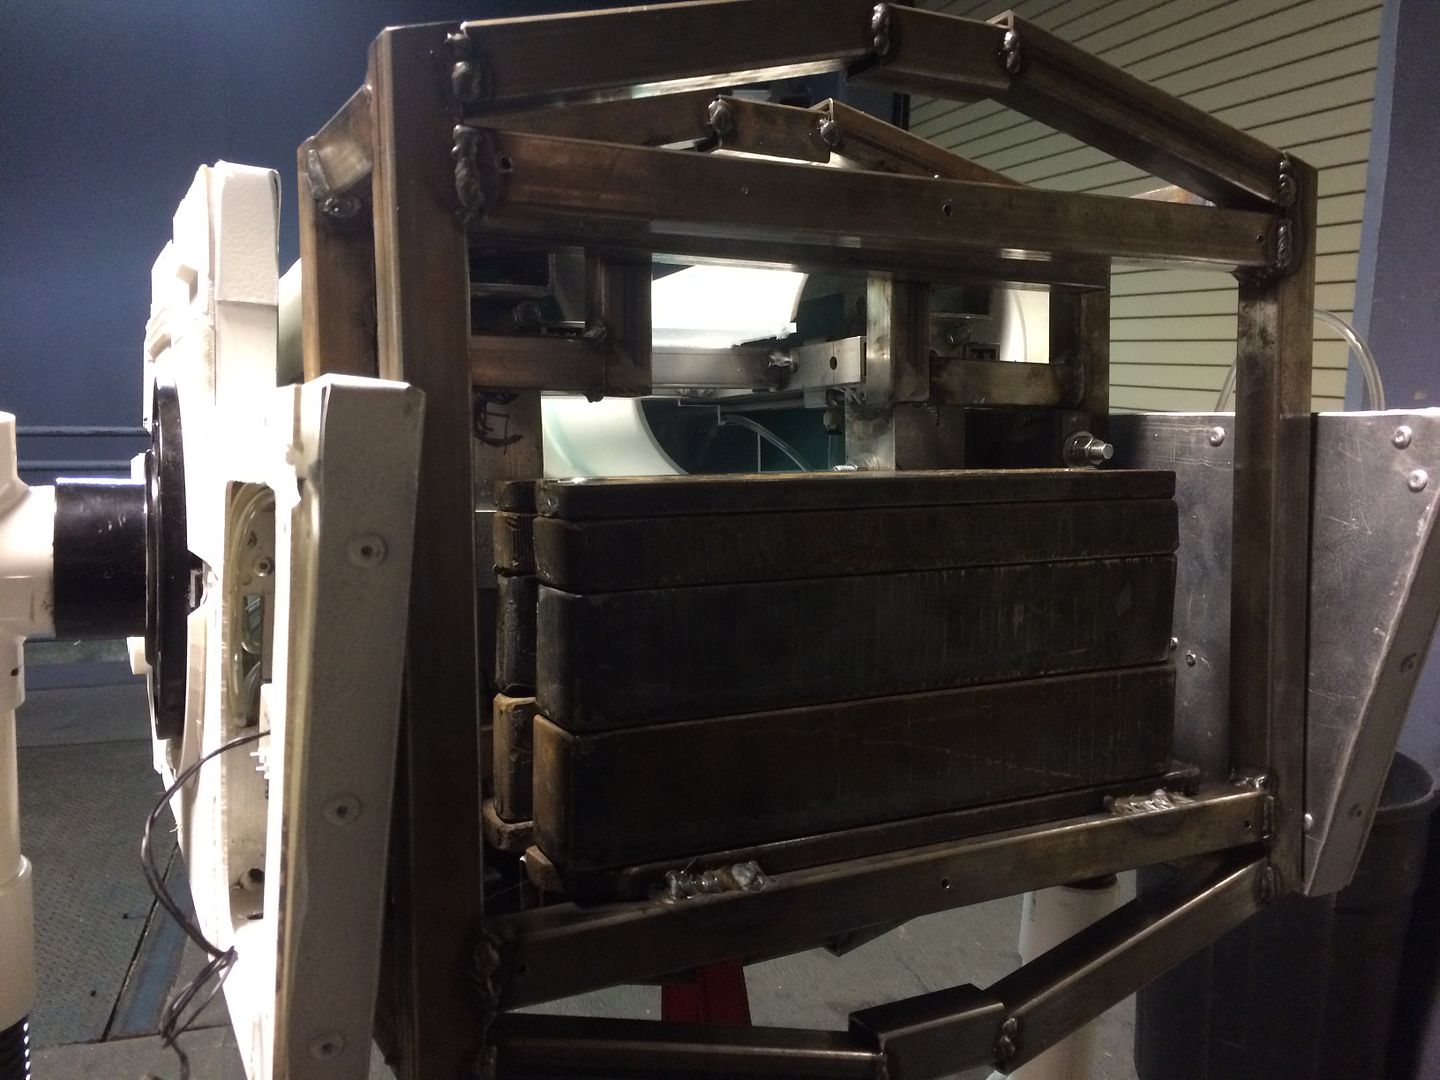
The bottom wafer is welded in. The 2" bricks are 30 lbs each. Figure 90lbs of counterweigh, not including the frame (all steel) or the shell, and whatever else ends up getting added.
I have been avoiding things I don't really know yet. One of these things has been the actual motor stuff. I had picked up a car seat motor with a 7/16" diameter,non-standard threaded worm gear shaft. It runs at 190 rpm. After much gnashing of teeth, a gear ratio of 20:1 was arrived at for elevation, and a consultation with McGuire Breaing here in Seattle got me to take this in two steps- a 12 tooth spur gear on the motor to a 60 tooth (5:1), which has a 15 tooth on the same shaft going to a 60 tooth on the main gun axle (4:1). Great!
Except-
The 12 tooth can only have a 3/8" bore in it.
Grr.
Cool, right?
Wrong. I overshot. It is now too narrow. I have another one coming sometime next week. Then I get to try again. The kicker is, I can't chuck it up so I can test the gear as I go, because the white plastic gear on the shaft a)won't come off (a good thing in general), and b) won't fit inside the chuck of the lathe.
Heavy sigh
Alright, back to cosmetics
I started building an enclosure for in between the blast chambers so the workings of the gun are hidden. I will find a way to greeblie it up so it doesn't just look like a plexi box, but for now...
I also changed from the 6:4 PVC reducers in the back to 6" couplers. It makes this look cleaner.
This is the point when the Celebration news came down, just for continuity's sake. This last Wednesday night, instead of working on the quad during down time, messed with a different project. It was frustrating.
But, after a couple of conversations with the folks on the project, we all agreed that the show would go on.
So, yesterday I started tackling the issue of ballast. First thing was to make a cradle for weight. I may have mentioned before I am a stagehand, and on stage we use "bricks" (stageweights ,pigs choose your nomenclature) to counter the weight of flying pieces.
A brick (actually a quarter brick, about 7 1/2 pounds in this case- it varies all over the place)
A 1"x 1" tube about to become a retaining device on the brick
That got welded into the ballast section, to be used later.
In the meantime, reinstall the axle (yes it will have to come out again to install a gearbox, don't remind me)
Attach the ballast section
Side walls
And realize at this point that, your idea to not have to lift as much weight by leaving the barrels and blast chamber cones off won't work, because of this little screw here on all four of the reducers.
Yeah, that one, that's so out of focus and hidden behid the aluminum. It's there.
OK, take off the side walls.
Screw on the barrels. (tiny little screws
Install the cones
THEN put the side walls on. Put the yoke on (no pictures, sorry)
Get a friend to help you lift, because this thing is now well over 100 pounds and more than a little awkward.
Put on the aft shell
AND....
At this point, only the side walls have any primer on them. The HIDs (the lights) kind of wash the rest out, so it doesn't look too bad, all things considered.
This is what the ballast section inside looks like, without the shell on
The bottom wafer is welded in. The 2" bricks are 30 lbs each. Figure 90lbs of counterweigh, not including the frame (all steel) or the shell, and whatever else ends up getting added.
Amazing DJ
Well-Known Member
This is looking really good. [emoji106]
Love it, Operascot! That quad is a beauty.
Operascot
Active Member
If only I could figure out how to put the video I recorded of it as I worked out its balance. It's in my photobucket, but I can't figure out how to put it here. To cross genres here, I'm a carpenter, not an IT guy
Thanks for the good words, folks. I'll keep working on it.
Thanks for the good words, folks. I'll keep working on it.
Operascot
Active Member
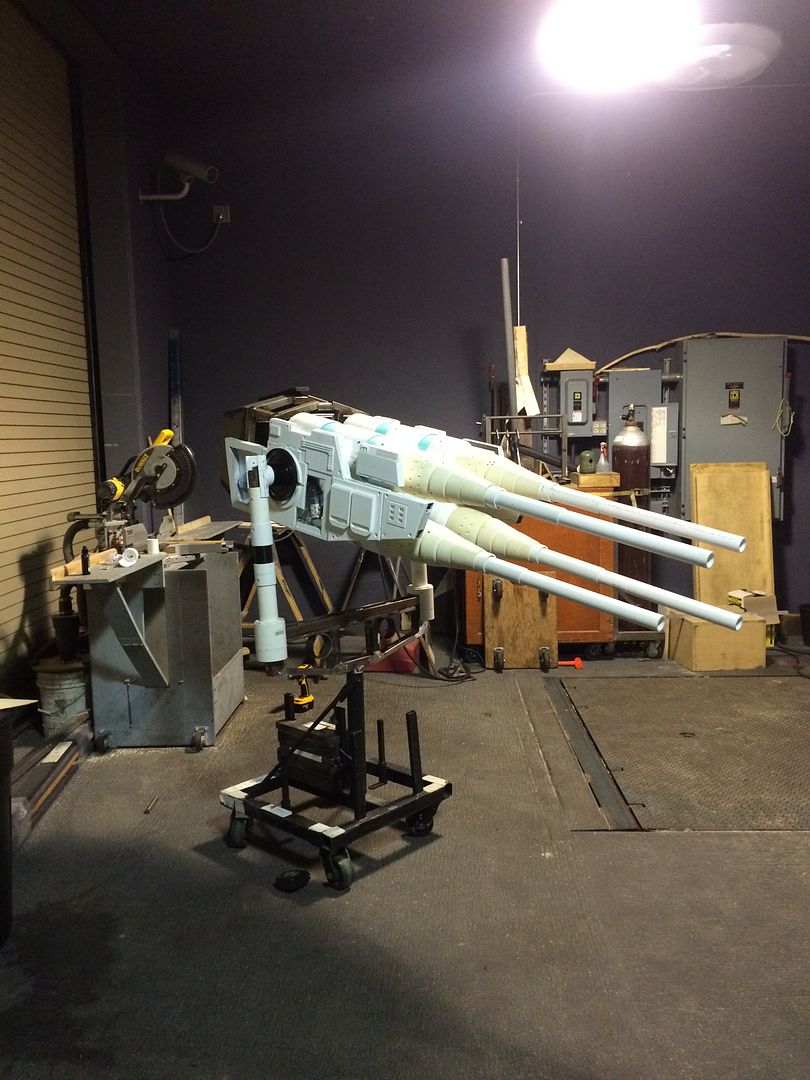
Man! That's an intense update Opera!! Then seeing the whole thing on its frame - new memes please!!!
Thanks, Wavey,
And that's not even remotely what the base will look like, ultimately. (he says with fingers crossed) That's a stand in. (sorry, unintentional) The yoke is the real one, just naked still. It needs the power, air, and control signal run through it out to the body, still.
I may got a couple more shots of it tonight, with the muzzles on the barrels, and a temprary greeblie setup in the back, but we load out tomorrow, so the bulk of the workspace is packed up. The good news, we move back on stage in about 2 weeks.
Last edited:
Operascot
Active Member
Me again
I have a temporary skin on the ballast box. I say temporary, because it dawned on me that I could take some 3/16" plate steel instead of the 3/16" plexi, and that would cu down on the number of bricks I need. I also want to reorient the ballast so it it more evenly placed vertically relative to the axle, but that will have to wait.
Anyway, I have the skin on there, and am trying out the greeblie box that could actually be a junction box if needed later on.
There is a Din rail onside that box, but it is on the "down" surface, so it might not work for me. Who knows? The wiring path is still somewhat of a mystery at this point. It is nice to have options.
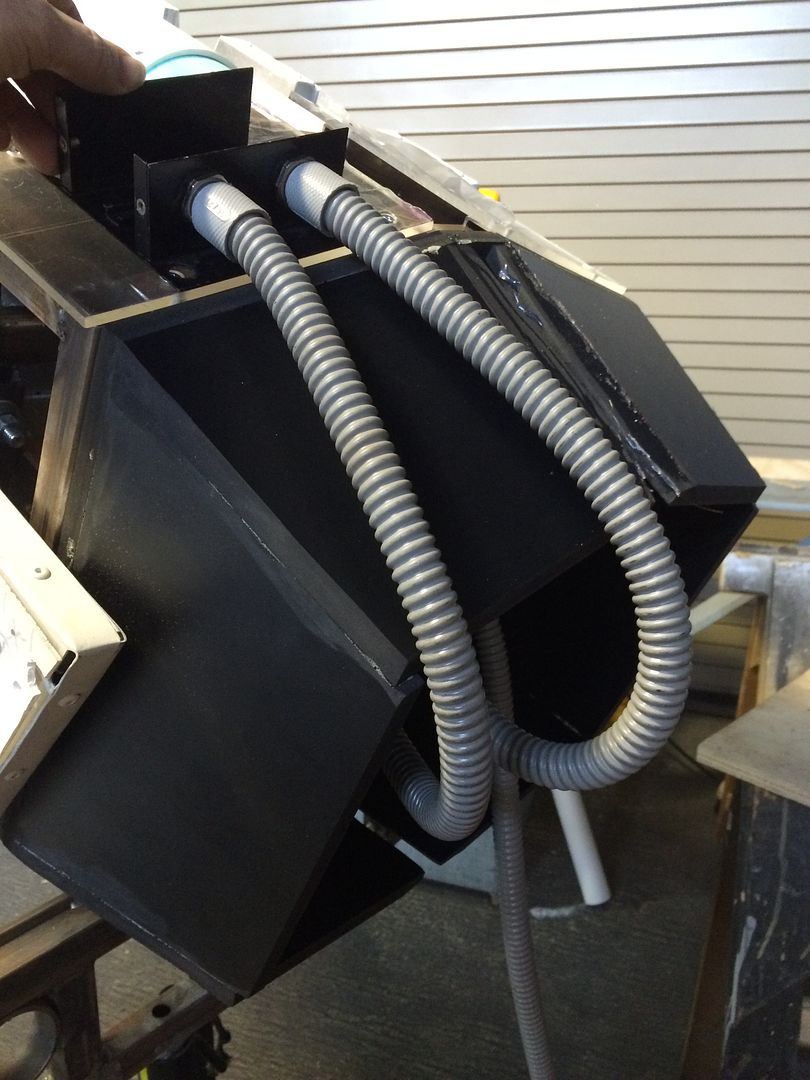
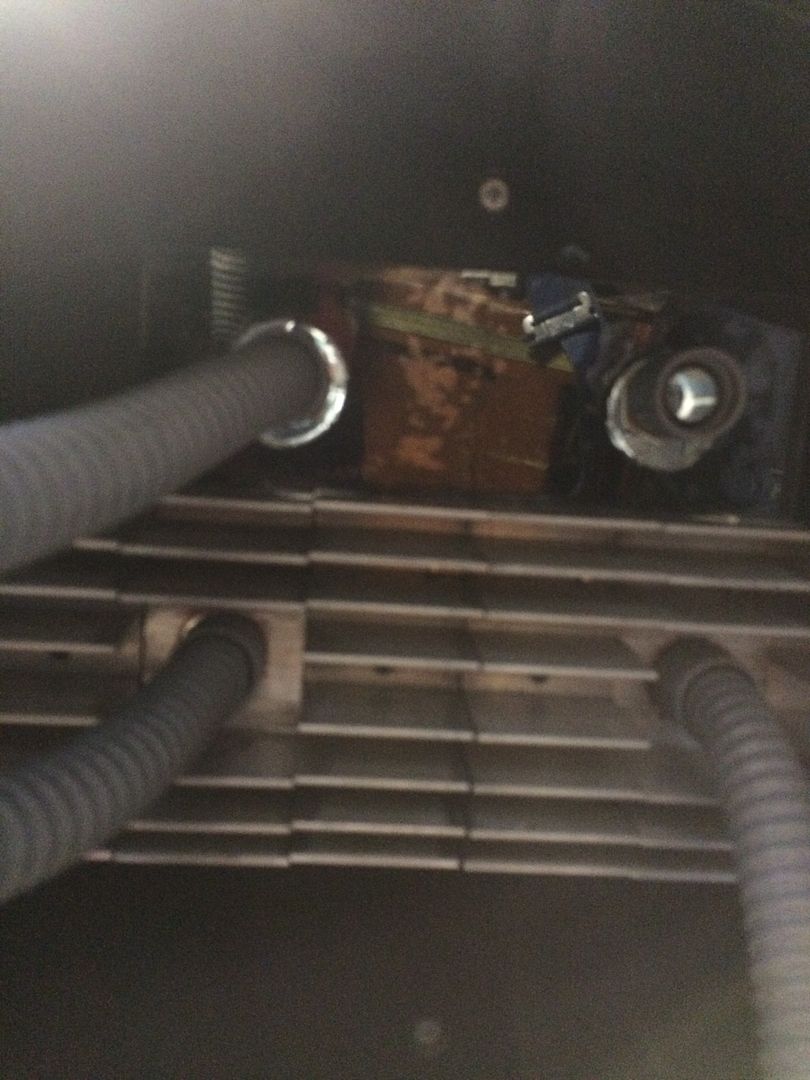
This is looking inside the aft shell. The heat sinks and cable hoses are recovered parts from some retired and dismantled lighting units. The shiny backing for the two top conduits is plexi, which will get some sort of printed greeblie in the future.
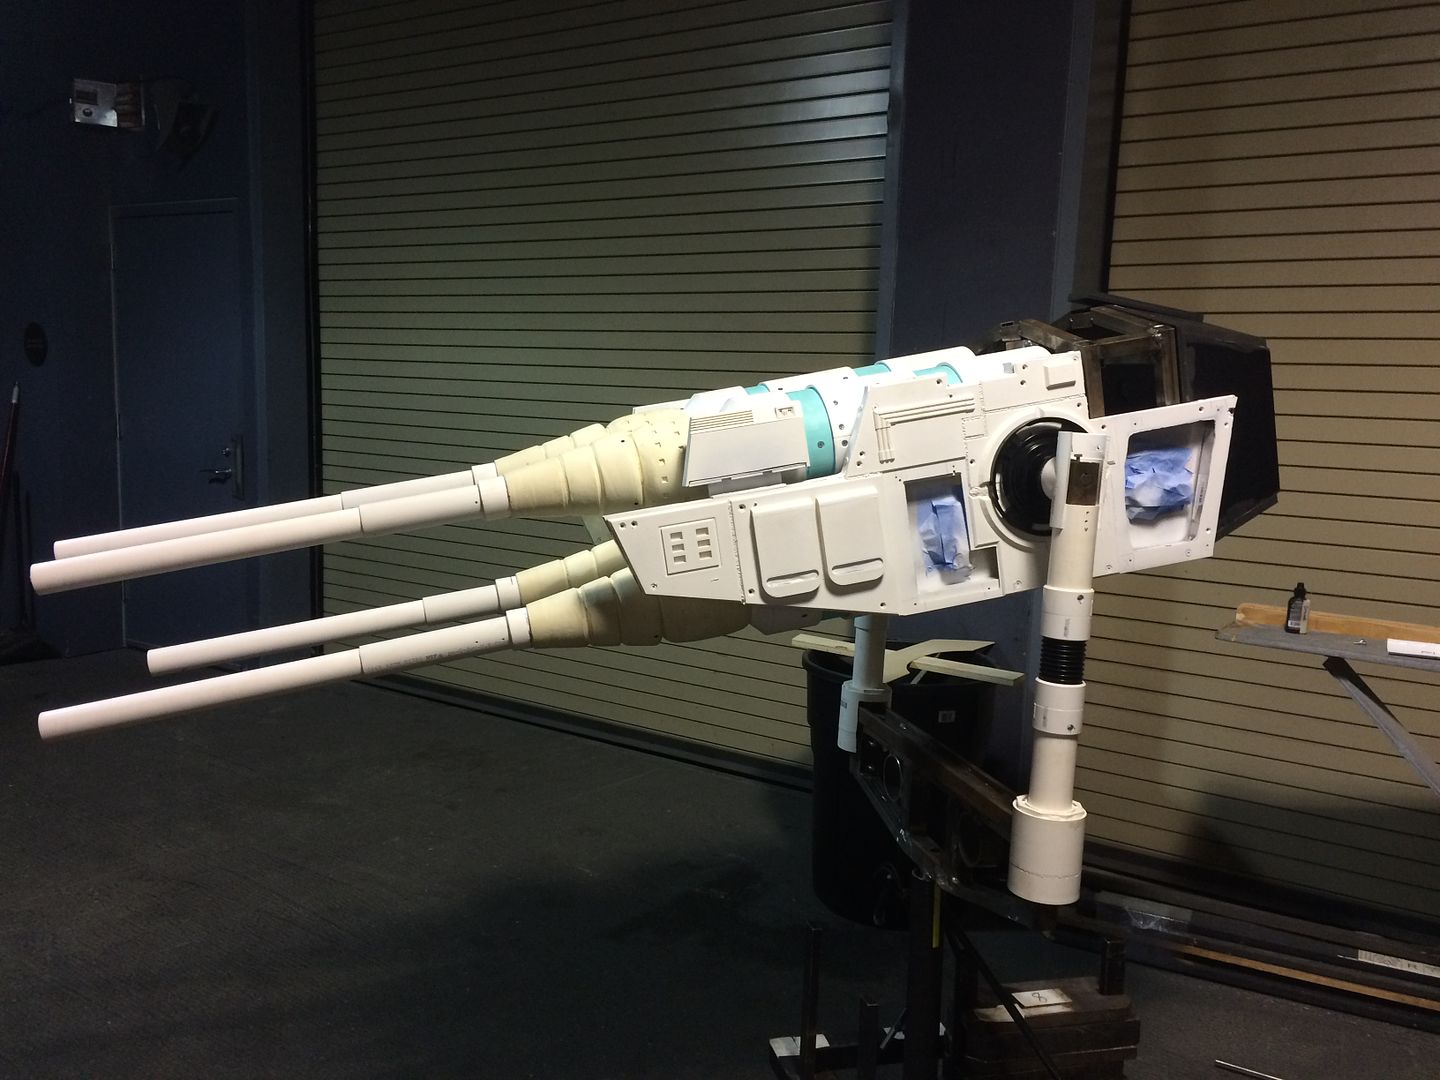
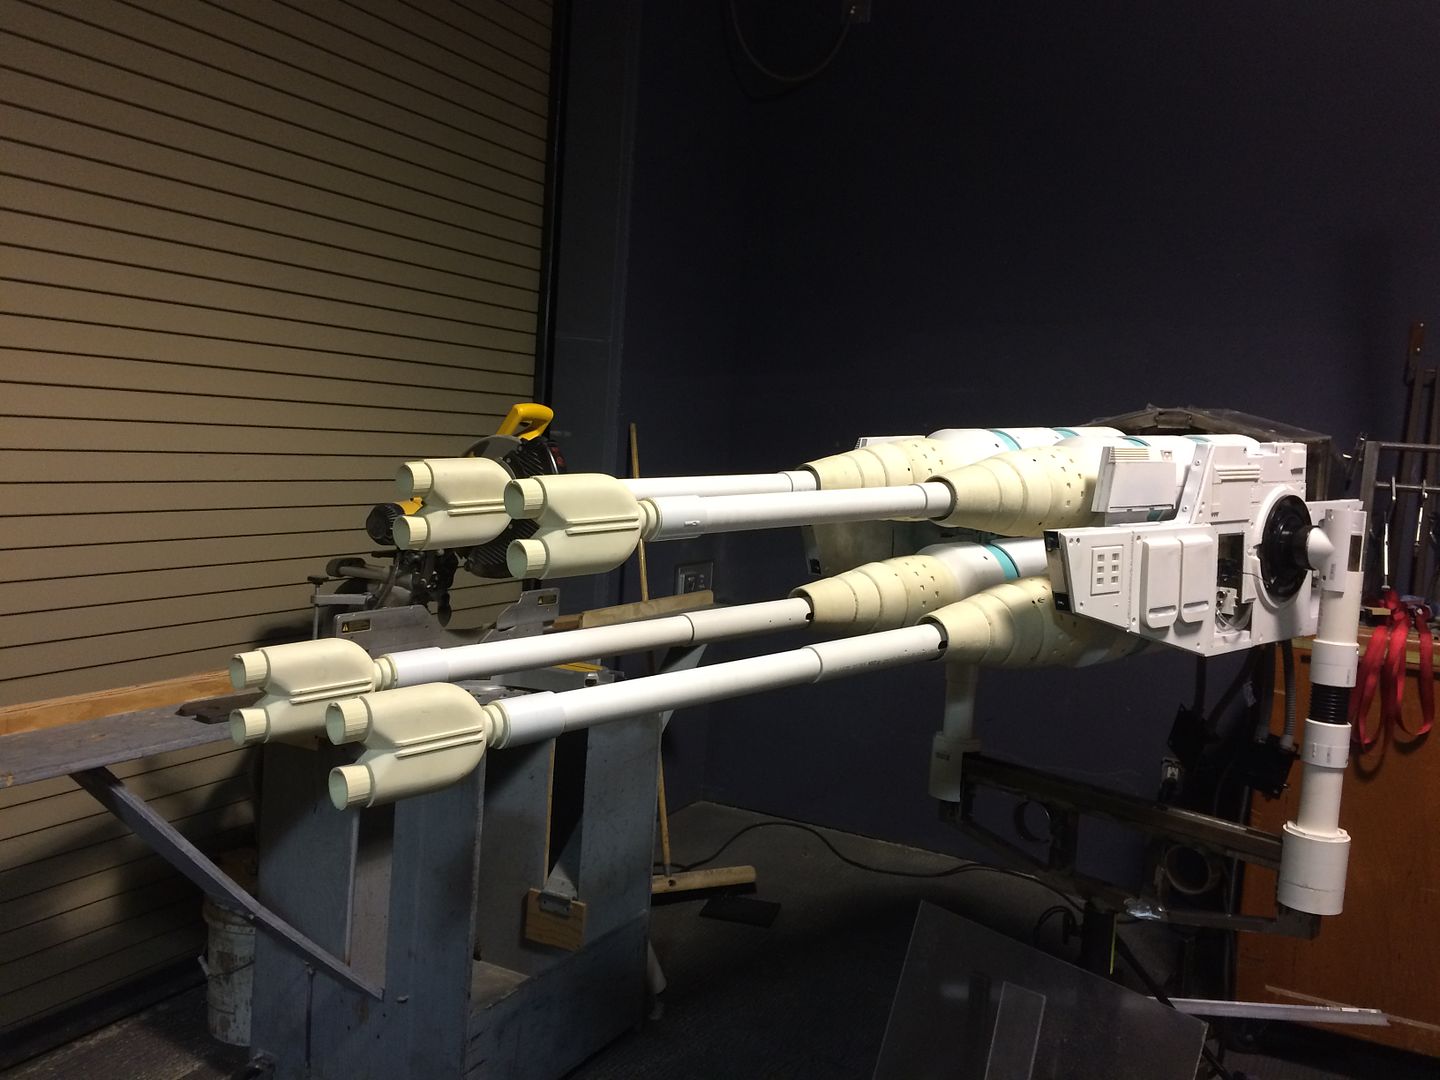
Then, just for the sake of having pictures of them, I threw the muzzles on and tried out a couple of looks.
Paired over and under, like in the on screen sequence
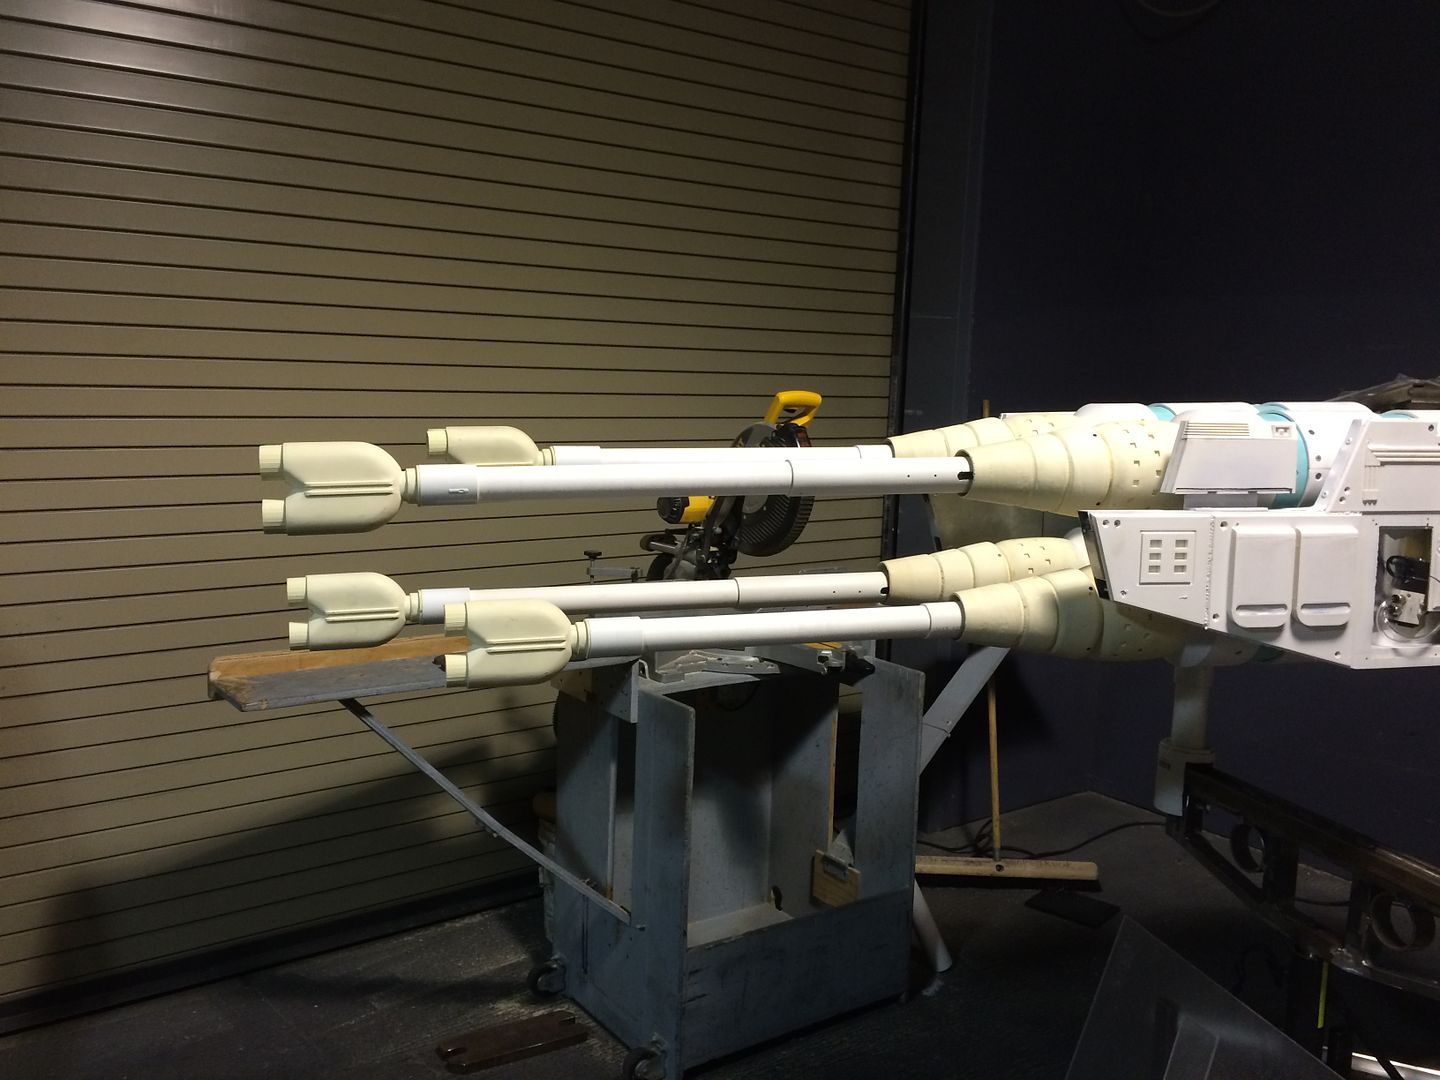
Linked diagonally, my preferred look, although this angle isn't the greatest.
Ultimately, the plan is to have different "fire select modes", kind of like in the old X-Wing video games: sequential fire, coupled diagonally, coupled over/under, and all four at once. Not ready for that, though.
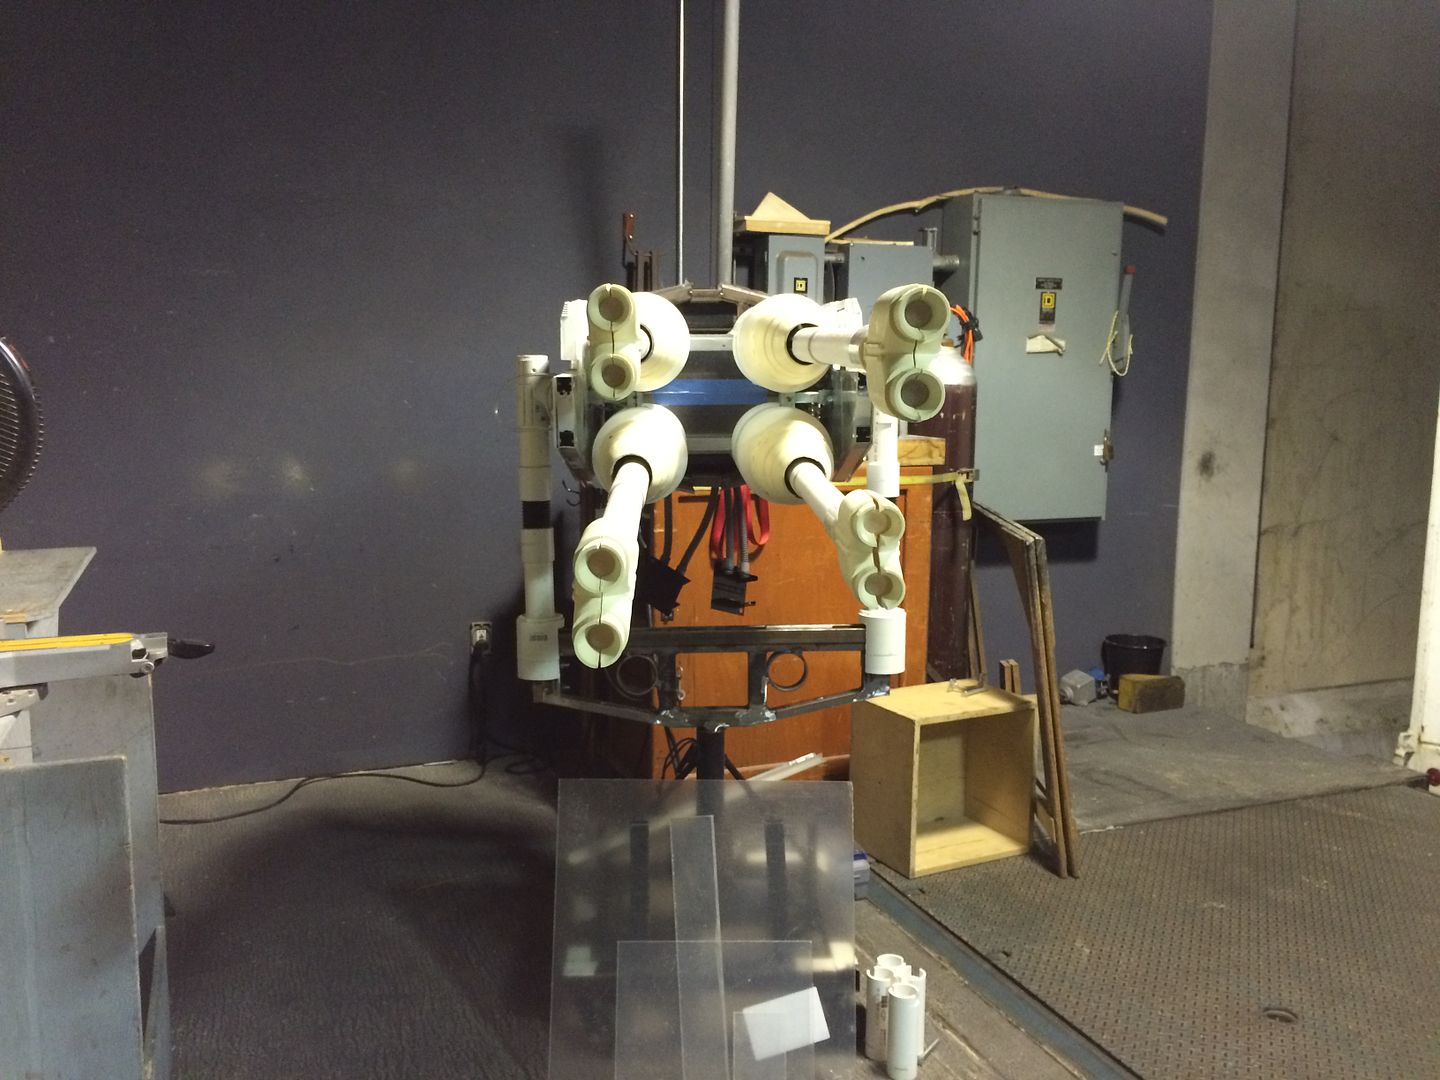
One more gratuitous muzzle shot. They are still a 2-piece item, and you can see that I need to find a way to close them up. Still waiting for the LEDs, (and the inspiration to create the holder for them.)
I also ran the air lines through the yoke tonight. I had to reverse a couple of the lines in their valves, and I have some leaks to address. Barrels 2 and 4 are making that nice hissing sound that I don't want. In addition, Barrel 4 is very slow to retract, so that will need some attention.
But I'm NOT taking the whole thing apart until I have all of the cosmetic stuff figured out.
Who am I kidding?
Anyway, have fun
I have a temporary skin on the ballast box. I say temporary, because it dawned on me that I could take some 3/16" plate steel instead of the 3/16" plexi, and that would cu down on the number of bricks I need. I also want to reorient the ballast so it it more evenly placed vertically relative to the axle, but that will have to wait.
Anyway, I have the skin on there, and am trying out the greeblie box that could actually be a junction box if needed later on.
There is a Din rail onside that box, but it is on the "down" surface, so it might not work for me. Who knows? The wiring path is still somewhat of a mystery at this point. It is nice to have options.
This is looking inside the aft shell. The heat sinks and cable hoses are recovered parts from some retired and dismantled lighting units. The shiny backing for the two top conduits is plexi, which will get some sort of printed greeblie in the future.
Then, just for the sake of having pictures of them, I threw the muzzles on and tried out a couple of looks.
Paired over and under, like in the on screen sequence
Linked diagonally, my preferred look, although this angle isn't the greatest.
Ultimately, the plan is to have different "fire select modes", kind of like in the old X-Wing video games: sequential fire, coupled diagonally, coupled over/under, and all four at once. Not ready for that, though.
One more gratuitous muzzle shot. They are still a 2-piece item, and you can see that I need to find a way to close them up. Still waiting for the LEDs, (and the inspiration to create the holder for them.)
I also ran the air lines through the yoke tonight. I had to reverse a couple of the lines in their valves, and I have some leaks to address. Barrels 2 and 4 are making that nice hissing sound that I don't want. In addition, Barrel 4 is very slow to retract, so that will need some attention.
But I'm NOT taking the whole thing apart until I have all of the cosmetic stuff figured out.
Who am I kidding?
Anyway, have fun

Similar threads
- Replies
- 2
- Views
- 882
- Replies
- 6
- Views
- 648
- Replies
- 8
- Views
- 578
- Replies
- 11
- Views
- 1,112
- Replies
- 4
- Views
- 2,355