-
Welcome to the Project Runs Forum!
This forum is intended for interest gauging and active runs. Due to the transient nature of this forum, please keep all research and ongoing discussion in one of our main forums so your information is not lost.
Only Premium Members can start a new run.
You are using an out of date browser. It may not display this or other websites correctly.
You should upgrade or use an alternative browser.
You should upgrade or use an alternative browser.
Limited Run Breaking Bad WALTER WHITE GLASSES by Magnoli Clothiers
- Thread starter Indy Magnoli
- Start date
We're now starting the design work on these and will post updates as we can. The current "official" name for this new item will be "Heisenberg Glasses". ")
Westies14
Master Member
We're now starting the design work on these and will post updates as we can. The current "official" name for this new item will be "Heisenberg Glasses".
You didn't want to reserve that name for the eventual Smith Turntable sunglasses?
Good point... I've always got the back-up name "Albuquerque Sunglasses".
Here's our design plan for these glasses:

Feel free to post comments, suggestions, etc.
Feel free to post comments, suggestions, etc.
SquidMan
Sr Member
Here's our design plan for these glasses:
https://i.imgur.com/QcOnLyr.jpg
Feel free to post comments, suggestions, etc.
I will have to do a more thorough check of these schematics when I get home later today, but one thing that jumped out at me is that the temple tips/ear pieces look like they're set at too flat/broad an angle compared to the screen-used pair and J EM's designs. J EM, what do you think?
Last edited by a moderator:
J EM
Well-Known Member
Ok. I have to ask, and correct another wrong dimension I provided (sorry). The temple. The length from where it tapers from 4mm to 2.5mm is 70mm, the other temple measurements still are as provided, still within the overall 137mm length.
How was the 53mm x 42mm lens size determined? Did you, or your techs, work off the image of Walt's face or the screen used weathered pair?
I'm asking because if you were to resize the images accordingly, so that the horizontal lens measurement, in pixels, is as close to either 52mm or 53mm when converted, the other frame dimensions no longer match. In fact, the other frame dimensions don't match each other on the images themselves, regardless of image size. If anyone wondered about why I was so unsure about previous frame dimensions I provided, and correcting them over and over, it's because of that (the other being that I rounded up to the nearest mm on some measurements, and measuring other things from wrong place. Ex. the aforementioned 138mm and 140mm overall frame width. It's 138mm on the image of Walt, and rounded to 140 on the image of the screen used frame - unresized.
Then there's also the bridge. On your schematic, it's 19mm from lens to lens, not accounting the distance within the lens frame edges themselves, which would be 17mm. 17mm is too narrow a bridge; the reason the SG301 looks off.
Anyway, I'm working on one final graphic - no measurements this time, so that I won't get lazy and take long[er] - to hopefully show what I mean about the different dimensions I get from using both.
And since we're on the topic of temple tips, what color do you think they are? I want to say they're a dark brown, like they are on mine, but they do look solid black throughout most of the show.
How was the 53mm x 42mm lens size determined? Did you, or your techs, work off the image of Walt's face or the screen used weathered pair?
I'm asking because if you were to resize the images accordingly, so that the horizontal lens measurement, in pixels, is as close to either 52mm or 53mm when converted, the other frame dimensions no longer match. In fact, the other frame dimensions don't match each other on the images themselves, regardless of image size. If anyone wondered about why I was so unsure about previous frame dimensions I provided, and correcting them over and over, it's because of that (the other being that I rounded up to the nearest mm on some measurements, and measuring other things from wrong place. Ex. the aforementioned 138mm and 140mm overall frame width. It's 138mm on the image of Walt, and rounded to 140 on the image of the screen used frame - unresized.
Then there's also the bridge. On your schematic, it's 19mm from lens to lens, not accounting the distance within the lens frame edges themselves, which would be 17mm. 17mm is too narrow a bridge; the reason the SG301 looks off.
Anyway, I'm working on one final graphic - no measurements this time, so that I won't get lazy and take long[er] - to hopefully show what I mean about the different dimensions I get from using both.
Are you referring to the bend of the temple or the size of the temple tips themselves? If it's the latter you mean, then it should be this shape - which I want to assume is the common, standard size. Either way, the tips should be 6mm at the widest. Edit: I didn't see it on Indy magnoli's schematic before this edit, but it's correct at 6mm.I will have to do a more thorough check of these schematics when I get home later today, but one thing that jumped out at me is that the temple tips/ear pieces look like they're set at too flat/broad an angle compared to the screen-used pair and J EM's designs. @J EM, what do you think?
And since we're on the topic of temple tips, what color do you think they are? I want to say they're a dark brown, like they are on mine, but they do look solid black throughout most of the show.
Last edited:
SquidMan
Sr Member
Are you referring to the bend of the temple or the size of the temple tips themselves? If it's the latter you mean, then it should be this shape - which I want to assume is the common, standard size. Either way, the tips should be 6mm at the widest. Edit: I didn't see it on Indy magnoli's schematic before this edit, but it's correct at 6mm.
And since we're on the topic of temple tips, what color do you think they are? I want to say they're a dark brown, like they are on mine, but they do look solid black throughout most of the show.
I'm referring to the curve of the bend over the ear. The shape you linked to is correct, the shape in Indy's schematic is not curved enough. And based on every image I've seen of the screenused ones, I believe they should be solid black.
@Indy Magnoli graciously shared the full schematics with me. Here are a few more comparisons of the temples, hooks and end pieces to highlight a few inaccuracies:
As you can see, the length of the temples may need to be a bit longer, with a much more pronounced curve in the over-the-ear piece. The hooks are placed in a spot that's not quite correct, and seem to be too big and with flat ends that are too short. The hinge is drawn on backwards, and the end piece that connects the lens frames to the temples is too small, and should have a sharper curve at that end piece as well.
Also, @J EM, would you say that this front curve of the lens frame that I'm posting below is correct:
Or should it be "flatter" like in your initial drawings?
The straight-on front view of Indy's glasses actually looks pretty spot-on to me, it's interesting that we picked up on two completely different parts of the glasses to criticize, haha.
Thanks again for doing this, @Indy Magnoli, and I appreciate you taking suggestions and critique!
Here's an overlay of our drawing on the straight-on shot. I expanded the height slightly, so a 43mm frame height might be more accurate. But the 19mm bridge seems to fit well. It also looks like we need to push the frames in slightly at the red arrows.

Westies14
Master Member
Perhaps it's just from the glasses so often being worn an angle or Walt's head being lowered, but my eye the outside verticals of the frames have always seemed to have more of a subtle curve than this schematic. It's a tiny adjustment - I can't see it on Walt's left eye (our right) in that last overlay, but I think if the bottom corner of the right eye (our left) was rounded off slightly to meet that bit of frame which tracks just inside it, that'd capture the "feel" of 'em...
Westies14
Master Member
I agree that the long shot is probably best for dialing in key dimensions, especially cross-referencing those measurements with common optical sizes and the found Aden pair's features. At the same time, I think that working back and forth with other shots is important for considering the form/feel of the organic shapes. Walt's glasses have a bit of a sad puppy dog quality which none of the "close" Hilco frames seem to capture. The note Indy made above about pushing in the angle near the bridge would help get it there, but I think the subtle rounding of the outside would help too. A few images from this thread to consider the feel of 'em:


Isn't there a good shot or two of these on his nightstand by his bed? Or in the cold open of the episode where Mike decks him in the bar? I'll try to run through and get some more grabs before you finalize your patterns, Indy!
So excited for this to finally be happening.
Isn't there a good shot or two of these on his nightstand by his bed? Or in the cold open of the episode where Mike decks him in the bar? I'll try to run through and get some more grabs before you finalize your patterns, Indy!
So excited for this to finally be happening.
Thanks for the input guys. I've put our design team on hold while we hammer out these tweaks here on the RPF.
J EM
Well-Known Member
Indy Magnoli, I think the lens - at 53 by 43, with a true 19mm bridge - are the accurate frame dimensions. This is a pic of an image of the graphic I started working on since yesterday. I hope to finish it later.

two frame sizes, currently working on the bridge shape - the top frame lens is 52 x 42, 18mm bridge (shown in transform box), 137mm overall frame width, and the bottom frame is 53 x 43, 19mm bridge, 140mm overall frame width)
As you can see, I got as close as I have yet in drawing out the shape. What I did was take the image of Walt's face that Squidman posted, since his was better than mine, rotated it clockwise in Photoshop by 1.125 degrees, decreased the contrast to -100/-150 (whatever the maximum is), increased the sharpness, and cropped out the excess. I then scaled it down to 550 x 232 so that the lens, when the image is imported in Illustrator, is 52mm. I selected the lens length in pixels to the best of my ability, and settled on 147 x 119. When converted to mm, it's approximately the lens I suspected. 52 x 42.
Anyway, I managed to work out the shape from the photo, but the lens size is 52 x 42 and the bridge is 18mm - due to the image being scaled so that the lenses meet those dimensions. Overall frame size, from hinge corner to hinge corner, is 137.5. When the lens is resized to 53x43, the frame around the lens is 55x45. 55+55+19=129. 140-129=11. 11/2 (for hinge corners) is 5.5. It's exactly the length needed so that the hinge corners don't appear too long.
One thing that was confusing. If we were to get lens dimensions from the image of the screen used pair, we could get the correct lens horizontal measurement but be missing approximately 1 mm on the lens vertical measurement. And the shape would be incorrect. We lose that mm because of the frame tilt. I tried showing what happens on my wip screenshot.
SquidMan
So you were referring to the bend. I'd say that it's fine. We could always bend it more. The weathered screen used pair is bent a lot more than Walt's is. Recall the screenshot you took for me a while ago

This pic also shows the dark brown colored temple tips that my aden frame has. Also, we can see that the nose pad arms - the bottom point of them - seems to meet the bifocal line. This would probably help Indy Magnoli for accurate placement of the nose pad arms, since I couldn't determine it before.
On to discussing the frame curve...
Yeah, I guess the frame needs to be straighter. :\
Also, what you mean about the temples needing to be longer - the hinge corner just needs to be bent closer to the frame.
two frame sizes, currently working on the bridge shape - the top frame lens is 52 x 42, 18mm bridge (shown in transform box), 137mm overall frame width, and the bottom frame is 53 x 43, 19mm bridge, 140mm overall frame width)
As you can see, I got as close as I have yet in drawing out the shape. What I did was take the image of Walt's face that Squidman posted, since his was better than mine, rotated it clockwise in Photoshop by 1.125 degrees, decreased the contrast to -100/-150 (whatever the maximum is), increased the sharpness, and cropped out the excess. I then scaled it down to 550 x 232 so that the lens, when the image is imported in Illustrator, is 52mm. I selected the lens length in pixels to the best of my ability, and settled on 147 x 119. When converted to mm, it's approximately the lens I suspected. 52 x 42.
Anyway, I managed to work out the shape from the photo, but the lens size is 52 x 42 and the bridge is 18mm - due to the image being scaled so that the lenses meet those dimensions. Overall frame size, from hinge corner to hinge corner, is 137.5. When the lens is resized to 53x43, the frame around the lens is 55x45. 55+55+19=129. 140-129=11. 11/2 (for hinge corners) is 5.5. It's exactly the length needed so that the hinge corners don't appear too long.
One thing that was confusing. If we were to get lens dimensions from the image of the screen used pair, we could get the correct lens horizontal measurement but be missing approximately 1 mm on the lens vertical measurement. And the shape would be incorrect. We lose that mm because of the frame tilt. I tried showing what happens on my wip screenshot.
SquidMan
So you were referring to the bend. I'd say that it's fine. We could always bend it more. The weathered screen used pair is bent a lot more than Walt's is. Recall the screenshot you took for me a while ago
This pic also shows the dark brown colored temple tips that my aden frame has. Also, we can see that the nose pad arms - the bottom point of them - seems to meet the bifocal line. This would probably help Indy Magnoli for accurate placement of the nose pad arms, since I couldn't determine it before.
On to discussing the frame curve...
Yeah, I guess the frame needs to be straighter. :\
Also, what you mean about the temples needing to be longer - the hinge corner just needs to be bent closer to the frame.
Last edited by a moderator:
Ok, lots going on here... so here are the bullet point tweaks of what we need to change:
Anything else?
- increase lens height to 43mm
- alter frame shape (as per my photo with the red arrows)
- confirm acetate temple tips to be dark brown
- overhead frame shape more flat (so connection to temples is more square)
- change hinge direction on temple
- larger hinge connecting temple to frames
Anything else?
SquidMan
Sr Member
Ok, lots going on here... so here are the bullet point tweaks of what we need to change:
- increase lens height to 43mm
- alter frame shape (as per my photo with the red arrows)
- confirm acetate temple tips to be dark brown
- overhead frame shape more flat (so connection to temples is more square)
- change hinge direction on temple
- larger hinge connecting temple to frames
Anything else?
All of the above, and the hooks need longer flat ends, should be slightly smaller, with the placement on the temples fixed.
J EM
Well-Known Member
So I learned about the problem I was being tricked by. The hinge corners. That extra length that seemed wrong, to me, despite being at 140, is the extra length toward the hinge. I attempted to draw the hinge and also attempted the correct frame bend.

I always thought the overall frame width was the length from corner to corner, but it turns out that's not the case here. anyway, top view of the bent frame to the closest I could get it to be at a 5 degree base curve. (I read an online article that mentioned a 5 degree bend being the standard for rx eyeglasses, with a 5-10 tilt angle.) The bend looks a lot closer to my Aden frame.
I did attempt to estimate the bridge curve from the top.
Beside that, maybe you could work on how much the bridge 'pops out.' You can see it on the screenshot of Walt's glasses that's on my previous post. I don't think we'll know for sure, but on my attempt, top frame view, there's a 1.5mm gap between the bottom edge of the bridge to where it rests on the frame.
I always thought the overall frame width was the length from corner to corner, but it turns out that's not the case here. anyway, top view of the bent frame to the closest I could get it to be at a 5 degree base curve. (I read an online article that mentioned a 5 degree bend being the standard for rx eyeglasses, with a 5-10 tilt angle.) The bend looks a lot closer to my Aden frame.
I did attempt to estimate the bridge curve from the top.
yes. The length of the corner pieces. I remeasured this time (with floss since my measuring tape wasn't wrapping around the curve properly), and got exactly 15mm at the top edge of the corners. Due to the shape of Walt's glasses, an exact 15mm might not be feasible.Ok, lots going on here... so here are the bullet point tweaks of what we need to change:
- increase lens height to 43mm
- alter frame shape (as per my photo with the red arrows)
- confirm acetate temple tips to be dark brown
- overhead frame shape more flat (so connection to temples is more square)
- change hinge direction on temple
- larger hinge connecting temple to frames
Anything else?
Beside that, maybe you could work on how much the bridge 'pops out.' You can see it on the screenshot of Walt's glasses that's on my previous post. I don't think we'll know for sure, but on my attempt, top frame view, there's a 1.5mm gap between the bottom edge of the bridge to where it rests on the frame.
Westies14
Master Member
The research here is so impressive! Thanks for putting in all that work!
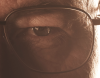
The one thing I think could still be refined is the shape of the lenses. I appreciate that this shot of Walt from the desert is a long lens, pretty straight on, and that makes it a useful reference (especially with a pair of glasses with similar features on hand). At the same time, it's a bit low-resolution. When we're looking to visually dial in millimeters, the blurry edges can fall on either side of the line.
With the curvature, we're getting into an organic shape. A sculptor or 3D modeler would reference as many angles as they could find and test their look against those images. While we may not have any shots as perfectly straight on and flat as that promo image, we have a lot of high-res images which aren't too wide-angle and are pretty front-on. Looking at these, I think the schematics posted so far may come dangerously close to flat/straight walled on the outside - *maybe* the inside too?
This shot might be a 50mm lens - nothing too wide or too close - and he's straight to camera. The glasses are tilted only slightly down, judging by the arm. I think this demonstrates something key to the "feel" of the frames - that there's a subtle curvature to the lens the whole way around. I don't think it ever really flattens out:
Another hi-res shot, just to add to the discussion:
Amazing work so far, fellas!
Attachments
beiderbeck
New Member
There is hardly any curve in this shot, and can always be bent to suit
Similar threads
- Replies
- 6
- Views
- 907
- Replies
- 0
- Views
- 340
- Replies
- 5
- Views
- 1,262
- Replies
- 0
- Views
- 751
- Replies
- 30
- Views
- 1,111