I've started on the armour of the suit. I started off by making a base out of cereal-box cardboard. I plan to make a masters and mold and cast resin versions. I used a hole punch for the screw Holes which is the perfect size for the no.6 Spanner Head Screws.

On the screen used suit, the armour plates have an interesting hex pattern/texture.


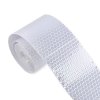
The originals were 3D printed, finished, molded, and cast in a very durable resin. I believe the hex texture may have been a part of the 3-D print, For my build I scoured many different sites for inexpensive hex reflective tape as I knew it may have the hex pattern as a texture. I found a rubberized hex textured fabric that Joann's Fabrics carries, item number: 15212343 . Sadly, they don't ship it to Canada so I had to find an alternative. I considered hand cutting the lines if I couldn't find anything. I finally found some highway reflective tape made by 3M that had the texture I wanted.

Once the tape came in the mail, I got to work patterning and cutting out the shapes. I had to be sure to make sure the hexagons were facing the right way.


Once they were applied, I attached thin craft foam to the back of he armour plate to make it thicker and allow me to countersink where the screws will eventually rest. Then I gave it a coat of primer to unify all the different parts.

I'm pretty happy with how it turned out so far. It still needs some more finishing but I think once that's done it'll be ready for molding, casting, and hopefully finishing!


More to come!