Brigandine - Stark Head of House Armor (Jon Snow Season 6) - EVA Questions

JQuacker

New Member
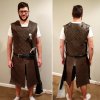
So prepping for DragonCon, and I'm going as Jon Snow in Season 6, specifically in Battle of the Bastards, I found this thread which discusses nicely that it's a brigandine, etc. I'm looking to make it out of EVA, working on the bracers first so I can screw up and its ok.

One thing the other thread doesn't get into is the EVA foam, only leather. I'm currently planning a base layer of thin EVA, a layer of cut out pieces to mimic the steel plates, and then another layer of EVA on top and somehow forcing the valleys. Anyone have any idea about this actually working or will it not fit into the valleys? Will heating it and flexing it in help? Oh and I have some 3/16" neoprene piping like Evil Ted uses for the edge leather roll.

Should I form the EVA base first & heat treat, then put on the plate layer and heat each one as I go (or do they not need heat treatIng?), then the top & heat it? Or should I contact cement them all while flat then heat form? This last one seems like it might have repercussions in the heat messing up the cement, or the bending/shrinking of it causing stresses.

I will be plastidip spraying the whole thing afterwards, then spray and/or acrylic painting the brown color, etc.
 
Are you saying that you want to make the entire thing out of foam? I so, I'm not sure that it would work, for one thing, I think that it will come out too stiff and not move like leather would. Secondly, I'm not sure that foam on foam would work to replicate the look of the armor, I'm not sure that foam will act like plastic and start to sag under enough heat and conform to the foam underneath. Even if it does there's a good chance that you'll end up doing something to the foam plates underneath.

I think that you'd be best off using a pleather if real leather is too hard for you to work with and/or too expensive. It would look more like the real thing while being cheaper and easier to work with than leather. Alternately, if you're deadset on foam, I'd use something different for the plates, something much less likely to the heat, that's assuming that the foam will conform to a shape underneath it under heat.
 
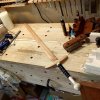
So, I went with the EVA, and so far the results have been good. I did the EVA base layer, then cut imitation steel plates from EVA, then put a top layer on that after alum. foil treating it to give it the leather texture. Neoprene 3/16" solid tubing provides the edging that Snow's armor has. Used a wooden stick I worked smooth to press the areas between the "steel" plates.

So far, so good. it bends nicely to my arm. The leather shouldn't "flow" like suggested, as it's supposed to have a lot of steel plates in it. It'd be stiffer than solely leather. So I think this mimics well. Next up is googly-eye rivets, elastic bands inside, and then cosmetic straps on the outside like Snow's bracers. Then plastidipping and painting. His armor doesn't look too distressed, so there won't be a ton of weathering involved.

PHOTO_20170616_201322.jpg

PHOTO_20170617_150238.jpg

PHOTO_20170619_063909.jpg
 
To speak to process, it was basically a rinse-repeat. Cut the base shape to size, then cut a million 2x4 pieces of foam and the 4.5x4.5 squares for the front.


PHOTO_20170712_053329.jpgPHOTO_20170719_212340.jpg

Then create a top layer series, fortunately Jon's armor has a split in it like mine does, so the front is in three pieces. Use the same foil + iron treatment, and then contact cement & press between the "steel" pieces. A 1/4" dowel helped a lot with this.

PHOTO_20170804_203024.jpg

Then spray painted with black plastidip, and then "leather" matte spray paint. Used the same "leather" on paper fasteners (below) and then stabbed them through.

PHOTO_20170817_062231.jpg

Used "metal" paint, black plastidip, and the leather on the previous-chrome-shiny buckles to weather them a bit.

PHOTO_20170824_201349.jpg

The straps are also EVA foam. EVA has a good shear strength, as does superglue, so I superglued those. EVA has a poor tear & puncture strength, so I backed the straps with black gorilla tape. So far so good.

IMG_2619_01.jpg

This was last night; my wife helped mark the sides which will be finished tonight. Left the paint drying this morning.
 
This looks incredible! It's making me think I need to start over. I was trying a pretty simple method just to have something for halloween...but this looks so good I want to make mine look just as good.

Is the foam 2mm thick?

Also, do you have a referance pic of the tubing you mentioned?
 
Last edited:
Would you by any chance have the measurements/pattern for the brigandine? This is probably one of the most accurate representations i've seen :D
 
Thanks folks!

I later found a better option for the tubing than what I used. While the McMasterCarr stuff is neoprene and more flexible, the stuff used for window screens is exceptionally cheaper. The Neoprene can bend at the corners, but the screen tubing can be cut for the corners, and is easier then to contact cement the pieces. I needed overall between 30-40 ft, if I remember right. Doing it again, I'd just get 100ft of the screen tubing.

Screen Tubing - .175-.210 (~$12 for 100 ft)
Neoprene - 3/16 ($51 for 100ft)

All the foam is 2mm, but I have some 5mm backing on the armpit to navel creases; it was starting to tear at one place. The rolls from Michaels are perfect because they're ~3x5, so one whole sheet can form the base's back. I think you could use 5 sheets for the whole outfit (armor, bracers, straps, and full sheath). I used 4 and several single sheets, but five would be more efficient and cheaper.

Craft Foam Rolls from Michaels ($9 for 36"x60")

The buckles I just bought on ebay. 1" wide strapping. I think Jon's are technically smaller.

Oh, there's about 850-900 paper fasteners in this. So be prepared for a LOT if you want to do that. I'm probably going to tape down the inside so I don't keep getting poked.

I tested it out yesterday; one of the straps broke. So I make a new one and put tape along the whole back of it, and glued that on. Will probably have to fix another or two by the end of Dragon Con.

I can get measurements, but most of it was sized to me and just "figuring it out."

IMG_20170827_115236_491.jpg
PHOTO_20170827_204541.jpg

Updated pics. I also have a gambeson made from a dress, not as dark as Jon's but good enough. Boots are a combination of some women's Goodwill boots and an old ratty pair of Vans I owned. Gorilla tape, pleather, and vinyl spray paint. His Battle of the ******* boots are plain black from what I can tell, not the fur ones of the NW.

Boots, belt, sheathe, and gambeson will be the "lamest" parts of this. Hopefully Longclaw and the brigandine itself will be good enough haha.
 
What's the "Foil + iron" approach you're referring to? Is it literally just pressing crinkly tin foil into the surface on the foam with a clothes iron to press "leather" texture into the foam?
 
Looking really good! I just did the same method and it's turning out pretty good. I finished the front of the armor and ran into a problem...

After a coat of plasti-dip I sprayed on a coat of Rustoleum Satin finish spray paint and now the entire piece is sticky/tacky and with a little force, the paint comes off on my hands...

I have no idea how to fix this problem, I'm hoping I can avoid redoing the project, but I'm not too hopeful.

Yours is looking top notch though.

What are you going to do for the gambeson?
 
Did you let the plasti-dip cure for whatever it says on the can, and a few light coats vs 1-2 heavy coats? After that, I then hit mine with a color paint, let that dry/cure, then put the matte finish on a day or so ago. Also, I'd make sure all the straps, etc are done before doing a finish spray.

Gambeson is just an XL women's dress from Goodwill that's roughly the right color and length. I sewed in some sleeve extensions and cut the "flaps" on the bottom up to my navel like the armor is, hemmed those. Did a tea dye bath, sort of worked. It's 50% polyester and I didn't want to deal with dyeing that. It's not super accurate, but that can be for next year.
 
I let it cure for about four hours, but applied one pretty mild coat. The plastidip seemed dry, but it did not take the paint well at all.

EDIT:

False alarm! Just threw on two more coats of plasti and it seems to be working now! Just have to decide if I want to do season 6 or 7 armor.

Now I'll stop hijacking your thread! Fantastic work! Thanks a ton for the inspiration and info!
 
Last edited:
I eventually want to get a whole write-up of the process, as there isn't a lot online about this kind of armor in EVA form, but here's about the best pic of THE FINAL FORM next to a Tormund. Strap is from my messenger bag; I took it off at night. Jon Snow pic for reference. There's not really a good one I've found of head-to-toe from the front. My sword is a bit higher, but that's because of my belt not being like his. Was a "run out of time, make something work" thing. Also the wig is really poofy, even after thinning it a bit.

PHOTO_20170902_175718.jpg

snow5.jpg
 
This thread is more than 6 years old.

Your message may be considered spam for the following reasons:

  1. This thread hasn't been active in some time. A new post in this thread might not contribute constructively to this discussion after so long.
If you wish to reply despite these issues, check the box below before replying.
Be aware that malicious compliance may result in more severe penalties.
Back
Top