Thanks guys! Your interest means a lot to me, I appreciate it. I've been laid up with a bad cough for a bit and thought it would be best to stay away from the solvents for a few days. Hopefully will be able to get back at it this weekend. There's a gathering of friends in a couple of weeks and i'd like to have the model at least presentable, if not 100% finished by then to show.
You are using an out of date browser. It may not display this or other websites correctly.
You should upgrade or use an alternative browser.
You should upgrade or use an alternative browser.
DaveG's "Green Leader" Y-Wing - Paint and Detailing
- Thread starter DaveG
- Start date
")
Thanks guys! Your interest means a lot to me, I appreciate it. I've been laid up with a bad cough for a bit and thought it would be best to stay away from the solvents for a few days. Hopefully will be able to get back at it this weekend. There's a gathering of friends in a couple of weeks and i'd like to have the model at least presentable, if not 100% finished by then to show.
There's a solvent called "Bourbon" that comes from a special formula in Kentucky that helps with the problems caused by those other solvents. You find it under B in the other hobby shops... ; ) Hope you feel better! And thanks for the tutorial, will have to get some of "God's Own Wash" for my own hobby room.
There's a solvent called "Bourbon" that comes from a special formula in Kentucky that helps with the problems caused by those other solvents. You find it under B in the other hobby shops... ; ) Hope you feel better! And thanks for the tutorial, will have to get some of "God's Own Wash" for my own hobby room.
Oohh, that's my favorite solvent too! It works wonders.
Re: DaveG's "Green Leader" Y-Wing - Paint and Detailing
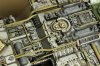
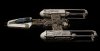
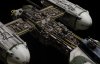
Moving on to more detailed weathering, this time working with more concentrated applications of various oil based paints to represent grease and grime. I ended up using a range of colors including Starship Filth, Engine Grease, Oxide Patina, Smoke and Bitumen. Where as the first wash was applied to large overall areas, these detail washes were applied selectively working on small sections at a time.

As before, the area to be weathered was first moistened with some clean thinner.

Small concentrated dabs of oil paint were applied here and there, mostly in corners where grease might be thought to leak or accumulate.

Then a brush moistened with clean thinner was used to blend out the paint as desired.

The overall effect is a nice mix of contrasting colors.


Once the weathering washes had dried for a bit I went over some areas with a dry brush of Steel enamel. Just a really light application of paint to highlight some of the contrasting edges.

Here's Gus76's brilliant 3D printed cockpit painted up and in place.

And the canopy. I wanted it to look like the Rebel Mechanics had scrounged a canopy from completely different colored bird so I went with a darkish blue grey. Even the paint chipping had a different style then the rest of the fuselage, implying a different history and pattern of use.

Next step... Battle Damage!
Moving on to more detailed weathering, this time working with more concentrated applications of various oil based paints to represent grease and grime. I ended up using a range of colors including Starship Filth, Engine Grease, Oxide Patina, Smoke and Bitumen. Where as the first wash was applied to large overall areas, these detail washes were applied selectively working on small sections at a time.
As before, the area to be weathered was first moistened with some clean thinner.
Small concentrated dabs of oil paint were applied here and there, mostly in corners where grease might be thought to leak or accumulate.
Then a brush moistened with clean thinner was used to blend out the paint as desired.
The overall effect is a nice mix of contrasting colors.
Once the weathering washes had dried for a bit I went over some areas with a dry brush of Steel enamel. Just a really light application of paint to highlight some of the contrasting edges.
Here's Gus76's brilliant 3D printed cockpit painted up and in place.
And the canopy. I wanted it to look like the Rebel Mechanics had scrounged a canopy from completely different colored bird so I went with a darkish blue grey. Even the paint chipping had a different style then the rest of the fuselage, implying a different history and pattern of use.
Next step... Battle Damage!
Attachments

Last edited:
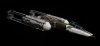
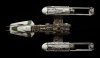
A little technical detail... originally I had planned on glueing the rear deck in place once I had finished paint and didn't think I'd need to use the rear mount anymore. Instead I've opted to make the little hatch in the center of the plate a removable plug so I can use the rear mount for photography or other uses.


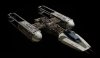
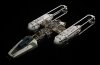
I airbrushed on some battle damage and smoke weathering. I like the idea that the engines are barely kept running and that smoke leaks out of seams in the nacelles, streaking backwards along the engines in flight. I used Vallejo's Nato Black acrylic for this.


Well, at this point Green Leader is mostly done, just waiting on the passengers, (Pilot and AstroMech). I'll post some overall photos once those last details are in place,
I airbrushed on some battle damage and smoke weathering. I like the idea that the engines are barely kept running and that smoke leaks out of seams in the nacelles, streaking backwards along the engines in flight. I used Vallejo's Nato Black acrylic for this.
Well, at this point Green Leader is mostly done, just waiting on the passengers, (Pilot and AstroMech). I'll post some overall photos once those last details are in place,
Last edited:
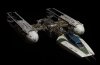
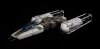
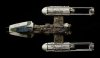
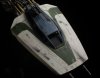
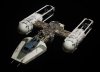
Finally I was able to find the time to get Gus76's fantastic Astromech and Pilot figures painted and attached to the model. Then came the photo shoot. Happy New Years guys!
Attachments
-
 7T9A0188-Edit.jpg608 KB · Views: 400
 -
 7T9A0187-Edit.jpg872.9 KB · Views: 422
 -
 7T9A0179-Edit.jpg722 KB · Views: 405
 -
 7T9A0174.jpg765.1 KB · Views: 396
 -
 7T9A0172-Edit.jpg937.9 KB · Views: 411
 -
 7T9A0170-Edit.jpg970.7 KB · Views: 446
 -
 7T9A0215.jpg1.3 MB · Views: 400
 -
 7T9A0213.jpg1.5 MB · Views: 413
 -
 7T9A0212-Edit.jpg826.7 KB · Views: 346
 -
 7T9A0198-Edit.jpg896 KB · Views: 353
 -
 7T9A0194-Edit.jpg1 MB · Views: 419
 -
 7T9A0191-Edit.jpg907.1 KB · Views: 400
It looks great Dave. Now that it’s done, I understand what you were aiming for. I thought it might look too steampunk, but that’s just realistically painted greeblies. I love it!
What I like so much about DaveG's build and paint job are a.) the super-sweetness of the pipes, straight, aligned, and all coming into and going out of an actual "pipe-fitting" nurnie -- this makes it look much more engineered than an afterthought, b.) the choice of chromate green (or whatever color it actually is) to give the pipes a clear identity and structural architectural element distinct from all the other pieces on the Y-Wing, which in the studio scale originals look camouflaged in with one consistent spray paint job (except for the copper pipes version), and c.) the "tightness" of the tension and balance between 1.) Distinct paint job for key elements and 2.) Overall used/weathered/well-worn universe pattern in keeping with all Star Wars and esp. Rebel Alliance vehicles.
To my eye, this is an example of the perfect aesthetic balance between creating a studio-scale replica and creating a static model that will look good when looked at in a display case, rather than only flying by at 24fps. Love the tutorial, which I plan to imitate in many ways. Would also love a tutorial on your photographing of the model - what your studio set-up looks like, and whether your lighting/black background is done "in-camera" or post-shoot in Photoshop.
As always, Dave, we learn a lot from your experience and generosity of spirit -- thank you and Happy New Year!
Thanks guys for the kind words! I have been thinking about putting together some model photography tutorials for a while now... it's a pretty broad subject. Like the hobby of model building itself. In the mean time, here are a few ramblings about how I did the most recent shoots of theY Wing and Escape pod models.
I don't have a dedicated photography space but rather have to clear enough space in my garage workshop to set up a backing and lights. Quite an endeavor in itself! The cleared area works out to be about 7 feet wide by ten feet deep (my garage has a finished ceiling height of 8 feet). This is not much space to work in, especially when it starts getting filled up with lighting stands! The following photo shows the general setup when shooting the Y. The lighting setup for this was very simple, one softball overhead light and a bounce card, more on that in a bit. This photo is with the garage door open, off to the right and all the work lights on. For the actual shoot the door was closed and the only light on in the room was the softbox.

Here are some ramblings about the photography equipment I am using. What, how and why. The following should in no way be taken as the gospel on how to shoot models, it's just how I do it at the moment. A lot of my techniques are based on those I used "back in the day" doing visual effects model shooting, although greatly simplified.
Camera - I am using a Canon 5D mark III DSLR. This camera has what's know as a full size sensor, which means it is the same size as a 35mm still camera film frame. A full frame camera is by no means essential, actually it's probably a bit of (expensive) overkill. Most DSLR cameras have a smaller sensor, about 2/3 the size. The most important thing is to have manual control over the exposure; the ability to adjust the ISO, aperture, and shutter speed as well as the focus. This is something that most point and shoot cameras do not do, or at least do not do easily. A DSLR also allows for the use of interchangeable lenses, which is very handy.
Lenses - I use a wide variety of lenses when shooting models but in general the ones used most often are wide angle or normal focal length lenses, 28mm, 35mm and 50mm. Generally models look more realistic when shot with a wide angle lens as they lend a more natural perspective. Wide angle lenses also have greater depth of field which is important. For the Y I started out shooting with the 35mm focal length lens but while the perspective may have been more realistic, I found it to be a bit extreme for a static display photo and ended up using a 50mm lens in the end. With a smaller chip size camera as mentioned above the 35mm lens would have worked well and the 50mm lens would have been too long. One advantage to 50mm lenses is that they are hands down the sharpest lenses made and also the fastest, in that they gather the most light, so exposure time can be shorter.
Camera Support - When shooting models one of the most important things is to try to get the entire model in focus from front to back. This means shooting long exposures at a small f-stop. Exposure for the Y Wing was 2 seconds at f22, and even at that the depth of field proved to be a bit shallow with the 50mm lens. It's impossible to hand hold the camera with exposures this long so a tripod is essential, as well as a remote camera trigger cable so you won't have to touch the camera to take a picture.
Backing - The model was shot against a black backing. The deeper the black the better so it won't reflect any light back from the relatively close proximity to the light. I used a vinyl backed black velour from Filmtools.com. the cost was $50 for a roll 58 inches wide by 24 feet long and as long as I keep it clean, it should last me for years. Black velvet from a fabric store is also a good option but is usually a good deal more expensive.
Lighting - Options for lighting are even more plentiful and varied than those for cameras, and I've used pretty much every type of light known over the years, most all with success. I use to use tungsten halogen photo lights, in fact they were my go to lights for many, many years and I still use them on occasion when I need a lot of light. But Halogen lights are hot and expensive. There are a good variety of LED lights available now that are fairly cheap and cool to run. The softbox with an LED light is a recent acquisition, this being only the second photo shoot I've done with it (the Escape Pod being the first). I really like the results. While probably a little soft and broad for a movie shot, it produces a nice lighting for a static model shot, which is really more akin to product photography than movie work. And the combined cost was under $50, not including a light stand.
https://www.amazon.com/gp/product/B00LTNKKVG/ref=oh_aui_detailpage_o09_s00?ie=UTF8&psc=1
https://www.amazon.com/Bonlux-Dayli...rd_wg=A2XBC&psc=1&refRID=K6661V590RZT0HW67Y07
For this shoot the only other "lighting" was a bounce card of white foamcore to reflect a little fill light back up into the shadowed underside of the model. By coincidence the bounce card is actually the backside of a mounted photo of the Y Wing that I've had for years.
Model Support - I used a Manfrotto Magic Arm and clamp attached to a short C Stand to support the model. This is a pretty elaborate and moderately expensive model support but it's handy in that it is very easy to adjust the position and angle of the model, just flip the lever and the double jointed arm goes completely loose, reposition the model and flip the lever back and it's locked in place. The arm did require that I machine an adapter post to connect it to the underside of the Y. The arm was blacked out by wrapping it with small pieces of the same black velour used for the backing.
https://www.amazon.com/Manfrotto-14...qid=1514844312&sr=1-1&keywords=manfrotto+143a
https://www.amazon.com/Manfrotto-03...rd_wg=sW9Z2&psc=1&refRID=HGFG2XDA571597PMS9ZZ


Stands and Other Equipment - I have a wide variety of studio equipment stands to hold lights and other things for the shoot. C Stands from some place like FilmTools.com are the best and most robust, but also the most expensive. I also have a few cheap lightweight light stands from Amazon that are okay for light duty use. Other equipment used for the shoot included some flags (framed black cloth panels) held in C stands to keep stray light from hitting the backing and to block daylight from the two windows in my shop.
Post Production - I shoot in RAW mode which gives the most flexibility to adjust color and exposure later. This means that rather than try to get a "perfect" exposure, instead the goal is to get a uniform range of exposure with no clipping at the top and bottom of the exposure histogram. "What?!" I hear you say... exposure is a much broader topic than I can get into now, but will in a future tutorial. Let's just say for now that my goal is to get an exposure that will allow me to create the image desired later in the computer rather than as shot. I import the images into Adobe Lightroom to make the adjustments and also use Photoshop to "paint out" the model stand and other flaws. Photoshop can also be used to do all of the color correction rather than Lightroom, but I prefer using Lightroom as it allows for easy changes later if needed.
Well, that's a pretty quick overview of how I shot the photos of the Y Wing. Like I said, I'll try to put together some more comprehensive tutorials on model photography in the future. I'm happy to answer any questions as well.


I don't have a dedicated photography space but rather have to clear enough space in my garage workshop to set up a backing and lights. Quite an endeavor in itself! The cleared area works out to be about 7 feet wide by ten feet deep (my garage has a finished ceiling height of 8 feet). This is not much space to work in, especially when it starts getting filled up with lighting stands! The following photo shows the general setup when shooting the Y. The lighting setup for this was very simple, one softball overhead light and a bounce card, more on that in a bit. This photo is with the garage door open, off to the right and all the work lights on. For the actual shoot the door was closed and the only light on in the room was the softbox.
Here are some ramblings about the photography equipment I am using. What, how and why. The following should in no way be taken as the gospel on how to shoot models, it's just how I do it at the moment. A lot of my techniques are based on those I used "back in the day" doing visual effects model shooting, although greatly simplified.
Camera - I am using a Canon 5D mark III DSLR. This camera has what's know as a full size sensor, which means it is the same size as a 35mm still camera film frame. A full frame camera is by no means essential, actually it's probably a bit of (expensive) overkill. Most DSLR cameras have a smaller sensor, about 2/3 the size. The most important thing is to have manual control over the exposure; the ability to adjust the ISO, aperture, and shutter speed as well as the focus. This is something that most point and shoot cameras do not do, or at least do not do easily. A DSLR also allows for the use of interchangeable lenses, which is very handy.
Lenses - I use a wide variety of lenses when shooting models but in general the ones used most often are wide angle or normal focal length lenses, 28mm, 35mm and 50mm. Generally models look more realistic when shot with a wide angle lens as they lend a more natural perspective. Wide angle lenses also have greater depth of field which is important. For the Y I started out shooting with the 35mm focal length lens but while the perspective may have been more realistic, I found it to be a bit extreme for a static display photo and ended up using a 50mm lens in the end. With a smaller chip size camera as mentioned above the 35mm lens would have worked well and the 50mm lens would have been too long. One advantage to 50mm lenses is that they are hands down the sharpest lenses made and also the fastest, in that they gather the most light, so exposure time can be shorter.
Camera Support - When shooting models one of the most important things is to try to get the entire model in focus from front to back. This means shooting long exposures at a small f-stop. Exposure for the Y Wing was 2 seconds at f22, and even at that the depth of field proved to be a bit shallow with the 50mm lens. It's impossible to hand hold the camera with exposures this long so a tripod is essential, as well as a remote camera trigger cable so you won't have to touch the camera to take a picture.
Backing - The model was shot against a black backing. The deeper the black the better so it won't reflect any light back from the relatively close proximity to the light. I used a vinyl backed black velour from Filmtools.com. the cost was $50 for a roll 58 inches wide by 24 feet long and as long as I keep it clean, it should last me for years. Black velvet from a fabric store is also a good option but is usually a good deal more expensive.
Lighting - Options for lighting are even more plentiful and varied than those for cameras, and I've used pretty much every type of light known over the years, most all with success. I use to use tungsten halogen photo lights, in fact they were my go to lights for many, many years and I still use them on occasion when I need a lot of light. But Halogen lights are hot and expensive. There are a good variety of LED lights available now that are fairly cheap and cool to run. The softbox with an LED light is a recent acquisition, this being only the second photo shoot I've done with it (the Escape Pod being the first). I really like the results. While probably a little soft and broad for a movie shot, it produces a nice lighting for a static model shot, which is really more akin to product photography than movie work. And the combined cost was under $50, not including a light stand.
https://www.amazon.com/gp/product/B00LTNKKVG/ref=oh_aui_detailpage_o09_s00?ie=UTF8&psc=1
https://www.amazon.com/Bonlux-Dayli...rd_wg=A2XBC&psc=1&refRID=K6661V590RZT0HW67Y07
For this shoot the only other "lighting" was a bounce card of white foamcore to reflect a little fill light back up into the shadowed underside of the model. By coincidence the bounce card is actually the backside of a mounted photo of the Y Wing that I've had for years.
Model Support - I used a Manfrotto Magic Arm and clamp attached to a short C Stand to support the model. This is a pretty elaborate and moderately expensive model support but it's handy in that it is very easy to adjust the position and angle of the model, just flip the lever and the double jointed arm goes completely loose, reposition the model and flip the lever back and it's locked in place. The arm did require that I machine an adapter post to connect it to the underside of the Y. The arm was blacked out by wrapping it with small pieces of the same black velour used for the backing.
https://www.amazon.com/Manfrotto-14...qid=1514844312&sr=1-1&keywords=manfrotto+143a
https://www.amazon.com/Manfrotto-03...rd_wg=sW9Z2&psc=1&refRID=HGFG2XDA571597PMS9ZZ
Stands and Other Equipment - I have a wide variety of studio equipment stands to hold lights and other things for the shoot. C Stands from some place like FilmTools.com are the best and most robust, but also the most expensive. I also have a few cheap lightweight light stands from Amazon that are okay for light duty use. Other equipment used for the shoot included some flags (framed black cloth panels) held in C stands to keep stray light from hitting the backing and to block daylight from the two windows in my shop.
Post Production - I shoot in RAW mode which gives the most flexibility to adjust color and exposure later. This means that rather than try to get a "perfect" exposure, instead the goal is to get a uniform range of exposure with no clipping at the top and bottom of the exposure histogram. "What?!" I hear you say... exposure is a much broader topic than I can get into now, but will in a future tutorial. Let's just say for now that my goal is to get an exposure that will allow me to create the image desired later in the computer rather than as shot. I import the images into Adobe Lightroom to make the adjustments and also use Photoshop to "paint out" the model stand and other flaws. Photoshop can also be used to do all of the color correction rather than Lightroom, but I prefer using Lightroom as it allows for easy changes later if needed.
Well, that's a pretty quick overview of how I shot the photos of the Y Wing. Like I said, I'll try to put together some more comprehensive tutorials on model photography in the future. I'm happy to answer any questions as well.
Last edited:
Similar threads
- Replies
- 3
- Views
- 732
- Replies
- 150
- Views
- 17,010
- Replies
- 2
- Views
- 527
- Replies
- 12
- Views
- 1,346