Re: MCM's (Mance Vader) Darth Vader saber projects and such
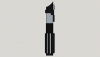
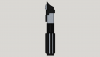
After some extensive reconstructive surgery, I think that I might use this ball tension catch after all! I started by rounding off the corners of the flat part near the mounting screw hole with a dremel and hand file.

On the actual piece, there is a lip that goes around the circumefrence of the flange of the catch. The piece that I received has no such lip; the boxes that houses the ball bearing continue to the bottom of the catch.
I masked off the area of the catch with tape that I wanted to remain intact and then took a hand file to the sides of the boxes in order to create a lip. This step was super tedious! It probably took an hour or so to file down both sides. I worked on it while listening to a podcast (multi-tasking ftw!). All in all, I maybe only took .5 mm off of either side, but it really helped the boxes to visually stand out from the flange


The ball bearing boxes on the actual prop are rectangular. Simply nobody makes them that way anymore (they just don't make them like they used to!). All of the catches that I've seen in the wild have rounded tops. In order to remedy this, I used a cutting wheel bit on a dremel to score the crap out of the top and sides of the bearing boxes. I then mixed up some JB Weld epoxy putty and put a couple blobs on top of the boxes. After the putty cured, I then spent about another hour (again listening to a podcast) filing the top and sides into the correct rectangular shape.
The catch wasn't quite wide enough (it should cover most of the allen bolt head with just a bit peaking out of the sides). In order to remedy this, I cut a few strips of plastic from an old gift card and glued them around the circumference of the catch, making sure to keep the top edge of the plastic level with the flange of the catch. I trimmed up any overhanging plastic, then blasted the whole thing with 3 or 4 coats of filler primer. The result is what you see here:


I also managed to get a template printed out and I've marked the holes for drilling on the upper shell. I think I'm going to keep the stock 2.0 core and have the bolts thread into that. It might be kinda difficult tapping the threads in the the holes that go into the ribbed section. Anyone have any advice on the best way to approach this? For the initial hoes, I definitely need to use a drill press, which I've never used on metal before. The last time I used one was literally half my life ago while in high school, so any advice on drill bits/speeds/technique would be greatly appreciated!
After some extensive reconstructive surgery, I think that I might use this ball tension catch after all! I started by rounding off the corners of the flat part near the mounting screw hole with a dremel and hand file.
On the actual piece, there is a lip that goes around the circumefrence of the flange of the catch. The piece that I received has no such lip; the boxes that houses the ball bearing continue to the bottom of the catch.
I masked off the area of the catch with tape that I wanted to remain intact and then took a hand file to the sides of the boxes in order to create a lip. This step was super tedious! It probably took an hour or so to file down both sides. I worked on it while listening to a podcast (multi-tasking ftw!). All in all, I maybe only took .5 mm off of either side, but it really helped the boxes to visually stand out from the flange
The ball bearing boxes on the actual prop are rectangular. Simply nobody makes them that way anymore (they just don't make them like they used to!). All of the catches that I've seen in the wild have rounded tops. In order to remedy this, I used a cutting wheel bit on a dremel to score the crap out of the top and sides of the bearing boxes. I then mixed up some JB Weld epoxy putty and put a couple blobs on top of the boxes. After the putty cured, I then spent about another hour (again listening to a podcast) filing the top and sides into the correct rectangular shape.
The catch wasn't quite wide enough (it should cover most of the allen bolt head with just a bit peaking out of the sides). In order to remedy this, I cut a few strips of plastic from an old gift card and glued them around the circumference of the catch, making sure to keep the top edge of the plastic level with the flange of the catch. I trimmed up any overhanging plastic, then blasted the whole thing with 3 or 4 coats of filler primer. The result is what you see here:
I also managed to get a template printed out and I've marked the holes for drilling on the upper shell. I think I'm going to keep the stock 2.0 core and have the bolts thread into that. It might be kinda difficult tapping the threads in the the holes that go into the ribbed section. Anyone have any advice on the best way to approach this? For the initial hoes, I definitely need to use a drill press, which I've never used on metal before. The last time I used one was literally half my life ago while in high school, so any advice on drill bits/speeds/technique would be greatly appreciated!
Last edited:
")