Whit
Well-Known Member
I decided to start a thread focusing on my second major prop. My first prop was Mjolnir which can be found via my page.
I am not the best when it comes to a play by play of my process, but I am happy to answer any questions anyone may have along the way.
I am starting this thread in progress, so I only have one image. I haven't posted in a long time, so I need to find a way to get the photo on this thread.
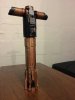
It all started when my friend had sent me an image of his Kylo Ren Lightsaber that he printed on his 3D printer as home. I was greatly surprised and interested in his build that I had to ask him about it. He is not on the RPF and he just wanted to print it for fun, but I was inspired by his print that I wanted to make my own.
He told me that he found the model on Thingiverse, so i went to work searching for the files. I was able to find it and have posted a link to his file page below. Shout out to CaseStudyno8 for the files! Thanks man, they worked out nicely.
http://www.thingiverse.com/thing:1598042
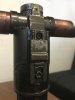
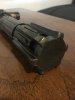
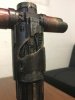
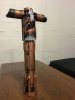
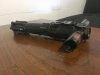
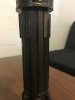
Once I got the files and set up the parts, I stared printing things in ABS at work after hours. Once everything was printed I brought them home for some sanding and acetone washing to smooth out some of the bits, I wasn't tedious with all the parts of the lightsaber, because I knew 1. that this would not be 100% movie accurate and 2. the movie version is actually a bit worn and not a sleek as most lightsabers. There is a certain roughness and almost archaic feel to it.
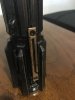
After getting the parts to a point in which I was satisfied, I used acetone to put all the pieces together with exception to the belt clip piece as I felt it would be hard to paint it and around it if I went ahead and installed that piece. I also had a slight issue with the printed wire that runs along the outside of the hilt so I shaved that off and bored out the small "clips" holding the wire in place. I am going to find some thin red wire to thread through the "clips" and secure it to the hilt once I have everything painted how I like.
Well, I'll leave it at that for now. I have primed most of the hilt and will set to work painting/weathering when I find some more time. Then I may move on to figuring out the blades. I have some ideas on that, but that will be for future posts.
I'll post an image of it as soon as I can.
I am not the best when it comes to a play by play of my process, but I am happy to answer any questions anyone may have along the way.
I am starting this thread in progress, so I only have one image. I haven't posted in a long time, so I need to find a way to get the photo on this thread.
It all started when my friend had sent me an image of his Kylo Ren Lightsaber that he printed on his 3D printer as home. I was greatly surprised and interested in his build that I had to ask him about it. He is not on the RPF and he just wanted to print it for fun, but I was inspired by his print that I wanted to make my own.
He told me that he found the model on Thingiverse, so i went to work searching for the files. I was able to find it and have posted a link to his file page below. Shout out to CaseStudyno8 for the files! Thanks man, they worked out nicely.
http://www.thingiverse.com/thing:1598042
Once I got the files and set up the parts, I stared printing things in ABS at work after hours. Once everything was printed I brought them home for some sanding and acetone washing to smooth out some of the bits, I wasn't tedious with all the parts of the lightsaber, because I knew 1. that this would not be 100% movie accurate and 2. the movie version is actually a bit worn and not a sleek as most lightsabers. There is a certain roughness and almost archaic feel to it.
After getting the parts to a point in which I was satisfied, I used acetone to put all the pieces together with exception to the belt clip piece as I felt it would be hard to paint it and around it if I went ahead and installed that piece. I also had a slight issue with the printed wire that runs along the outside of the hilt so I shaved that off and bored out the small "clips" holding the wire in place. I am going to find some thin red wire to thread through the "clips" and secure it to the hilt once I have everything painted how I like.
Well, I'll leave it at that for now. I have primed most of the hilt and will set to work painting/weathering when I find some more time. Then I may move on to figuring out the blades. I have some ideas on that, but that will be for future posts.
I'll post an image of it as soon as I can.
Last edited by a moderator: