Arc Reactor Mark 1 - First attempt at molding. (Finished)

Kingmob

Well-Known Member
So I finally have a weekend free so I can make a start on this project.
For the last while I've been gathering all the parts and stuff i need and I think I've everything I need to build straight through. but we'll see how much i regret those words...

I'm starting with this kit I ordered off Shapeways. https://www.shapeways.com/product/NUKUB3LSW/arc-reactor-master?li=more-from-shop&optionId=12751876
It printed really nice and took care of the hardest part. The maker was also really helpful with some questions I had.

The one issue is that I have to recast the main ring in clear resin, which will be a challenge since I've never cast anything before, clear or otherwise.

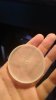
First things first though. I decided to be extra movie accurate and start by making the palladium ring just like Tony Stark did.

Currently I live in Japan and there is an amazing store called Tokyu Hands. (It's a dangerous place if you have any kind of making hobby...)
I found some jewelry wire that was the perfect size, cut a length and laid in in the groove of the main ring. it was a little trickier than I thought, it didn't want to lay straight or flat.
For the moment i haven't closed the ring, but once I have my clear part, I'll glue it in place and hide the seam.
DSC_0709.JPG

It's actually a little hard to see it in the real prop if it's ever there, but I'm going to go with it.

Next step: Making the internal circuits and greebles and spending far too much time and effort on a section that no one is going to care about when they see the finished prop.
 
Last edited:
Re: Arc Reactor Mark 1 - First attempt at molding.

That's a really nice kit. Here's what I did with it;

http://www.therpf.com/showthread.php?t=229214

If you're casting in a clear resin, make sure that you get a compatible silicone for the mold. Ideally get the clear resin and silicone from the same supplier so that they can advise which combination works.

I used a water clear polyurethane for my lightboxes - they looked good, but are very brittle - one drop, and they shatter. If this is something that will be handled, perhaps investigate getting some clear acryllic laser cut instead. For my chest plate cover, I found an ebay seller that would do rings or circles in custom sizes.
 
Re: Arc Reactor Mark 1 - First attempt at molding.

Well in Japan, my choices for resin and silicone are a bit limited. But I think the lady in the shop said what I got works ok together.
And I had a long look for acrylic discs for the the light box. It's looking like I'll have to make my own.
 
Re: Arc Reactor Mark 1 - First attempt at molding.

Part Two: The circuit board
One of the sources I'm using is this one: http://blog.heliumware.com/category/models/arcreactor/
I liked the look of the circuit board he did, so I'm going to steal it.

First, after spending too much time looking for round PCBs that would fit, I decided to just make it from scratch.
DSC_0710.JPG
I used this neat compass thing that takes exacto blades to cut a disc and a ring. Then I marked out some holes for drilling.
DSC_0715.JPG

Next the components. I went to Nipponbashi in Osaka (which is like Akihabara but more hipster) and found an old cheap motherboard from something and ripped it apart for intersting looking parts. My mouse also died recently, so I tore that apart too for good measure.
DSC_0716.JPG
Some more drilling, painting and faking circuits with a gold pen:
DSC_0721.JPG

And full assembled:
DSC_0727.JPG

A little fake solder just in case someone has a look underneath...
DSC_0732.JPG

Fits very nicely, almost a shame it will be buried under everything.
DSC_0728.JPGDSC_0729.JPG

Next, some in betweeny parts while I put off starting the moulding.
 
Re: Arc Reactor Mark 1 - First attempt at molding.

Part 3: In-between bits.
The whole project is going a lot faster and smoother than I was expecting. I can only assume that's how it's always going to go.

I painted up the heat sink with black, and rather than fiddle around with masking, I just painted the geared looking section by hand.
DSC_0734.JPGDSC_0737.JPG
I didn't worry too much about filling and sanding her. I didn't want the headache. But a few thick coats of paint seemed to do a good job.

Next, the focusing rings with some brass paint and some brass mesh painted white and trimmed up.

DSC_0733.JPG
I got two sets of these and I'm planning to make a wearable version as well if I don't need spares and don't mess up the casting too much.

Finally I started on the small coil that's on the inside and under the top plate. Just some styrene tubes painted red. I bought the Copper wire in a hobby store and by coincidence it was already looped into just the right size, so it saved me a little bit of bother.

DSC_0739.JPGDSC_0740.JPG

Next up: making a master for the internal light box and prepping the main ring for moulding (Spoiler: Lots of sanding!)
I have a 3 day weekend this week, so hopefully that's when I'll be getting the resin out, once I get a coworker to help translate the instructions on the tin...
 
Re: Arc Reactor Mark 1 - First attempt at molding.

This is looking killer! Great to see my files being used by people who are passionate for the project :)
 
Re: Arc Reactor Mark 1 - First attempt at molding.

Part 3: Moulding.

So finally got some time to sit down and cast the light box and main ring.

I scratch-built a disc for the lightbox after a lot of time searching for something that would fit. Nothing fancy, just stacking some styrene cut using my compass thing, then a thin strip around the edge to make it nice even and smooth. Then just lots of filler, primer and sanding.
The main ring was similar. Lots of filler and snading to get rid of the print lines and get everything nice and glass smooth.
DSC_0747 1.JPG

Then it was time for moulding. It was messy and a little haphazard, I wound up mixing way too much of the clear resin so I poured it into whatever container I could use and ended up testing some of the dye I had for it.
All seemed to be going well... No flaws.. no bubbles...
Here`s one of the random things I filled to use up the resin.
DSC_0752 1.JPG

Then it was time to demould... I was excited. I was planing to run a second set as spares and to use them for the wearable version...
But then:
DSC_0748 1.JPGDSC_0749 1.JPG
I have no idea what happened, but I had to cut them out of the moulds.

So after blowing a lot of frustration in Overwatch, I came back and started picking off the silicone and sanding again...
DSC_0750.JPG
They are pretty salvageable, They are still the right size and the lightbox was going to be diffused anyway. The main ring is meant to be clear, but I can live with it being diffused as well.
Im looking at options to clear it up, but if anyone has any advice, Im all ears.
I plan to try more casting with the silicone and resin I have left, this time with tint to get that coke bottle green effect.

Next: Starting the transformers.
 

Attachments

  • DSC_0751.JPG
    DSC_0751.JPG
    689.3 KB · Views: 125
Re: Arc Reactor Mark 1 - First attempt at molding.

Small update.
I picked at the sanding last night and got both pieces as smooth and clean as possible.
There's a big bubble in the main ring, but it's something I can hide with the transformers.
DSC_0753.JPGDSC_0755.JPGDSC_0757.JPG

I can live with these pieces, but I'm going to recast them and see if I can do better. I got some mould release (I think) so I'll try that along with some colouring.
I also picked up some plastic polishing stuff, so we'll see if that will clear up the main ring I already have.
 
Re: Arc Reactor Mark 1 - First attempt at molding.

Attempt no.2
This time I used some mold release and used a little dye to colour the pieces to get that coke bottle green in the main ring.
DSC_0760.JPG
Came out mostly good. they'll still need a sanding and polishing and the colour is a little too strong. I also need to test what they do with light from embedded leds. Hopefully it's not too green.

I had enough resin to make one last set and the moulds where mostly still good. This time I think I got the colour down, but we'll have to see how much fixing I need to do on them. Third time's the charm?
 
Re: Arc Reactor Mark 1 - First attempt at molding.

Remolded and recast the same parts again and was a little more careful with the colours.
DSC_0761.JPGDSC_0767.JPG
They are a bit rough, but they should sand up pretty well. I've gotten some polishing stuff that's getting good results. So I've one main one and a couple of back ups.
That was the hard part over. Now I just have the annoyingly fiddly electronics coming up.
 
Re: Arc Reactor Mark 1 - First attempt at molding.

Update:
I drilled the holes for the LEDs in the clear rings, and did a test with one of my spare rings.
DSC_0821.JPG
Nothing caught on fire, so things continue apace.

Next I started work on the face plate.
It needed a metal ring in the centre, but I didn't have access to a lathe and I couldn't find anything that matched particularly well. I was considering giving up and just making it from styrene and hoping for a good paint job. But, at the same time I was busy tracking down a the screen used part that would be on the end of the power cable. When it arrived it had a metal ring that was almost perfect. It actually made me wonder if that's what they used for the real one.
I just needed to add to the centre ring so the metal ring would sit right.
DSC_0823.JPGDSC_0824.JPG

In Osaka I found a store that only did screws, bolts and nails. And after a lot of browsing I found exactly the right ones. It's one of my favourite shops here.
I added them in and stuck the whole plate to the secondary coil. The brass focusing rings will go under that, but I'm saving that for final assembly.

Since I'm actually getting close to the end, I started on the stand... and kept going until I accidentally finished it. It's nothing fancy, just some random plastic thing I found at the 100 yen store with an acrylic box. The dial doesn't do anything cause it dims the LEDs too much, so right now, it's for cool looking purposes.
DSC_0827.JPG

The stickers I got from Etsy: https://www.etsy.com/listing/263187579/iron-man-stark-industries-vinyl-decal?ref=shop_home_active_40
https://www.etsy.com/listing/128243693/stark-industries-asset-tag?ref=shop_home_active_9
The metal part is the female end for the screen accurate power connector, so I am able to plug the reactor in without any extra, non-accurate wires.

So I'm coming up on the parts I've been dreading. Wiring and making the transformers. If things are going to go wrong, now's the time...
DSC_0826.JPG
 
Re: Arc Reactor Mark 1 - First attempt at molding.

Getting close. Finished winding the transformers, added the brass and a dab of silver paint for the solder.
When it was all done, the face plate actually had trouble squeezing into the main ring. It took a lot of fiddling and pushing and a little sanding, but it got there in the end.
DSC_0873.JPGDSC_0875.JPGDSC_0879.JPG
So now it's just some final wiring. Final assembly. The adding the power cord.
 
Re: Arc Reactor Mark 1 - First attempt at molding.

And finally done.
I tracked down the movie accurate part for the power socket. I think I saw the part number mentioned here, but can't remember now.
But it's this: http://jp.rs-online.com/web/p/products/6904071/

It takes a little convincing and love to coax the part out of the metal. Also, I used the washer for it as the ring on the faceplate.
DSC_0893.JPG
I soldered the leads to it and it works through the female socket you can get with it perfectly.

At last with a little touch up, I was done.
DSC_0880.JPGDSC_0881.JPGDSC_0882.JPGDSC_0883.JPGDSC_0884.JPGDSC_0886.JPGDSC_0891.JPGDSC_0889.JPGDSC_0897.JPGDSC_0888.JPG

There's a lot of stuff I'd change if I built it again. but over all, pretty happy.
But I think something with less soldering and wires for the next project.
 
This thread is more than 7 years old.

Your message may be considered spam for the following reasons:

  1. This thread hasn't been active in some time. A new post in this thread might not contribute constructively to this discussion after so long.
If you wish to reply despite these issues, check the box below before replying.
Be aware that malicious compliance may result in more severe penalties.
Back
Top