Kilano
New Member
Hi folks !
First of all, i want to thanks @Jamestan for is thread on this forum. I started my mod on my BS helmet following is advice.
I want to share my work too because i love looking at other people work on the BS helmet so feel free to comment my work too.
I will update this message directly for update.
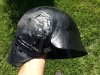
This is the first stage of my welding and sanding. I'm struggling a little with the button part right now but overall you can see the welding and the orbital sanding doing a great job. I also cut the side part where the fourth line jaw part was to replace it with a custom one (still in progress). The first thing i notice is the color difference between the two part after the sanding.


The tool i use to weld and sand


Here my first layer of painting. As you can see, the paint on the button doesn't react the same. I hope next layer of paint will get ride of that. I have use firebrick dust for texture.


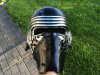
After that, i have begin to mod the chrome part with a dremel and a nice fabric i found. I also cutted the eye part. You see it's loot like a ninja turtle headband.


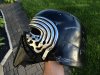
Last update (Disney mod) finished on 11 september 2016 !!
Here some photo of the process.
First part was to cut and weld in place the jaw part

After i have sand and do some test fitting the jaw part and the chrome part

The next part was to heat the chrome part (This is a stressful moment we you do it !!!)


The hardest part was to fit this two piece on the chrome part and the bottom. I finally decided to weld in place and use milliput to put part together. Here some pic before and after milliput


The next part was to sand properly with 80 and 320 grind. Picture before and during the painting

Here the final result, maybe i'll take better picture later with better light

I hope you enjoy !
First of all, i want to thanks @Jamestan for is thread on this forum. I started my mod on my BS helmet following is advice.
I want to share my work too because i love looking at other people work on the BS helmet so feel free to comment my work too.
I will update this message directly for update.
This is the first stage of my welding and sanding. I'm struggling a little with the button part right now but overall you can see the welding and the orbital sanding doing a great job. I also cut the side part where the fourth line jaw part was to replace it with a custom one (still in progress). The first thing i notice is the color difference between the two part after the sanding.
The tool i use to weld and sand
Here my first layer of painting. As you can see, the paint on the button doesn't react the same. I hope next layer of paint will get ride of that. I have use firebrick dust for texture.
After that, i have begin to mod the chrome part with a dremel and a nice fabric i found. I also cutted the eye part. You see it's loot like a ninja turtle headband.
Last update (Disney mod) finished on 11 september 2016 !!
Here some photo of the process.
First part was to cut and weld in place the jaw part
After i have sand and do some test fitting the jaw part and the chrome part
The next part was to heat the chrome part (This is a stressful moment we you do it !!!)
The hardest part was to fit this two piece on the chrome part and the bottom. I finally decided to weld in place and use milliput to put part together. Here some pic before and after milliput
The next part was to sand properly with 80 and 320 grind. Picture before and during the painting
Here the final result, maybe i'll take better picture later with better light
I hope you enjoy !
Attachments
Last edited:


")


