Sharken Beard
Active Member
Good afternoon guys!
First off I wanted to thank everyone in this forum. I have spent countless hours browsing through these forums getting all kinds of ideas for this room and for future props! I have always wanted a home theater in my house. And I have always loved immersive locations like Universal Studios, Disney, Halloween at Cedar Point, how they incorporate the set into the line making you feel a part of the experience! So I began to design my themed theater.
My wife and I are massive Lord of the Rings fans so it seemed the best idea to theme my theater in LOTR! I began planning the spring/summer of 2014. And began construction the beginning of November of 2014. I Had quite a few pictures of that winter, but lost them all after a failed windows 10 update...Basically I tore out all the drop ceiling. I moved duct work and wiring to allow me to drywall. Ran all my speaker wire, hdmi, etc.Built my soffits to hide said duct work and the projector. And wrapped up the winter with drywall.
So fast forward to this last November, 2015. Here is where I have pictures for my work. I figure I will post some photos with a brief description and if anyone has any further questions, I'd be happy to answer them! And finally critiques, please feel free to give me any advice criticism, whatever! I love this community and I feel privileged to be able to post here! Thanks!

So this was the first project I tackled, an Argonath for each corner surrounding my screen. This was my visualization.


Next I took the Weta bookends I had and photographed them on a white background so I could scale them up to size.

Next I laid a graph of 1"x1" over the photos and decided on a final statue size. I wanted to maximize the room size and make these guys as large as possible! So I decided on a final height of 90" from the tip of the crown to the floor. I then laid a grid over 4'x8' sheets of eps foam.

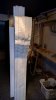
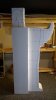
I then roughly cut out the shape and traced it onto 4 more sheets of eps. I then cut 4 sheets for the arm and ax buildup and glued the entire thing together into one massive block.


And in no particular order, I began to carve the statue bit by bit. I realized quickly that minor details were much harder to replicate in the foam exactly as the Weta pieces, so I adapted my own interpretation of how I felt these guys would look! I also had to turn the hand up closer to a 90 then a 45 to accommodate my space.
First off I wanted to thank everyone in this forum. I have spent countless hours browsing through these forums getting all kinds of ideas for this room and for future props! I have always wanted a home theater in my house. And I have always loved immersive locations like Universal Studios, Disney, Halloween at Cedar Point, how they incorporate the set into the line making you feel a part of the experience! So I began to design my themed theater.
My wife and I are massive Lord of the Rings fans so it seemed the best idea to theme my theater in LOTR! I began planning the spring/summer of 2014. And began construction the beginning of November of 2014. I Had quite a few pictures of that winter, but lost them all after a failed windows 10 update...Basically I tore out all the drop ceiling. I moved duct work and wiring to allow me to drywall. Ran all my speaker wire, hdmi, etc.Built my soffits to hide said duct work and the projector. And wrapped up the winter with drywall.
So fast forward to this last November, 2015. Here is where I have pictures for my work. I figure I will post some photos with a brief description and if anyone has any further questions, I'd be happy to answer them! And finally critiques, please feel free to give me any advice criticism, whatever! I love this community and I feel privileged to be able to post here! Thanks!
So this was the first project I tackled, an Argonath for each corner surrounding my screen. This was my visualization.
Next I took the Weta bookends I had and photographed them on a white background so I could scale them up to size.
Next I laid a graph of 1"x1" over the photos and decided on a final statue size. I wanted to maximize the room size and make these guys as large as possible! So I decided on a final height of 90" from the tip of the crown to the floor. I then laid a grid over 4'x8' sheets of eps foam.
I then roughly cut out the shape and traced it onto 4 more sheets of eps. I then cut 4 sheets for the arm and ax buildup and glued the entire thing together into one massive block.
And in no particular order, I began to carve the statue bit by bit. I realized quickly that minor details were much harder to replicate in the foam exactly as the Weta pieces, so I adapted my own interpretation of how I felt these guys would look! I also had to turn the hand up closer to a 90 then a 45 to accommodate my space.