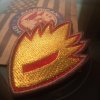
Star Lord Build from scratch-ish...

Staar Lord Maan, Looking good, I ordered the same parts as you, I got my zipper, and i had joatrash send them to Indy for my jacket. I will be using my zipper for the pants. I have to see is i can dye or color the red to black.
 
Last edited by a moderator:
Okay, so I started work on my bits and pieces tonight and compared them with these images so I can choose my paints...
Insignia - RAISED Circular detail.jpgInsignia.jpg

...and naturally this one...

Arm Valve DETAIL.jpg

I like to documet as much as possible so I shot the work area...

Arm Valve painting 01.JPGArm Valve painting 02.JPG

...then my battery started going out...I got these two before proceeding to the Insignia

Arm Valve painting 03.JPGArm Valve painting 04.JPG

What really sucks is that I'm very proud of the process I followed to get to this treatment...

Insignia placement and valve.JPGInsignia placement.JPG

And of course, the close ups - I don't normally go this close on something but because I missed out on showing how I did it, here ya go.
Insignia Close up Blue.JPGInsignia Close up RED.JPG
And here's the comparison - Mine is on the left and Chris Pratt's in on the right...
Insignia Close up.JPG <--mine Insignia - RAISED Circular detail.jpg <--Chris Pratt's

This thing came to me in all black. I did the blue first, (had to mix paint for the first time in 30 some odd years) and dry brushed most of anything you see with red or blue. I then took a small paper towel and rubbed it with gray on the parts surrounding the circle and square. I compared it to the first images you see at the top of this post and realized that there was a bit of beige going on in there so I repeated the treatment using beige instead. The red field had some dark highlights which had to be applied only after dry brushing some red in the valleys of this relief. I went back and dabbed some black in there then took a very small amount of thinner to it to achieve the look. As for the white lines, I had a very VERY small brush and I triple-finger-braces as I painstakingly painted each white line by hand...oh and I did a little white and blue for the valleys in the relief parts of the circle - again, using the image from the movie as a color mapping guide

So there you have it! I'm going to bed now..:sleep
 
Last edited:
Heads up, people, I just got schooled by a five year old on all things Guardians of the Galaxy...

Psst, it's not a 'Blaster' like we've all be calling it.....it's an 'Element Gun'

Have a look...


Last edited by a moderator:
Quad Blaster is NERF's name for their toy because you can shoot four darts.

3d6f756ad7a21989f61921f63b296a89.jpg


Indeed it does, and likely that's probably as far as they were thinking. I personally figured they named it as such because Quill's gun (at least in the comics) has the ability to use the four elements as ammo. So they might have loosely incorporated that idea into the design. *shrugs* Or they just thought that having the option of firing fours darts at the same time would be cool. But maybe my thinking is too abstract, those blasters of his might not even be a re-invented design of the element gun, maybe he has yet to receive it in the movies. One can only speculate, and I'm likely wasting my time doing so. lol.
 
Last edited:
For what it's worth, I love the animated gif, :lol

https://s-media-cache-ec0.pinimg.com/originals/3d/6f/75/3d6f756ad7a21989f61921f63b296a89.jpg


Indeed it does, and likely that's probably as far as they were thinking. I personally figured they named it as such because Quill's gun (at least in the comics) has the ability to use the four elements as ammo. So they might have loosely incorporated that idea into the design. *shrugs* Or they just thought that having the option of firing fours darts at the same time would be cool. But maybe my thinking is too abstract, those blasters of his might not even be a re-invented design of the element gun, maybe he has yet to receive it in the movies. One can only speculate, and I'm likely wasting my time doing so. lol.
 
I got this in the mail today, and as you can see by the image, below...

Infinity Orb before.JPGInfinity Orb after.JPG

...I had some work ahead of me.
Custom made by Soulinertia, (many thanks), I requested a special version of this.
Watch the details, here;


ORB.jpg


Infinity Orb after.JPG


Infinity Orb before.JPG
 
Last edited by a moderator:
Okay, so I started work on my bits and pieces tonight and compared them with these images so I can choose my paints...
View attachment 385878View attachment 385879

...and naturally this one...

View attachment 385880

I like to documet as much as possible so I shot the work area...

View attachment 385872View attachment 385873

...then my battery started going out...I got these two before proceeding to the Insignia

View attachment 385874View attachment 385875

What really sucks is that I'm very proud of the process I followed to get to this treatment...

View attachment 385876View attachment 385877

And of course, the close ups - I don't normally go this close on something but because I missed out on showing how I did it, here ya go.
View attachment 385881View attachment 385882
And here's the comparison - Mine is on the left and Chris Pratt's in on the right...
View attachment 385883 <--mine View attachment 385878 <--Chris Pratt's

This thing came to me in all black. I did the blue first, (had to mix paint for the first time in 30 some odd years) and dry brushed most of anything you see with red or blue. I then took a small paper towel and rubbed it with gray on the parts surrounding the circle and square. I compared it to the first images you see at the top of this post and realized that there was a bit of beige going on in there so I repeated the treatment using beige instead. The red field had some dark highlights which had to be applied only after dry brushing some red in the valleys of this relief. I went back and dabbed some black in there then took a very small amount of thinner to it to achieve the look. As for the white lines, I had a very VERY small brush and I triple-finger-braces as I painstakingly painted each white line by hand...oh and I did a little white and blue for the valleys in the relief parts of the circle - again, using the image from the movie as a color mapping guide

So there you have it! I'm going to bed now..:sleep

that arm badge looks great!!!

it look like you used enamels form the looks of those little jars, would that be correct?

i've been looking at my badge for days wondering how to paint it, worried im gonna mess it up, or what ever paint i decide to use will just flake right off
 
that arm badge looks great!!!

it look like you used enamels form the looks of those little jars, would that be correct?

I've been looking at my badge for days wondering how to paint it, worried im gonna mess it up, or what ever paint i decide to use will just flake right off

First off, don't think you'll 'mess it up'. Think of George Lucas' used universe he created for Star Wars and lean into the mistakes...make them work for you. The trick with recreating a pre-existing item like this insignia, (or anything that looks to have been 'worn'), it the ability to discern that there can be a lot of colors in it. 'See past' the whole and look at the finished item from the movie from the base color....'up'

As you can see, mine shipped to me as a black/charcoal-ish thing;
Insignia.jpg
....that was lucky for me, because there is a lot of shadowing in Chris Pratt's piece....so from there, opted to go with the square shapes first.

Before I continue, I'll hand everyone a small bit of advice that can be used in any project, be it for prop making or for anything in life which may seem bigger than one's self and it comes in the form of a question followed by an answer;

How do you eat an elephant?
------------------------------------------------> One bite at a time.

With that said, get your 3x magnification glasses out and look CLOSE at your reference materials as you work, doing this one small segment at a time and enjoy your newly-found talent of hyper-focusing. Now, as I mentioned, my camera battery died when I was painting, so I couldn't document it, but I'll do my best, here, from memory.

I'll start by showing you closeups of the paints I used...mind you, I'm not the end-all/be-all of painting objects and I used only what I had at my disposal. A lot of this stuff was dried up so I lucked-out in finding paints that were sort of viable. for the bits that were a bit gummy, I just popped some thinner into the paint cap and dabbed one drop at a time in it and mixed. Most of what I did was dry brushing, anyway, so keep some paper towels nearby.

All Paints.JPGall paints closeup.jpg

For the blue part, I mixed some of that 'blue' with some 'Nato' black stuff in that relish jar-lid and then did that dry brush technique.

Okay, I mashed a cheap-O set of testors brushes into into each square; spinning the bristles around. Beyond this, I wasn't afraid to 'smudge' the paint around with my finger tip or a bit of paper towel. I really can't give you technique on painting, you just gotta grip it and rip it - hoping that you learn along the way. I will say that where I noticed that there were some bright highlights, I took a small dab of white and rubbed and blended with the aforementioned finger-smudging technique and now that I look at it, I think I may need to tone down that white a little and bring out the blue a bit more...(by the way, in the post thread, you may notice something that looks like finger prints...that's just the texture the 3D printer laid down as it went and I couldn't do anything for that...it keeps fooling me every time I see it, LOL)

insignia close up blue.jpg

For the red portion, you'll notice that there are darker shadows in the lower relief.

Insignia Close up RED.JPG

I started by dry brushing everything in red, then went I dabbed in the lower parts with black again to dull it down.

For the areas surrounding the red and blue, I, first, used white....big mistake. I held my crappy work up to the reference photo to discover it was way too bright. It's actually tan, so I applied it to a paper towel, making sure there wasn't much on it and lightly went over the surface. It worked surprisingly easily. Oh, by the way, about the reference photo, you'll want to PRINT the Chris Pratt insignia photo, above, as an 8x10 and have it next to you as you work...you'll be glad you did. It's the same as working a puzzle and looking at the box to figure out where a piece should go.

Lastly, for those bits that look like it was a dry-wipe with white, I actually took a brush with three or four hairs on it;

Brush size.JPG

....triple braced my fingers and hands, (held one hand with the other holding the brush and anchoring my fingers of my brush hand against the forefinger of the opposite hand - the wrist for which was braced against the table edge)...

Grip 1.JPGGrip 2.JPGGrip 4 closeup.JPGGrip 3 reverse.JPG

...and painstakingly painted each line;

White Lines 1.JPGWhite Lines 2.JPG ....individually.

Yes, close-up, this looks like *****, but it'll be on your arm and you'll be moving around...the wonderment in the eyes of the people looking at your outfit (as a whole costume) will be enough to make them not see something that is less than two millimeters wide. :cool

Now, when you move your brush to apply the paint to these ridges, get those three bristles at a 45 degree angle and move s l o w l y, moving both your hands while gripping that brush f i r m l y. Think of your hands as the assembly robot that makes cars. It's exponentially larger then what is being made, but the whole thing moves with precision.

Scroll up...look at the Brass and Rust paint bottles. As you can see, the brass was used for the Arm Valve and a little bit of the Rust was added to make the center ring that unique color. I left the flange on the valve so when I glue it into the jacket, It'll have something to grab on to, but I'm thinking I may adhere a sub strait so that it - for sure - won't fall off. These things are kind of irreplaceable...

Arm valve 1.JPGArm valve 3.JPGArm valve 2.JPG


Did that help?:D
 
Last edited:
Staar Lord Maan! This is coming along amazing! I love following this build!

I have a friend in the patch collecting community who just made the Star Guard patch and has just released it for sale on his site. I thought you or other might find it useful for a build. (Please let me know if this isn't ok to post here. I'm still learning the ropes of the RPF forums)

http://www.american-sheepdog.com/products/guardians-of-the-galaxy-uniform-patch10450841_10152799514178735_6629815170045011745_n.jpg
 
Everyone is new once, heh! No worries, but you probably should Private Message folks first in the future ;) Also thanks for following me here - I'm trying to keep this as accurate as I can with the resources I currently have. Regarding the patch, once I do my Trench coat, I'll be making it from leather. Replicating what's on the screen is what makes this both fun and often frustrating, LOL!

Staar Lord Maan! This is coming along amazing! I love following this build!

I have a friend in the patch collecting community who just made the Star Guard patch and has just released it for sale on his site. I thought you or other might find it useful for a build. (Please let me know if this isn't ok to post here. I'm still learning the ropes of the RPF forums)

http://www.american-sheepdog.com/products/guardians-of-the-galaxy-uniform-patchView attachment 390417
 
Sorry, man. I'll do that in the future. I got really excited when I saw the patch and really wanted to share it with you guys.

On a different note, I'm super pumped to see your trench when you start working on it! Seriously, your build is incredible!


Sent from my iPhone using Tapatalk
 
I have a camera man doing a documentary on my progress as I move along. Today's recording session yielded a small bit of the build involving the element gun. This is the lower cowl in a before and after shot. In order to seat this item against the rear part of the cowl, I had to remove a lot of material so that once it's in place, I'll have a more accurate length.

Lower Cowl before after for fit.JPG Gap Explained.JPG

And I'm kinda proud of this....I went all over town looking for heat shielding in auto shops etc. So, dejected, I ducked into Home Depot for something for the house when I found myself standing in front of THIS stuff...

Fiberglass sheeting for Rocket controls 2.JPG

Which, in my opinion, after painted silver will pass for THIS:

Rocket Control Sub Strait.jpg

No, really, look closer...

Rocket Control Sub Strait ZOOMED.jpg
See?
Fiberglass sheeting for Rocket controls.JPG

Chalk one more item off the list for less than ten bucks!

By the way, does anyone know how big these magnates are on this thing? 12mm Earth Magnates? (he said hoping they're actually magnates...)
 
My impression was that those were posts with a wider head instead of magnets, however magnets would probably be easier. I'd say those are no bigger than 5mm. And probably 2mm tall.
 
Be careful with the fiberglass. It will fray when you cut it, and it will itch like crazy if you get it on your skin!
Thanks for the tip! Might I inquire what you're using to mount your rocket controls? I've tried finding thin heat shield material and the like to no avail so I'm open to suggestions. So far as the Fiberglass material is concerned, I was thinking that I could saturate the fibers with some 'spray mount' or other kind of rubberized cement and let it dry before cutting it. There is some stuff a plumber friend of mine showed me which, when it dries, is flexible and extremely durable. I just need to part ways with a spatula for this process, LOL :lol
 
This thread is more than 6 years old.

Your message may be considered spam for the following reasons:

  1. This thread hasn't been active in some time. A new post in this thread might not contribute constructively to this discussion after so long.
If you wish to reply despite these issues, check the box below before replying.
Be aware that malicious compliance may result in more severe penalties.
Back
Top