Protocol
Active Member
Inspired by @kwalsh0000's fantastic build of the Footman from the new Warcraft Movie, I figured I could start my own thread (so as not to fill his thread will all my trash) for my build of the Footman from the 2016 movie "Warcraft" from Legendary Pictures and Duncan Jones.
We're a group of 5 guys making this, so sometimes some of them might hopefully pop in with their own contributions to this thread. I'll be documenting primarily my own effort, letting them go at their own.
Allright, here we go.

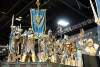
Based on the pictures from SDCC last year, we we're able to gain quite a bit of insight into how they look.
Turns out, there are two different kinds. We opted to call one the "Footman", and one "Royal Guard"
Luckily I had a buddy who went there, and I ended up calling him in the middle of the night (I live in Norway, so the timezones are a bit hard to keep track of) pestering him into hauling his camera down to the convention center the next day taking some nice high resolution pictures for me.
Note: The suit with the most "hands on" possibility is one of the Royal Guards, so its the best documented one, whereas the Footmen are only visible in the form of action figures, or on top of the Warcraft stand (seen above)
 The "Footman" (FM): Main features differing from the RG is the "ball" shoulders, unadorned armguards, unadorned helmet, missing chest piece, and generally less detailing all around. Note, Picture for ref is the action figure, but its more or less accurate to the screen used one. Screen used features a kama with rounded edges.
 The "Royal Guard" (RG): Large, rounded pieces make up the shoulders, unlike the "Footman" with the spheric shoulders. Lions on arms, much more details all around, cloth pieces are more angular and "angrier". Another big difference is the helmet, featuring a large extra "crown" and extra detailing. An extra chest piece has been added, on top of the chest from the FM. Back (not shown) also very different.
Also the shields and sword vary between the FM and RG, but those have to come later.
 Personally, I dont care for the RG shoulders and helmet, but the detailing on the greaves, the angular cloth pieces, and the chest are much nicer on the RG than the FM.
Neither did the other guys involved, so it was quickly resolved that we would mix and match the best parts of both, and make a "supersuit" of sorts.
Based on this, @Kroforce (another member here, and part of our group) made a quick 'shop job out of the different pieces we all agreed on wanting for our amalgamation of the suits. Other things like increasing the size of the shoulders and such were also considered, and even added. This is warcraft after all, so big shoulders are a bit of the charm. V1.3 is the one we ended up going for, but this is still open for moderation as the project progresses.
 I work part time at a industrial rapid prototyping lab, aka. I work as a 3D print machine operator, so I thanks to a very friendly boss, I had the possibility of getting the helmet printed for a very friendly price, and jumped on the possibility. A "quick" CAD model later, and we're in business! Note: The shoulders are still very WIP, so don't mind them.
I do all my modelling in Solidworks. Not the quickest way, but definitely the best for going the 3D printing route. Take it from me, I'm a professional.
 Now, these are stupid big in the movie, but I scaled them down a bit, so we would look a bit more heroic, and less bubbleheady. These are now about the size of a small Street Judge helmet (for anyone who has one.) Much longer though.
A bit lacking in pictures here, as this was done inbetween multiple other projects, but the short of it was:
Helmet was printed as two parts, the main dome, and the "mohawk". This was done to get the whole helmet into one machine, without having to cut up the structure itself. Afterwards it was mounted back in with glue and some taps, then smoothed on with some filler and lovely sanding. I stupidly enough didn't make any marks or keys so the ridge would go precisely where it should, but with enough eye-measuring, swearing and a bit of luck, it ended up where it should.
A couple of layers of spray filler to smooth out the printing lines in the nylon, sanding, then more spray filler and sanding followed, ending with two layers of black paint and wet sanding to get the texture silky smooth.
 A bit of a stupid choice I made, was to print the helmet without any kind of visor, or anything to hold the visor in place while sanding (this was ofcourse done since I wanted to wear the damn thing as soon as it came out of the machine... Oh vanity!) Also, since the plan was to cast atleast 7 copies of this since we all want one, and some even more than one, I had to figure out a smart way to close the visor. Since I had the CAD-model, I modelled a insert to perfectly fit into the visor to be mounted when the main bodywork was done.
 So this is where it stands as of now. This will be molded in the coming week, and cast in multiple copies from Smooth On ONYX in the coming weeks. We're debating cold casting them, but aluminium powder is heavily regulated in Norway, since... well... you can make things that go boom with it.
I've been working on both the bracers, and shoulders, but these are currently so heavily WIP that I have nothing to show apart from some ugly prints, and a couple of crappy 3D models.
Will ofcourse be updating as the project progresses, however slowly that might be.
I have quite a bit of reference on this project, but could always use more, so please, feel free to share any pictures you come into.
We're a group of 5 guys making this, so sometimes some of them might hopefully pop in with their own contributions to this thread. I'll be documenting primarily my own effort, letting them go at their own.
Allright, here we go.
Based on the pictures from SDCC last year, we we're able to gain quite a bit of insight into how they look.
Turns out, there are two different kinds. We opted to call one the "Footman", and one "Royal Guard"
Luckily I had a buddy who went there, and I ended up calling him in the middle of the night (I live in Norway, so the timezones are a bit hard to keep track of) pestering him into hauling his camera down to the convention center the next day taking some nice high resolution pictures for me.
Note: The suit with the most "hands on" possibility is one of the Royal Guards, so its the best documented one, whereas the Footmen are only visible in the form of action figures, or on top of the Warcraft stand (seen above)
Also the shields and sword vary between the FM and RG, but those have to come later.
Neither did the other guys involved, so it was quickly resolved that we would mix and match the best parts of both, and make a "supersuit" of sorts.
Based on this, @Kroforce (another member here, and part of our group) made a quick 'shop job out of the different pieces we all agreed on wanting for our amalgamation of the suits. Other things like increasing the size of the shoulders and such were also considered, and even added. This is warcraft after all, so big shoulders are a bit of the charm. V1.3 is the one we ended up going for, but this is still open for moderation as the project progresses.
I do all my modelling in Solidworks. Not the quickest way, but definitely the best for going the 3D printing route. Take it from me, I'm a professional.
Helmet was printed as two parts, the main dome, and the "mohawk". This was done to get the whole helmet into one machine, without having to cut up the structure itself. Afterwards it was mounted back in with glue and some taps, then smoothed on with some filler and lovely sanding. I stupidly enough didn't make any marks or keys so the ridge would go precisely where it should, but with enough eye-measuring, swearing and a bit of luck, it ended up where it should.
A couple of layers of spray filler to smooth out the printing lines in the nylon, sanding, then more spray filler and sanding followed, ending with two layers of black paint and wet sanding to get the texture silky smooth.
I've been working on both the bracers, and shoulders, but these are currently so heavily WIP that I have nothing to show apart from some ugly prints, and a couple of crappy 3D models.
Will ofcourse be updating as the project progresses, however slowly that might be.
I have quite a bit of reference on this project, but could always use more, so please, feel free to share any pictures you come into.
Attachments


Last edited by a moderator:
 )
)


