mwmuir12
New Member
Hello everyone, I debated for a while whether or not to make thread on my BS conversion, there are already plenty of threads already but I decided to anyway for two reason 1) I set out to make this helmet as accurate as possible to screen used/officially licensed versions of the helmet and 2) there are some gaps in the general knowledge of this process that seemed to be missing from most threads, and since I had to so some figuring out on my own I thought I would share for anyone else that has similar questions as I did when I started.
Before I go into the details I want to say while I'm setting out to make it as accurate as possible it still won't get that close due to the variablility in screen used helmets from shot to shot and the difference in the two licensed helmets I've been using for reference: Anovos and the Prop Shop that was only open for a short period of time, and I'm also fairly new at building props, I only started in July of 2016 so just about every process of this helmet involved some skill that I had never tried before, but I'm hoping the photos of my work give this thread some weight in credibility on the build. My helmet will likely fall between the two helmets I used for reference, I want the finish of the Anovos helmet, but the shape and structure are based more on the Prop Shop version as there is a brilliant thread on the Tested website of Adam Savage's Prop Shop helmet that has a ton of reference images. I'll touch on some of the subtle differences between the two. Finally I tend to rant and use more words that necessary to explain things and my thoughts tend to wander quite a bit resulting in writeups that may not flow very well, so if there is any confusion on any part of this writeup please ask or send me a private message! Enough rambling, on to the build!
The first part is getting all of the pieces. I went with the typical Black Series/Disney hybrid, if you're not familiar with this it takes the face plate sections (triangular plates over the mouth) and transplants them onto the BS helmet. I won't including pictures of the helmets before the conversion (mainly because I don't have any) there are plenty of threads with that info and they aren't difficult to find. The first step is dismantling both helmets. Again I either lost or didn't take any pictures of this process since I didn't know I would be doing a writeup, so try to bear with me for this section and as always there are plenty of posts that go over this info.
First one the BS helmet, I removed the chrome section that goes over the eyes then I cut out the mouthplates with the intent to use bondo to make them three dimensional. I can say from this experience, unless you're doing this mod with the idea to mold and cast this helmet, DON'T USE BONDO. Due to its chemical nature it doest like to adhere to the plastic of the BS helmet and it's very brittle, if you do manage to get a nice, smooth, and coherent finish with the bondo, it will absolutely shatter if you drop it on any hard surface. Again if your plan is to mold and cast the helmet, go crazy with the bondo, but most people aren't in the budget to mold and cast so doing the Disney transplant is the cheapest and less frustrating option IF you're going for accuracy. For the rest of the dome on the BS helmet I used a dremel to cut away all of the chin and faceplate area up to the rim that flares out on the side of the helmet.
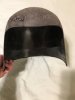
I decided to put down the dome for a while and focus on the faceplate. The ultimate goal is to have the faceplates done first and attach it to the done so I can fiberglass the inside of the dome. Without the proper pictures this part will be difficult to explain so please ask if you have questions and if necessary I can add in stock pictures to point out what I mean. From the BS helmet I kept the chrome eye plate (for lack of better terms) and trashed the rest. I removed the two layers of the mouth plate from the Disney Store helmet and cut out the plastic strip that connected the mouth plates to the eye plate directly under the chrome. This is where I deviated from the normal conversion process. Most people cut a semi-circle that runs from the bottom of the cheeks, directly over the top holes that house the mouth plates, but when you fit that onto the black series chrome plate it leaves a huge gap where the nose sits in the helmet, requiring some form of filling. I found it's better to make two cuts on either side that run from the bottom of the cheek (where the chrome connects two the black strip) up to either side of the nose section, then use a file or sanding drum to fit the nose area into the slot on the BS chrome plate. This is also hard to explain because fitting it into to the chrome plate is something you have to get a feel for, its hard to give an exact defining line to cut on. Once that was done I used a heat gun to bend the chrome cheeks back to fit the curve of the piece taken from the Disney helmet. The chrome section on the BS helmet does flare out more than it should do this, aside from making the transplant easier, makes it more accurate. I used super glue to tack the top of the Disney nose piece into the groove of the chrome plate, then plastic welded it into place where I could. the last piece needed from the Disney helmet is the jaw line area that sits under all of the other mouth piece layers and runs out to the rim flares on the side. The only pictures I have from this process is the first test fits I did before I started sculpting the cheek details so hopefully that helps clear all I did up a little.

Also, although this is skipping ahead, here are the pieces after a lot of sculpting on the faceplates

Heat forming the chrome plate tarnished the paint and gave it an undesirable texture, so give up any hopes of keeping that shine now. Next I invested in some apoxie sculpt to sculpt the details or the cheek back in as accurate as possible. The first step of this was grinding the back of the chrome plate flat. The vanilla BS helmet has fairly accurate holes but they are sunken in, so to speak, and are plugged. These "plugs" are connected to a black eye ring, which I removed and cut off the entire bottom section of the ring and trashed it, you'll only need the top. I then set about the sculpting. This is where those reference images from Tested.com came in handy. Theres not much to describe here at the pictures speak for them selves, these are rough progress photos of the process.


This process is pretty "rinse and repeat", sculpt in the rough details, let it cure, sand and file the fine details back in. The next photos are test fits after a few hours of sculpting and they demonstrate another inaccuracy of the typical conversion


Although many won't notice this, the chrome strip (in this case grey apoxie sculpt) that goes over the nose and behind the tip of the mouth plates is much too high, infact the entire section of the nose is at the wrong angle and the eye hole is slightly too narrow. The chrome layer should sit well below the tip of the mouth plates. this again you just have to get a feel for, but luckily I have pictures of this so I don't have to explain it more


After these pictures I still wasn't happy and ground the section down even more to point where I broke through the plastic weld. I then resculpted the chrome layer in. This is essentially where this section is right now. The pictures below are the most recent at the time of this original post. I've done much more sculpting of the fine details and started sculpting the chrome rings above the eyes. I'm still not sure how I feel about the area above the nose, it's much better now, but this is a section that varies between helmets, on the Anovos helmet it sits so its a little more concealed by the mouth plates, however on the prop shop version it sits much more like what I've come up with. I'd like to not redo the whole section yet again but I may get frustrated with it enough to do so, I'm not sure yet. Again these pictures are where I'm at now, I still have a ton of sculpting left on it. I glued in the eye ring and shaped the outer corners of the eyes as my last step so far. The pictures don't really do the sculpting justice and I feel they won't until I can get some filler primer on and smooth everything out, the contrasting colors of plastic and apoxie sculpt take away a lot of detail. At the end of this update I'll include the photos of my most recent test fit that show off the cheeks a little better.


So far the bulk of the work has been on the faceplates but I did some work on the dome as well. First I plastic welded the dome from the BS together and welded in the button pieces. Then I ground all of the unnecessary features on the inside flat. This is a tricky part, not in detail but in method. The seams may leave gaps that need filled but once again bondo won't work and even apoxie sculpt isn't ideal for this (trust me I tried). So far I've filled it in by melting in scrap pieces of plastic from the helmet then sanding then down, which is pain but seems to be the best option so far


This is where I've left off in the build. The general plan moving forward will be to finish the faceplate section then attach it to the dome and finish shaping the dome and then living it with fiberglass. I'll need to find a good way to smooth out the dome and seal it for paint, only after setting the jawline piece for the Disney helmet and attaching it. Then will be texturing and paint. These last photos are the most recent text fit I did. I likely won't make many small updates to this thread, and rather make a large update once I've made significant progress. Once again if have any questions or need any clarification please ask! Thanks for checking out my progress so far, stay tuned for more!


Before I go into the details I want to say while I'm setting out to make it as accurate as possible it still won't get that close due to the variablility in screen used helmets from shot to shot and the difference in the two licensed helmets I've been using for reference: Anovos and the Prop Shop that was only open for a short period of time, and I'm also fairly new at building props, I only started in July of 2016 so just about every process of this helmet involved some skill that I had never tried before, but I'm hoping the photos of my work give this thread some weight in credibility on the build. My helmet will likely fall between the two helmets I used for reference, I want the finish of the Anovos helmet, but the shape and structure are based more on the Prop Shop version as there is a brilliant thread on the Tested website of Adam Savage's Prop Shop helmet that has a ton of reference images. I'll touch on some of the subtle differences between the two. Finally I tend to rant and use more words that necessary to explain things and my thoughts tend to wander quite a bit resulting in writeups that may not flow very well, so if there is any confusion on any part of this writeup please ask or send me a private message! Enough rambling, on to the build!
The first part is getting all of the pieces. I went with the typical Black Series/Disney hybrid, if you're not familiar with this it takes the face plate sections (triangular plates over the mouth) and transplants them onto the BS helmet. I won't including pictures of the helmets before the conversion (mainly because I don't have any) there are plenty of threads with that info and they aren't difficult to find. The first step is dismantling both helmets. Again I either lost or didn't take any pictures of this process since I didn't know I would be doing a writeup, so try to bear with me for this section and as always there are plenty of posts that go over this info.
First one the BS helmet, I removed the chrome section that goes over the eyes then I cut out the mouthplates with the intent to use bondo to make them three dimensional. I can say from this experience, unless you're doing this mod with the idea to mold and cast this helmet, DON'T USE BONDO. Due to its chemical nature it doest like to adhere to the plastic of the BS helmet and it's very brittle, if you do manage to get a nice, smooth, and coherent finish with the bondo, it will absolutely shatter if you drop it on any hard surface. Again if your plan is to mold and cast the helmet, go crazy with the bondo, but most people aren't in the budget to mold and cast so doing the Disney transplant is the cheapest and less frustrating option IF you're going for accuracy. For the rest of the dome on the BS helmet I used a dremel to cut away all of the chin and faceplate area up to the rim that flares out on the side of the helmet.
I decided to put down the dome for a while and focus on the faceplate. The ultimate goal is to have the faceplates done first and attach it to the done so I can fiberglass the inside of the dome. Without the proper pictures this part will be difficult to explain so please ask if you have questions and if necessary I can add in stock pictures to point out what I mean. From the BS helmet I kept the chrome eye plate (for lack of better terms) and trashed the rest. I removed the two layers of the mouth plate from the Disney Store helmet and cut out the plastic strip that connected the mouth plates to the eye plate directly under the chrome. This is where I deviated from the normal conversion process. Most people cut a semi-circle that runs from the bottom of the cheeks, directly over the top holes that house the mouth plates, but when you fit that onto the black series chrome plate it leaves a huge gap where the nose sits in the helmet, requiring some form of filling. I found it's better to make two cuts on either side that run from the bottom of the cheek (where the chrome connects two the black strip) up to either side of the nose section, then use a file or sanding drum to fit the nose area into the slot on the BS chrome plate. This is also hard to explain because fitting it into to the chrome plate is something you have to get a feel for, its hard to give an exact defining line to cut on. Once that was done I used a heat gun to bend the chrome cheeks back to fit the curve of the piece taken from the Disney helmet. The chrome section on the BS helmet does flare out more than it should do this, aside from making the transplant easier, makes it more accurate. I used super glue to tack the top of the Disney nose piece into the groove of the chrome plate, then plastic welded it into place where I could. the last piece needed from the Disney helmet is the jaw line area that sits under all of the other mouth piece layers and runs out to the rim flares on the side. The only pictures I have from this process is the first test fits I did before I started sculpting the cheek details so hopefully that helps clear all I did up a little.
Also, although this is skipping ahead, here are the pieces after a lot of sculpting on the faceplates
Heat forming the chrome plate tarnished the paint and gave it an undesirable texture, so give up any hopes of keeping that shine now. Next I invested in some apoxie sculpt to sculpt the details or the cheek back in as accurate as possible. The first step of this was grinding the back of the chrome plate flat. The vanilla BS helmet has fairly accurate holes but they are sunken in, so to speak, and are plugged. These "plugs" are connected to a black eye ring, which I removed and cut off the entire bottom section of the ring and trashed it, you'll only need the top. I then set about the sculpting. This is where those reference images from Tested.com came in handy. Theres not much to describe here at the pictures speak for them selves, these are rough progress photos of the process.
This process is pretty "rinse and repeat", sculpt in the rough details, let it cure, sand and file the fine details back in. The next photos are test fits after a few hours of sculpting and they demonstrate another inaccuracy of the typical conversion
Although many won't notice this, the chrome strip (in this case grey apoxie sculpt) that goes over the nose and behind the tip of the mouth plates is much too high, infact the entire section of the nose is at the wrong angle and the eye hole is slightly too narrow. The chrome layer should sit well below the tip of the mouth plates. this again you just have to get a feel for, but luckily I have pictures of this so I don't have to explain it more
After these pictures I still wasn't happy and ground the section down even more to point where I broke through the plastic weld. I then resculpted the chrome layer in. This is essentially where this section is right now. The pictures below are the most recent at the time of this original post. I've done much more sculpting of the fine details and started sculpting the chrome rings above the eyes. I'm still not sure how I feel about the area above the nose, it's much better now, but this is a section that varies between helmets, on the Anovos helmet it sits so its a little more concealed by the mouth plates, however on the prop shop version it sits much more like what I've come up with. I'd like to not redo the whole section yet again but I may get frustrated with it enough to do so, I'm not sure yet. Again these pictures are where I'm at now, I still have a ton of sculpting left on it. I glued in the eye ring and shaped the outer corners of the eyes as my last step so far. The pictures don't really do the sculpting justice and I feel they won't until I can get some filler primer on and smooth everything out, the contrasting colors of plastic and apoxie sculpt take away a lot of detail. At the end of this update I'll include the photos of my most recent test fit that show off the cheeks a little better.
So far the bulk of the work has been on the faceplates but I did some work on the dome as well. First I plastic welded the dome from the BS together and welded in the button pieces. Then I ground all of the unnecessary features on the inside flat. This is a tricky part, not in detail but in method. The seams may leave gaps that need filled but once again bondo won't work and even apoxie sculpt isn't ideal for this (trust me I tried). So far I've filled it in by melting in scrap pieces of plastic from the helmet then sanding then down, which is pain but seems to be the best option so far
This is where I've left off in the build. The general plan moving forward will be to finish the faceplate section then attach it to the dome and finish shaping the dome and then living it with fiberglass. I'll need to find a good way to smooth out the dome and seal it for paint, only after setting the jawline piece for the Disney helmet and attaching it. Then will be texturing and paint. These last photos are the most recent text fit I did. I likely won't make many small updates to this thread, and rather make a large update once I've made significant progress. Once again if have any questions or need any clarification please ask! Thanks for checking out my progress so far, stay tuned for more!