Tom's DL-44 ANH Solo Blaster

This looks great! Todd's kit looks great, I have a DEC kit (which I love) but thinking of getting one of Todd's too. Its a great price point for steel parts

I havent fit the bull barrel, Im afraid of messing it up

i was too - what you'll want to do is start by marking straight lines with tape or a pencil, and cutting into the gun with a hacksaw or dremel cutting disc. Once you have the lines cut, you can file up to those clean lines and you seriously lower the chance of messing up the rest.
 
I clipped the tail off a metal copy of the tomtit part, blackened it with some AB and put some wax on it. I think these came with the DEC kit. I didn't use the metal T track though, I cut some of Gino's I had left over and used a metal file to sculpt it! Scratched them with a file and cleaned them with alcohol. Some JB Weld on the arm, track and barrel and voila!

i also used a sanding drum to sculpt out the lower ridge of the Blast Tech grill, to make it look more like the real thing. I swore I wouldn't get into accuracy mode on this, but i can't help it!
 

Attachments

  • image.jpeg
    image.jpeg
    41 KB · Views: 80
  • image.jpeg
    image.jpeg
    130.1 KB · Views: 100
Redbutton got some ebony Briwax today! It may look like tar but it only barely darkened the finish. I applied some today to my blaster, disassembled. I also roughed up the front of my gun and glued on the front grill, glued the dovetail and glued the rail pins because they kept sliding out.

The mystery disc worked, by popping off that metal piece I glued on. I tried fixing some edges and messed up the circle so I ended up applying aluminum black around a British Mortar Fin endcap. It's smaller than the prop but matches the Blast-Tech cut-out
 

Attachments

  • image.jpeg
    image.jpeg
    536.2 KB · Views: 87
  • image.jpeg
    image.jpeg
    690.4 KB · Views: 84
  • image.jpeg
    image.jpeg
    1.2 MB · Views: 90
  • image.jpeg
    image.jpeg
    309.2 KB · Views: 98
Aaaaand, not sure if they do it justice, but here's where I stand at the moment!
 

Attachments

  • DSCN3676.jpg
    DSCN3676.jpg
    367.4 KB · Views: 76
  • DSCN3672.jpg
    DSCN3672.jpg
    1.5 MB · Views: 97
  • DSCN3671.jpg
    DSCN3671.jpg
    826.2 KB · Views: 98
  • DSCN3670.jpg
    DSCN3670.jpg
    894.5 KB · Views: 109
  • DSCN3666.jpg
    DSCN3666.jpg
    1.6 MB · Views: 95
That's looking pretty good! I think maybe doing some small silver touch up on the front grill piece, it would add a bit of needed wear to a very worn blaster. It just looks a little too new, you know? Personal preference, is all!
 
I was thinking about touching up the grill...still mulling that over.

I also still need to brass my scope dial, but here are some beauty shots, alongside redbutton 's Greedo Killer finally finished!
 

Attachments

  • DSCN3706.jpg
    DSCN3706.jpg
    955.5 KB · Views: 107
  • DSCN3704.jpg
    DSCN3704.jpg
    1 MB · Views: 94
  • DSCN3699.jpg
    DSCN3699.jpg
    854 KB · Views: 113
  • DSCN3695.jpg
    DSCN3695.jpg
    1.2 MB · Views: 78
  • DSCN3693.jpg
    DSCN3693.jpg
    1.3 MB · Views: 99
Last edited by a moderator:
I found some grips from a guy who never got to buy a real c96. They're those replacement grips from the backs of magazines so long ago - so they're uneven, different sizes and wonky but they're wood, and didn't cost 50 bucks :lol

I had a problem with the MGC grips sliding around, because (thanks to scottjua ) the inner rim was smaller than the denix frame. These grips...while off...were much closer to the size of the inner frame. After much dremeling and filing of both the grips and the Denix....and some blueing....and a trip to Valu Home centers for a brass 6/32 screw to replace the missing original....here's what we have!

DSCN3759.jpgDSCN3726.jpgDSCN3710.jpg
 
Last edited by a moderator:
she came out great, i know I've said this before but i love the aluminum black job you did on it! looks sharp!
 
Thank you everyone!

For anyone coming here for tips:

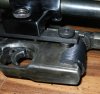
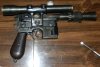
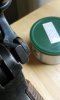
1) I used a mixture of Birchwood Casey Aluminum Black and Brass Rub 'n' Buff for the scope dial. ( Thanks @chizbot for all the support and inspiration)
Brass Rub 'n' Buff will dissolve Birchwood Casey, so do that after the brass, not before. It will also dry if you leave it alone, I kept accidentally removing a finish from tinkering.
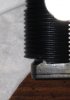
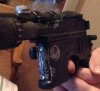
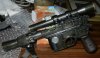
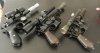
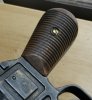
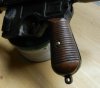
2) Fitting wood grips is a pain in the butt! Lots of hand filing and power tools, but it's worth it. I used a fat drill bit the same size as the screw hole to flatten out the center support on the Denix. Just drilled that mother down into a crater. Also, taking a few minutes to widen the gap behind the trigger guard is worth it! It doesn't hurt to hold anymore!
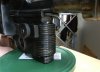
3) Epoxy is the best bonding agent for the plastic parts (sight, grill) as well as parts that won't tighten. I epoxied the scope mount into place and the pins for the top of the gun. They were loose from taking the gun apart.
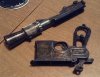
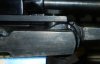
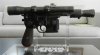
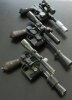
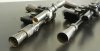
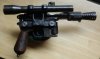
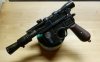
4) check out the different Blackening results for the scope and the gun body. This comes from the different metals and can really add character.
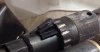
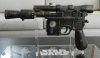
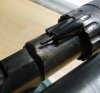
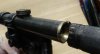
5) a strip of packing tape beneath the flash hider helps it sit into place, just like a lightsaber board.
6) This gun has so many details, try not to get sucked in! draw the line somewhere! Since I had a Blast-tech grill I just made the mystery disc to match, even though it's smaller!
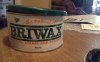
7) Johnson's Paste Wax is a great sealer for wood and metal. Briwax can also polish and seal the finish on a blaster. Libman (or Liboman) Tudor Oak wax also creates a wonderful finish, is less oily than Johnsons and smells better. I've used all of these on the gun, and I'll keep waxing and buffing at random times. It's probably good, I handle this a LOT!
Was the ANH blaster painted? Like the body..
 
I revisited this blaster by smearing some more Rub n Buff on the bull barrel, grill (to make it look metal-y), flash hider and sides of the gun. I put a bit too much on..so I aluminum blacked over the brass buff, and then did a full disassembled coat of Ebony Briwax again, including the handles. She looks pretty great :)
 

Attachments

  • DSCN3783.jpg
    DSCN3783.jpg
    895.6 KB · Views: 72
  • DSCN3781.jpg
    DSCN3781.jpg
    294.1 KB · Views: 81
  • DSCN3777.jpg
    DSCN3777.jpg
    953.1 KB · Views: 83
  • DSCN3776.jpg
    DSCN3776.jpg
    1.6 MB · Views: 106
  • DSCN3767.jpg
    DSCN3767.jpg
    1.2 MB · Views: 88
  • DSCN3766.jpg
    DSCN3766.jpg
    1.6 MB · Views: 78
  • DSCN3764.jpg
    DSCN3764.jpg
    1.5 MB · Views: 75
  • DSCN3762.jpg
    DSCN3762.jpg
    841.5 KB · Views: 93
  • DSCN3785.jpg
    DSCN3785.jpg
    1.2 MB · Views: 87
This thread is more than 7 years old.

Your message may be considered spam for the following reasons:

  1. This thread hasn't been active in some time. A new post in this thread might not contribute constructively to this discussion after so long.
If you wish to reply despite these issues, check the box below before replying.
Be aware that malicious compliance may result in more severe penalties.
Back
Top