I'm in the 501st... so obviously I'm nuts about Star Wars. I thought wouldn't it be nice to make a Samurai/Vader mashup...
I went into this project with a few requirements in my head. One, I wanted it to immediately be recognized as Darth Vader and a Samurai, simultaneously. To me that meant making sure all the recognizable elements of both elements... the recognizable parts for Vader for me are the helmet and face, the silver/black shoulder piece, the chest box, belt boxes and cape. For the samurai part, the helmet (again), the mail being tied together with cord, the hakama, the gloves, the katana, and the shoes. Finally... because it's Vader, no skin can be showing... Even samurai Darth Vader needs his iron lung.
First, the reference material. I've been using a few sites as reference. The main site I use is the incredibly detailed samurai armor build page by Anthony Bryant. Simply invaluable for this project. The other page I used for cutting out the Dô (the breastplate) is a very nice instructable page.
Next I gathered the materials I needed. Here's the basic rundown:
A Rubies Darth Vader costume
4x4 3mm thick Sintra
Utility knife with lots of extra blades
Dremel
100+ yards 3/8 paracord in your chosen color (you will use a LOT of cord)
Drill with a 3/8 bit
Heat gun
3 cans Rust-oleum Lacquer black spray paint
2 cans Rust-oleum Glaze spray pain
Hot glue gun
Chosen fabric for making the hakama and hitatare
Wide, single fold bias tape
Okay... I'm not very good at drawing, but I attempted to do a sketch of my concept so I can get a rough idea of what I'm doing.
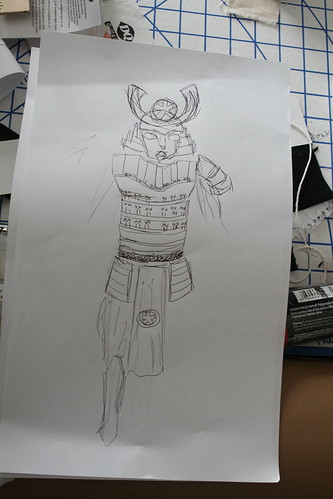
See? Absolutely horrible drawing skills!
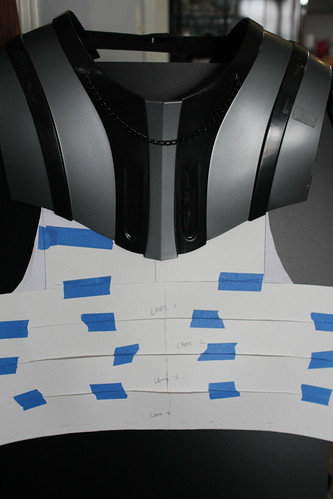
The first step was cutting out templates for the dô in posterboard. This was great for test fitting. I realized that I didn't need the second to bottom lame (each individual plate) because it was cause problems if I wanted to sit down. Samurai's can sit down! There are a lot of reference pictures on the internet to prove this.")
You'll want to make you bottom lame half the width of your widest part of your torso. You want it come halfway around your body.
Okay, here's where hindsight rears it's ugly head. In hindsight, this is the point at which I should have started thinking about the chestbox and how I will intrigrate it into the costume. At the stage I'm at now, I'm having to go back and figure it out when it's much harder to take care off. I would have done the templates differently. But more on this later.
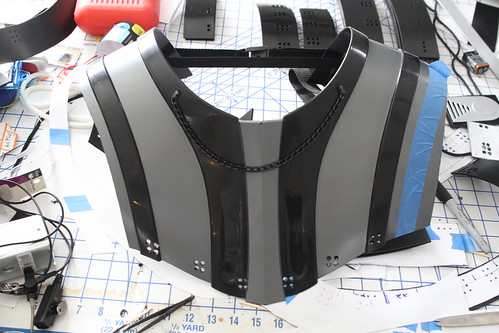
Okay... so the templates are done. Trace the templates to the Sintra (I found that blue permanent marker shows up very nicely on black Sintra). Next, cut the piece out with your utility blade. It's a bitch and a half. Take your time though... if you mess up, you can possibly fix it with the heatgun, but it's a pain. Anyway... cut cut cut. Finally, you'll have all your pieces ready for the heat gun.
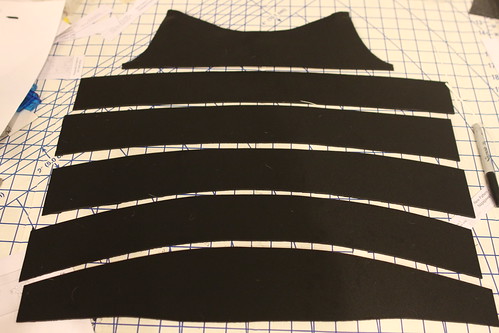
Take your time and start forming the pieces in the basic shape of your body.
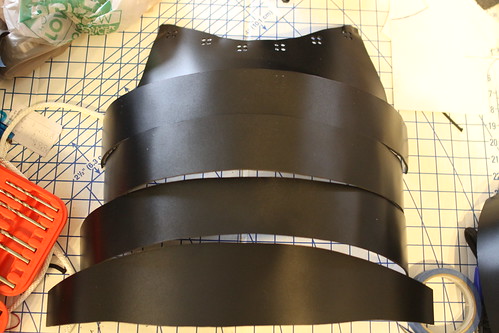
As you can see here, the second to bottom lame was removed.
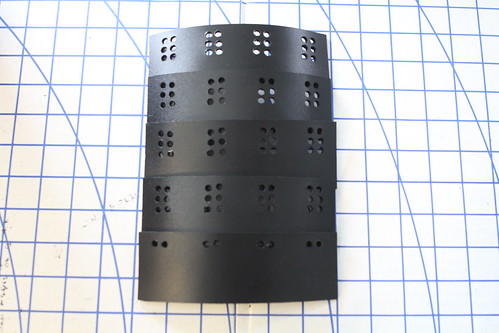
Don't worry if it's not exact, we'll be fixing this later. Time to start drilling your holes for your lacing. Do NOT do this before the heatgun process. This will deform the holes. It's best to do this after it's heat-formed. I didn't take a picture of the drilling process, but get ready for some time consuming tedium. I used the templates for lacing holes here. I used the 3/8 template. This is pretty much your life saver. I'd mark the back of the Sintra and then drill baby, drill.
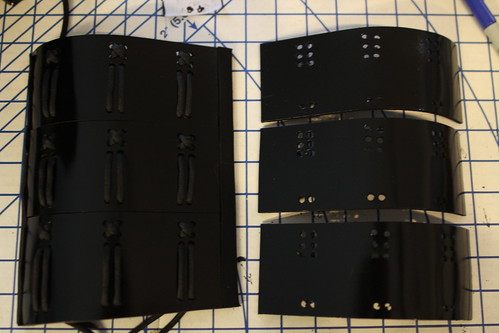
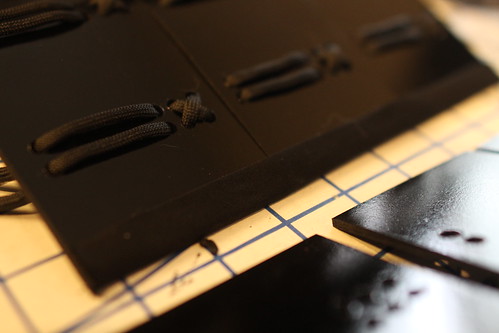
Here's a picture of one of four kusazuri (upper thigh/groin armor) with holes so you can see how this is all supposed to work together. Later on, I drilled a row of two holes in the bottom for decoration thread.
So time to paint. No pictures of this process, but I used Rust-oleum black lacquer paint. Geniune samurai armor is leather or metal that's then coated with lacquer. I'm not doing that, so paint was the next best thing. I finished it off with a clear glaze spray paint to give it a very shiny appearance.
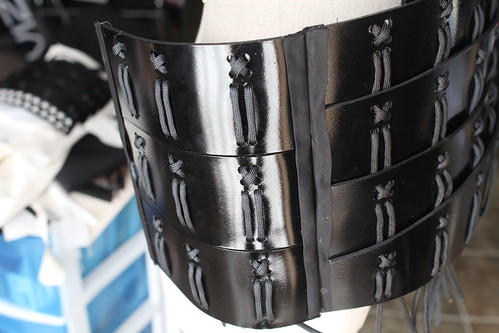
After that, you lace your dô up. Get used doing this... you'll be doing this a lot. I found that the best way was to do one string that did both sides of a row and then lace all the rows in unison. But, whatever works for you. The process takes awhile and is pretty tedious, but I developed a real appreciation for this ingenious method of attaching scales to form something solid.
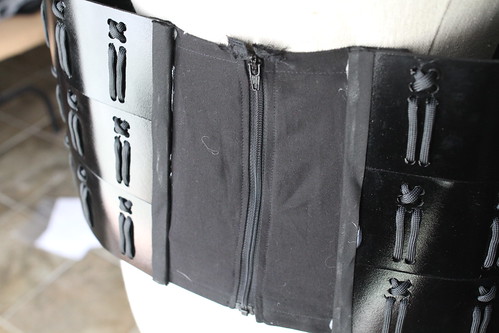
Next (I jumped around a lot in my build, so logically "next'), I realized that the way I wanted the cape to fall wouldn't completely cover the sides, so I would have to make small "wing" pieces that would be attached to the front and then further attached to fabric with a zipper up the middle of the back to secure the chest plate.
Instead of overlapping like the front, aestically, I liked the pieces butting up against one another. It also made it easier when it came to fabric gluing time. These pieces are held together with single fold wide bias tape which I then glued to the Sintra to create a smooth line.
So you can see how the two pieces fit together. Underneath this is another piece of fabric that's hot glued to the whole thing. No idea yet as to how sturdy this whole thing will be at these hot glue points. I'll have to troop it in a little bit to get a better idea.
Zipper up the back, although not traditional, makes getting it on and off a breeze.
Attaching it to the should piece takes some thought because this is the first time your working with the existing rubies suit. There's no going back from a mess up here.
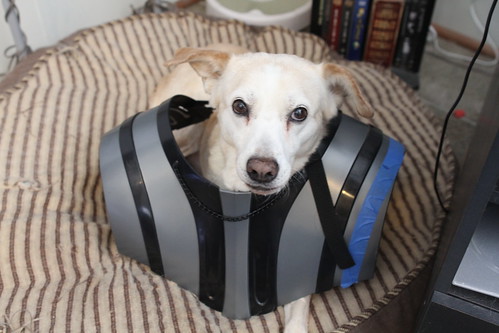
This how I choose to attach my dô to the shoulder pieces. The red paracord is only to make it easier to see visually for the picture. Also, you'll notice the blue painter's tape. That's where I'm going to trim the exisitng shoulder piece so I can attach my sode (shoulder armor) to the vader shoulder piece. I kept this instead of making my own because I feel that this is so distinctive to the look of vader that if I made my own, I'd be doing a close copy anyway.
Another view with the right side trimmed already.
My dog, Molly, modeling the shoulder piece for me. Come to the darkside and together we shall rule all the milkbones!
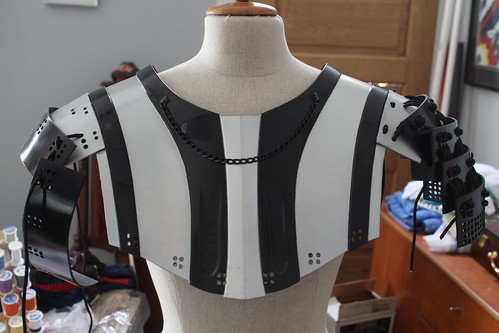
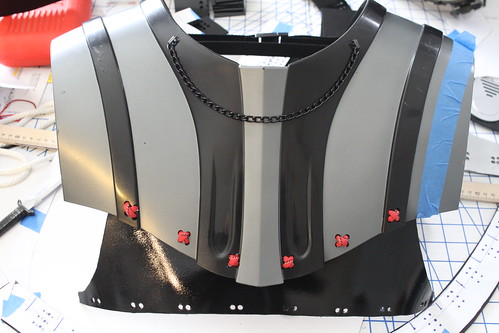
So, here it is almost complete. The sode is about five plates about 10" long. You can see the many holes in the bottom of the plate for the left shoulder. This will contain cord that serves now purpose except as decoration. The silver plate that's attached to the shoulder is "permanently" attached with e6000 because I didn't want it slipping or falling at cons and becoming a major wardrope malfuntion. The cord that "attaches" it to the shoulder is merely for show. I suppose it gives it extra protection from falling, but the glue would have to fail first.

The real bitch about this is that to butt up against the raised black part of the shoulder bell is NOT a straight line. I had to trace an approximation of the weird curve it does there, then carefully make that happen with a dremel. Wear a mask and gloves as this Sintra dust is crazy and it's probably given me cancer.
One finally thing to do here for me is to actually put a ridge that runs vertically between the black and the silver part. This traditional of samurai armor and something I've decided I would like on my armor... but it's very low on my priority list ATM.
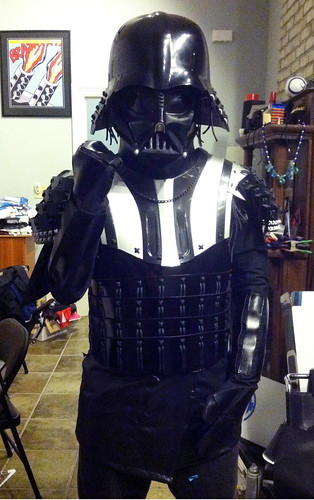
Here's what the torso selection will look like (mostly) complete. I haven't permanently attached the sode yet because of the work I still have left to do with the chestbox (more later) and I can't decide between the silver or black cord to attach the sode to the shoulder. But, it's starting to look like samurai armor!
Next... we'll tackle the helmet. This is basically the same stuff we've already done, the only fly in the oinment being the translating the extreme curve of the back of the helmet to a 2D space and then back again. The hole placement took a lot of goes before I was happy. I HIGHLY recommend paper/postboard templates for this part. It will save you a lot of headache in the long run because you can easily bend it around the form to see how it will look.
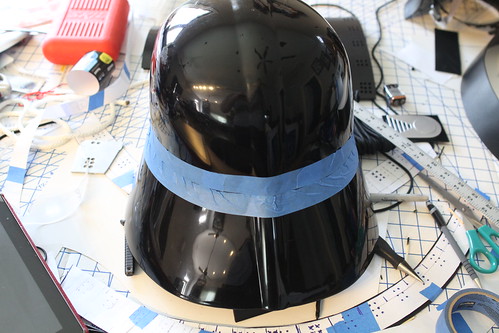
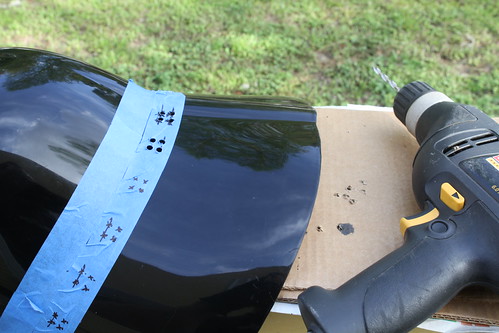
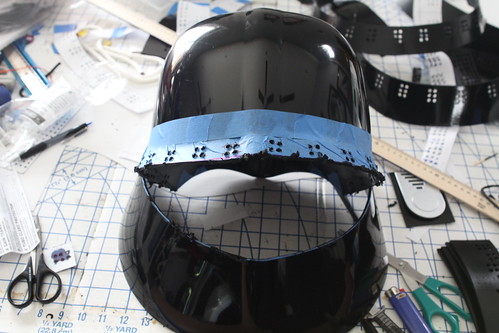
First mark the helmet. The bottom edge of the second piece of tape is my cut line. The bottom piece of tape in total is my overlap. I'm not going to bother recreating the ridge that continues down the back of the helmet in my lames, so I just tried my best to factor it out of the process. The trick here is to figure out how many lames you are going to use to keep the helmet the same relative size. In my case, I used 3 lames, with the last lame being slightly fatter in the middle than the rest.
With these guides, I was able to make my paper template of the bottom of the helmet.
Figuring out the hole placement is the real tricky part. Use the hole template and then modify the spacing for a curved surface until it all starts to line up.
Cutting this in the Sintra is tricky. Just take your time.
I transferred my hole pattern for the first lame to the tape for drilling.
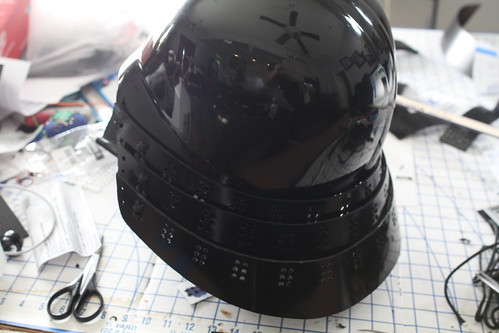
Carefully cut along the tape line (this part will be under a armor lame, so it's not the end of the world if it's not perfect)... but it does make you nervous, none-the-less. I used a dremel rotary cutting attachment to get through this hard plastic. You can see my already heat-formed and a painted helmet armor lames in the background. Just need to lace it all up.
Start putting it all together. After it was all laced up, I used hotglue to secure it down to give it a slicker look.
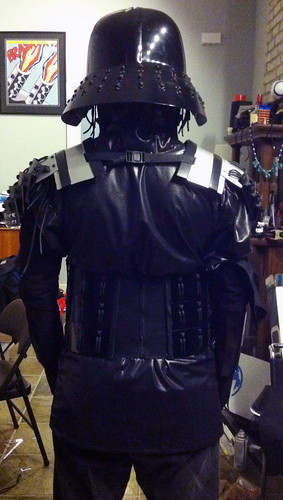
From the front it looks almost normal, but boy is striking from an angle!
Okay. So that's enough for now. I've done a few other things: I've sewn the hakama (pants) and hiatare (shirt). I've also started work on the haidate (thigh armor panel).
Some of the things left to do:
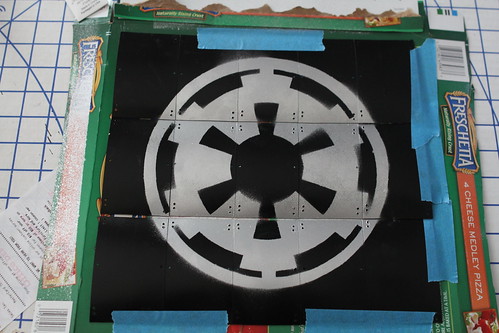
Making and attaching a imperial crest to the helmet.
Attach the kusazuri to the dô.
Finish the haidate. DONE
Install the chest box into the dô. (which in hindsight, I would have done totally differently than I'm forced to do now that the dô is built).
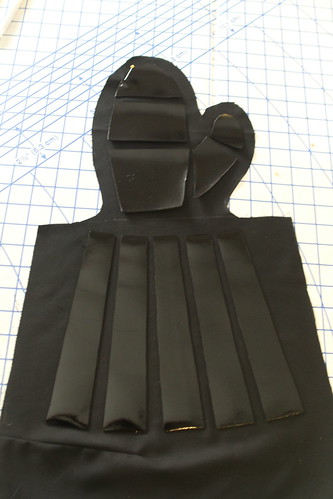
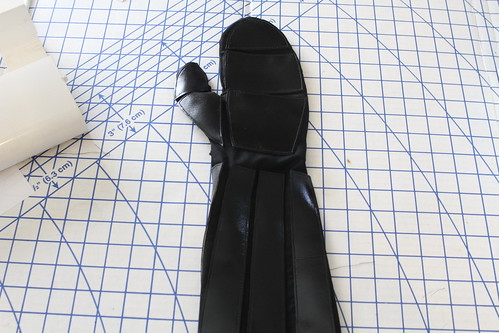
Make the kote (arm and hand armored sleeve)
Make some geta (wooden sandals)
Make the obi (the cloth belt that ties around the waist)
Make the lightsaber katana which can be sheathed (which I have NO IDEA on how to accomplish ATM... IDEAS ARE VERY WELCOME!)
I'll be updating as a cross things off or add to this list.
I went into this project with a few requirements in my head. One, I wanted it to immediately be recognized as Darth Vader and a Samurai, simultaneously. To me that meant making sure all the recognizable elements of both elements... the recognizable parts for Vader for me are the helmet and face, the silver/black shoulder piece, the chest box, belt boxes and cape. For the samurai part, the helmet (again), the mail being tied together with cord, the hakama, the gloves, the katana, and the shoes. Finally... because it's Vader, no skin can be showing... Even samurai Darth Vader needs his iron lung.
First, the reference material. I've been using a few sites as reference. The main site I use is the incredibly detailed samurai armor build page by Anthony Bryant. Simply invaluable for this project. The other page I used for cutting out the Dô (the breastplate) is a very nice instructable page.
Next I gathered the materials I needed. Here's the basic rundown:
A Rubies Darth Vader costume
4x4 3mm thick Sintra
Utility knife with lots of extra blades
Dremel
100+ yards 3/8 paracord in your chosen color (you will use a LOT of cord)
Drill with a 3/8 bit
Heat gun
3 cans Rust-oleum Lacquer black spray paint
2 cans Rust-oleum Glaze spray pain
Hot glue gun
Chosen fabric for making the hakama and hitatare
Wide, single fold bias tape
Okay... I'm not very good at drawing, but I attempted to do a sketch of my concept so I can get a rough idea of what I'm doing.
See? Absolutely horrible drawing skills!
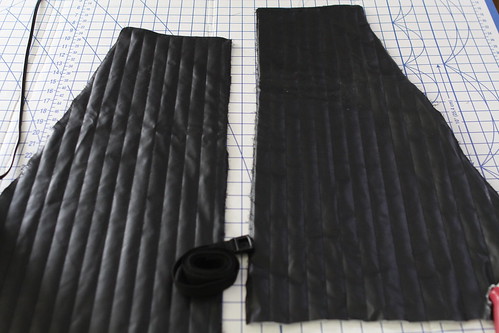
The first step was cutting out templates for the dô in posterboard. This was great for test fitting. I realized that I didn't need the second to bottom lame (each individual plate) because it was cause problems if I wanted to sit down. Samurai's can sit down! There are a lot of reference pictures on the internet to prove this.
You'll want to make you bottom lame half the width of your widest part of your torso. You want it come halfway around your body.
Okay, here's where hindsight rears it's ugly head. In hindsight, this is the point at which I should have started thinking about the chestbox and how I will intrigrate it into the costume. At the stage I'm at now, I'm having to go back and figure it out when it's much harder to take care off. I would have done the templates differently. But more on this later.
Okay... so the templates are done. Trace the templates to the Sintra (I found that blue permanent marker shows up very nicely on black Sintra). Next, cut the piece out with your utility blade. It's a bitch and a half. Take your time though... if you mess up, you can possibly fix it with the heatgun, but it's a pain. Anyway... cut cut cut. Finally, you'll have all your pieces ready for the heat gun.
Take your time and start forming the pieces in the basic shape of your body.
As you can see here, the second to bottom lame was removed.
Don't worry if it's not exact, we'll be fixing this later. Time to start drilling your holes for your lacing. Do NOT do this before the heatgun process. This will deform the holes. It's best to do this after it's heat-formed. I didn't take a picture of the drilling process, but get ready for some time consuming tedium. I used the templates for lacing holes here. I used the 3/8 template. This is pretty much your life saver. I'd mark the back of the Sintra and then drill baby, drill.
Here's a picture of one of four kusazuri (upper thigh/groin armor) with holes so you can see how this is all supposed to work together. Later on, I drilled a row of two holes in the bottom for decoration thread.
So time to paint. No pictures of this process, but I used Rust-oleum black lacquer paint. Geniune samurai armor is leather or metal that's then coated with lacquer. I'm not doing that, so paint was the next best thing. I finished it off with a clear glaze spray paint to give it a very shiny appearance.
After that, you lace your dô up. Get used doing this... you'll be doing this a lot. I found that the best way was to do one string that did both sides of a row and then lace all the rows in unison. But, whatever works for you. The process takes awhile and is pretty tedious, but I developed a real appreciation for this ingenious method of attaching scales to form something solid.
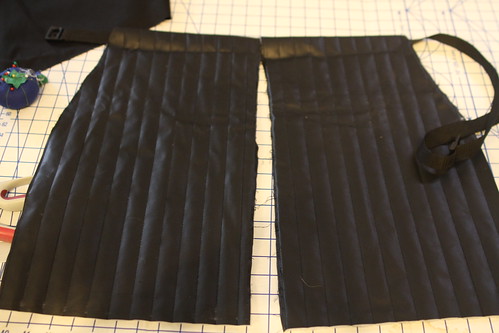
Next (I jumped around a lot in my build, so logically "next'), I realized that the way I wanted the cape to fall wouldn't completely cover the sides, so I would have to make small "wing" pieces that would be attached to the front and then further attached to fabric with a zipper up the middle of the back to secure the chest plate.
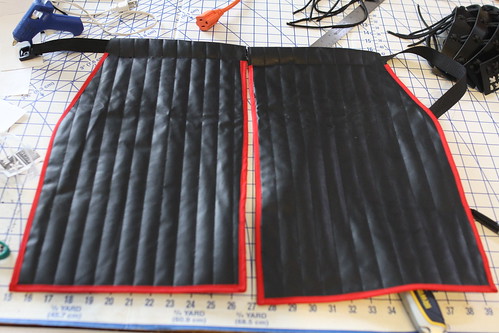
Instead of overlapping like the front, aestically, I liked the pieces butting up against one another. It also made it easier when it came to fabric gluing time. These pieces are held together with single fold wide bias tape which I then glued to the Sintra to create a smooth line.
So you can see how the two pieces fit together. Underneath this is another piece of fabric that's hot glued to the whole thing. No idea yet as to how sturdy this whole thing will be at these hot glue points. I'll have to troop it in a little bit to get a better idea.
Zipper up the back, although not traditional, makes getting it on and off a breeze.
Attaching it to the should piece takes some thought because this is the first time your working with the existing rubies suit. There's no going back from a mess up here.
This how I choose to attach my dô to the shoulder pieces. The red paracord is only to make it easier to see visually for the picture. Also, you'll notice the blue painter's tape. That's where I'm going to trim the exisitng shoulder piece so I can attach my sode (shoulder armor) to the vader shoulder piece. I kept this instead of making my own because I feel that this is so distinctive to the look of vader that if I made my own, I'd be doing a close copy anyway.
Another view with the right side trimmed already.
My dog, Molly, modeling the shoulder piece for me. Come to the darkside and together we shall rule all the milkbones!
So, here it is almost complete. The sode is about five plates about 10" long. You can see the many holes in the bottom of the plate for the left shoulder. This will contain cord that serves now purpose except as decoration. The silver plate that's attached to the shoulder is "permanently" attached with e6000 because I didn't want it slipping or falling at cons and becoming a major wardrope malfuntion. The cord that "attaches" it to the shoulder is merely for show. I suppose it gives it extra protection from falling, but the glue would have to fail first.
The real bitch about this is that to butt up against the raised black part of the shoulder bell is NOT a straight line. I had to trace an approximation of the weird curve it does there, then carefully make that happen with a dremel. Wear a mask and gloves as this Sintra dust is crazy and it's probably given me cancer.
One finally thing to do here for me is to actually put a ridge that runs vertically between the black and the silver part. This traditional of samurai armor and something I've decided I would like on my armor... but it's very low on my priority list ATM.
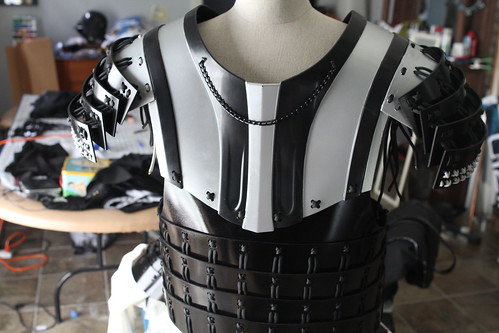
Here's what the torso selection will look like (mostly) complete. I haven't permanently attached the sode yet because of the work I still have left to do with the chestbox (more later) and I can't decide between the silver or black cord to attach the sode to the shoulder. But, it's starting to look like samurai armor!
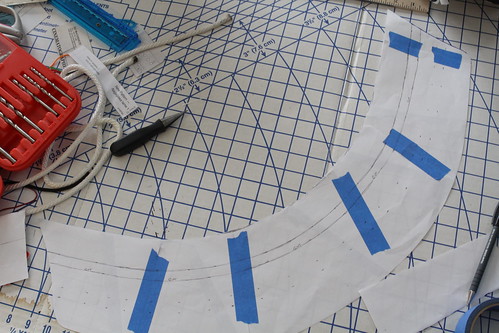
Next... we'll tackle the helmet. This is basically the same stuff we've already done, the only fly in the oinment being the translating the extreme curve of the back of the helmet to a 2D space and then back again. The hole placement took a lot of goes before I was happy. I HIGHLY recommend paper/postboard templates for this part. It will save you a lot of headache in the long run because you can easily bend it around the form to see how it will look.
First mark the helmet. The bottom edge of the second piece of tape is my cut line. The bottom piece of tape in total is my overlap. I'm not going to bother recreating the ridge that continues down the back of the helmet in my lames, so I just tried my best to factor it out of the process. The trick here is to figure out how many lames you are going to use to keep the helmet the same relative size. In my case, I used 3 lames, with the last lame being slightly fatter in the middle than the rest.
With these guides, I was able to make my paper template of the bottom of the helmet.
Figuring out the hole placement is the real tricky part. Use the hole template and then modify the spacing for a curved surface until it all starts to line up.
Cutting this in the Sintra is tricky. Just take your time.
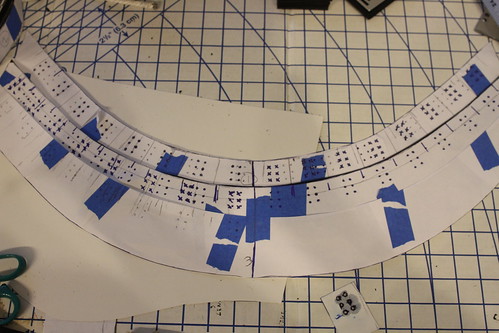
I transferred my hole pattern for the first lame to the tape for drilling.
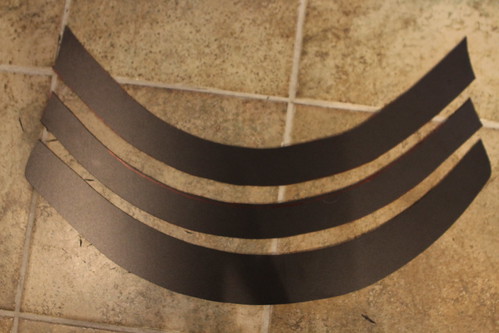
Carefully cut along the tape line (this part will be under a armor lame, so it's not the end of the world if it's not perfect)... but it does make you nervous, none-the-less. I used a dremel rotary cutting attachment to get through this hard plastic. You can see my already heat-formed and a painted helmet armor lames in the background. Just need to lace it all up.
Start putting it all together. After it was all laced up, I used hotglue to secure it down to give it a slicker look.
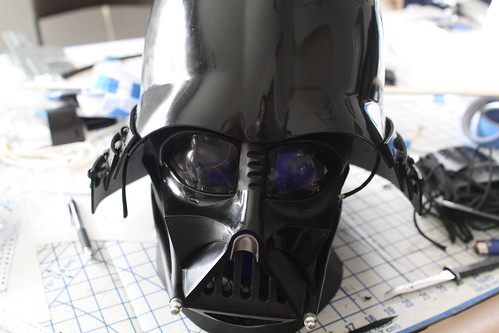
From the front it looks almost normal, but boy is striking from an angle!
Okay. So that's enough for now. I've done a few other things: I've sewn the hakama (pants) and hiatare (shirt). I've also started work on the haidate (thigh armor panel).
Some of the things left to do:
Making and attaching a imperial crest to the helmet.
Attach the kusazuri to the dô.
Finish the haidate. DONE
Install the chest box into the dô. (which in hindsight, I would have done totally differently than I'm forced to do now that the dô is built).
Make the kote (arm and hand armored sleeve)
Make some geta (wooden sandals)
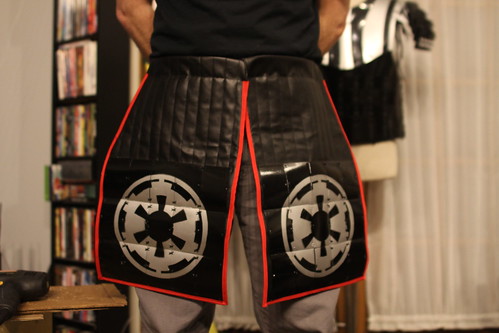
Make the obi (the cloth belt that ties around the waist)
Make the lightsaber katana which can be sheathed (which I have NO IDEA on how to accomplish ATM... IDEAS ARE VERY WELCOME!)
I'll be updating as a cross things off or add to this list.
Last edited: