Warhammer 40K Sisters of Battle

thorssoli

Sr Member
RPF PREMIUM MEMBER
For the past few years, I've had this on my bucket list for Warhammer cosplay projects. With all of the updates regarding the impending release of new plastic Adepta Sororitas models, I've finally gotten to the point where it's made it to the top of the to-do list. The goal: a full squad. The method: brute force.

I started working on these gals a couple of months ago when I'd just returned from my last-ever overseas trip with the Navy Reserve. I needed something to show off at the Bay Area Maker Faire, so I decided this was the just right thing. The main problem wit this plan was that I would only have six weeks to go from zero to wearable costume(s) and I also had to prep the rest of my usual display items for the Faire.

Challenge accepted.

In order to meet the timeline, I needed a faster, less expensive option than the fiberglass and resin cast parts I've been using for my last few big projects. I opted instead to make the armor largely vacformed with a few resin cast detail bits. Vacforming is good because it allows me to make many pieces rather rapidly without breaking the bank on materials. In this case, I'm using styrene because it's readily available at a local supplier.

Since I was going to be short on time, I decided that I'd use all of my skills and all of my robots to make the various vacforming bucks and prototype parts simultaneously. Some parts were 3D printed while other pieces were being CNC carved from wood, and other pieces were sculpted by hand or modified from parts of other costume projects.

For no particular reason, I began with the shoulder/collar assembly. I started by having my friends at Do3D.com model the parts I needed. They did pretty good:
47989769818_a423c98908_c.jpg


The digital models were sliced up and fed to my CNC machines. The machines whittled the slices out of MDF and I then glued them up in the real world like so:
47953111306_8650383055_c.jpg


After a bit of sanding and filling, they looked pretty good:
47953111206_cf194543b0_c.jpg


The next step was to lay out the collar/shoulder parts and the lower sholder plates on the forming table:
32786810667_87464758b7_c.jpg


32786810537_d8e14cd70f_c.jpg


The first pull came out pretty good:
47730269851_41cb9ec31a_c.jpg


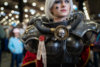
Though I'll freely admit, it looks better on my friend Madison:
47677134332_6f6ef4f499_c.jpg


32786870147_4a6a0f6ebc_c.jpg


The ankle pieces were also carved out on the CNC machines:
47730269671_08ebf2c1a1_c.jpg

But we'll get back to that later.

The thighs started out as a particularly heavy fiberglass pair from my Captain Phasma project (Link https://protagonist4hire.blogspot.com/2019/02/building-captain-phasma-part-2-armor.html) that were trimmed a bit before I added the ridge details with Bondo:
46965691794_60e2409557_c.jpg


After the Bondo work was completed, I split them into front and back halves, mounted them onto some plywood, and sealed up the open ends to make them into vacforming bucks:
47755007691_d7d1f9ce27_c.jpg


The lower legs were Phasma parts, mounted and closed on the ends with some 3D printed trim added to the ankles:
47730269251_13901eeec5_c.jpg


Fiberglass vacforming bucks are the best thing when it comes to enduring the heat and pressure of vacforming, but they did okay:
40831906623_633f9283a9_c.jpg


The next step was to make some weapons. I started by having the CNC machine cut out some profiles:
32786810087_7c8f740b56_c.jpg


Then I layered on some details and sculpted out a pistol grip:
46965691864_ce9590ba92_c.jpg


The grip was designed so I could mold it and cast it separately and use it for all of the different weapons I had in mind:
47702339802_49090d489e_c.jpg


47026992324_708f625979_c.jpg


Once the shells were vacformed, it was just a matter of gluing in the resin cast parts:
46986908215_94033a73cd_c.jpg


46986906185_d46d4486a8_c.jpg


The muzzles were resin cast details, but the magazines were separate vacformed parts.
 
The flamer was made in largely the same way:
46986907405_d61809bb56_c.jpg


For the chest armor, I started by looking at the chest plate I'd made for my Cobra Baroness project (link https://protagonist4hire.blogspot.com/2018/11/cobra-baroness-costume-part-1-rushed.htm):
47702339642_d162373f8d_c.jpg


Proportion-wise it wasn't awful, but turning it into a forming buck was going to be a bit of a pain and it wasn't quite the shape I was looking for. Instead, I decided to dust off a vacformed copy of a mannequin chest I had laying around:
33939306578_c91c56b6d8_c.jpg


This was filled with rigid expanding foam:
47026992554_091ec26f90_c.jpg


Then the plastic was peeled off:
33939306488_d677531117_c.jpg


The chest was sawn in half from top to bottom and a slice of 3/4" MDF was inserted in the middle to make the piece a tiny bit wider and stronger. Then I took a saw to the boobs:
33939306338_0c9d5bf262_c.jpg


The cups themselves would be vacformed separately to make the parts easier to remove from the forming bucks. In this case, they started as styrofoam hemispheres skinned over with Bondo and reshaped a bit:
33939305738_5fafde59ee_c.jpg


Once I was happy with the overall shape, I cut out some 1/4" MDF in the same shape, offset by about 3/16" larger. These were glued in place before the final smoothing for the chest buck:
47026992164_aeb4a746c3_c.jpg


The vacforming went as well as I could've hoped:
33953416028_ff4835b51e_c.jpg


My assistant Rachel cut out the boob windows:
47990331621_f5de2b6e4e_c.jpg


The cup parts were glued in from the inside, making for a pretty sturdy assembly:
46986909575_3e1455a432_c.jpg

Banana for scale.

Somewhere along the way we started hanging parts on a mannequin in the shop:
47850927312_c15cc3b229_c.jpg

She also acquired any loose accouterments that seemed funny along the way.

The forearm vacforming bucks started out as blocks of Renshape that were carved by hand. Here's an early pull of one of the outer forearms:
46986907575_33433cf879_c.jpg


These pieces were vacformed in two layers so we could cut sections out of the outer layer to create recessed sections and make variations:
47850925222_8a8b28cce6_c.jpg


Rachel did most of the cutting and gluing to make the forearms:
47850924162_c151bc22ec_c.jpg


I didn't get a lot of great photos of the forearms coming together, but the knees were made pretty much the same way:
46986908675_7164e735f0_c.jpg


47850927892_85dc2f019e_c.jpg


46986908895_9ddcae49ef_c.jpg


Rachel was also entirely responsible for sewing up the sleeves and skirt panels in velvet:
33939306208_24847942ce_c.jpg

pg[/img][/url]
 
The backpack forms started as hand-cut pieces of 3/4" MDF and a piece of 6" PVC pipe:
47026992714_c7e25ee132_c.jpg


At this point I was getting a bit tight on time, so I started skimping on the photo taking. Rest assured that the sketchy-looking backpack forms ended up working pretty well:
46986909095_3bae34f1b0_c.jpg


46986906105_5da3987afc_c.jpg


Somewhere along the way I started needing the smaller cast detail bits to add on. Most of these were simply 3D printed, cleaned up and molded, then cast in urethane resin:
47990075927_13caca468f_c.jpg


For the hose attachment thing on the front of the collar, I started with some MDF pieces cut out with a hole saw and a few scraps of PVC pipe:
47113627044_e0188192f1_c.jpg


This assembly was notched to fit onto the collar trim. To ensure a snug fit, the backside was gooped up with Bondo and pressed onto the collar (which had been masked off and coated with Vaseline to prevent bonding). When it had cured, I had the just-right shape:
46986908055_4af02a4cce_c.jpg


Once that piece was molded and cast, it was just a quick matter of attaching it to the front of the collar with glue, screws, or rivets:
47990075637_fd27dbec5f_c.jpg


Somewhere along the way we made an excursion to a local tannery that sells leather scraps and off-cuts by the pound. We ended up finding more than enough to make up some pouches:
47990131696_5bdb0eaed8_c.jpg


Full disclosure: I'm not a very talented leatherworker (yet), so those were vacformed plastic boxes wrapped in leather with a stitched cover wrapped around and glued in place. The flap is held down by velcro and the icons were just glued on as well.

Somewhere along the way we finally got around to cleaning up the seams on the first set of shoulders and started paint tests:
47850924892_8c33ffeaee_c.jpg


This was Rustoleum hammered black metallic. At first I was worried it would be too silver, but a blackwash would end up taking a lot of the shine off of it.

We were also regularly dressing up the mannequin in the shop as we made progress:
47990079068_6abc6311e1_c.jpg

She was starting to look like something.

With no time to spare, we spent a couple of days forming and rough trimming parts. You can always tell when we've been working on a vacforming project:
47778610922_136b8333d2_c.jpg


But things were shaping up:
40864228433_a04468c78b_c.jpg


46986905995_c11cc4600e_c.jpg


47778611052_f98c199d59_c.jpg


40864228223_548041ec99_c.jpg


47903020151_d6dcfb89f2_c.jpg


47903019241_52ded4eb31_c.jpg
 
Eventually it was time for paint:
47850923732_9c500b717b_c.jpg


46986903935_b27f626923_c.jpg


47850922502_eda3b123b5_c.jpg


46986903725_ab651e2fd5_c.jpg


Those pics were taken the night before we had to load everything up for the Bay Area Maker Faire. Stay tuned for finished pics when I get a moment to write more.

For now, here's a preview:
47990639113_4c4701429b_c.jpg
 

Attachments

  • 47947560746_0ea2920522_c.jpg
    47947560746_0ea2920522_c.jpg
    130.2 KB · Views: 405
Last edited:
Holyyyy... Beyond awesome, the quality of details are amazing, can't wait to see the finished pictures

Thank you for the kind words. So far these are the "rough draft" suits. There's a lot of things I want to go back and upgrade, but for now they'll do just fine.

Now on to the final assembled costumes...

The base garments were all picked up on Amazon. Started with this catsuit: LINK These boots: LINK and this simple corset: LINK. We also picked up a variety of short wigs. Some silver, some white. Once it was all combined, it made for a great look:

32860793237_c13c53af7b_c.jpg


Because we were up against a tight timeline, we ended up putting the final blackwash on the parts the morning of the event. While the rest of the crew was assembling the display booth, Rachel focused on final assembly and weathering of the Sororitas armor:
47903016541_7fc499dc3e_c.jpg


My friend Sierra strapped everyone into their gear:
47850921032_564fa3e679_c.jpg


47850921212_a87d0898c6_c.jpg


As with any complete costume, the final step in putting these together is makeup. My cousin Amanda came along for the weekend to do everyone's scar effects and she did a great job:

47947512502_53e52bb9ee_c.jpg


46986901745_1672fd2440_c.jpg


47947510912_985198a67f_c.jpg


We were strapping the girls into the armor just as soon as the paint was dry. The first completely assembled sister was my friend Madison:
48052386168_5b15294f8e_c.jpg


Of course, that pic doesn't do anything to showcase the costume. Here's some better shots:
47947555241_22456a5590_c.jpg


47947491702_99bcf0df8d_c.jpg


47947516498_1c6919c086_c.jpg


The next completely assembled sister was Danielle:
47947507968_5a3563c538_c.jpg


Third was Rachel (left in this pic):
46986900125_c767beab7b_c.jpg


The next day we had Mallory too:
47947582501_a713fe14a9_c.jpg


For the duration of the Bay Area Maker Faire, I had three sisters dressed and walking around at all times:
47947481132_c8bf8b7a3d_c.jpg


47947517751_d984675ec2_c.jpg
 
Last edited:
On Sunday, my friend Samantha joined in:
47947498416_bcd01f059f_c.jpg


And we added a couple of guardsmen:
47947460943_f29ee55c9d_c.jpg


47947444867_24b7da72d3_c.jpg


47947495716_9f04668c80_c.jpg


47947455082_afeca3d850_c.jpg


It worked out to be a pretty good weekend. Even if breaktime was hard to come by:
47850919222_3717b5eb25_c.jpg


Now I need to go back and make a few tweaks to the shoulder armor, make another size of chest and back plate, fine tune the weapon forms, and finish the helmet:
48046800756_52bd938b8f_c.jpg


Stay tuned...
 
Your WH 40K looks always on point. It’s hard to make it work on real people, and still get the WH feel. But you always get it spot on...

that being said, I'm a huge Tau fan....:rolleyes:.....

nice job!
 
Welp, we managed to get most of a squad together for San Diego Comic Con.

This meant that my hotel room was a sea of Sororitas armor for a few days:
48400493336_9c1dc9522a_c.jpg


Then we had all kinds of fun getting everyone into hair and makeup and armor:
48400627967_b858d014c3_c.jpg


My hotel was a bit away from the hustle and bustle of the convention center in Old Town. So we got to take the train into town. On the way to the train station we crashed a wedding:
48400627742_64e798025a_c.jpg


And getting everyone onto the train was fun:
48400627052_b4732a23cc_c.jpg


48400616197_6a6cb0535a_c.jpg


48400616802_bfd860740d_c.jpg


Then when we got to the convention center, we had to go through weapons check:
48407062996_87c9523e58_c.jpg


This was made more comical by virtue of the fact that the grenades were bolted onto the belts:
48407209927_4a780ef5b2_c.jpg


But once that was over, the squad got to arrive properly:
48400477666_6d81b94d0e_c.jpg


48400481931_aa1f231f63_c.jpg


48400617707_26eac6e300_c.jpg


48400617577_81de81d92e_c.jpg


I'm still sorting through pictures, so expect more when I get some time to catch up. In the meantime, a good time was had by all:
48400620467_5fe5420cd5_c.jpg

Mostly.

Stay tuned.
 
This thread is more than 4 years old.

Your message may be considered spam for the following reasons:

  1. This thread hasn't been active in some time. A new post in this thread might not contribute constructively to this discussion after so long.
If you wish to reply despite these issues, check the box below before replying.
Be aware that malicious compliance may result in more severe penalties.
Back
Top