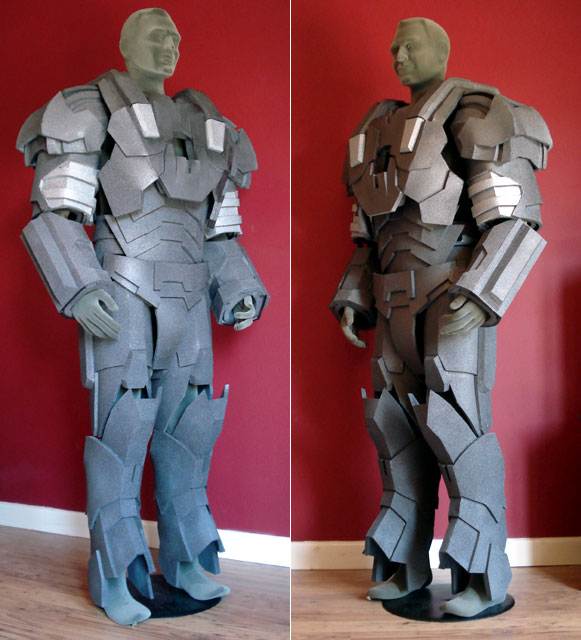
War Machine Foam build (my first full suit)

Han Polo

New Member
Hi All,

I'm a new member and have been lurking and reading up to get helpful tips for my War Machine build. I started this suit In early May, have been working on it pretty steadily, but have had some rough delays due to scaling issues. I think I've finally learned my lesson, later today or tomorrow I will post a pic of the pile of wrong sized parts that have frustrated me as I go along.

I'm using Juice's pep files, modified for foam by Stealth. Stealth's Hero Tutorials' on Youtube gave me a huge head start on this, as I watched all of them over and over before I finally decided to take on this build.

Right now I am working on making the last few pieces:
Arm guns
Hands (almost done)
Gatling
Helmet (the one in the pic is a Mk 3 SD, and a little too big, I'm thinking about trying to hard coat this helm, hinge the faceplate, and light it)
HD abs by StageFiveDrift (pic abs are just not cutting it imo)

I'm also working on fitting the suit, most of the attachments are done, I'm gonna build hinges into the knees (like Indie Film Geek did in his son's suit), right now they're just web straps and I don't like how floppy they are.

Having some issues with the boots, I will go into detail on that later in the thread. I've been pretty poor about taking progress pics, but I'll try and take more as I go forward. As a new builder and forum member, I appreciate all input, thanks for reading!
 
Great work so far! How long has it taken you to get to where you're at once you zeroed in the scale on parts? Like I said in the other thread, I've also wasted too much time and foam on my War Machine build due to scaling problems. Out of curiosity, how tall are you and what scaling did you use for the chest?

Looking forward to more pics.
 
@ msleeper:
I have been building this suit since early May, I have to estimate that I've spent between 80 and 100 hours to get this far. The time table is a lot longer though, due to the scaling delays. I have a shoulder, 2 thighs, a calf, and 2 cods that have all been mis-sized. After wasting so much time, I've slowed down a lot in order to avoid those mistakes in the future. Compared to other foam builders though, I get the sense that I'm a bit slow. It's probably because I'm new and such a perfectionist.

I am 6' tall, ~190 lbs. The chest piece is sized up by 14% from the file that Stealth modded. This makes the length about right imo, but it's still too wide. Now I am going to shrink the width a little by taking in the attachment points to the back under the arms. Also, my new abs which I will show later today will fill in the gaps from the pic.

A lot of my scaling issues started with my foam being 1/2" thick, it forces you to scale up to be able to wear it. I'm going to do a Mk 7 using Darkside's pep after htis, and I will definitely be using 1/4" foam, should make it a lot easier.
 
What scale factor did you use (the number in Pepakura in the scaling dialog)? The "default" for the Robo/Stealth files is 1.8 when you download them and that was way too small for me. I'd have to check what I figured my scale to be (I don't have my pep files on this computer), but I just wanna compare and see if we're in the same neighborhood. I'm 5'10, and I'm a girl so I have other considerations when making a chest piece.

I got super lucky I think and found 1/4" foam sheets at Sears. Everywhere else I find only carries 1/2" sheets. I had found 1/4" previously in a roll, which kinda sucked since the foam always had a curve to it and that took time to prep it with a heat gun to flatten it out.
 
The scale factor is 2.05. When joined with the back, also at 2.05, the inner dimension, using 1/2 " foam, is large enough to accomodate a chest measurement up to 48".
 
Man that looks Sick awesome, the color scheme is nice, I'm also starting to build my WM; I think I and going to use the colors of the special edition toy which is gunmetal grey and white....I will call it my oreo war machine....

here is a reference pic:

View attachment 99126
 
Thanks for the compliments. The colors in the pic are just the raw foam, the orange pcs are 6mm foamies, used for recessed details, but I think it looks kind if cool :). I think I am going to go for the movie paint scheme, charcoal and silver, with black wash for grime and silver dry brushing for weathering. Any suggestions for good threads on those techniques? It will be my first shot at them, I will start with my oversized parts as testers.
 
Whew, it's been a long couple of days. Finally got the HD Ab/Cod by StageFiveDrift built, now I'm trying to figure out how the heck I'm going to wear it. It would clearly look best as a single joined piece, but then I couldn't get into it. Seems like I will have to have the spine glued for alignment (I know it looks awful in the pics).

Thinking about trying this:
1. Cut down the side, 1 clean straight line
2. Put a zipper on it (on the inside, I got the idea from Full Metal Sam's website) to keep it aligned and pulled tight
3. glue most of the ab/cod joint, except for 6" either side of the zipper so that I can spread it enough to get it on
4. velcro the ab/cod joint near the zipper.

And I also plan on keeping the upper plate separate, attached to the chest piece for mobility.

Thoughts or suggestions? Here are some pics of where I'm at.
 
Hopefully you haven't glued things together yet. Xrobots did something really smart on his: the front actual abs are all one single piece, which presumably comes apart from the sides/back of the ab part.

warmachine042.jpg
 
Yeah, that looks easier, but it will bug me knowing it doesn't look like the movie version :( That solution adds 2 shadow lines that aren't on the original, which would bug me. Then again, there's no side zipper seam on the original...
 
You don't have to do that exact idea, but something similar. Have the abs be connected, and the sides buckle or velcro onto the back of them. I also am not sure how please you're going to be with you results if you're going to film accuracy, yet using foam for your material. Foam is great for a fast and very wearable costume, but not so much for getting incredibly detailed.
 
Yeah, you may have a point there. I'd love to do a resin/fiberglass pep build sometime, but right now my workspace (pronounced small 1 bedroom apartment with no outdoor space) means I have to work in foam. That is sounding solid, attach the sides and leave the front section removable, gonna work on it. Thanks for the input!
 
Soooo... many hours of messing with the ab/cod fitting later, I have this. It's about 80 - 85%. I just need to do a little more heat shaping to close up the joints, and find some stronger magnets for the latch system. The ones I have will just barely keep it on the dummy. Anyone seen a good tut on magnet latches? I've just heard the word, and this was my attempt at figuring it out.

Also, in the pics you can see I've drawn on the screw/latch detail, I am waiting to install this so that I can use it to cover up the magnets, once I get some that are strong enough.

I didn't use velcro because I thought magnets would be cooler, but I'm starting to wonder if it's worth the time.
 
What kind of magnets are you using? The best kind to get are the rare earth / neodymium magnets. Velcro will probably work just as well though, or even button snaps or something along those lines.
 
Regular ceramic disc magnets. I found a store by me that sells the neodymium ones, but they are closed for the weekend. Gonna let the abs sit a bit and knock out some other parts.
 
Hi All,

Update, finally finished the Arm Guns. I spent a lot of time tweaking the pep files so that they made sense for foam use. The heat sink details (white bases with grey on top) were alot easier to do this way than the file version, which is a single piece folded a bunch of times to create the same surface contour.

The front site blade was a tweak I added, as you can kind of see a front site in alot of the reference pics.

They're velcroed on, but since I used 2" Industrial Strength velcro, I guess I might as well have glued them, lol. They're really tough to take off, have to use a ruler to seperate the velcro to avoid damaging the parts.

All that remain are ab/cod tweaks, boot issues (still need to add a post about that, I'll get to it this week), knee hinges, helmet, lighting, and gatling, coming along alright. Oh, and then paint... yeah. Thanks for reading.
 
Back
Top