USS Enterprise NCC-1701 - 1/1000 Scale

trekriffic

Sr Member
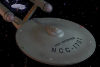
I took some better pics of my 1/1000 Enterprise this past weekend against a black velvet backdrop and wanted to share them. Hope you guys like them...

33641685808_583245c667_o.jpg
USS Enterprise NCC-1701
by trekriffic, on Flickr

47465820542_e448b5d4ec_o.jpg
USS Enterprise NCC-1701
by trekriffic, on Flickr

47465820472_5244aa5ee0_o.jpg
USS Enterprise NCC-1701
by trekriffic, on Flickr

47518601131_a7f88baa2b_o.jpg
USS Enterprise NCC-1701
by trekriffic, on Flickr

33641685688_1219103f74_o.jpg
USS Enterprise NCC-1701
by trekriffic, on Flickr

47518601281_47867b9068_o.jpg
USS Enterprise NCC-1701
by trekriffic, on Flickr

47518601421_c07f2de23c_o.jpg
USS Enterprise NCC-1701
by trekriffic, on Flickr

Composite using MS Paint...

47466683702_9814e834e8_o.jpg
Constellation Under Tow - The Doomsday Machine
by trekriffic, on Flickr
 

Attachments

  • 47466683702_9814e834e8_o.jpg
    47466683702_9814e834e8_o.jpg
    236.9 KB · Views: 142
Last edited:
Those pictures look fantastic!!

I'm interested in the black velvet backdrop you used to take these. I like that there are no light reflections off the black backdrop. Looks like screen captures from the Blu-ray's.

Could you post some pictures of the backdrop setup including how you lit it?

Thanks!
 
did you use Photoshop to make the ship appear to be in space?

No. I took the photos in my garage using a piece of black velvet for the backdrop. There are other versions of these photos where I added stars using MS Paint. I do these during off hours on my work laptop and my employer won't allow programs like Photoshop to be installed on it.
 
Those pictures look fantastic!!

I'm interested in the black velvet backdrop you used to take these. I like that there are no light reflections off the black backdrop. Looks like screen captures from the Blu-ray's.

Could you post some pictures of the backdrop setup including how you lit it?

Thanks!

You're lucky. It just so happens I took one photo of my camera setup. It's nothing fancy.:

47477963682_4cbd6a88f6_b.jpg
Garage Photography
by trekriffic, on Flickr

The black velvet hangs from a framework made of PVC irrigation pipe. I use 3-4 lamps using daylight spectrum LED bulbs to light the model. My camera isn't pictured but it's a first generation Canon Rebel T1i. The old girl still takes nice pictures.
 
Thanks!! That is great.......just what I would like to do.

Never bought black velvets but is it any specific kind?

Where did you get the lights from?

Your using the overhead lamp and the 2 on the sides clamped to the PVC pipes.

Is there some kind of diffuser in front of the 2 side lamps?

Thanks Again!

Black velvet is sold at any fabric store. I got mine at JOANN's:
https://www.joann.com/royalty-3-velvet/xprd728568.html#q=Velvet Fabric&start=1

It's expensive so I got my 2 yards when they had a 40% off sale. You might need less or more depending on how large your subject is that your photographing. I love it because it absorbs light thus avoiding any shadows from your subject.
Just avoid any velvet fabrics that have patterns.

The clamp lights I got from Lowes or any hardware store:
https://www.lowes.com/search?searchTerm=clamp+lights

For diffusion I first measured the diameter of the clamp light and then went to Michaels (or JOANN's or Hobbylobby) and bought some wooden embroidery hoops:

47592711642_9bce6ebf91_z.jpg
Embroidery Hoop
by trekriffic, on Flickr

The hoops come in various sizes and you want one that's slightly smaller than the diameter of the lamp.
Loosen the thumbscrew and place the inner smaller part of the hoop around the circumference of the light just inside the edge and glue it onto the lamp using hot glue so it doesn't slide down the lamp. Then take a piece of T-shirt, or or any white cotton or linen fabric, (JOANNs or Michaels sells this too across the aisle from the embroidery hoops) and place it over the hoop on the lamp. Place the outer part of the hoop over the inner hoop with the fabric trapped in between. As you tighten the thumbscrew, the outer hoop will tighten onto the inner hoop. Pull on the fabric as you do so until it's tight across the face of the lamp. Of course you want to make sure your bulb doesn't touch the fabric if possible,although, heat shouldn't be much of an issue if you use LED bulbs which "burn" cooler than incandescent.

The lights will clamp to the PVC pipe but you need to get some small hand clamps like these to clamp to the clamp on the light or they will tend to slide down the pipe. You can see this arrangement of clamps on the light on the left side of my photograph:

40679128433_45dec1dea8_z.jpg
Nylon Spring Clamp
by trekriffic, on Flickr
 
Last edited:
Thanks for all the detailed info!! I will be ordering this tonight.

What size diameter clamp light did you buy and did you get the LED bulbs from Lowes and at what wattage? Loews has day light LED bulbs from GE, Sylvania and a few others in basic / classic white in various wattages.

Thanks!
 
Thanks for all the detailed info!! I will be ordering this tonight.

What size diameter clamp light did you buy and did you get the LED bulbs from Lowes and at what wattage? Loews has day light LED bulbs from GE, Sylvania and a few others in basic / classic white in various wattages.

Thanks!

I'll have to go out and measure and see what bulbs I have this weekend.

In the meantime, here are a couple of other images of the Enterprise; this time against a sheet of off-white matte board with her lights turned on...

23835604783_0ac93d31a1_z.jpg
USS Enterprise NCC-1701
by trekriffic, on Flickr

24354102062_29b00d3550_z.jpg
USS Enterprise NCC-1701
by trekriffic, on Flickr
 
I'll have to go out and measure and see what bulbs I have this weekend.

In the meantime, here are a couple of other images of the Enterprise; this time against a sheet of off-white matte board with her lights turned on...

I appreciate all the info and the pictures look great!
 
OK. Here you go.

I have three clamp lights measuring 8.5" in diameter:

47599254402_cc4ef853df_b.jpg
8.5 Inch Dia Light
by trekriffic, on Flickr

The lamp has this warning label on the inside:

46928184974_6602c0fa64_b.jpg
8.5 Inch Light Warning
by trekriffic, on Flickr

The bulbs are actually compact "coily" fluorescents:

32709462407_71c0decc1b_b.jpg
Fluorescent Bulb
by trekriffic, on Flickr

Labelling on the these bulbs indicates they are Model EDXO-23, self-balasted lamps. 23W, .38A, 120V, 60HZ, 5500K

They use this type of fabric for diffusion:

47599254112_9fce23073a_b.jpg
Diffuser Fabric
by trekriffic, on Flickr

The inner embroidery hoop is glued to the outside edge of the lamp's rim using a hot glue gun before the facbric is clamped tight between the inner and outer hoop:

46736478165_0cc904634d_b.jpg
Hot Glue
by trekriffic, on Flickr

I only used 2 of these lights for taking the latest photos of my Enterprise as it is not a large subject and they provided plenty of illumination. Usually these are placed in front of the subject to the left and right with one above and one below to get even lighting.I generally do not point the light directly at the model so as to avoid hot spots. I also spray most of my ships with a matte clearcoat to cut down on glare bouncing off the surface into the camera lens.

The other clamp light measures 10.5" in diameter:

46928184784_5f51057b32_b.jpg
10.5 Inch Dia Light
by trekriffic, on Flickr

This lamp has this warning label:

46928184704_7abba57811_b.jpg
10.5 Inch Light Warning
by trekriffic, on Flickr

It uses this bulb:

40685594803_bbc00cac80_b.jpg
Fluorescent Flood Light Bulb
by trekriffic, on Flickr

The bulb has this printing on it:

46928184594_1f38f829ba_b.jpg
Bulb Labelling
by trekriffic, on Flickr

It looks like a traditional flood light but it actually has a coily fluorescent inside it:

46928184904_82d3c9cfbc_b.jpg
10.5 Inch Dia Light with Bulb
by trekriffic, on Flickr

This bulb has the following printed on it:

Ultitech LBP18R40/5K, 18W, 120VAC, 60HZ, 300mA, 950 lumens

It's positioned above and behind the subject and serves to illuminate the backdrop and the backside of the model.

So that's it. The fluorescents work well but you could probably substitute LED bulbs of similar wattage and amperage. There are so many to choose from these days. My suggestion is to find ones that are close to the color of natural sunlight unless you are looking to create a specific effect and need a cooler or hotter light.
 
Wow....you really explained your setup and was way more than I expected. I can't thank you enough!!

My one concern is the black velvet backdrop. Does light reflect off it or is it completely flat with no light reflection. Did you have to touchup the background after you took your pictures. How do you get the completely black background and is it only from certain angles. I have been using black poster board as my backdrop and it's fine at certain angles but at others you see light reflecting off it and it ruins the picture instead of a completely black background.
 
I used to use black foamcor board (speckled with white paint for stars) for my photos but I had to be really careful with the angle of the light or it would reflect off the foamcor forcing me to edit (darken) the images in Paint. The black velvet I have now is soft, thick and "furry" and will not reflect light. One recommendation I saw online said to brush the fabric with your hand so the nap all goes in the same direction. This would mainly come into play if you have a light source too close to the backdrop at a sharp angle. So you might end up with areas with a slightly lighter "sheen" to them. So even with the light hanging above to the rear you should angle it more downward at a slight rear facing angle but most of the light should fall on the table behind the model.

Here's an image taken years ago using my black foamcor background with stars. The planet is a beachball:

9043040747_e1bc3a3be8_z.jpg
IMG_1638-GE2
by trekriffic, on Flickr

And one in front of the black velvet with stars added in Paint:

32589733477_46a18f878d_b.jpg
USS Enterprise Space
by trekriffic, on Flickr

You can see the black velvet is slightly darker.

One trick I learned in the past when I was using foamcor and poster board for my backdrops was to overexpose the image just slightly so when I went to edit it in Paint I could darken it to eliminate any reflections or "hot spots" visible in the background. Not the best solution but I had not thought to use black velvet at the time.
 
Last edited:
Thanks for all the great lighting tips. I found a 50% off coupon for 2 yards. How big is 2 yards since you purchased that amount? The website just says 44"
 
Incredible. I recently got the 1/1000 refit/A Model, I was thinking of perhaps getting this something to start off being easier to help me get an idea for the refit/ A, Do you recommend getting this model?
 
This thread is more than 4 years old.

Your message may be considered spam for the following reasons:

  1. This thread hasn't been active in some time. A new post in this thread might not contribute constructively to this discussion after so long.
If you wish to reply despite these issues, check the box below before replying.
Be aware that malicious compliance may result in more severe penalties.
Back
Top