Junk Pilot
Sr Member
I would definitely recommend using an internal support for the fuselage. It adds so much strength to the overall hull.
BTW, do you know how much thicker the hull needs to be to be accurate to the ANH falcon?Hi Weezer,
If its the shape your after and you dont need to fix the docking rings then just space the center of the ship. Like this.
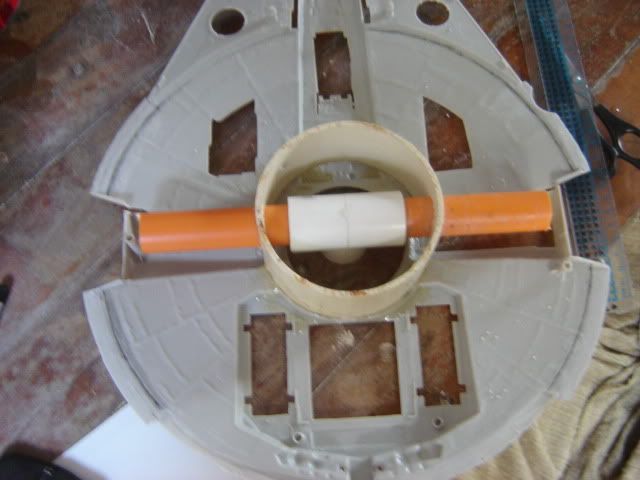
You dont have to cut the ship up. It will work fine with scratch built walls or upgrade kits.
When your done with that, just cut down the side walls to the size you need and then, (as you suggested,) greeble them up with some kit bits. 1/144 tank kits dont have many parts to use other than the decks, but you can find some bits from 1/72. Or do as I did with my first build and just find things around the house that have the shape your looking for and glue the bugger on.
Ozzy
Ohhh, crap, I screwed that up. I was just about to respond with, no, no, no you got the numbers wrong, that's wayyyyyy to high, but as I checked my spread sheet that has all Johns measurements on it as well as mine and the original MPC's, I have just realized that the spacer I put in my new falcon is the measurements I made for the falcon without modifying the docking rings.
Man I am daft, I have looked at my own spread sheet and used the wrong column.
So please disregard what I said above, except for the fact that the numbers above are for an MPC falcon with modifications to side walls only. If you use the original docking rings then any higher the docking ring walk ways slop way to much. So if that's the way you were going then use those.
For a cut up and modified docking rings and walk way MPC falcon use John's templates and height of 6.6cm. Which is around about what I did with my first rebuild falcon.
Sheesh, moron, I am going to have to pull mine out and do it again. Cnat believe I did that.
Ozzy
Why didn't you just edit the post with the wrong measurement in it? :lol
The MPC falcon takes a LOT of grief but with soem dedication it does really build nicely. But reading your original post I'm not sure you realize how loaded a question you're asking. The way I see it there are about 3 levels of MPC falcon modifications... and which way you go determines how crazy you are... an I oughta know I've gone down all of the roads :eek
Level 1 you decide to buy an upgrade kit and build a darn fine reperesentation of the Falcon. FalconKits or Blue moon make replacement parts for the side walls and a few other bits. Using them will produce a very respectable result.
Level 2 - you decide that you want to try your hand at scratch building and want to partially relive the process that ILM when through when they built the falcon. you purchase some sacrificial, 1/72 tank kits, 1700 (or smaller) battleships, assundry helicopters, jets and cars, and have a go at kitbashing a ton of details that "look functional".
while:
Level 3 - you've decided that while the basic geometry is close you just can't live with what's not right with this model you:
- Correcting the height of the sidewalls.
- adding detail to the engine deck area
- the crossmember pieces missing form the kit cockpit cone
Enjoy,
- correct the diameter of the cockpit tube and cockpit
- correct the sidewall height
- correct the diameter of the radar dish
- correct the curvature of the hull (various methods but the most effective in my erperience is placing a plug in the center, clamp the outer rings, and GENTLY apply heat to soften the plastic enough to "take" the new shape - long slow but effective.
- research the studio model and get the parts maps form the studio scale guys, then research the same model "subjects" at 1/4 the scale used on the 5 footer or 1/2 the scale used on the 32" (depending on which you're replicating).
- Buy all said models and try to steal the same/similar bits form the smaller subjects to use on the MPC replicating the studio look as closely as possible
- scratchbuilding anything that cannot be found by above utilizing the studio scale reference
- practicing on every scrap piece of styrene or other material to perfect the airbrushing, and weathering techniques to get the "just right" amount of grunge
- Researching and experimenting with every shade of gray, until you finally realize that you're gonna have to learn to mix paint and airbrush if you're ever going to be satisfied with the end color. This will include the obligatory appeal to every modeling and prop board for the "what is the right color for the Falcon thread". To which they will reply a variety of colors and paint mixtures that will be "close" but never to your satisfaction.
- messing up several paintjobs (that everyone else thinks look perfect)
- redoing several odd bits that you just aren't happy with because your scratching kitbashings skills have imporved greatly from when you started.
- Repainting "again"
- finishing the project and thinking Damn I could do that so much better now...
- Wash, rinse, repeat... Welcome to our world of Falcon insanity...:lol
Jedi Dade
(I just couldn't resist)
The MPC falcon takes a LOT of grief but with soem dedication it does really build nicely. But reading your original post I'm not sure you realize how loaded a question you're asking. The way I see it there are about 3 levels of MPC falcon modifications... and which way you go determines how crazy you are... an I oughta know I've gone down all of the roads :eek
Level 1 you decide to buy an upgrade kit and build a darn fine reperesentation of the Falcon. FalconKits or Blue moon make replacement parts for the side walls and a few other bits. Using them will produce a very respectable result.
Level 2 - you decide that you want to try your hand at scratch building and want to partially relive the process that ILM when through when they built the falcon. you purchase some sacrificial, 1/72 tank kits, 1700 (or smaller) battleships, assundry helicopters, jets and cars, and have a go at kitbashing a ton of details that "look functional".
while:
Level 3 - you've decided that while the basic geometry is close you just can't live with what's not right with this model you:
- Correcting the height of the sidewalls.
- adding detail to the engine deck area
- the crossmember pieces missing form the kit cockpit cone
Enjoy,
- correct the diameter of the cockpit tube and cockpit
- correct the sidewall height
- correct the diameter of the radar dish
- correct the curvature of the hull (various methods but the most effective in my erperience is placing a plug in the center, clamp the outer rings, and GENTLY apply heat to soften the plastic enough to "take" the new shape - long slow but effective.
- research the studio model and get the parts maps form the studio scale guys, then research the same model "subjects" at 1/4 the scale used on the 5 footer or 1/2 the scale used on the 32" (depending on which you're replicating).
- Buy all said models and try to steal the same/similar bits form the smaller subjects to use on the MPC replicating the studio look as closely as possible
- scratchbuilding anything that cannot be found by above utilizing the studio scale reference
- practicing on every scrap piece of styrene or other material to perfect the airbrushing, and weathering techniques to get the "just right" amount of grunge
- Researching and experimenting with every shade of gray, until you finally realize that you're gonna have to learn to mix paint and airbrush if you're ever going to be satisfied with the end color. This will include the obligatory appeal to every modeling and prop board for the "what is the right color for the Falcon thread". To which they will reply a variety of colors and paint mixtures that will be "close" but never to your satisfaction.
- messing up several paintjobs (that everyone else thinks look perfect)
- redoing several odd bits that you just aren't happy with because your scratching kitbashings skills have imporved greatly from when you started.
- Repainting "again"
- finishing the project and thinking Damn I could do that so much better now...
- Wash, rinse, repeat... Welcome to our world of Falcon insanity...:lol
Jedi Dade
(I just couldn't resist
When I started my MPC last year......I thought the level 3 was an exaggeration! To everyone out there: THAT'S NOT AN EXAGGERATION
Hi mslz22, you're not hijacking this thread.....its been dormant for a couple of years until today
....I've done some mods to the MPC kit and the main problem when cutting not the hull is it loses it's stability and warps all over the place,.....so the idea of an internal structure would be an excellent idea,....that would be a great help in fixing the curvature problem
J
Surely correcting the dish curvature means you'd have to separate it from the docking corridors, the cockpit corridor, and the jawbox, like Ozzy did. After that, how do you blend them back together? Or could you just use a heat gun on the dish and form it by hand over a laser-cut rib system like mslz22 suggests?
.Having done it - its a crazy amount of work ... Both ways. If you don't disconnect the docking arms and the cockpit they get a definitely slant to them - from any of the non-profile angles it looks OK - profile angles (front rear and directly side) it looks off due to that slant.
While its definitely in my wheelhouse of crazy I really don't think that the internal curvature armature would sell a lot... the MPC Falcon is just one of those things that is in the in-between place is almost good enough to spend the time and money on to correct... But not really. Only the crazy's throw all caution to the wind and dissect the thing to reconstruct it. That being said I'd probably go for it if you did one
Jedi Dade
. I have the SMT 1/48 Falcon and its cool - but how cool would it be for a reasonably accurate detail wise one to come out! the SMT looks the part - but... and I'll leave it there.