Tom's DL-21

thd9791

Master Member
RPF PREMIUM MEMBER
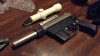
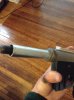
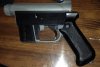
I got myself an AR-7 casting from OdiWan and a stormtrooper sterling grip lying around. Oops, guess that means I'm making a new blaster!

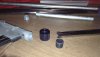
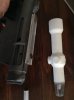
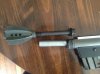
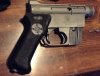
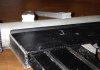
I started buying any metal parts I could legally own that were out there..the side plate, trigger (and other internal pieces) and the magazine. With a little sanding they fit into the resin parts seamlessly!

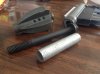
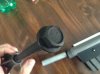
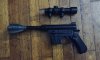
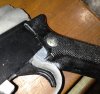
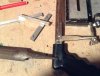
i played with the idea of screwing the sterling grip on from the butt but the angle was weird. I heaped a ton of qwiksteel putty on there, shaped a "handle" tang and jammed it in place. It's stuck. For good measure I even jammed the l2a3 bolt I got with it in the bottom along with more putty. That also got stuck :lol cool thing is everything's in place, the side plate is screwed and tapped in and this is a good solid piece.

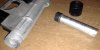
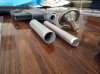
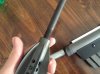
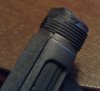
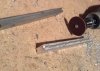
I had to repair the barrel but threads, I dropped the thing and it broke off!

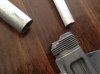
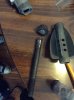
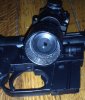
I also stuck a wood screw with a bulbous countersunk head in the grip to screw it into the putty, for good measure :cool
 

Attachments

  • image.jpeg
    image.jpeg
    497 KB · Views: 119
  • image.jpeg
    image.jpeg
    590.8 KB · Views: 133
  • image.jpeg
    image.jpeg
    473.6 KB · Views: 115
  • image.jpeg
    image.jpeg
    416.3 KB · Views: 112
I also wanted a metal scope rail, so I took some aluminum stock and used a dremel to shape the correct mount. OdiWan also included a casting of the rail so I used that as a guide, even drilling the wonky holes. I'll countersink them eventually...
 

Attachments

  • image.jpeg
    image.jpeg
    382.9 KB · Views: 89
  • image.jpeg
    image.jpeg
    515.2 KB · Views: 88
  • image.jpeg
    image.jpeg
    699.1 KB · Views: 93
  • image.jpeg
    image.jpeg
    772.2 KB · Views: 97
Thanks Markus!

I figured out the barrel too. This is a piece of aluminum pipe I scrounged that looks thick enough compared to the nut (yep, metal nut from AR-7 parts site) and I hollowed out the plastic foot from a shower caddy/shelf thing for the "ridge" that the nut holds against the reviever. I bought it for the tubing, there's like five feet of shiny pipe in there and I never used it! The scrap aluminum just looked better :) I eyeballed the length, I didn't realize how long of a gun this is. what are people's measurements?

i bought an m12 die and a 12mm piece of aluminum stock and I'm going to cut my own threaded rod that I'll plant into te reciever...glue or putty, the recessed dimple in there is a half inch which is like 1-2 mm off! Got my half inch drill bit ready for when those get here
 

Attachments

  • image.jpeg
    image.jpeg
    666.8 KB · Views: 86
  • image.jpeg
    image.jpeg
    409 KB · Views: 90
  • image.jpeg
    image.jpeg
    945.5 KB · Views: 114
Ugh! well the repair on the barrel threads broke off, but that doesn't really matter.,

I bought an M12 die from china and it's huge. I have to find like.. larger die handles to use it, or bite the bullet and buy an m12 bolt and cut it to size lol

also the barrel shoulder came right off, so thats back to the drawing board! any tips for the barrel would be great lol
 
Thanks for the interest guys - okay so first off I have to replicate a barrel ridge so my barrel can be held in place by the nut. I only have about 1/8th inch of depth where the barrel sits. Also the space is much wider than the barrel itself, so this will be like a donut on the butt of the barrel. I tried steel putty but it just popped right off, and it's tough finding a washer with those dimensions
 

Attachments

  • image.jpeg
    image.jpeg
    1.1 MB · Views: 63
  • image.jpeg
    image.jpeg
    33.2 KB · Views: 65
In order to get more anchorage I decided to drill a hole for an M12 rod for the flash hider, since I'm pretty sure its base is m12. I just bought a die that's way too big for my handles. I CAN just buy an m12 threaded rod or an M12 bolt (and cut the head off) and stick it in there, but they're really expensive over here! I technically only need the tip to be threaded, as I'll epoxy it inside the gun. And try to keep it straight lol
 

Attachments

  • image.jpeg
    image.jpeg
    523 KB · Views: 75
  • image.jpeg
    image.jpeg
    1.1 MB · Views: 73
  • image.jpeg
    image.jpeg
    886.4 KB · Views: 70
Not sure if i understand what you want - you have a 12mm solid alu-rod, that needs a rim/ring on one side, and a 12mm thread on the other end, to screw the mortar fin on?
 
Not sure if i understand what you want - you have a 12mm solid alu-rod, that needs a rim/ring on one side, and a 12mm thread on the other end, to screw the mortar fin on?

Correct on the threading. I was going to run the solid aluminum rod inside the barrel.

The rim or ring has to be on the pipe (which is my barrel. can't seem to find a tapered rod like the real thing, so the rim/ring has to be larger)
 
I finally found an M12 bolt that gets a bit thicker after the threads. I think the pitch is different, since it feels a bit loose until it's screwed all the way in, but it works for me! I believe this is 120 mm long or something: I added the barrel length, and the length of the hole I drilled and the length of threading inside the flash hider mortar. I'm going to chop the head off this bolt and epoxy it into the gun....slide the barrel over and screw the flash hider in place!

(I may have found a resin ruger so a greedo blaster is in order!)
 

Attachments

  • image.jpeg
    image.jpeg
    1.1 MB · Views: 74
  • image.jpeg
    image.jpeg
    1.1 MB · Views: 77
  • image.jpeg
    image.jpeg
    1 MB · Views: 73
  • image.jpeg
    image.jpeg
    1.2 MB · Views: 68
I hacksawed the head off the bolt and embedded it in the gun with a mix f steel putty and epoxy glue. The putty seemed to fill the spaces around the bolt and barrel but wouldn't stick to either so I mixed up some epoxy and put it everywhere I could.

I also shaped aped the side greeblies and glued them on. Pics to come!
 

Attachments

  • image.jpeg
    image.jpeg
    898.9 KB · Views: 67
  • image.jpeg
    image.jpeg
    907.2 KB · Views: 69
Here is where I stand now! I used a cutting disc and sanding drum to shape the model kit parts, rough up the back and the gun and used loctite epoxy to stick them on.

the barrel is pretty straight, the combination of glue and putty seems to do the trick for now - but this thing is very top heavy now! Small potatos, I'm waiting on some .22 scope rings I won for cheap

- - - Updated - - -

Very imprsive clean and smooth work:) Pure profesionalism I belive it will look better then rought oryginal:)
Thank you! It's taken me a long time to be able to drill or putty anything close to smooth so I really appreciate the compliment!
 

Attachments

  • image.jpeg
    image.jpeg
    506.7 KB · Views: 81
  • image.jpeg
    image.jpeg
    435.6 KB · Views: 85
Some satin paint and flat clear coat do a blaster nicely. The scope kept shunning paint so I finally did a coat of chrome painters touch which was a thicker consistency, under the black.. Still a rough finish but better than before

those are "traditions" .22 scope rings, the rail I also resculpted and painted (to be more angular and sharp) so it's curing on the oven...

Any tips on scope positioning or accuracy?
 

Attachments

  • image.jpeg
    image.jpeg
    1.1 MB · Views: 84
  • image.jpeg
    image.jpeg
    342 KB · Views: 77
  • image.jpeg
    image.jpeg
    1.2 MB · Views: 95
I found thin scope rings! 1 inch and the 11mm rail with the chunky base. They say "low" but they're anything but. I'd imagine this is because they are unnamed and from China. They are thinner than the knob used to tighten them. I'll update when they finally show up (it's been a week)
 

Your message may be considered spam for the following reasons:

If you wish to reply despite these issues, check the box below before replying.
Be aware that malicious compliance may result in more severe penalties.
Back
Top