Tom's Busch Custom Saber

thd9791

Master Member
RPF PREMIUM MEMBER
Hi folks,

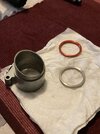
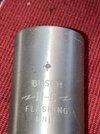
I stumbled upon a couple Busch flashes over a few years. After gutting and engineering the stunt sabers from the OT, I felt more confident in exploring these flashes. I find the make-up fascinating. This is what's underneath that obnoxiously large black part of my first flash (#1)
IMG_7873.jpegIMG_7876.jpegIMG_7875.jpegIMG_7874.jpeg

(#1) And some more disassembly pictures. I had to unscrew the center pin/spring in order to get the release lever to tuck inside the tube. Then I was able to slide out the internals. there's a massive capacitor I chucked, as well as bad wiring, etc. LOTS of fiber washers, and I have to at least save the one in the middle of the socket pieces, so my sockets are properly aligned.
IMG_7883.jpegIMG_7888.jpegIMG_7889.jpegIMG_7887.jpegIMG_7886.jpegIMG_7880.jpeg

Also, there is the whole row of holes underneath the black thing too. This is hilarious and I want to fill some of them with LEDs.
IMG_7882.jpeg

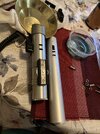
Flash #2 is coming up next. I think the ring is red on this next one!
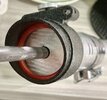
 
Second one came with the shroud! Red ring... shorter, and machine finish as opposed to the coating on the other one. (I sanded and buffed the dull coating off anyway)

I spent the day stacking greeblies in the socket before re-installing it.. can't wait to show you
 

Attachments

  • IMG_7908.jpeg
    IMG_7908.jpeg
    1.7 MB · Views: 70
  • IMG_7904.jpeg
    IMG_7904.jpeg
    1.8 MB · Views: 60
  • IMG_7893.jpeg
    IMG_7893.jpeg
    2.3 MB · Views: 74
  • IMG_7891.jpeg
    IMG_7891.jpeg
    1.9 MB · Views: 64
Alright, so I gutted the flash. I took the whole socket apart and learned how it worked. There was a large gap in the middle where the bulb spring goes.. you’ll remember that from Graflexes, so I thankfully had 5/16 ID aluminum to throw in there. I then screwed the socket back together, without any special plates or anything. Exactly how I imagine they did for the graflex or mpp.

Thankfully I also had an extra core. Since this is a custom saber I didn’t outsource my drilling, and my drill press… something is still off. Maybe the plate is tilted or the force needed to bite in shifts the main spindle… who knows. Anyways it’s crooked and it aligns if I rotate all the parts a certain way lol
IMG_7951.jpeg
IMG_7950.jpeg

So I drilled for some LEDs and put an M4 grub screw in each socket section for the tang. Dry fit..
IMG_7958.jpeg
IMG_7956.jpeg
IMG_7955.jpeg
IMG_7954.jpeg
IMG_7953.jpeg
IMG_7949.jpeg
IMG_7947.jpeg
IMG_7946.jpeg
IMG_7943.jpeg
 
Oh, on Busch flashes there is a big lever that pops out to remove the bulb. Without the lever there is a big rectangular hole so I filled it with an LED like the ones on the droids in OT and the lightsabers in the PT!

The hole in the socket and the LED display are larger than the hole in the flash. That and glue keep it in place
 
So this post is a long time coming. I needed a few evenings to sit down and do some classic hand fitting and machining.

First off, I had to lock my core into the saber. I opted for the age old black bolt thing… and had to map out where the tang set screws were to avoid hitting them… plus this main hole is crooked so the orientation wasn’t the same in different places lol
IMG_8014.jpeg
IMG_8009.jpeg
IMG_8019.jpeg
IMG_8020.jpeg
IMG_8017.jpeg

Anyway, I eventually tapped for M6 and bored out the areas… making sure to be off center and misaligned (and even up under the shroud like the Barbican)

Shroud! I wrinkle coated the damned thing. Suggestion from redbutton and it was a great idea!
IMG_8008.jpeg
IMG_8007.jpeg
IMG_8011.jpeg
IMG_8013.jpeg

IMG_8006.jpeg

IMG_8029.jpeg
IMG_8028.jpeg
IMG_8027.jpeg

Where should the D ring go?

IMG_8024.jpeg
IMG_8023.jpeg
 

Attachments

  • IMG_8026.jpeg
    IMG_8026.jpeg
    1.3 MB · Views: 41
I did a brave thing.. I took a piece of aluminum and designed a little D ring holder!

I drilled through for 4-40 screws on both sides of the retaining thumbscrew (went all the way through, it was just easier) and then barreled a little into the sides for a D ring.

I opted not the trap a whole D ring against the shroud, like the barbican, because I wanted the D ring to be closer to the outside surface of the shroud, realistically, to be used as a D ring. It’s a stubby shroud so you don’t have the vertical space to get at a lower ring.

Also, because of this I made the block lower in profile. It looks a bit more tasteful given the ratio of the shroud steps/dimensions.

I just went ahead and got black screws from the hardware store and made sure to get ones that took up some of the awkward space under there and it looks great!

The D ring I cut, spread, and squished into the side holes. They blow out into the 4-40 threads so I took the 4-40 tap and used a drill to run through the threads again.. clearing out the space and making sure the threads still line up!

IMG_8039.jpeg
IMG_8038.jpeg
IMG_8037.jpeg
IMG_8036.jpeg
IMG_8035.jpeg
 
Thank you PoopaPapaPalps

Today I ran to grainger and grabbed some discount 0-80 taps. They have a spiral tip to push more swarf forewords. Gold colored, so coated with something.
70950719943__BCFA9670-6BA9-47C1-839B-F1E1B197C3CD.jpeg

I tapped the grips for little screws!

Also carved one of my energizer parts into an upper greeblie. I used these 4-40 screws with fillister heads that I got from a model airplane builder
IMG_8152.jpeg
IMG_8153.jpeg
IMG_8157.jpeg
IMG_8158.jpeg
IMG_8159.jpeg
IMG_8160.jpeg
IMG_8165.jpeg
IMG_8166.jpeg
IMG_8161.jpeg
IMG_8167.jpeg


I did find these cards on eBay.. edge connectors that were small, and had holes in them. I filled them with solder…
IMG_8164.jpeg


Watcha think everyone?
 
Looks great! I like the red ring in the emitter and the D ring holder.
Great job getting other parts in the holes in the body of the
handle. Grips with tiny screws is brilliant too!
 
Lol also, I drilled this with the saber sideways, instead of lengthwise under my drill press. This means I wasn’t sighting the t track like a gun, which I like to do, because I can eyeball the drill bit exactly perpendicular to the t track. With the saber behind the bit, it’s susceptible to very small angle differences you wouldn’t notice.

Lol look at my consistency though!
IMG_8148.jpeg


The drill bit might have also bent a little, the force needed to bite into the brass vs the force enough to bend it are very close together….
 
I had a messed up blade floating around my basement for almost a year. The reflective fabric cut was terrible, I got glue all over the exposed part of the blade so I took a scrubby pad and stripped it of the excess… and called it a weathered blade. I fixed some loose fabric and put it on this custom saber! Feels pretty great to hold this saber with the extra weight needed to balance it.. please excuse the messy house
IMG_1014.jpeg
IMG_1015.jpeg
IMG_1016.jpeg
IMG_1018.jpeg
IMG_1019.jpeg
IMG_1020.jpeg
IMG_1021.jpeg
 
I had a messed up blade floating around my basement for almost a year. The reflective fabric cut was terrible, I got glue all over the exposed part of the blade so I took a scrubby pad and stripped it of the excess… and called it a weathered blade. I fixed some loose fabric and put it on this custom saber! Feels pretty great to hold this saber with the extra weight needed to balance it.. please excuse the messy houseView attachment 1773387View attachment 1773388View attachment 1773389View attachment 1773390View attachment 1773391View attachment 1773392View attachment 1773393
Nice emitter and blade. A stellar job!
 

Your message may be considered spam for the following reasons:

If you wish to reply despite these issues, check the box below before replying.
Be aware that malicious compliance may result in more severe penalties.
Back
Top