Alright, it's story time:
I wanted my ammo counter to have dual functionality: count down continuously when the trigger is pulled („display function“), but also count down with each shot when I use the GBBR („airsoft function“). The solution: I programmed my counter to show the display function when the bolt is closed and the trigger is pulled, and the airsoft function when I pull the bolt back first and then pull the trigger.
More on that and my counter later.
Here‘s the problem: there‘s very little space inside the rifle, and I needed a way to electronically check if the bolt was closed or pulled back (this switch is also needed to count down with each actual shot when in airsoft mode, i.e. every time the bolt slams forward). But where?
Behind the bolt? Possible, but you’d need to run cables next to the bolt all the way back. Also, I don‘t know if the bolt really goes back all the way to hit the switch there, especially when the gas in the magazine is low.
In front of the bolt? Not if I want it to function properly.
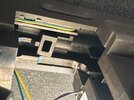
But wait, there‘s a steel part just where the bolt sits in its closed position. This is a separate part held in place by screws on my full steel kit, not sure if it‘s molded into the upper receiver on the original WE part:
Now here’s what I want to show off: I recreated the part in Fusion 360, added a recess and a „cable channel“, and had it machined in steel:
Then I designed a „mini PCB“ with the smallest switch I could find and ordered it with pre-installed switch online. I then glued it into the recess after soldering the cables onto the PCB. I used my magnifying lamp and had a couple of beers to „steady“ my hands.
")
Even the glueing was a pain.
You can‘t appreciate how crazy small all this is until you hold the mini switch in your hand… err, I mean… fingernail?
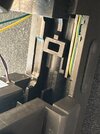
This is the final product:
Installed in the Pulse Rifle:
I'll have to adjust the "bounce" settings in the code, since the impact of the bolt sometimes causes the switch to count down twice, but that should hopefully solve that.
More updates coming soon! Next the shrouds will be painted, and then all the electronics will be put in place.
Cheers!
Roman