The Phantasm from Batman mask and blade build

The Ronin

Well-Known Member
I just realized that I never posted this over here. My good friend Lunara has begun doing a cosplay of Andrea Beaumont, AKA: The Phantasm. She's not exactly an armor or prop specialist, so I've been commissioned to do the mask and blade gauntlet.

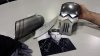
I decided to go a modified pepakura route on the mask, feeling that modifying an Ironman helmet would be easier than making a base from scratch. Thankfully Shark made that size tester that's very simplified over a standard IM dome.

Phantasm Mask by RoninsArt, on Flickr

Phantasm Mask by RoninsArt, on Flickr

Phantasm Mask by RoninsArt, on Flickr

Phantasm Mask by RoninsArt, on Flickr

Phantasm Mask by RoninsArt, on Flickr


Yes, I'm glassing the outside, that's intentional. I want the fiberglass to create a new shape over the paper.

Phantasm Mask by RoninsArt, on Flickr

Phantasm Mask by RoninsArt, on Flickr


Starting the filler.

Phantasm Mask by RoninsArt, on Flickr


Decided I needed a little more edge on the cheekbone area

Phantasm Mask by RoninsArt, on Flickr


It was a little cold in the shop, so I gave the filler some extra "motivation"

Phantasm Mask by RoninsArt, on Flickr


Cut the eye sockets out and shaped the nose.

Phantasm Mask by RoninsArt, on Flickr


And layers of spot putty

Phantasm Mask by RoninsArt, on Flickr

Phantasm Mask by RoninsArt, on Flickr


We decided that the mask needed to have a little more POP than just the normal eyes looking out, so...

Phantasm Mask by RoninsArt, on Flickr

Phantasm Mask by RoninsArt, on Flickr

Phantasm Mask by RoninsArt, on Flickr


Finally laid some primer on

Phantasm Mask by RoninsArt, on Flickr


And started cutting the mouth "grill"

Phantasm Mask by RoninsArt, on Flickr

Phantasm Mask by RoninsArt, on Flickr

Phantasm Mask by RoninsArt, on Flickr


Laid down a silver base

Phantasm Mask by RoninsArt, on Flickr

Phantasm Mask by RoninsArt, on Flickr


Shaded and highlighted with the airbrush

Untitled by RoninsArt, on Flickr


And gave it a good drybrushing with light and dark shades to give a brushed steel look

Untitled by RoninsArt, on Flickr


Then I mounted the eyes.

Untitled by RoninsArt, on Flickr

Untitled by RoninsArt, on Flickr

Untitled by RoninsArt, on Flickr

Next time I'll show the progress on the gauntlet. Unfortunately I'm out of time.
 
The mask looks awesome, love the brushed steel look :thumbsup

Thanks! I took WAY more time with that than I should have, but I feel the results speak for themselves.

On to the blade gauntlet! I started with one method, I was REALLY unhappy with how that went so I started over. One of the things I really wanted to get right was the shape of the blade itself, so I went down to visit my brother-in-law who happens to have a laser! I LOVE having access to that thing. As long as I'm not interrupting his business or wasting his materials, I can do pretty much whatever I want.

So we cut a prototype blade that will also double as the grab handle (1st generation sleeve shown. Ignore that)

Untitled by RoninsArt, on Flickr

After I decided that I hated the first go round, I decided to go with real metal. I wanted it to have a real, hard armor look with rivets and all. It'll still get painted to match the mask, and the final blade will be cut from 5mm acrylic so that it'll be fully con legal.
I started with a paper mockup, cause I didn't want to wing it with metal

Untitled by RoninsArt, on Flickr

I grabbed part of the blade from the first attempt to get a look. I tried to save it, but I guess I don't know my own strength. LOL!

Untitled by RoninsArt, on Flickr

Once I was satisfied with the shape, I started cutting metal. I folded the edges over to avoid sharp bits, but I'm thinking I may just trim them back and grind them smooth. We'll see about that. I also have to figure out exactly how I'm going to dome the knuckle guard. I'm thinking of braising strips together. I'd weld them, but this thin metal would just blow through in a heartbeat. I may just fiberglass a dome and rivet it in place. We shall see.

Untitled by RoninsArt, on Flickr
 
The Armour Archive

Look up or ask about "dishing"

You need a dishing hammer, which can just be a ballpien ground down and polished, and a dishing form, which can be anything from a donut of metal to a sandbag.

You start in the middle hammering the metal then work outward in circles "stretching" the center of the metal into a dished dome. The other method is called raising... you don't want to do that.

Something small like this in a thin gauge will be easy as pie.
 
Last edited:
The Armour Archive

Look up or ask about "dishing"

You need a dishing hammer, which can just be a ballpien ground down and polished, and a dishing form, which can be anything from a donut of metal to a sandbag.

You start in the middle hammering the metal then work outward in circles "stretching" the center of the metal into a dished dome. The other method is called raising... you don't want to do that.

Something small like this in a thin gauge will be easy as pie.

Thanks. I was thinking of something along those lines as I think the heat transfer would negate braising a dome together. Honestly didn't know the term for it. I'll definitely have to bookmark that page when I get home. I think I might even have the right type of hammer in my autobody tools.
 
So I FINALLY got back to work on this after my friend gave me a swift kick in the ass. >_>

Yeah, I needed it


I spent a while playing around with shaping metal. Let's just say that there's a reason I didn't take ANY pics. After giving up on that because I didn't have time to practice enough to get good, I decided to go a route that I'm comfortable with.

Fiberglass.

I started by lining a 2 liter bottle top with aluminum foil so that I could easily remove the form, then I rounded up a bunch of glass cloth scraps that I keep lying around. A little resin later and WALA! A vaguely domed shape.


I had to stick it in the end of the gauntlet to make sure it didn't need too much trimming.


Then came filler, and filing, and sanding.


Apparently I missed a few pics in the middle there, but that's how it goes when you're in the zone. Once I got it smoothed shaped the way I wanted I hit it with plenty of filler primer and wet sanded it with 220 grit


I riveted the main gauntlet together, trimmed out the grooves for the blade and test fit everything together. I had to sand down the cap around the edges. Apparently I laid the filler on a bit thick.


Hopefully I'll be able to get the whole thing primed and basecoated tonight.
 
OMG watching your pictures first thing that comes to my head is that terrifying voice saying "CHUCKIE SOL, YOUR ANGEL OF DEATH AWAITS"
 
OMG watching your pictures first thing that comes to my head is that terrifying voice saying "CHUCKIE SOL, YOUR ANGEL OF DEATH AWAITS"
Yeah, I get that a lot XD
Looks great! You definitely are putting time into this
Yeah, probably more than I charged for, but oh well. The client's reaction is what's really important.

Back to the work! If you don't care, then skip to the bottom to see the test fit on the client.

The final blade is laser cut acrylic, which I hand sanded with 400 grit to make sure the paint would stick


Got that fit into the gauntlet


Riveted the cap in place and hit the whole thing with some self etching primer. I used the self etching to give a better bond to the galvanized steel and the plexiglass.


After a quick scuff to remove the little bits of lint and crap that seems to always magically find fresh paint, I hit the whole thing with a few coats of the same metallic silver that I used on the mask.


Then it was time for the fun paint. I started with the shading, hitting the low areas with some black that was thinned with matte clear and a drop of silver flake


Then I went back over the highlights with some platinum pearl


Then began the drybrushing. So much drybrushing. I think I drybrushed at least 4 different shades on this thing. Unfortunately I forgot to take a pic before I cleared it


And the finished blade gauntlet!


And of course she had to do a test fit with everything.


She has a professional shoot scheduled in a couple of weeks, so I should have those shots shortly after.
 
That is amazing. Those lights for the eyes are absolutely perfect, and the gauntlet and mask have the perfect finish! Wonderful job! I love the character and I wish you saw it at conventions more often.
The one thing it needs is that characteristic peak to the cowling at the top.
 
That is amazing. Those lights for the eyes are absolutely perfect, and the gauntlet and mask have the perfect finish! Wonderful job! I love the character and I wish you saw it at conventions more often.
The one thing it needs is that characteristic peak to the cowling at the top.

Thank you! I really had fun making the mask and gauntlet. I'll mention the peak of the cowl to her, but I know that she's still refining the whole look.
 
Thanks for the support guys! Ronin really did do a killer job.
Mister Wayne, thanks so much for the thought on the cowl! I actually have it sewn in, I just need to add some light stuffing in there to make it stand up! :D
(The mock up cape shown here.)
Untitled.png

I figured you guys might also like to know that the photoshoot, with one of my absolute FAVORITE Denver photographers (https://www.facebook.com/weneals), will be near the end of the month with edits done around the first of May. It's going to be legendary.
 
Thanks for the support guys! Ronin really did do a killer job.
Mister Wayne, thanks so much for the thought on the cowl! I actually have it sewn in, I just need to add some light stuffing in there to make it stand up! :D
(The mock up cape shown here.)
View attachment 308510

I figured you guys might also like to know that the photoshoot, with one of my absolute FAVORITE Denver photographers (https://www.facebook.com/weneals), will be near the end of the month with edits done around the first of May. It's going to be legendary.

I love that the tree topper I made you ends up in so many pics. :lol
 
Hey Ronin, did you wear this costume to DCC?
I didn't. LunaraDe did, though. That mask is too small for my face. She did manage to get the blade signed by Kevin Conroy while she was there!
 

Attachments

  • IMG_4510440665345.jpeg
    IMG_4510440665345.jpeg
    61 KB · Views: 251
Back
Top