mydigitalvoid
Well-Known Member
Hello Everyone,
So, I have decided to tackle the Fifth Element stones. I've chosen this for a few different reasons. First off, I love the film and have always wanted a set to call my own. Secondly, they are not overly complicated in design and since I've never done anything with clay or molding and casting, I figured this would be an ideal learning subject. And most importantly, I love the film and have always wanted a set to call my own. Oh wait, I already said that
I plan on making one stone at a time using a reusable mold of sorts that I have already built. The idea here is that I wouldn't need as much clay to make the stone details. The general shape and size is already there, I could just focus on fine tuning it. Here are some pictures of where I am currently.
1) I started off with what seems to be the generally accepted size of the stones and reduced it by 1/4". I would use the paper version to then create a styrofoam version.

2) I glued a couple slabs of styrofoam together and then cut to size based on my paper template.


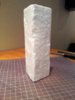
3) Then it was time to focus on the basic shape.


4) This next move was skipped the first time I attempted this. Basically, the styrofoam is to soft and would probably get destroyed by the process of adding clay and if not, pieces of styrofoam would get into the clay when I tried to remove it. So, I wanted to create a shell that could handle this process and since I had some bondo left over from my previous project, I figured I'd go with that. Unfortunately, this would be only the second time using bondo and the heat from the bondo basically destroyed the styrofoam. :cry Learning process I suppose. So, this time around I put a glue coating around the styrofoam to ward off any potential issues. Thanks to a friend for suggesting that! Here are pictures of the glue version of the stone.


5) This time the bondo worked and I have a nice hard shell. After a few thin layers and some sanding here is how it sits now.


Tomorrow the plan is to go to a local store and pick up some clay and tools to help me work with the clay. After lots of reading, I'm thinking on going with a medium or hard clay. Something that is reusable so after I make a stone I can remove the clay and make the next one. It also has to be able to hold up to the molding process. Any recommendations here would be great! I figured I'd talk to the store people as well and see what they recommend based on what they have. I really don't want to buy clay and have to pay to have it shipped.
Thanks for watching and any feedback you can provide (good or bad) is much appreciated.
-Dv
So, I have decided to tackle the Fifth Element stones. I've chosen this for a few different reasons. First off, I love the film and have always wanted a set to call my own. Secondly, they are not overly complicated in design and since I've never done anything with clay or molding and casting, I figured this would be an ideal learning subject. And most importantly, I love the film and have always wanted a set to call my own. Oh wait, I already said that
I plan on making one stone at a time using a reusable mold of sorts that I have already built. The idea here is that I wouldn't need as much clay to make the stone details. The general shape and size is already there, I could just focus on fine tuning it. Here are some pictures of where I am currently.
1) I started off with what seems to be the generally accepted size of the stones and reduced it by 1/4". I would use the paper version to then create a styrofoam version.
2) I glued a couple slabs of styrofoam together and then cut to size based on my paper template.
3) Then it was time to focus on the basic shape.
4) This next move was skipped the first time I attempted this. Basically, the styrofoam is to soft and would probably get destroyed by the process of adding clay and if not, pieces of styrofoam would get into the clay when I tried to remove it. So, I wanted to create a shell that could handle this process and since I had some bondo left over from my previous project, I figured I'd go with that. Unfortunately, this would be only the second time using bondo and the heat from the bondo basically destroyed the styrofoam. :cry Learning process I suppose. So, this time around I put a glue coating around the styrofoam to ward off any potential issues. Thanks to a friend for suggesting that! Here are pictures of the glue version of the stone.
5) This time the bondo worked and I have a nice hard shell. After a few thin layers and some sanding here is how it sits now.
Tomorrow the plan is to go to a local store and pick up some clay and tools to help me work with the clay. After lots of reading, I'm thinking on going with a medium or hard clay. Something that is reusable so after I make a stone I can remove the clay and make the next one. It also has to be able to hold up to the molding process. Any recommendations here would be great! I figured I'd talk to the store people as well and see what they recommend based on what they have. I really don't want to buy clay and have to pay to have it shipped.
Thanks for watching and any feedback you can provide (good or bad) is much appreciated.
-Dv