The Chappie build continues

caxack

New Member
Hi all,

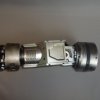
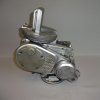
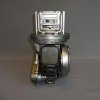
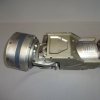
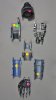
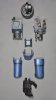
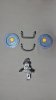
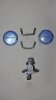
I thought I would share a few photos on where I am at with the Chappie build. I still have a few bits to hunt down mainly to do with the head, a middle toe for the right foot and a right leg top of leg/hip. I have a few spare bits if anyone else is looking for parts.

Caxack
IMG_2210.jpgIMG_2205.jpgIMG_2207.jpgIMG_2208.jpg
 
What the h*ll? Are these actual pics of what you're building? That's almost a complete chappie there! Do you have another thread on the RPF about this? Looking great!
 
I probably should have given about of background. I had a friend ask me if I wanted to assemble a Chappie robot as he had just brought a whole bunch of bits from the movie off eBay. Of course I said yes and a few weeks later 5 boxes of Chappie bits turned up (all with CoA's), so after sorting and referencing the movie etc I have him about 95% complete.

He also managed to get a couple of the bank heist bags and a few other props ( gun mags, sunglasses etc)

Chappie will be used as a draw card for the Costume for a Charity organization.
 
Awesome ! :thumbsup it's very nice he will be used to help others.. and your doing a wonderful job putting him together. hope you find the parts you need..:)
 
Thanks,

The head is the troubling bit, missing a fair bit of it, eyes, all the stuff at the back, camera pod, grill, ear attachment points, also the right foot middle toe. Hopefully I can chase these down or get print files however I still have a few other things to work on - attaching the arms, running wiring, assemebling his legs etc.

He started off as a prototype torso with one completed arm and I have been swapping out the bits ( the worst bit taking to him with a drill/screw driver knowing how much he cost) to make him more like the Chappie robot, luckly I was able to find the bits to build a complete second arm (after a few trips to a Specialitly Fasterners Shop for the right screws) from all the parts and I have the internals for both legs as well.

Happy to trade or swap our spare parts (with a copy of the CoA) or pay with Chappie money for the parts or real money if it comes to it for the missing parts.

We has feet.jpgA transport box.jpgBack.jpgFront.jpgMore arrivals.jpgScary stuff.jpgStarting out.jpg
 
Hi just a quick update.....

I am in the process of wiring up the lights, making them remote control, have the shoulder spotlight, battery indicator and eyes to go..after that it attaching the shoulders, legs, hips, waste, moulding a couple of knee pieces and a middle toe (this will be my first attempt at clay modeling), as well as all the head bits that need to be built printed.... all this and more is due in time for the Oz comic cons at the end of September. Ok I have most likely forgotten about a hundred things....like a reject sticker, mounting frame etc..

And now the video link https://vid.me/uCua
 
Last edited:
WOW amazing work.

Not to nitpick, but shouldn't the right "ear" be red?

Yep it should however as this is a movie prop and we were only able to get 2 blue ears I didnt want to paint one, so I am going to try and mould an ear and paint it orange - i think this is a must. The same goes for his orange arm, at the moment there are a couple of blue arm peices that will need to go orange as well.
 
thats awesome :D it looks like the kinda material they make store promotional statues from you know?
beautiful pieceyou must be very proud :D
 
Yep it should however as this is a movie prop and we were only able to get 2 blue ears I didnt want to paint one, so I am going to try and mould an ear and paint it orange - i think this is a must. The same goes for his orange arm, at the moment there are a couple of blue arm peices that will need to go orange as well.

So were these part "screen used"? Awesome buy regardless.
 
The photos below tell the story, first issue of many no doubt, there was no connecting piece for the shoulder joint on the torso to the arm. With the use of CAD (Cardboard Aided Design) I templated the two joining surfaces, a bit of balsa wood and a few angles later I have a shoulder hinge joint, not finished yet though.

My plan is to fill and detail it and then use it as a template to mould the pieces for each shoulder, we will see how it goes.

1 Chappie Shoulder Problem.jpg4 Some Progress.jpg3 All Angles.jpg2 CAD Templates.jpg
 
The photos below tell the story

I remember I saved quite a few images of the parts sold from the chappie auction. Is this the part you were looking for?
 

Attachments

  • CustomImage (70).jpg
    CustomImage (70).jpg
    91.3 KB · Views: 182
  • CustomImage (65).jpg
    CustomImage (65).jpg
    316.1 KB · Views: 194
  • CustomImage (64).jpg
    CustomImage (64).jpg
    260 KB · Views: 180
  • CustomImage (60).jpg
    CustomImage (60).jpg
    176.9 KB · Views: 177
  • CustomImage (39).jpg
    CustomImage (39).jpg
    58.8 KB · Views: 191
  • CustomImage (40).jpg
    CustomImage (40).jpg
    63.4 KB · Views: 184
  • CustomImage (47).jpg
    CustomImage (47).jpg
    55.2 KB · Views: 179
  • CustomImage (48).jpg
    CustomImage (48).jpg
    47.8 KB · Views: 184
This thread is more than 6 years old.

Your message may be considered spam for the following reasons:

  1. This thread hasn't been active in some time. A new post in this thread might not contribute constructively to this discussion after so long.
If you wish to reply despite these issues, check the box below before replying.
Be aware that malicious compliance may result in more severe penalties.
Back
Top