Thain's 'The Mandalorian' Collection

Thain

Sr Member
RPF PREMIUM MEMBER
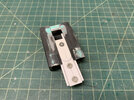
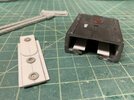
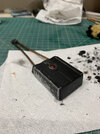
Howdy, travelers! This should come as no surprise, but like many of you, I am obsessed with The Mandalorian.

It consistently hits all the right notes and I commonly find myself feeling like it was made just for me. I could talk for hours about why I love this show so much, but one of the biggest reasons is obviously the props, costumes, and sets! There's something about the classic aesthetic and the designs all wrapped up in a fun space western that really speak to my prop-maker soul. My list of things I want to make from this series grows with each new installment, and at this point, I don’t know how I’ll ever build/collect them all!

So, as I embark on my journey, I wanted to have a place here where I could share my collection and builds with my fellow Mando fanatics. Let’s jump right in, shall we?
 

Beskar Ingot & Mythosaur Pendant​

| "This was gathered in the Great Purge. It is good it is back with the Tribe."


I’ll start with a couple small but quintessential pieces - a Beskar ingot (with The Client’s ingot “reveal” cloth) and the Mythosaur pendant. The cloth was where it all started for me - I made a handful of these last year while I waited on a good ingot replica. Fortunately, I was lucky to get one of lukyanov's beautiful solid aluminum beskar ingots. It was finished up by coating it with Alumablack, sanding that off of the high spots with 600-1500 grit, and then polishing it with some compound. Quick and easy, and the result was perfect!

The mythosaur pendant is from the sculptor Tom Most at mostlyfantasy.com. It’s a gorgeous piece and for those unaware, his pendant was the one used in the show!

IMG_3169.jpeg

A415BAF5-6F57-4E8A-9E6D-566149457BEF.jpeg
85206543-92E7-42A3-BD48-C04C99BA63C6.jpeg
 
Last edited:

BlasTech IB-94 Blaster​

| “I’m a Mandalorian. Weapons are part of my religion.”


Mando’s blaster is such an excellent design for a gunslinger, and like all the best Star Wars blasters, based on a cool real-world firearm. I plan on making a more accurate blaster replica at some point, but for now I’m just modding a Rubies blaster that I’m going to repaint (which should serve as some good practice) to hold me over until then. The overall size of the Rubies is pretty good aside from being too thick and the details are not well defined, but it’s not too bad for a quick $12 project.

I started by filling the blaster with resin to give it some weight and strength. Because the Rubies blaster is missing the rear sight block, I scratch built one with styrene and fixed it in place. I also replaced the rear sight with styrene since it was a block instead of a thin strip. I basically re-did the entire right side panel, adding in the missing circular line where the panel “swivels” and rebuilding the 2 discs with some random little washer things I had in my shop. Not super accurate, but better than where it started!

I’ve primed it black and am waiting for the weather to be reasonable to clear it with some gloss. Then it’s painting time!

IMG_6195.jpeg


IMG_6193.jpeg
Screen Shot 2020-11-28 at 4.56.06 PM.png
 
Last edited:

Tracking Fob

| “Between that and the fob, a man of your skill should make short work of this.”


This was a fun one - started with a resin print of Darren Pattendon's file, but scratch built a custom & accurate removable back panel so I could add a light to the inside. Despite building props for years now, I've never actually painted anything before, so this was also my first foray into the world of airbrushing and finishing. Lots of trial and error, paint tests, and a new Iwata airbrush & air compressor later, I finally worked up the courage and skill needed to spit paint onto it. I'm quite proud of how this turned out, and it taught me just how fun painting can be! Huge thanks to my good friend Mr Mold Maker for all the advice and tips, couldn't have finished this without him!

FA0A22A5-B551-4E0B-8A7B-B8AEC006321E 2.jpeg
CA6E96EA-A687-4100-BBFF-C25045DCE2BA.jpeg

52FC4807-6E29-4B50-8351-F96AD6EBA179.jpeg
79A4880F-C6CA-48E6-828B-351D9AF65C68.jpeg

6359646C-856E-47C7-9CE4-AD21B6933AF7.jpeg
7B39F0BD-F8C3-41F5-8717-03F3AE063A29.jpeg

8745C3C4-424B-4156-B78E-55069DEC057E.jpeg
275CF1E3-88B7-47F5-A42E-572CB0B21FB6.jpeg

A2DDB936-38EB-4AFB-A6B3-1BFF954ABCF4.jpeg
 

Attachments

  • IMG_6531.jpeg
    IMG_6531.jpeg
    3.6 MB · Views: 71
  • IMG_6534.jpeg
    IMG_6534.jpeg
    2.7 MB · Views: 63
  • IMG_6989.jpeg
    IMG_6989.jpeg
    1.3 MB · Views: 63
Last edited:

Boba Fett's 'Re-armored' Helmet

| “I don't want your armor. I want my armor.”


Here is my modified Black Series Boba Fett helmet, repainted as his appearance from season 2. I really had a blast with this one; it's obviously more of an imagined version using an ESB/pre-pro styled bucket. I started with fusing the exterior parts together, and then filled in the seams along the brim. I replaced the RF ear assembly with an aluminum one I bought on Etsy, but had to do a fair amount of work to that section to get everything to fit, and shave down the lower ear so it lined up with the new ear cap parts. That was pretty much it for the mods, aside from narrowing the visor eye slit by 2mm, which I actually did in the middle of painting and was fortunately able to hide my crimes pretty well. I'm really happy I decided to do that, as the standard Black Series visor height totally kills the iconic squinty-eyed Fett look.

Then I filled in all the molded damage, primed, and spent a loooong week masking the smooth spots using the Cobb Vanth helmets as reference. Texture was high-density acrylic modeling paste stippled on with a sponge. All the colors were custom mixed Tamiyas, and then it was weathered with various brown washes and some subtle airbrushing. Once again, massive thanks to Mr Mold Maker for all the advice and tips.

DSC04406.JPG
DSC04381.JPG
DSC04384.JPG
DSC04410.JPG
DSC04390.JPG
DSC04398.JPG
 
Last edited:

Boba Fett's 'Re-armored' Helmet

| “I don't want your armor. I want my armor.”


Here is my modified Black Series Boba Fett helmet, repainted as his appearance from season 2. I really had a blast with this one; it's obviously more of an imagined version using an ESB/pre-pro styled bucket. I started with fusing the exterior parts together, and then filled in the seams along the brim. I replaced the RF ear assembly with an aluminum one I bought on Etsy, but had to do a fair amount of work to that section to get everything to fit, and shave down the lower ear so it lined up with the new ear cap parts. That was pretty much it for the mods, aside from narrowing the visor eye slit by 2mm, which I actually did in the middle of painting and was fortunately able to hide my crimes really well. I'm really happy I decided to do that, as the standard Black Series visor height totally kills the iconic squinty-eyed Fett look.

Then I filled in all the molded damage, primed, and spent a loooong week masking the smooth spots using the Cobb Vanth helmets as reference. Texture was high-density acrylic modeling paste stippled on with a sponge. All the colors were custom mixed Tamiyas, and then it was weathered with various brown washes and some subtle airbrushing. Once again, massive thanks to Mr Mold Maker for all the advice and tips.

View attachment 1454838View attachment 1454839View attachment 1454840View attachment 1454841View attachment 1454843View attachment 1454842
Love it!
 

Your message may be considered spam for the following reasons:

If you wish to reply despite these issues, check the box below before replying.
Be aware that malicious compliance may result in more severe penalties.
Back
Top