Small drill bits haunt my dreams. I don't envy the task.
The magnets will be 3mm holes. I’ve never been so excited to drill 3 mm holes.
Small drill bits haunt my dreams. I don't envy the task.
It really does take trial and ordeal to appreciate the common. I never understood why anyone would pay crazy prices for good bits until I had to start a piece from scratch due to my leaving bit pieces in the last one.The magnets will be 3mm holes. I’ve never been so excited to drill 3 mm holes.
Tech is always advancing but Tungsten Carbide was the standard for not breaking. It is the core. The over coating can be stuff that is ultra hard but can't flex so this part varies. However, newer crazy hard ones include Cobalt alloys.I’m going to be doing the same. It’s time for me to invest a bit (heh) more in my drill bit sets. Any recommendations?
Are you using a hand drill? I wouldn’t spend a crazy amount on sets – the likelihood of snapping the micro bits is inevitable with a pin vise at certain angles! For me, it always seems like the odds of breaking one are directly proportional to whether or not it’s my very last bit (that, or it just goes straight into my finger!) I agree with greenmachines on the more expensive ones, especially if you work with a variable-speed rotary tool. Amazon has some good deals, and you might look under their jewelry suppliers as they offer a wider selection of bit types for specific metal hardness. Yes I’m certainly a fan! The show sounds great; checking it out right now, thanks!
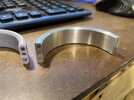
Not sure if the kicker works on gel but I have many times gone to superglue gel when running was an issue.Magnet day today. The nice think about having the scrap from 4 rings is that I can experiment with the hole drilling and glueing of the magnets. This was my first attempt. The holes are all about 1/64” too far to the right. I used an edge finder on my mill but I may need to scribe lines and do it manually.
I tried a 3mm drill for these 3mm magnets and that wasn’t quite right. When I put the epoxy in the hole it created a suction effect. Too tight. The 3.1mm drill was perfect.
Not sure if I’m sold on the BSI 30 min epoxy or the super glue and activator method. The super glue is was easier, but messier. The epoxy is probably stronger? But these little magnets jump all over the place when near the others. That makes putting the 2nd and 3rd in the row a real challenge.
Not sure if the kicker works on gel but I have many times gone to superglue gel when running was an issue.
If the second magnet wants to jump out to the first before curing, maybe a tape dot (removable) and popscicle stick to carry it to home would suffice but my brain is throwing out a ton of silly ideas. Definitely post your experience on getting all 3 in there. Now I am curious. Hopefully, no issue at all but I have done nearly the exact same oops and watched horrified as the glue dried in seconds and magnet one was glued directly to magnet 2. Mine was far more fragile on a last minute cardboard sample for a class project.
Actually my memory of that moment went more like "Holy$$%^&#&&" as the light speed jump of the magnet slung super glue on me. Nothing scarier than realizing you are NOT wearing eye protection.

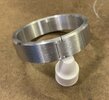
Yes!!!!Not sure which is more satisfying, the finishing of one bracelet or the specific "click" noise that it makes when it closes. One down, one to go.
A quick video that I made showing the bracelet mech in action: