Star Wars Scope Repair & Restoration

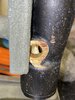
Yes - the weird looking half-window right into the body is how they look beneath the light port lens.

I loosened the paint mostly by laying acetone saturated paper towels over it like when you microwave a potato with a wet paper towel. With enough contact, it will start to look wrinkly. At that point it peels and falls right off, at least most of it. Some parts you have to rub with a piece of wood or something, or go at it with a q tip. It was tough work
20200521_171511.jpg
 
This is the first one - with the missing rear foot that I replaced. The JB Weld seems to be good enough so I went ahead and coated it. The letters have gone so I have white crayons on their way to me.

this is after a good coat of BBQ Black. Seemed good but too light of a color!
4E4126D2-AE34-4D80-BD4A-1668F95C36C6.jpeg
F714195C-2300-4710-AFC7-DB4B8FAE528B.jpeg
85B69A58-4433-492A-9923-C3BD7AB3C20A.jpegC26E1202-121B-4C55-BD38-DB1B42067A47.jpeg These are my scope, another real one and one of bobadebts casts with BBQ and clear coat


I went and got one of those basic cans of rustoleun. satin black... and dusted it over the BBQ later.
EC73FBF5-DEB5-47CB-B08C-B4BF67D016B0.jpeg

cool thing... I used an x acto knife to cut circles of tape for the lenses, and stood it upright on the rear lens to dust the bottom... then bolted it to a box to paint
4045F38F-B403-4586-B856-FA506C214B3C.jpeg
4BFAE296-4279-49AA-BAFB-B03E257C3E26.jpeg

This was a shipping box supplied to me by Apple to fix my laptop lol
 
Crayola is way better than Rose-art crayons. Rose art looks like coconut milk, and Crayola... well..

IMG_1891.jpg

I used a really sharp point from a compass to empty the letters of the rose-art crayon. Now, I did it cold, scribbling, and then heated up the scope to more easily wipe off the excess. But while the scope was warm, I went ahead and added more crayon and it flowed easier.... then heated it a third time to smooth out the infill!
 
This is a culture difference that's always puzzled me. Filling the letters white just doesn't happen over here. Indeed in Arms & militaria circles it's actively frowned upon (not by me I hasten to add, do what you like it's yours). Makes it easy to spot when it's been in the US though.
 
This is a culture difference that's always puzzled me. Filling the letters white just doesn't happen over here. Indeed in Arms & militaria circles it's actively frowned upon (not by me I hasten to add, do what you like it's yours). Makes it easy to spot when it's been in the US though.
This IS weird now that I think about it! I don't see it on hensoldt scopes. Compac scopes do though, I think those are Japanese

The reason I do this is because they come that way. An untouched tank telescope has a white waxy coating filling in the letters from the manufacturer and I was trying to restore it to the look of the original finish. I kinda felt okay about this because the previous owner stripped it, and even ground off some of the lettering.

US and Europe definitely have different aesthetics and i hadn't thought about this one!
 
I'd like to put a bit more context here about the frowning. This is when European pieces are bought by US collectors who then infill the lettering. The specific item I had in mind was the C96 Mauser pistol with which I'm sure you're familiar but the principle is a general one. Does not apply to items that 'should' have it, as in your case.
 
The scopes were manufactured that way but as far as I can tell they were repainted black in ANH. Or has anyone found white lettering visible in the film?

Regardless, great job on this scope! :)
 
Excellent job! Looks great.
Thanks! means a lot coming from the master telescope caster himself
How about silver soldering the Base, would that work?
This is a good idea, if my JB Weld fails I'll try this

The scopes were manufactured that way but as far as I can tell they were repainted black in ANH. Or has anyone found white lettering visible in the film?

Regardless, great job on this scope! :)
You know what..... I don't think I have, this is exciting. The first image I pulled was of the Hoth gun, and I don't see the lettering... I also see a lump of glue on the front of the scope, like they pulled off one of those chips from the E11s
 
I see some white lettering here...
Han_dl44promo.jpg
ESB_real_luke.jpg


So maybe the hero's were not repainted?

But there's glue residue on the front of the scope here! (also, do you see
HothTop.png
white lettering?)
HothMagazine.jpg
LargerHoth.jpeg
 
Hi everyone

Vince from Corellian Exports made a light port for me. Now, he did a run but this one he trimmed the post to 3/8 diameter. He did this because the microscope makers cut the light port off and left the inside alone. The light port is a hair over 3/8 diameter inside. After cleaning, this is what I have to work with
163E31C4-1680-49AA-B712-BAE0425FB192.jpeg3F7C62FB-E7E6-46D5-87F1-38306D7E8ED0.jpeg
Vince did make a great bevel inside with a hole in the center... but I first tried to glue a lens inside (I have a lot of weird sized Edmund scientific lenses..long story)

Except it got cloudy, wouldn’t come out and shattered to powder...spent some time stripping the inside..

then I tried to file down a Field Marshall light port to fit...
144B98AA-5EFF-4D60-B58D-E3C865AE97D0.jpeg
but the inner hole is very large ...and it snapped in two :(

so I used steel wool to strip it fully and left it alone! Scratching with a file and some JB Weld was next. I slathered it around the post and inside. I positioned it and used Q tips to clean up the area and shape it to sort of match an original. I also filled in some area that was scraped by the saw
E353A425-3205-456C-B789-940A5E6021A4.jpeg402844EC-5342-4350-B4F0-7B6728F508B7.jpeg62C798C6-1274-452C-8492-2297B8CD1060.jpeg

AA2BA8FC-487D-41AA-A35C-EB3904745653.jpeg316C41C2-2DD7-4911-B4FF-53551FD159FD.jpeg6F38FC98-4C4E-4452-ABEA-A0B1095A7422.jpegBDEB8C39-1C83-4976-A264-ED1B07F3629A.jpeg

01199E8B-5A29-44D5-A434-1E6C89CA5AD7.jpeg
 

Attachments

  • 6390E4B3-C054-4634-BEC0-CCA6141D4DC2.jpeg
    6390E4B3-C054-4634-BEC0-CCA6141D4DC2.jpeg
    1.4 MB · Views: 98
Tom you are killing it on this restoration. 2 thumbs up bro!
Thank you!

I first brushed on satin rustoleum to cover the repair and darken the old finish without realizing you don’t get as much solvent by doing it this way.

it looked blotchy and glossy, much like an M38A2 I have that had been chipped and worn down. After sleeping on it I wanted it a little softer and more uniform so I dusted on the same paint from the can and it came out better.

there are small differences, my transition is a bit thicker and more beveled and real scopes have a small straight edge like they were lathed

I used the stove and a crayon to fill in the lettering again, and a paper towel to buff off the excess.

it looks pretty good though!

17D62871-B544-469A-AC7F-685CFA9117E8.jpegBB63A498-9E01-47CF-AABC-C1846D162C12.jpeg101BB7BA-D229-4AAD-BCE8-7C6A881567FA.jpeg00A56245-91B3-4957-846D-D7F89420CBA2.jpegF27824FD-3C55-4395-A938-7228FC79F84E.jpeg134B7B07-7B59-4250-958C-3D412DAE8C8C.jpeg
B87D327C-BADB-4558-BDF1-DAD1EA89DC33.jpeg
E53A2746-235C-4568-9DE6-F356A0E62328.jpeg
 
Back
Top