You are using an out of date browser. It may not display this or other websites correctly.
You should upgrade or use an alternative browser.
You should upgrade or use an alternative browser.
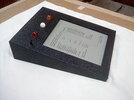
Star Trek TOS Tablet/Logbook/PADD (it never had an official name)
- Thread starter Starbase101
- Start date
Starbase101
Sr Member
That looks great! From the first pic I'd guess you used Light Weight Bronco tolex. The plunger on your switch looks close enough to the one I ordered that from the outside they should be similar. I'll wait for the 3 skin materials I ordered to arrive for evaluating them before investing further in yet another material. Great pics for this thread, though!
Last edited:
JFB64
Well-Known Member
Thank you.I think you're right about the Tolex. I can never remember what I used and have to look it up every time someone asks. Let me know if you do decide to wrap you logbook. A friend of mine took a lot of pictures while I was demonstrating how to wrap one and was kind enough to let me share them here. It will take me some time to organize them into a coherent post however.
Starbase101
Sr Member
After seeing your pics and Alley's pics I'm convinced to wrap instead of paint. The corners will be problematic, so I had planned to do research on Google and YouTube for "learning" how to do the wrapping - but if you've got pics they'd be helpful too. (You could pm or email them to me and I'm sure I can figure them out.) The black Tolex I had ordered got canceled for being temporarily out of stock, but I've got a marine vinyl ordered which is more flexible and more durable than Tolex and might have a better texture:

For comparison, here is how the Light Weight Bronco Tolex looks:

...and this is a Taco Tolex:

...and this is the back-ordered Smooth Tolex:

The magnification probably is different in each of the above manufacturer photos, but overall I'm liking the Smooth Tolex or marine vinyl. The other two seem too "bumpy" to me.
For comparison, here is how the Light Weight Bronco Tolex looks:
...and this is a Taco Tolex:
...and this is the back-ordered Smooth Tolex:
The magnification probably is different in each of the above manufacturer photos, but overall I'm liking the Smooth Tolex or marine vinyl. The other two seem too "bumpy" to me.
Last edited:
Starbase101
Sr Member
No rush, most of my supplies haven't even shipped yet, and I probably won't start on this until at least spring when the weather warms up. (I've got a much larger project in progress, and furniture for it is scheduled to start arriving this week.) But I'm sure other people reading here and haven't posted might enjoy seeing your photos - I for one am interested.
Starbase101
Sr Member
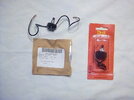
My push button switch arrived today and I think it will work nicely, either with the bezel (more "finished" look) or without (maybe truer to original prop but a more "raw" look). In case anybody might be interested, I got it from Mouser Electronics: https://www.mouser.com/ProductDetail/apem/4743c02/?qs=13SBeMgRQilhwVDceugiDg==
JFB64
Well-Known Member
I've wrapped two logbooks (LB) and a friend as generously allowed me to use her pictures of wrapping the second one. This guide is going to take several post and be pic heavy. I used the contact adhesive recommend by the manufacturer and applied it with a 1" chip brush. The adhesive goes on milky and dries clear but that takes a while. You can use a blow dryer to speed up the process but be careful not to melt the Tolex. A heat gun will definitely do that. I kept the brush in a cup of water in between applications to keep it from drying out but it still got very sticky near the end so you may want to have more than one on hand paper towels will also be handy.
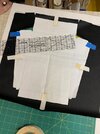
I drew a template on graph paper and carefully cut it out using an Xacto knife. Then I taped it to the underside of the Tolex to keep it from sliding around and stay in position. You will need a large clean work surface, one that you can cut on. Using a knife and or a new single edge razor blade and a straight edge cut out the Tolex following the template. Be sure to cut though the material on the first pass because it's difficult to recut without cutting into something you don't want to. Re tape as you cut it to maintain the templates position. One note. I added tabs to the long side that wrapped around the corners to ensure that they were covered but I'm not sure I would do that again. They show through when the end pieces are applied and those corners are now peeling up because I don't think the adhesive sticks well to them. I also don't think they are all that necessary to cover the corners. So it's up to you whether to include them or not. Okay that's it for the intro. More to follow.
I drew a template on graph paper and carefully cut it out using an Xacto knife. Then I taped it to the underside of the Tolex to keep it from sliding around and stay in position. You will need a large clean work surface, one that you can cut on. Using a knife and or a new single edge razor blade and a straight edge cut out the Tolex following the template. Be sure to cut though the material on the first pass because it's difficult to recut without cutting into something you don't want to. Re tape as you cut it to maintain the templates position. One note. I added tabs to the long side that wrapped around the corners to ensure that they were covered but I'm not sure I would do that again. They show through when the end pieces are applied and those corners are now peeling up because I don't think the adhesive sticks well to them. I also don't think they are all that necessary to cover the corners. So it's up to you whether to include them or not. Okay that's it for the intro. More to follow.
Attachments
Starbase101
Sr Member
Great intro! I'm hesitant to overlap the wrap because as thin as the material is I'd bet it would show through. I'm planing to paint with black primer or something everywhere a seam will be so if any tiny gap occurs then at least it will be the same color underneath.
Wrapping the logbook is much easier than one may think.
I did the entire top, all 4 sides, and the rear edges with one large piece of covering, with no breaks in the material.
The key is to have a NEW (sharp) Xacto blade to cut the material cleanly, a good straight edge (ruler), and to glue one plane at a time, as you wrap. Since the logbook is basically a few flat planes with 90 degree angles, it’s a very easy object to wrap.
Watch how Adam approached wrapping his Blade Runner blaster case, in the video above.
JFB64
Well-Known Member
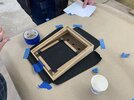
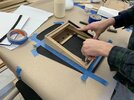
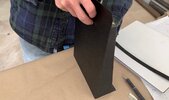
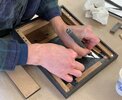
Painting the corners is a good idea and yes it's not as hard as one might think. The first thing I did was to wrap the in side corners of the "view screen" area. This is so you have material later when you trim the wrapped edges after gluing the face side on. It will become clearer later. The strips were abut 3/4" wide. They DO NOT wrap around onto the face of the LB.
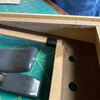
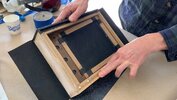
Now you can start the main wrap. Position the LB onto the Tolex face down lining up the four corners. Apply adhesive to the LB side, Tolex
and the bottom and bottom inside edges. When dry, press down hard on the corner of the LB and pivot it up and over onto the Tolex. Rotate the LB back down to it's original position. I used a heavy steel veneer roller to roll the glued side but a clean smooth block of wood or your hand will do. Now carefully fold the material over the bottom edge. You will have to make some relief cuts in the Tolex at the corners so you can continue wrapping the inside edges. I used a small machinist square to press the material into the corner. That's it for now. Sorry this it going to be piece meal but it's the only way I can do it.
Attachments
-
 0a3621a160ceef8353f82125359b60b8a6ba7aa8_2_750x750.jpeg96.1 KB · Views: 81
 -
 88fddfd433394de4e65e75e198b9eaf13bc927a4_2_999x750.jpeg155.3 KB · Views: 79
 -
 b5a6ae2cad1f249534ed527c2be4c99ced77b5a3_2_991x750.jpeg151.3 KB · Views: 87
 -
 63e6ff7c003a82ceeaac6228f1f4d480d25f636a_2_1035x672 (1).jpeg110.3 KB · Views: 73
 -
 5547be7239b7dbea5e823cea66cfaef0bebf4881_2_1035x643.jpeg117 KB · Views: 83
JFB64
Well-Known Member
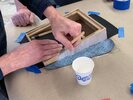
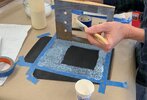
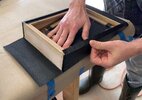
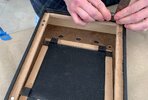
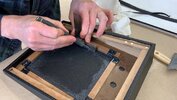
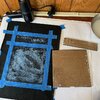
Okay, with the LB in it's original position, place tape around the three sides on the Tolex. This will keep adhesive off those areas while you are brushing the face. Also trace along the inside edges of the "view screen" with a pencil. Do not apply adhesive beyond these marks. Now pivot the LB up onto the side that is covered and brush glue on the two face surfaces. When dry carefully fold the LB onto the Tolex. Press firmly everywhere on the inside face to ensure a tight bond. Remove the masking tape protecting the three Tolex sides. Repeat the steps for wrapping the first side.
Attachments
-
 2c44dcef5699e3dacf8f0f449c635e6d7f781b50_2_999x750.jpeg136.6 KB · Views: 64
 -
 41f22d48b45ba363db4c8062875bad0fbdff346d_2_1035x708.jpeg153.2 KB · Views: 69
 -
 2d4a0a0a6e6cf36cd35a148ef1b42daaaa7d2dcf_2_1035x613.jpeg119.6 KB · Views: 64
 -
 70436d73a28031cff06a1381cd092d33420b61ea_2_1035x586.jpeg129.8 KB · Views: 61
 -
 f887b09b50e15b3ed954ef55502ccbb1b7ff187f_2_1035x588.jpeg133.8 KB · Views: 61
 -
 ced9a9ccb202abba54e858e0875fd73d3f915ffc_2_1035x732.jpeg144.1 KB · Views: 68
 -
 c355dc133cac4ee3a213e205554b9f9b2b812c54_2_1035x604.jpeg127.7 KB · Views: 81
Starbase101
Sr Member
These pics are great! Seems to me it would be easier applying the top (view screen) face first, and then the 4 sides second. Also then the most important face of the prop is guaranteed to have no defects introduced when rounding the first turn.
Last edited:
JFB64
Well-Known Member
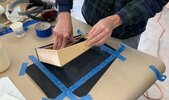
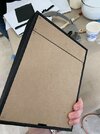
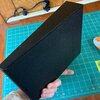
With the second side done I used a small 45° triangle as a guide to cut the bottom edge corners. Then I wrapped both ends. Then I used the triangle again to cut the matching corners on the end pieces. Sorry I don't have a lot of pictures of these steps. This may be the last post until the long holiday week end. I'll be too tired to think after work. I need to do these when I'm reasonably fresh .
Attachments
-
 e53c6340b27ef786d542b70f283e959e3c751f43_2_1035x654.jpeg118.5 KB · Views: 60
 -
 8239b9b580852ecad12325901635bec84f0b7afc_2_1035x685.jpeg102.9 KB · Views: 61
 -
 01758ea20c521f442d35eeb410fc53d3db1dd90b_2_1035x613.jpeg108.2 KB · Views: 75
 -
 59961a5ddc76141cb780216fdf90755ba77e4b1d_2_1035x700.jpeg160 KB · Views: 67
Starbase101
Sr Member
That's fine, I'm spending the next few days painting anyway. I won't be starting on my tablet until at least spring.This may be the last post until the long holiday week end. I'll be too tired to think after work. I need to do these when I'm reasonably fresh .
Starbase101
Sr Member
The OtterTex marine vinyl arrived today and although it has a really good texture, it has a fabric backing and thus thicker than Tolex. The fabric backing would also effect white/gray seams at the outer corners. So, not useable.
JFB64
Well-Known Member
Too bad about the Otter Tex. With all the sides wrapped you have to finish trimming the bottom corners. Sorry I don't have a picture of this exact process but it's just like trimming the previous ones. Using the same steel triangle, I lined it up with the edge of the cut corner and trimmed the new one. Here is the picture I used earlier just for some kind of reference.
Attachments

JFB64
Well-Known Member
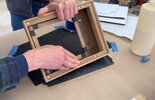
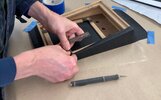
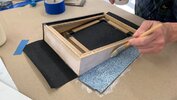
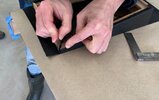
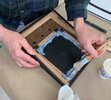
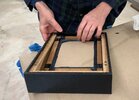
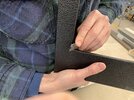
Now it's time to finish wrapping and trimming the screen area. First apply the adhesive to the Tolex and LB. I thought it best to trim the excess material away after in order to keep from getting cement all over the work bench and onto the face of the LB. Once the adhesive is dry trim the corners at a 45°angle. Then using at least a 1/2" wide guide block pressed against the inside edge, trim away the excess material. Now start to carefully fold the Tolex down onto the edges and around onto the underside of the face. Press everything firmly into place. With a sharp razor blade, trim through the newly wrapped material and those tabs you applied at the beginning. I just eyeballed the 45° angle. You will notice that without these tabs there would be bare wood exposed on the inside of every corner. Once the corners are cut remove the parts of tab underneath the newly wrapped edges.
Attachments
-
 e0de4814714e641ef7f8f6f294cd6a6f3ff3773e_2_828x750.jpeg146.6 KB · Views: 66
 -
 882812bd04ddd5264c590597206a81c293c7d97b_2_912x750.jpeg143.4 KB · Views: 54
 -
 cfc3891f8450d437498c44d79d6ec76fd11e7056_2_1035x586.jpeg140.2 KB · Views: 55
 -
 e18582e5000a6cbb6d840c10fefd39b017db6041_2_1035x745.jpeg129.9 KB · Views: 55
 -
 9c30a88d57424a2f765d3eae035452e78287e106_2_1035x607.jpeg133.4 KB · Views: 50
 -
 a892989b160681c55ecaf0dd4f09e7070fd16062_2_999x750.jpeg191.4 KB · Views: 63
 -
 170a300a72199ed6abd5adc3eb0a227c4af885f3_2_750x750.jpeg96.1 KB · Views: 77
JFB64
Well-Known Member
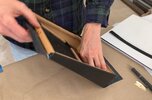
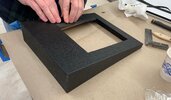
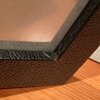
I painted the edges of the two piece bottom black and only applied Tolex to the face. I also used magnets to attach them. I hope this guide helps. I probably forgot some details. Hopefully these aren't catastrophic omissions. If anything is confusing, please ask and I will try clear it up.
Attachments
Similar threads
- Replies
- 8
- Views
- 436
- Replies
- 11
- Views
- 1,404