TOS Phaser
Active Member
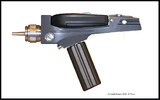
STAR TREK: TOS Phaser Unit #2 (P2) and Phaser Unit #1 (P1) Props
It all began when Walter M. Jefferies (the future Art Director for Star Trek) was given the assignment to create a new hand held energy weapon that did not look like every other "ray gun" that went before. The first Star Trek "pilot" had "laser" pistols that looked like a western "six shooter".
HISTORY
I. Matt produced two working drawings for the Desilu Prop Department. One covered the "Phaser Unit # 1" (P1) and the other covered the "Phaser Unit # 2" (P2) and the "Phaser Unit # 3" (the power pack grip/handle).
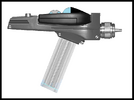
Matt Jefferies's Phaser Unit # 2 (P2) drawing:

Source of this drawing: Live Auction Group
The first working Hero P2s the Desilu Effects Department (DED) made are very close to this drawing. In fact one member of the TPZ overlaid a photo of the Greg Jein (GJ) P2 (as it appears now) on a version of this drawing and the photo and drawing lined up almost exactly.
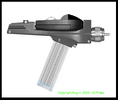
Matt Jefferies's Phaser Unit # 1 (P1) drawing:

Source of this drawing: Live Auction Group
The DED did not make the first working Hero P1s exactly to this drawing. For example the rising sight opens in the opposite direction and the sight screen and the "push buttons" and the "snap lock" recess were not illuminated.
These drawing are the foundation of any Star Trek: TOS Phaser prop study.
- - For those of you who cannot visualize what a 3-D object looks like based on a "working drawing" - here are some photo mosaic drawings of what the P2 and P1 would have looked like if the Desilu Effects Department (DED) had made the props exactly to Matt's drawings (Note - the "forward facing louvers" are not shown on either P1 side view):
Matt Jefferies's Phaser Unit # 2, side view (in Wah Ming Chang colors):
.png")
Drawing Source: I drew this representation of what the left side view of Matt's P2 would have looked like based on the "Phaser Unit #2" drawing. (Qi Press is my company)
Drawing Note: I did not draw the "forward facing louvers" on the P1.
Matt Jefferies's Phaser Unit # 2, front view:
png.png")
Drawing Source: I drew this representation of what the front view of Matt's P2 would have looked like based on the "Phaser Unit #2" drawing by Matt Jefferies.
Matt Jefferies's Phaser Unit # 1, side view and top view, with sight screen fully open:

Drawing Source: I drew this representation of what the top and left side views of Matt's P1 would have looked like based on the "Phaser Unit #1" drawing. This is a
photo of my Wand Company P1 modified with photo mosaic techniques.
Matt incorporated several things in his original design (drawing) that were not produced by the Desilu props department (DPD) for the Phaser Unit # 1:
· P1 safety – the trigger button was not operational until the sight was up
· P1 sight screen illuminated when in the [fully] open [up] position
· The power push buttons on the P1 were illuminated
· Clear sight opening on P1 (the rectangle above the nozzle in the front)
· Sight screen was rotated by rack and pinion to slider control (switch)
See Drawings: 2.1 and 2.4.
· Sight screen rotates 195 degrees to full open or full closed*
· A magnet inset into the bottom of the P1 for mounting it on a belt (the
DPD glued a piece of Velcro to the bottom half of the P1 instead.)
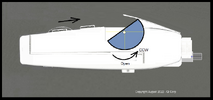
* Matt Jefferies's Phaser Unit # 1, right side view, xray drawing, showing final sight screen position during the opening process the when slider
switch was pushed forward:
Z.png")
The sight screen was designed to move down (from the closed position - i.e. flat) and then revolve 195 degrees counter clockwise to full open. Pulling back on the slider switch reversed the opening process (the plexi revolved clockwise) closing the sight screen.
The DED sight screen moved up from the closed position (clockwise) when the thumb wheel was rotated forward.
Matt incorporated several things in his original design (drawing) that were not produced by the Desilu Effects Department (DED) Phaser Unit # 2:
· Probe (emitter) on P2 would extend or retract by rotating the “range
adjustment” ring on the nozzle
· P2 Trigger unlocked when power pack (Unit #3) is rotated into position
(1/2 turn, 90 degrees) - - see my drawing reproduction on cover
· Recess on rear bottom of P2 body to receive spring lock of Unit #4 (Note: this recess was not found on the Greg Jein (GJ) P2. So the logical assumption is - this original phaser rifle ala Man From Uncle feature was not incorporated. I believe there is a thread on therpf that shows what the P2 would have looked like if the take down rifle had been built. - - I will look for the link.)
II. The second basis for studying Star Trek: TOS Hero Phasers is the Desilu "production memo" that "feek61" researched and compiled. The Desilu production memo entitled: "Inventory", dated 14July1966, provided by "feek61" reflects:
PHASER GUNS
4 Practical Guns - - includes #1 & #2 – Power Packs
4 Practical Power Packs (extra)
4 Power Packs to make Phaser #3
6 Wood Dummy Power Packs
5 Rubber Guns Complete #1 & #2 – Power Pack
4 #1 Guns
"PLASTIC GUNS"
10 Complete Dummy Guns #1 & #2 - Power Packs
9 #1 Dummy Guns
4 #2 Dummy Guns
4 Guns-includes #1 & #2 -- without Power Packs
===========================================
There is no doubt that 4 "practical" (or "working" or "hero") phaser unit 2s were built (P2s and P1s) in 1966.
THANK YOU FEEK61 !
III. The black and white (B&W) "practical" ("working" or "hero") Phaser Unit # 2 (P2).
The four B&W Hero P2s produced by the DED were filmed in episodes: 5, 6, 7 and 8. (Note: I use the production episode numbers - not the air date episode numbers or the "remastered" episode numbers.) After episode 8 Wah Ming Chang "reworked" them into the iconic phaser pistols that every "baby boomer" recognizes.
Drawing notes: (1) The rounded push buttons instead of the flat top push buttons Matt's drawings specified.
(2) The control knob on the rear deck is taller than was specified in Matt's P2 drawing.
(3) The power pack grip was longer than the grip specified in Matt's P2 drawing.
(4) The power pack grip cross section was not exactly the same as the cross-section in the drawing.
(5) The power pack grip was not as wide.
The B&W Finney P2 was in episodes: 5, 6 and 7. ("The Enemy Within", "The Man Trap" and "The Naked Time".)
The B&W Unknown P2 was in episodes: 5 and 6 ("The Enemy Within" and "The Man Trap")
The B&W Greg Jein was in episodes: 6 and 8 (The Man Trap" and "Charlie X") - - I think the forehead on this P2 was broken in episode 6 ("The Man Trap") and the Jein P1 was also damaged.
The B&W Riley/Lenore P2 was in episodes: 6 and 7 ("The Man Trap" and "The Naked Time".) - - This B&W Hero P2 was worn on Kirk's tan pistol belt and then on Scotty's tanj pistol belt while he was trying to figure out where to cut the Engineering room bulkhead. Note: the Hero P1 in these two episodes was different.
Note: How the power push buttons (on the Hero P1s, in the following B&W Hero P2 drawings) were rounded and the sight screen slider switch control was implemented as a thumb wheel.
You can clearly see the rounded push buttons on the B&W P1 in the B&W hero P2 that Captain Kirk holds in the Engineering scene of episode 5, "The Enemy Within". And note how the shell battery cover is only on the bottom of the P1. Compare this drawing to the Matt Jefferies's Phaser Unit # 1, side view and top view drawing.
- - B&W drawing notes - I originally had problems with loss of definition when I made the P2 and P1 bodies black. The complex curves and corners were being lost. So I set the drawings to a lighter shade of gray. Matt Jefferies's Phaser Unit # 1, side view and top view drawing in the previous section are more correct. It was a photo mosaic rather than a "rendering".
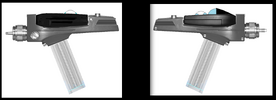
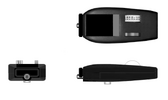
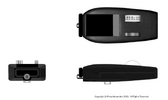
The following four drawings reflect the four practical phaser unit # 2s (P2) the DED fabricated in 1966 before filming of the show began:
.png")
B&W Greg Jein P2
 .png")
B&W Finney P2
 .png")
B&W Unknown P2
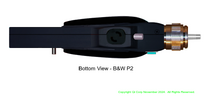
Note: The cylindrical emitter in the aluminum P2 nozzle. This was the only hero P2 to have a cylindrical emitter.
.png")
B&W Riley/Lenore P2
.png")
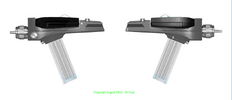
The 4 B&W P2 - front views
Note: The difference between the emitter diameter of the Unknown P2 and the other 3 emitter diameters.
.png")
B&W P2 - top views
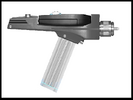
The following true color drawing of the B&W Finney P2 - is an example of the all black phaser pistol:
.png")
This drawing reflects one of the main reasons Gene Roddenberry did not like the B&W Hero P2s - first fabricated by the DED - the all black body causes a loss of detail.
I found no evidence in TMOST or in Herb Solow's books that Gene ever sent a memo regarding the color of the "phaser gun" to Matt during
the design process. My guess - the DED team chose black - because black was the color of military firearms in the 1960s.
The following photo mosaic represents the B&W Jein P1 - the future Greg Jein P1:
Z.png")
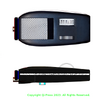
B&W Jein P1
This drawing is from my B&W P1 rendering sheet for (what I l have re-labeled the B&W Jein P1) the future Greg Jein P1. Note: It has Velcro on the left side and no jewel between the thumb wheel and force indicator push buttons. Also note how the thumb wheel and push buttons are in line with the sight hood cut-out.
IV. Wah Ming Chang (WMC) "reworked" the 4 black and white (B&W) "practical" ("working" or "hero") Phaser Unit # 2s (P2s). (Reference Desilu Invoice # 43977)
The following changes were made by Mr. Chang to the four B&W Hero P2s:
(1) Hand Phaser (“Phaser Unit # 1” or P1):
· The body of the P1 was painted dark grey
· Aluminum rails were added to both sides of two of the Hero hand phasers. The Hero P1s with Velcro on the left side had an aluminum rail
added to the right side only and WMC painted a silver/white line on the Velcro on the left side to match the width and length of the rail.
· Diamond textured silver foil was added to the top of the sight cover
· A watch crown with a colored jewel was added to the top of two of the Hero hand phasers (P1s) between the sight control thumb wheel and the two force indicator windows. Two P1s apparently only received a jewel. (2 blue and 2 red)
· The two force indicator power push buttons were replaced with a single curved window (now called the “half-moon”):
(2) Pistol phaser body (“Phaser Unit 2” or P2):
· The body of the P2 was painted a light cool (blue) gray
· Aluminum fins went over the molded fins on the rear of the P2 body
· The rear control knob (aluminum bar) was changed to a “ten turn” knob,
(3) Pistol phaser power pack grip (Phaser Unit 3 or P3):
· The white power pack grip (handle) was replaced with the special power pack
grips with the base plate with Valise plug prong cut-outs for P4 assembly.
The following sampling of photo mosaic drawings represent a WMC "reworked" P1 and and two WMC "reworked" P2s:
Z.png")
WMC Nona P1
Note: The alignment of the thumb wheel and force indicator with the sight screen cutout and the red jewel.
.png")
WMC Riley/Lenore P2
Note: The short P2 emitter in the aluminum nozzle.
.png")
WMC Greg Jein P2
Note: The Velcro on the left side of the P1 for carrying practical P2s on the tan pistol belt.
Also note: The short emitter in the aluminum nozzle.
The following drawing represents the front views of the 4 WMC Practical P1s:
.png")
The following drawing represents the front views of the 4 WMC Practical P2s:
-frame.png")
The Greg Jein P2 had the largest sight window of the four (4) Hero P2s.
V. AutoCad drawings of the "Practical" P2 and P1 ("reworked" by Wah Ming Chang) were made by Nelson Au in 2009.
Nelson presented his work on the TPZ as "sunking69". In my opinion the lines and curves of the drawings he posted in July 2007 were "spot on". Other members at the time disagreed and gave him their preferences. His dimensions were based on the JLong P1 Kit. Fortunately robn1 was able to provide the correct dimensions - see his corrected drawing below.
The following AutoCad drawings were posted by "sunking69" on or around 09August 2009:
P2 layout:

Copyright Nelson Au - 2009. All Rights Reserved.
P1 layout:

Copyright Nelson Au - 2009. All Rights Reserved.
P2 sections:

Copyright Nelson Au - 2009. All Rights Reserved.
P2 detail:

Copyright Nelson Au - 2009. All Rights Reserved.
P1 detail:

Copyright Nelson Au - 2009. All Rights Reserved.
P1 rendering:

Copyright Nelson Au - 2009. All Rights Reserved.
The following drawing with corrected dimensions, added by robn1, was posted 08Aug2022 (see robn1's reply):

As you can see the length of the P2 saddle is 3.614 inches in robn1's corrected drawing compared to 3.72 inches in Nelson's 2009 drawing.
This difference in the length of the P2 saddle means the length of the P1 shown in Nelson's P1 drawing is also incorrect.
VI. The "Tells" that allow you to pic out a practical P2 in a given episode.
The following photo mosaic drawings reflects the nozzle nozzle location and emitter length “tell”s and the forehead slope “tell”:
.png")
The top P2 nozzle is the Finney P2 and the bottom P2 nozzle is the Greg Jein P2.
Nelson's P2 Detail Drawing (upper right) above reflects the forehead slope tells.
.png")
The bottom emitter is very short compared to the top emitter. Note: The
emitter lengths shown occur on the real props when their respective
P1s are inserted (FinneyP2 + TMOST P1, Greg Jein P2 + Jein P1)
.png")
The forehead thickness of the Greg Jein P2 is larger than the Finney P2.
The top P2 has a section in grayscale from the bottom P2.
The following B&W Hero P2 drawings reflect the rear fin "tells" for two B&W Hero P2s that were filmed in episodes 5, "The Enemy Within" and 6, "The Man Trap":

These B&W rear fin differences can be seen in the Wah Ming Chang "reworked" P2s - where the aluminum clips are located and the lengths of the clip sets.
VII. The Finney P2 and TMOST P1 have been put up for auction! Check out the following links for rare photos provided by the auction house:
The "Finney" P2 - filmed in closeup in "Court-Martial":
LONG-LOST STAR TREK TOS HERO PHASER AND COMMUNICATOR COMES OUT FOR SOME ACTION – PART 3 / THE PHASER 2
The TOST P1 (matted in the Finney P2) - filmed in closeup in "Court-Martial:
LONG-LOST STAR TREK TOS HERO PHASER AND COMMUNICATOR COMES OUT FOR SOME ACTION – PART 2 / THE PHASER 1
In case you are wondering - the Finney P2 prop was filmed in more episodes of Star Trek than any of the other 4 Hero P2s.
It all began when Walter M. Jefferies (the future Art Director for Star Trek) was given the assignment to create a new hand held energy weapon that did not look like every other "ray gun" that went before. The first Star Trek "pilot" had "laser" pistols that looked like a western "six shooter".
HISTORY
I. Matt produced two working drawings for the Desilu Prop Department. One covered the "Phaser Unit # 1" (P1) and the other covered the "Phaser Unit # 2" (P2) and the "Phaser Unit # 3" (the power pack grip/handle).
Matt Jefferies's Phaser Unit # 2 (P2) drawing:
Source of this drawing: Live Auction Group
The first working Hero P2s the Desilu Effects Department (DED) made are very close to this drawing. In fact one member of the TPZ overlaid a photo of the Greg Jein (GJ) P2 (as it appears now) on a version of this drawing and the photo and drawing lined up almost exactly.
Matt Jefferies's Phaser Unit # 1 (P1) drawing:
Source of this drawing: Live Auction Group
The DED did not make the first working Hero P1s exactly to this drawing. For example the rising sight opens in the opposite direction and the sight screen and the "push buttons" and the "snap lock" recess were not illuminated.
These drawing are the foundation of any Star Trek: TOS Phaser prop study.
- - For those of you who cannot visualize what a 3-D object looks like based on a "working drawing" - here are some photo mosaic drawings of what the P2 and P1 would have looked like if the Desilu Effects Department (DED) had made the props exactly to Matt's drawings (Note - the "forward facing louvers" are not shown on either P1 side view):
Matt Jefferies's Phaser Unit # 2, side view (in Wah Ming Chang colors):
Drawing Source: I drew this representation of what the left side view of Matt's P2 would have looked like based on the "Phaser Unit #2" drawing. (Qi Press is my company)
Drawing Note: I did not draw the "forward facing louvers" on the P1.
Matt Jefferies's Phaser Unit # 2, front view:
Drawing Source: I drew this representation of what the front view of Matt's P2 would have looked like based on the "Phaser Unit #2" drawing by Matt Jefferies.
Matt Jefferies's Phaser Unit # 1, side view and top view, with sight screen fully open:
Drawing Source: I drew this representation of what the top and left side views of Matt's P1 would have looked like based on the "Phaser Unit #1" drawing. This is a
photo of my Wand Company P1 modified with photo mosaic techniques.
Matt incorporated several things in his original design (drawing) that were not produced by the Desilu props department (DPD) for the Phaser Unit # 1:
· P1 safety – the trigger button was not operational until the sight was up
· P1 sight screen illuminated when in the [fully] open [up] position
· The power push buttons on the P1 were illuminated
· Clear sight opening on P1 (the rectangle above the nozzle in the front)
· Sight screen was rotated by rack and pinion to slider control (switch)
See Drawings: 2.1 and 2.4.
· Sight screen rotates 195 degrees to full open or full closed*
· A magnet inset into the bottom of the P1 for mounting it on a belt (the
DPD glued a piece of Velcro to the bottom half of the P1 instead.)
* Matt Jefferies's Phaser Unit # 1, right side view, xray drawing, showing final sight screen position during the opening process the when slider
switch was pushed forward:
The sight screen was designed to move down (from the closed position - i.e. flat) and then revolve 195 degrees counter clockwise to full open. Pulling back on the slider switch reversed the opening process (the plexi revolved clockwise) closing the sight screen.
The DED sight screen moved up from the closed position (clockwise) when the thumb wheel was rotated forward.
Matt incorporated several things in his original design (drawing) that were not produced by the Desilu Effects Department (DED) Phaser Unit # 2:
· Probe (emitter) on P2 would extend or retract by rotating the “range
adjustment” ring on the nozzle
· P2 Trigger unlocked when power pack (Unit #3) is rotated into position
(1/2 turn, 90 degrees) - - see my drawing reproduction on cover
· Recess on rear bottom of P2 body to receive spring lock of Unit #4 (Note: this recess was not found on the Greg Jein (GJ) P2. So the logical assumption is - this original phaser rifle ala Man From Uncle feature was not incorporated. I believe there is a thread on therpf that shows what the P2 would have looked like if the take down rifle had been built. - - I will look for the link.)
II. The second basis for studying Star Trek: TOS Hero Phasers is the Desilu "production memo" that "feek61" researched and compiled. The Desilu production memo entitled: "Inventory", dated 14July1966, provided by "feek61" reflects:
PHASER GUNS
4 Practical Guns - - includes #1 & #2 – Power Packs
4 Practical Power Packs (extra)
4 Power Packs to make Phaser #3
6 Wood Dummy Power Packs
5 Rubber Guns Complete #1 & #2 – Power Pack
4 #1 Guns
"PLASTIC GUNS"
10 Complete Dummy Guns #1 & #2 - Power Packs
9 #1 Dummy Guns
4 #2 Dummy Guns
4 Guns-includes #1 & #2 -- without Power Packs
===========================================
There is no doubt that 4 "practical" (or "working" or "hero") phaser unit 2s were built (P2s and P1s) in 1966.
THANK YOU FEEK61 !
III. The black and white (B&W) "practical" ("working" or "hero") Phaser Unit # 2 (P2).
The four B&W Hero P2s produced by the DED were filmed in episodes: 5, 6, 7 and 8. (Note: I use the production episode numbers - not the air date episode numbers or the "remastered" episode numbers.) After episode 8 Wah Ming Chang "reworked" them into the iconic phaser pistols that every "baby boomer" recognizes.
Drawing notes: (1) The rounded push buttons instead of the flat top push buttons Matt's drawings specified.
(2) The control knob on the rear deck is taller than was specified in Matt's P2 drawing.
(3) The power pack grip was longer than the grip specified in Matt's P2 drawing.
(4) The power pack grip cross section was not exactly the same as the cross-section in the drawing.
(5) The power pack grip was not as wide.
The B&W Finney P2 was in episodes: 5, 6 and 7. ("The Enemy Within", "The Man Trap" and "The Naked Time".)
The B&W Unknown P2 was in episodes: 5 and 6 ("The Enemy Within" and "The Man Trap")
The B&W Greg Jein was in episodes: 6 and 8 (The Man Trap" and "Charlie X") - - I think the forehead on this P2 was broken in episode 6 ("The Man Trap") and the Jein P1 was also damaged.
The B&W Riley/Lenore P2 was in episodes: 6 and 7 ("The Man Trap" and "The Naked Time".) - - This B&W Hero P2 was worn on Kirk's tan pistol belt and then on Scotty's tanj pistol belt while he was trying to figure out where to cut the Engineering room bulkhead. Note: the Hero P1 in these two episodes was different.
Note: How the power push buttons (on the Hero P1s, in the following B&W Hero P2 drawings) were rounded and the sight screen slider switch control was implemented as a thumb wheel.
You can clearly see the rounded push buttons on the B&W P1 in the B&W hero P2 that Captain Kirk holds in the Engineering scene of episode 5, "The Enemy Within". And note how the shell battery cover is only on the bottom of the P1. Compare this drawing to the Matt Jefferies's Phaser Unit # 1, side view and top view drawing.
- - B&W drawing notes - I originally had problems with loss of definition when I made the P2 and P1 bodies black. The complex curves and corners were being lost. So I set the drawings to a lighter shade of gray. Matt Jefferies's Phaser Unit # 1, side view and top view drawing in the previous section are more correct. It was a photo mosaic rather than a "rendering".
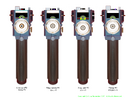
The following four drawings reflect the four practical phaser unit # 2s (P2) the DED fabricated in 1966 before filming of the show began:
B&W Greg Jein P2
B&W Finney P2
B&W Unknown P2
Note: The cylindrical emitter in the aluminum P2 nozzle. This was the only hero P2 to have a cylindrical emitter.
B&W Riley/Lenore P2
The 4 B&W P2 - front views
Note: The difference between the emitter diameter of the Unknown P2 and the other 3 emitter diameters.
B&W P2 - top views
The following true color drawing of the B&W Finney P2 - is an example of the all black phaser pistol:
This drawing reflects one of the main reasons Gene Roddenberry did not like the B&W Hero P2s - first fabricated by the DED - the all black body causes a loss of detail.
I found no evidence in TMOST or in Herb Solow's books that Gene ever sent a memo regarding the color of the "phaser gun" to Matt during
the design process. My guess - the DED team chose black - because black was the color of military firearms in the 1960s.
The following photo mosaic represents the B&W Jein P1 - the future Greg Jein P1:
B&W Jein P1
This drawing is from my B&W P1 rendering sheet for (what I l have re-labeled the B&W Jein P1) the future Greg Jein P1. Note: It has Velcro on the left side and no jewel between the thumb wheel and force indicator push buttons. Also note how the thumb wheel and push buttons are in line with the sight hood cut-out.
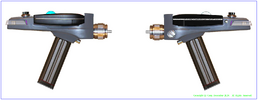
IV. Wah Ming Chang (WMC) "reworked" the 4 black and white (B&W) "practical" ("working" or "hero") Phaser Unit # 2s (P2s). (Reference Desilu Invoice # 43977)
The following changes were made by Mr. Chang to the four B&W Hero P2s:
(1) Hand Phaser (“Phaser Unit # 1” or P1):
· The body of the P1 was painted dark grey
· Aluminum rails were added to both sides of two of the Hero hand phasers. The Hero P1s with Velcro on the left side had an aluminum rail
added to the right side only and WMC painted a silver/white line on the Velcro on the left side to match the width and length of the rail.
· Diamond textured silver foil was added to the top of the sight cover
· A watch crown with a colored jewel was added to the top of two of the Hero hand phasers (P1s) between the sight control thumb wheel and the two force indicator windows. Two P1s apparently only received a jewel. (2 blue and 2 red)
· The two force indicator power push buttons were replaced with a single curved window (now called the “half-moon”):
(2) Pistol phaser body (“Phaser Unit 2” or P2):
· The body of the P2 was painted a light cool (blue) gray
· Aluminum fins went over the molded fins on the rear of the P2 body
· The rear control knob (aluminum bar) was changed to a “ten turn” knob,
(3) Pistol phaser power pack grip (Phaser Unit 3 or P3):
· The white power pack grip (handle) was replaced with the special power pack
grips with the base plate with Valise plug prong cut-outs for P4 assembly.
The following sampling of photo mosaic drawings represent a WMC "reworked" P1 and and two WMC "reworked" P2s:
WMC Nona P1
Note: The alignment of the thumb wheel and force indicator with the sight screen cutout and the red jewel.
WMC Riley/Lenore P2
Note: The short P2 emitter in the aluminum nozzle.
WMC Greg Jein P2
Note: The Velcro on the left side of the P1 for carrying practical P2s on the tan pistol belt.
Also note: The short emitter in the aluminum nozzle.
The following drawing represents the front views of the 4 WMC Practical P1s:
The following drawing represents the front views of the 4 WMC Practical P2s:
The Greg Jein P2 had the largest sight window of the four (4) Hero P2s.
V. AutoCad drawings of the "Practical" P2 and P1 ("reworked" by Wah Ming Chang) were made by Nelson Au in 2009.
Nelson presented his work on the TPZ as "sunking69". In my opinion the lines and curves of the drawings he posted in July 2007 were "spot on". Other members at the time disagreed and gave him their preferences. His dimensions were based on the JLong P1 Kit. Fortunately robn1 was able to provide the correct dimensions - see his corrected drawing below.
The following AutoCad drawings were posted by "sunking69" on or around 09August 2009:
P2 layout:
Copyright Nelson Au - 2009. All Rights Reserved.
P1 layout:
Copyright Nelson Au - 2009. All Rights Reserved.
P2 sections:
Copyright Nelson Au - 2009. All Rights Reserved.
P2 detail:
Copyright Nelson Au - 2009. All Rights Reserved.
P1 detail:
Copyright Nelson Au - 2009. All Rights Reserved.
P1 rendering:
Copyright Nelson Au - 2009. All Rights Reserved.
The following drawing with corrected dimensions, added by robn1, was posted 08Aug2022 (see robn1's reply):
As you can see the length of the P2 saddle is 3.614 inches in robn1's corrected drawing compared to 3.72 inches in Nelson's 2009 drawing.
This difference in the length of the P2 saddle means the length of the P1 shown in Nelson's P1 drawing is also incorrect.
VI. The "Tells" that allow you to pic out a practical P2 in a given episode.
The following photo mosaic drawings reflects the nozzle nozzle location and emitter length “tell”s and the forehead slope “tell”:
The top P2 nozzle is the Finney P2 and the bottom P2 nozzle is the Greg Jein P2.
Nelson's P2 Detail Drawing (upper right) above reflects the forehead slope tells.
The bottom emitter is very short compared to the top emitter. Note: The
emitter lengths shown occur on the real props when their respective
P1s are inserted (FinneyP2 + TMOST P1, Greg Jein P2 + Jein P1)
The forehead thickness of the Greg Jein P2 is larger than the Finney P2.
The top P2 has a section in grayscale from the bottom P2.
The following B&W Hero P2 drawings reflect the rear fin "tells" for two B&W Hero P2s that were filmed in episodes 5, "The Enemy Within" and 6, "The Man Trap":
These B&W rear fin differences can be seen in the Wah Ming Chang "reworked" P2s - where the aluminum clips are located and the lengths of the clip sets.
VII. The Finney P2 and TMOST P1 have been put up for auction! Check out the following links for rare photos provided by the auction house:
The "Finney" P2 - filmed in closeup in "Court-Martial":
LONG-LOST STAR TREK TOS HERO PHASER AND COMMUNICATOR COMES OUT FOR SOME ACTION – PART 3 / THE PHASER 2
The TOST P1 (matted in the Finney P2) - filmed in closeup in "Court-Martial:
LONG-LOST STAR TREK TOS HERO PHASER AND COMMUNICATOR COMES OUT FOR SOME ACTION – PART 2 / THE PHASER 1
In case you are wondering - the Finney P2 prop was filmed in more episodes of Star Trek than any of the other 4 Hero P2s.
Attachments
-
 Matts P2 sight opening.png179 KB · Views: 3,612
 -
 Matts P2 - left side view 2.png221.1 KB · Views: 5,312
 -
 Matts P2 front view.png36.8 KB · Views: 528
 -
 Matts P2 - front view.png45.4 KB · Views: 686
 -
 Matts P2 - front view.png68.1 KB · Views: 3,277
 -
 Scot P1.png106.2 KB · Views: 2,089
 -
 B&W Scot (GJ) P1.png101.2 KB · Views: 185
 -
 B&W Scot (GJ) P1- -C.png108.1 KB · Views: 506
 -
 New Bottom View - B&W P2 - (1.7)x-(C).png87.5 KB · Views: 152
 -
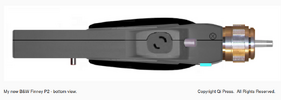 B&W Finney P2 - bottom view (C).png109.7 KB · Views: 102
 -
 B&W Jein P1 (C).png131.7 KB · Views: 66
 -
 B&W Jein P1 (C).png131.7 KB · Views: 93
 -
 WMC Greg Jein P2 - side views-(C).png297.8 KB · Views: 62
 -
 P2 Front Views - 4.3z-(C).png178 KB · Views: 86
Last edited: