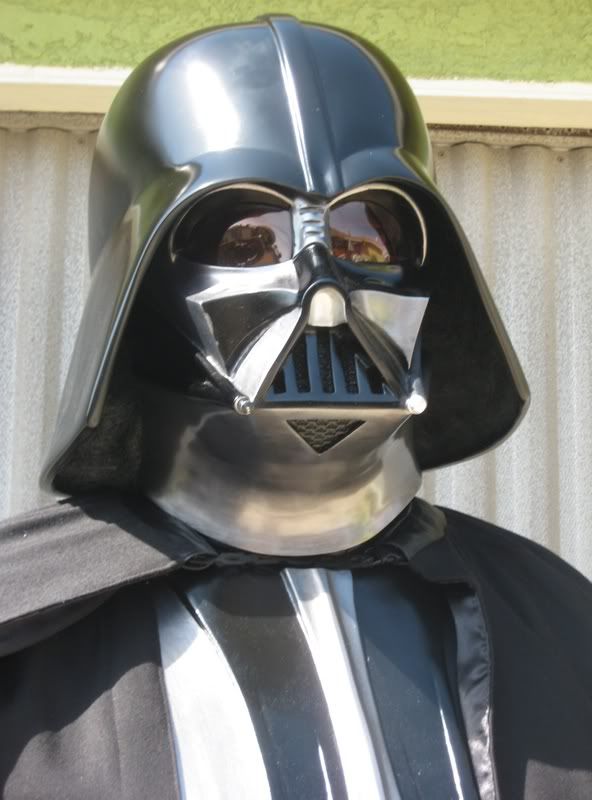
SgtFang Vader Helmet Buildup Need Paint Scheme Help

Dann

Master Member
RPF PREMIUM MEMBER
Well, I have yet to see a thread about this, and I guess it can be considered an easy project for most of you guys out there, but I thought I'd start a thread anyhow.

Here's what I've got so far. Took me about three hours to get to the first "semi" coat of primer.


If I had to do it again, I'd do the teeth differently. I kinda screwed mine up. I ended up using the front side of a dremel cut-off wheel on the inside of the helmet to slowly remove the excess material. In doing so, I messed up the thickness of the teeth. I probably shoulda just used a drill to remove most of it then a file for cleanup. Live and learn I guess.

Anyway, I'm taking a break for awhile. Need to go to the store and get some velcro, more primer, and something to use for the gunmetal. I don't really have hobby stores around here so I'm not sure what I'm gonna use for that.
 
Last edited:
Re: Sgt Fang Vader Helmet Buildup Progress Thread

So I've started the black on this baby.

I have a question, what's the correct paint scheme for the ANH helmet? Is the whole underside neck area supposed to be gunmetal as well as the cheek and whatnot, or is it just black?

I've seen a bunch of different paint variations on people's fan made helmets, and I'm not sure what's correct.
Same paint scheme as all of the other OT Vader helmets. The difference comes in the crudeness of the look of the paintjob. It was brushed on as opposed to sprayed. It's also not very glossy at all, all told.
 
Re: Sgt Fang Vader Helmet Buildup Progress Thread

Well here's where I'm at.


So you're saying it should look like this?

Mellow13fibredyneANHVader4.jpg
 
Last edited:
Re: Sgt Fang Vader Helmet Buildup Progress Thread

I'm no expert but it looks good to me. :thumbsup
 
Re: Sgt Fang Vader Helmet Buildup Progress Thread

Same paint scheme as all of the other OT Vader helmets. The difference comes in the crudeness of the look of the paintjob. It was brushed on as opposed to sprayed. It's also not very glossy at all, all told.

The paint schemes differed slightly on the OT helmets theres some great diagrams of all 3 OT paint schemes over on the propden :thumbsup
 
Re: Sgt Fang Vader Helmet Buildup Progress Thread

Just remember to brush it on if you want it to be somewhat screen accurate. If you don't care about that, go ahead and paint it like the lid you posted.
 
Re: Sgt Fang Vader Helmet Buildup Progress Thread

..as far as color schemes go , I would refer to as many screen captures as you can..the ANH is brush painted..here's mine ( not a Fang helmet)

IMG_17822.jpg
 
Re: Sgt Fang Vader Helmet Buildup Progress Thread

Any tips on the paint to use? I don't have a hobby store around. Well, maybe a Michael's, but not a model shop.

Sheesh, I didn't realize how much gunmetal was involved. Maybe I shoulda put on a big base coat of THAT first, then brushed the BLACK on....

Which brings to mind, any suggestions on brushes and techniques for the hand brushing phase (aside from "Paint the fence!")?
 
Last edited:
To me, the big difference with the New Hope Vader is the apparent look of the paint being brushed on. It is very crude looking. For instance, in the neck and underchin area, you can see the brush marks.

Also, the black isn't glossy at all. Funny thing is before I really got into the details of props, I always thought of the New Hope Vader as being battle worn. His helmet and armor seemed to look like it was covered in battle soot.
 
..... and something to use for the gunmetal. I don't really have hobby stores around here so I'm not sure what I'm gonna use for that.

Your best gunmetal is going to be automotive paint. Do you have auto parts store nearby?
 
Painting the black first was the right way to go, on the original the way the gunmetal is handbrushed you can see black showing through the brushmarks if you had painted the gunmetal first you wouldn't be able to achieve that look.
 
Re: Sgt Fang Vader Helmet Buildup Progress Thread

Actually I believe the scheme you referenced is outdated; it was how Fyberdyne said to paint his helmet but wasn't fully correct.

The yellow arrow points to an area that once was believed to be gunmetal, but was later discovered to simply be a place where light "pools" on the helmet, the brightness making it look lighter--thus it should be black like the rest of the upper cheek, all the way up to the eyelid edge. Go frame-by-frame in ANH and you can see it change as he turns in and out of direct light.

The red arrow points to an area that should be gunmetal. The black "eyeshadow" is only on the upper lid (and side of nose?), not lower lid.

Correct me if I'm wrong, Vader nuts. :)
 
Re: Sgt Fang Vader Helmet Buildup Progress Thread

Yeah after looking at the templates at the Prop Den I noticed there were some differences.

I'll be using the ANH template from the Den. I'm not sure if I'm allowed to post a pic of that over here or not, so I'll just leave it at that.

So if I go to an auto parts store, what exactly should I be looking for? Something brushable, or what? Any particular color, brand?
 
The templates were developed here on this forum - check out post #49 of this thread: http://www.therpf.com/showthread.php?t=10171
EDIT: Aah, nice one... Kell beat me to it! :cheers

Things to notice about the ANH paint job.
The upper and lower inner eyelids are black - some say the area at the nose is grey, others that it's black... I'll just say: you decide.
The black on the top of the cheeks at the nose extends further onto the left upper cheek area than on ESB and RotJ.
Both sides of the face, at the cheeks are grey on the ANH.
I would suggest a medium sized brush - not one of those small detail brushes - to get those paint strokes in there. But don't overdo the crappyness of the appliance, as most of the crappyness comes from the wear and tear of filming and not from a over-crappy paint job.
Other than that it is pretty much down to shine of the paintjob, but make no mistake: the black IS gloss... it's just covered with a lot of fingerprints. Just paint it perfect and then when dry, use no sealer or clear coat, but handle it some to get a used look.

Just keep things simple and then beat it up a little.
 
Thanks for the help.

I just laid several coats of gloss on him, I'm a little worried because he's still so textured. I'm not really getting a very smooth surface. I wet sanded after every coat of paint I put on (sanded before the gloss, but not in between each coat of gloss).

Am I missing something? Or am I just going to need to polish with something after he's all dry?
Just out of curiosity, are your coats drying completely between? The way it reads is that you are kinda rushing it.
 
Maybe I am, I'm not totally sure to be honest. The three coats I put on were pretty thin, and the spray can said to wait 1 minute in between coats.
 
Back
Top