Sewing Basics - Sewing Machines

MaulWalker

Sr Member
I’ve sewn on about seven different brands of machines. I am not going to recommend a particular brand of sewing machine, but rather give you some ideas of what to look for if you are in the market for a machine and where you might find one.

In the bad old days, sewing machines were often integrated into a piece of furniture –such as a credenza or table. Then manufacturers started making “portable” machines. That meant they were no longer integrated into furniture and you only needed two people to move them instead of three. Now, you can find extremely light-weight machines.

But that light weight comes at a price. Sewing machines are just that – machines. They have motors, gears, levers, etc. When one stops sewing, it may be because the timing is off' like your car. To save weight, most low-end sewing machines contain lighter motors and plastic parts.

New machines range from $99 to low four figures. Metal parts and heavier motors of course cost more. Even the most basic new machine has stitch width selection, stitch length selection, reverse, a handful of presser feet for designed for different applications, and a selection of different stitches. More expensive machines have heavier motors, more metal working parts, more feet, and many more stitches. I know several years ago Consumer Reports magazine reviewed sewing machines. You might want to look that article up.

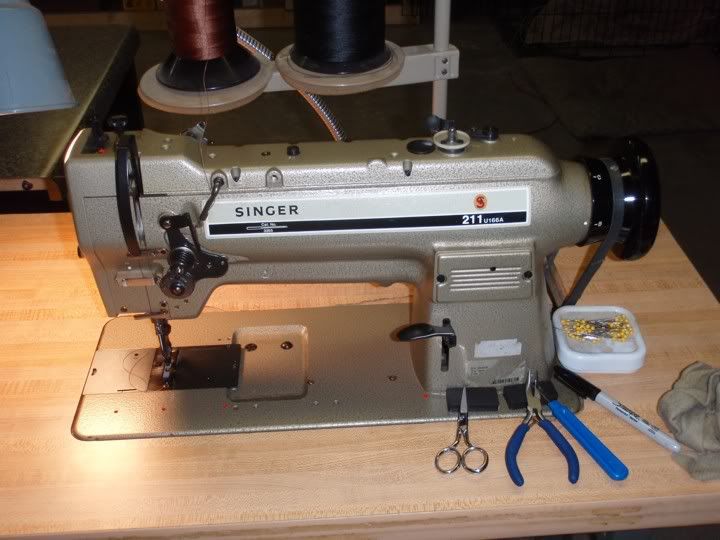
Older machines are perfectly serviceable and will save you a considerable amount of money. You get the benefits of all those metal innards and heavy motors. Old Singers and Kenmores are excellent machines. You can find these machines on eBay, at yard sales, and flea markets. Another place to look for old machines is at a free-standing sewing machine store (not the sewing machine section at your local fabric store.) Many of these stores accept trade-ins and then resell the trade-ins.

Note: if you find a machine advertised as a zigzag machine, don’t worry. On these machines you set the stitch width to zero to get a straight stitch.

Now there are a number of machines that look like sewing machines and may sew but are primarily designed to do something else. These are quilting machines and embroidery machines. These special-purpose machines are much more expensive.

You may notice that some serious sewers have more than one machine. For instance, I know one costumer who has an old cast-iron Singer machine that only sews straight stitches, but it sews through leather like it was light-weight cotton. So it is reserved for leather work. Another costumer I know has an expensive machine that she uses for everyday and an inexpensive machine that travels with her to conventions.
 
Sewing Machines: Care

You know that lint that forms in your dryer? Sewing machines gather the same lint, particularly in the bobbin area. Your machine may come with a set of tools, including a brush. This is used to clean the lint out of your machine.

I recommend you do this before you start a new project. If you are sewing a fabric that has nap, like velvet or corduroy, you will want to clean the machine during the project. If you don’t have a brush with your machine, an old toothbrush will work.

Why should you care about the lint? Well, sewing machines parts are also oiled. That lint can get some oil on it. And a little piece of that oily lint can get caught in the thread and sewn into a seam and stain your fabric.

Sewing machines also need regular tune-ups. I use my machine heavily and have it tuned up once a year. During the tune-up, the machine will be thoroughly cleaned, adjusted, and oiled. If there is a free-standing sewing machine store in your area, they can do this. Otherwise, contact your local fabric store and ask about repair services. They may have a contact or have a repair person who makes a circuit through the area.
 
I used canned air to clean my machine. It works really well to blow out all the fuzz, lint, and small pieces of thread that gather in it. Open the top and sides, blow all the mess out, then oil the joints.
My machine is 60 years old and runs like a dream. My hubby bought me a new machine for my birthday and it broke within a week. If you can get an old metal one I highly recommend it.
 
Re: Sewing Basics - Sewing Machines Part - Handwheel

The hand wheel is found on the side of the machine. The hand wheel allows you to move the needle up or down. If you turn it far enough, you can get the machine to complete an entire stitch.

There will be times when sewing a seam that you need to stop to adjust the fabric, remove pins, answer a phone call, etc. Get into the habit of immediately using the hand wheel to lower the needle into the fabric. This “holds your place” in the seam so you don’t end up with a crooked seam or a loose stitch. (Some newer machines have an option that automatically lowers the needle when you stop stitching.)

When turning a corner, like on a collar, stop sewing just before you reach the point and use the hand wheel to complete the last few stiches, and then ensure the needle is positioned in the fabric by using the hand wheel. Release the presser foot, turn the fabric, lower the presser foot and resume stitching. This ensures you have a nice crisp point.
 
Sewing Machines - Stitch Length Adjustment

Stitch length is measured in “stitches per inch.” (In areas that use the metric system, I suppose this would be stitches per cm.) This is exactly what it sounds like – for every inch of seam there will be some number of stitches.

Some of the newer machines have “automatic stitch length adjustment” where the machine automagically determines the correct number of stitches per inch required. You will be able to override this and set your stitch length manually.

Older machines may require you to use a lever or wheel and have a numbered scale so you can set the number of stitches per inch. Very old machines may not have the numbered scale and require you to stitch some samples and adjust you stitches per inch that way.

The number of stitches you need per inch depends on the type of fabric you are sewing. The weight, thickness, and type of fabric you are sewing will determine the stitch length you use.
  • Light-weight fabric: 12 – 14 stitches per inch
  • Medium-weight: 10 -12 stitches per inch
  • Heavy-weight: 8 – 10 stitches per inch
Basting Stitches
Basting uses your very longest stitch length – typically six stitches per inch. Basting is used to temporarily hold fabric together. The long stitches are easier to remove than shorter stitches.

Sometimes the pattern directions will tell you to do something to your garment, such as set in a sleeve, and then baste it in place. You will then be directed to stitch the seam.

Basting stitches are also very useful when you are making a sample garment for fitting before you cut out your fashion fabric.

Examples of Stitch Length Adjusters
View attachment 75805

View attachment 75806
 
Sewing Machines - Stitch Width Adjustment

When you are sewing with a straight stitch, stitch width is not a concern. You can think of it as a stitch width of zero. But when you get into zigzag or other complex stitches, you will need to adjust the stitch width.

Note: the widest setting is typically only about ¼”.

You may have a lever, a knob or a button.

Examples of Stitch Length Adjusters
View attachment 75807

View attachment 75808
 
Putting Stitch Length and Stitch Width Together

You can combine stitch length and stitch width to get something other than straight seams or zigzags.

Take a look at this garment.
http://www.rookscastle.com/props/3musketeers/tunic1.jpg

You may recognize this as a garment from the Three Musketeers. The silver design is a fabric embellishment technique called applique in which a decorative peice of fabric is applied to a base fabric.

What I want you to pay attention to is the outer edge of the silver design. See the solid, slightly humped outline? That can be accomplished via satin stitching. In satin stitching, you set your machine to make a zigzag stitch with a wide stitch length, but an extremely short stitch length.
 
Last edited:
Great basic info. I'm so bad at getting my machines tuned - I do clean them myself, though.

I actually have 3 machines... My fancy one, one heavy duty and easy to thread that I bought for my kids learn on but I end up using it for almost everything. My youngest son begged to learn at 9 when he saw his 12 year old brother making things... they both have been sewing for a while and make some cool stuffed toy characters from their video games. They use the embellishment technique above for eyes and do the tight zig-zag embroidery stitch for mouths and noses.

And I have a really old New Home Light Running machine that my Great Grandmother passed down to me. I haven't tried to use it in 20 years, and it's one of those furniture pieces. The date on one of the stickers says 1889 but I think that's when they started making them, not this machines age.

It looks something like this:

PB111571.JPG


I've thought about what to do with it several times, but I can't get rid of it... too special.
 
Are we allowed to ask stupid sewing questions here or would you prefer a pm so the thread isn't clogged up like the garbage disposal after Thanksgiving?
 
Are we allowed to ask stupid sewing questions here or would you prefer a pm so the thread isn't clogged up like the garbage disposal after Thanksgiving?


Ask away! If you have a question about something already posted, either quote the relevant portion of the post, or use the same post title. If the question is about something that hasn't been posted, try to make the title of your post descriptive so others can follow the "thread within the thread."

You can PM me, but if the question is relevant to others, don't be surprised if your question ends up in the thread.

Lynn
 
Sewing Machines - Needles

You will need an assortment of machine needles. There are specific needles for specific applications.

Woven or Knit Fabrics
  • Needles for woven fabrics have sharp points, designed to pierce through the fabric.
  • Needles for knits, typically called ball-point needles, are designed to push the fabric threads aside rather than pierce them so you don’t end up with runs in the fabric.
Fabric Weight
You will find the needle packages marked with the suggested fabric weight.
Light-weight fabric will use a needle with a smaller diameter while heavier weight fabric will use a thicker needle. The needle manufacturer you prefer may even make a needle specifically for denim.

In a pinch, you can use a needle designed for the weight of the fabric you are sewing, but you can expect some issues. Needles designed for light-weight fabric may break more easily sewing heavy fabric while needles designed for heavy fabric are going to leave larger holes in light-weight fabrics.

Specialty Needles
Needle manufacturers make needles for special applications such as:
  • Leather
  • Top stitching on demin
  • Metallic threads, etc.
Buy extras – Needles can get bent or break. One of the most common ways needles break is by the needle hitting a straight pin while stitching.

There is a right way and a wrong way to install a sewing needle. The top of the needle typically has a flat side. The flat side should face away from you when you put the needle in the machine’s needle holder.

Lynn
 
I use a lot of different types of machines, but I personally prefer Bernina. I second the advice for buying an older used machine. The heavier the better. The economy machines that you buy at Walmart aren't good for much more than learning to sew basic garments. They can't handle anything much thicker than cotton broadcloth and have poorly designed bobbin systems. Ebay is a great resource for buying high quality used machines as well as local sewing machine dealers. Some people like to promote certain brands over others and they all have pros and cons, but the truth is that all sewing machine manufacturers have low quality machines as their basic entry-level lineup. This includes makers like Singer, Janome, Baby Lock, Pfaff...even famous Bernina. The trick is to make sure to get a machine that is mid to upper level. For Bernina (because I'm familiar with it) the Bernina Mechancial 1008 is a wonderful basic workhorse machine that is used in costume shops everywhere. It's a staple. Other great Bernina machines are the Activa line, they are all metal machines with some computerized functions. But stay away from Bernina Bernettes...that is Bernina's entry level line that they do not even make. Real Bernina's are always made in Switzerland...Bernette's are made in Thailand. Singer, Janome, and Baby Lock, and Pfaff all have similar line ups and really all are great machines...if you stay away from their economy machines. Most dealerships will usually resell machines too...but ebay is usually cheaper way to get one.

Now, if money is no option...laughable for most people I know...Bernina (as well as the other guys) have amazing top of the line machines that have some really awesome features like sewing and machine embroidery combos...and Bernina will finance. These machines can range from a grand to 10 grand easily.

However if you are an experienced sewer and looking to upgrade...You might want to look at Bernina, Juki, Singer for their industrial lines. You can also get industrial sergers. They aren't as expensive as you might think either...most are under 3 grand. They will sew through anything (including you if you aren't careful) and last eons. There are several good brands and industrials can be bought used as well. It's important to know that industrials are bought in pieces: the machine, the motor, and the table. Sometimes you can get them all together. They are very bulky, very heavy, and pretty much stay where they are put.

Hope this helps!
 
Sewing Machines - Free Arm

Some machines have what is called a free arm. This is a way to make the sewing surface smaller so that you can more easily sew cuffs, pant hems, etc.

Some garment parts may be too narrow for even the free arm. These you just have to do the best you can be spreading the fabric out, making a few stitches, and then readjusting the fabric.

Example of Free Arm and Free Arm in Use
View attachment 76194

View attachment 76195
 
Re: Sewing Basics - Tension Adjustment

Someone contacted me via PM with a sewing question. "About 50% of the time when I try to sew ...the thread bunches up in the back ( or underneath) the fabric/strap /whatever. OR- the thread separates and gets tangled up like gum in a girls hair. I hold onto the thread(s) as I start and roll the wheel for the first few stitches. Sometimes it works but I am never sure until I flip it over. "

In almost every sewing machines, there are two threads - the upper thread and the bobbin thread. The machine puts both threads under some amount of tension in order to create a stitch. If the tension on either thread is not set properly, you can end up the loopy stitches on either the top of the fabric, or underneath. In the worst cases, you can end up with "thread that gets tangled like gum in a girl's hair" and can even break your thread. Thread tension can be affected by many things - the needle size, the thread, the thickness of the fabric, even the direction the thread comes out of the bobbin.

When you cut out a garment, save some of your scraps including your interfacing. First, ensure that you have the correct size needle and the correct thread on your machine. Also ensure that your bobbin thread is coming out the right side. (My workhorse machine has bobbins that are the same size on the top and bottom and I have inadvertantly loaded the bobbin so the thread is exiting from the wrong side.)

To start adjusting the tension, lay two pieces of fabric on top of each other and sew a sample seam. I typically use a basting stitch as I find it easier to see if the upper or lower thread is looping on the face of either fabric. If you can see the bobbin thread being pulled to (so that it shows on) the top fabric, then the upper tension is too tight. If the top thread shows on the bottom face, the upper tension is too loose. Ideally, the stitches should look the same on both sides of the fabric. Check your sewing machine manual on how to adjust the tension.

Now add a scrap of interfacing to your fabric and test stitch again. You may find you will need to adjust your thread tension again. In this case, I will stitch all or almost all of the seams that just require two layers of fabric first. Then I will determine what thread tension I need for seams where interface is involved and stitch those. You will also want to test your thread tension before you stitch button holes.

If you are sewing Velcro on your garment, you may want to sacrifice a piece of Velcro to test the tension.

Most newer machines have self-adjusting bobbin tension, so all you will have to worry about is the upper tension. Machines that require you to manually adjust the bobbin tension typically have a screw on the bobbin case that adjusts the tension.

Keep an eye on you stitching as you progress through your project. If you notice that the stitches are not being formed properly, you may need to readjust your tension. I also recheck mine after I change thread.

Lynn
 
Thanks for all the good info... Keep it coming!

I am a sewing neophyte myself, but have found having a couple of machines is handy. My workhorse is a Pfaff 332 and my extra is a Brother 1217.
 
I thought I would through in my two cents on this.
I build nylon tactical gear on the side and have been working on stuff for about 7 years.
01PCWornFront.jpg

I started with a brother machine from walmart and it did not work out well with thicker nylon like 1000D. After some serious research I found that I needed a serious machine. I picked up a government surplus Singer 211U???? all metal machine for 0.00 dollars. I downloaded the owner manual and had it running in a day. Here is a Pic
WS05.jpg

For what I do (leather and Nylon) it is a perfect machine. I have seen these things go for about 200.00 on ebay without the motor and table. The motor and table can be acquired elsewhere and you should be able to get setup for under 500.00. the biggest issues I have run into are threads and materials. Since I build tactical gear I work with 750D and 1000D nylon I also use lost of webbing Velcro and side release buckles. I get most of this stuff from Military, Medical, Softgoods Fabric, Trim, Hardware - Gerald Schwartz . I know the owners and they can get almost anything I need. For leather supplies (for holsters and belts) I buy stock cow hide from my local Tandy Leather Supply. I also work with pull dot snaps and grommets, I get most of this stuff from the internet.
What took me longest to learn was what thread to use. For Nylon I use a #69 bonded Nylon. This thread can also be used on leather.
I still use the brother to sew uniforms and patches etc. but most of what I do is on the singer. Other machines I would consider are sergers to sew inseams etc… there are a lot of tactical gear forums on the internet and even if you are not interested in tactical gear there are lots of tutorials on sewing and the basics like box stitching etc…
Well I hope this helps somewhat.
 
Thanks for the thread! It's been a long time since I did any sewing and I've recently started again due to a friend getting me to help with costumes. It's great to have someone go over the basics.
 
A great tip 11B30B4! I use local Seattle Fabrics.

Got a forum name to recommend? I've been to AR15.com.

Sorry for the hijack. Maybe a PM? Thanks.

Sew on!
 
Craigslist is also another excellent place to look for older machines. I got a 1950 Singer 66 cast iron beast with table for $30 that sews wonderfully. The person I bought it from took very good care of it so there was minimal work for me to do, but it's possible to rescue even a seized machine with the right products and a little elbow grease. Yes, most of them only do straight stitches, but seeing as how that's the stitch sewers use probably 90% of the time, they're worth looking into. I've heard of people having luck with machines on freecycle too, so that's another resource to consider.
 
This thread is more than 11 years old.

Your message may be considered spam for the following reasons:

  1. This thread hasn't been active in some time. A new post in this thread might not contribute constructively to this discussion after so long.
If you wish to reply despite these issues, check the box below before replying.
Be aware that malicious compliance may result in more severe penalties.
Back
Top