You are using an out of date browser. It may not display this or other websites correctly.
You should upgrade or use an alternative browser.
You should upgrade or use an alternative browser.
Scratchbuilt Millennium Falcon 1/72nd
- Thread starter Archive&Future
- Start date
Archive&Future
Sr Member
Uh yeah so all I've really managed with my 0 free time nowadays is to add more dorsal portside panelling.
My main gripe with myself is that the original Five Footer clearly had the cockpit tube integrated before any panelling was done, so the demarcation between the two planes is quite clear, while on mine the hull panels push up against the tunnel panels which clearly continue down below the surface of the main hull panelling.
Am I over-analysing this? It's hard to step back from your own work, to know which battles to pick...
tarnyloo73
Well-Known Member
Re the cockpit tube: For me, what you've done is faithful enough that such minor differences could be overlooked. Ultimately you have to go with your personal compromise level and what feels right for you.Am I over-analysing this? It's hard to step back from your own work, to know which battles to pick...
Been watching this beautiful and important project for a while, an amazing example of how far skill and work can take you without Bandai's resources and Lucasfilm access.
A beacon for builders everywhere (sorry if that's pressure!).
gt350pony66
Master Member
I think HH is a bit too hard on himself, and too humble of a guy to appreciate his own work to the extent that we do. But you have to respect a man who strives for perfection in what he does. H3ll, if I had half of his talent I'd be a hard person to live with :lol
Three cheers for our friend Haystack :thumbsup
Three cheers for our friend Haystack :thumbsup
Re the cockpit tube: For me, what you've done is faithful enough that such minor differences could be overlooked. Ultimately you have to go with your personal compromise level and what feels right for you.
Been watching this beautiful and important project for a while, an amazing example of how far skill and work can take you without Bandai's resources and Lucasfilm access.
A beacon for builders everywhere (sorry if that's pressure!).
gt350pony66
Master Member
another thing...my last Falcon wouldn't be the gleaming beauty it is, if not for Haystack's remarkable work...the man is a genious ") thumbsup
thumbsup
thumbsupAm I over-analysing this? It's hard to step back from your own work, to know which battles to pick...
Honestly, the only spot where it's noticeable is where the hull indents on the back side the tunnel. But the way the light hits the tunnel vs hull naturally gives some separation between the two. I don't even notice it looking from the front. There's also always the option that you leave the cockpit tunnel the way it is and sometime down the road fix the issue, assuming you leave the tunnel removable from the rest of the ship--doesn't seem like it would be a fix that would mess with the paint job that much.
Archive&Future
Sr Member
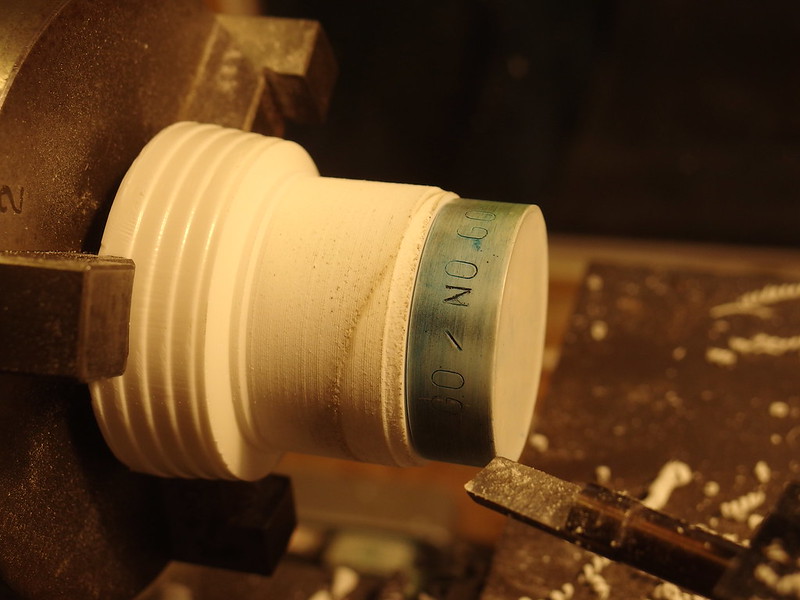
Rather than removing the clay from the cockpit master, re-seating it in the mould and the pouring the next half of rubber, I decided make my life even more complicated by creating the second part of the mould separately.
I started by machining a go/no go gauge to the dimensions of the cockpit interior-
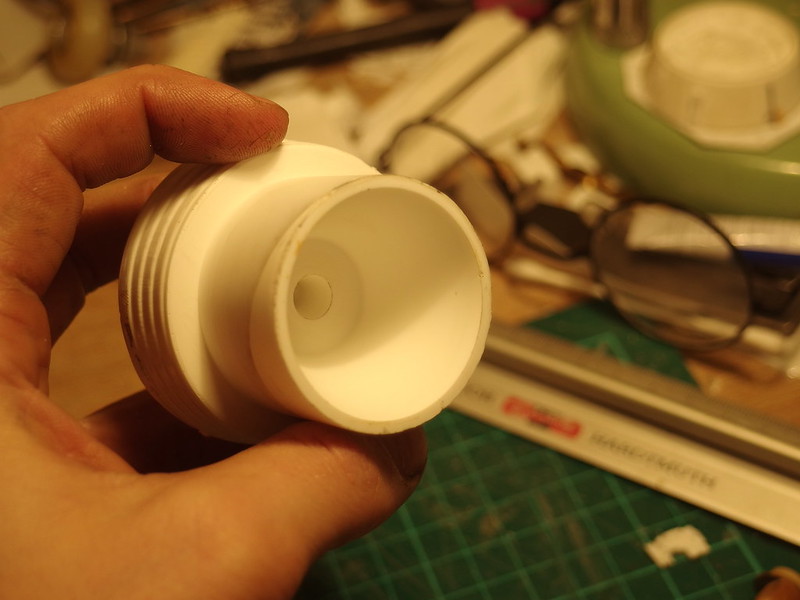
then with another billet I machined the negative into which the rubber would be poured.
The go/no go gauge ensured the negative was within dimensional tolerances (in theory)
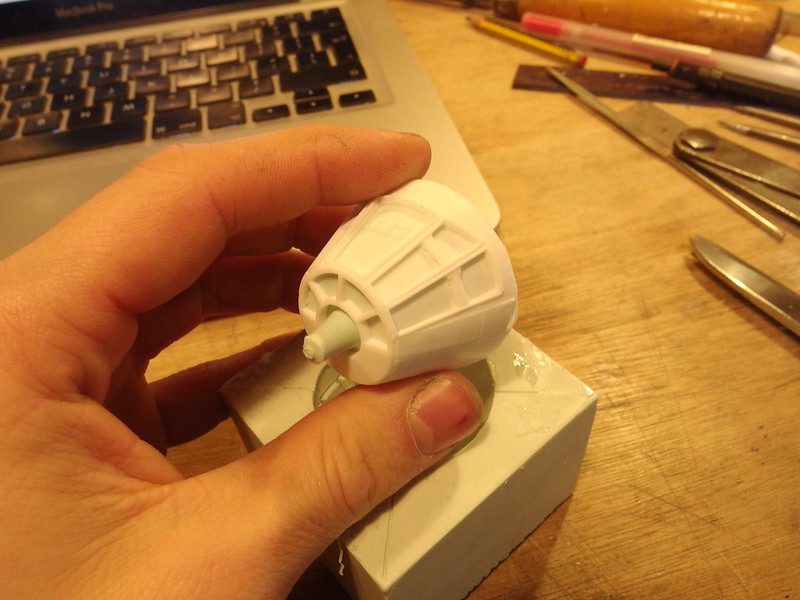
Once the rubber was cured, I made my first cast...as you can see, I would say...very successful! The window panes simply pushed out before trimming them with a sharp No.11 scalpel.


I started by machining a go/no go gauge to the dimensions of the cockpit interior-
then with another billet I machined the negative into which the rubber would be poured.
The go/no go gauge ensured the negative was within dimensional tolerances (in theory)
Once the rubber was cured, I made my first cast...as you can see, I would say...very successful! The window panes simply pushed out before trimming them with a sharp No.11 scalpel.

gt350pony66
Master Member
...is there pics here that everyone can see but me?
Archive&Future
Sr Member
Odd...I host them on Flickr so they should be publicly visible...I'll check the privacy settings
Last edited by a moderator:
Archive&Future
Sr Member
Looks awesome - love the HH logo
But I don't get the go/no go thing tbh
The Go/No Go gauge is to check the internal dimensions without using measuring tools, when machining Morse tapers and things designed to fit together it's common practice (apparently!) to create an exact negative...if the gauge doesn't fit correctly, you've machined the piece wrong !
Last edited by a moderator:
Gimme Shelter
Member
blimey - I'm blown away by this amazing journey of self creation - simply amazing stuff. There I was thinking life was difficult building Randy Coopers Star Destroyer - this is serious modelling - I'm very jealous
gt350pony66
Master Member
Thanks HH, I've also noticed this on other threads as well...guys are stating, "man that looks awesome!" ...and I see no images...feel like I'm missing out on great stuff. Then again, it might be my network on my desktop at work. Our IT guys block, or worse yet partially block stuff...aggravating. I'll look on the laptop at home and see if they're visible there.
Another weird thing, incidentally... I was ordering some Star Destroyer pieces from Falcon 3D, and my work station didn't show an "add to cart" to click on...at home...there it is. Oh well
Cheers man! :thumbsup
Another weird thing, incidentally... I was ordering some Star Destroyer pieces from Falcon 3D, and my work station didn't show an "add to cart" to click on...at home...there it is. Oh well
Cheers man! :thumbsup
Odd...I host them on Flickr so they should be publicly visible...I'll check the privacy settings
Last edited by a moderator:
Archive&Future
Sr Member
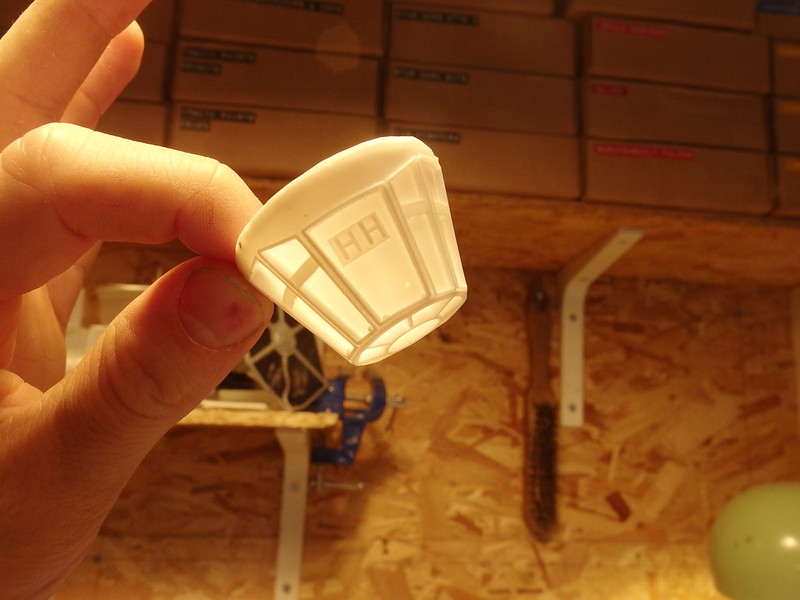
Cockpit cast cleaned, thinned and primed. Could do with a polish to free up that primer texture really, it's certainly no Perfect Grade. The nose is also annoyingly flat, and try as I might I can't get it to dome out without breaking the window struts, which are very thin.
I'm wondering whether to design a half etch/ half resin cockpit, with the solid parts as resin and the frame canopy as brass etch? The resin has give in it, but it's waaay more brittle than styrene, I had at least three struts snap while I was thinning them out from the inside (They were around 1.7mm when they came out the mould, I needed them to be between 0.6 - 1mm to look effectively in-scale)
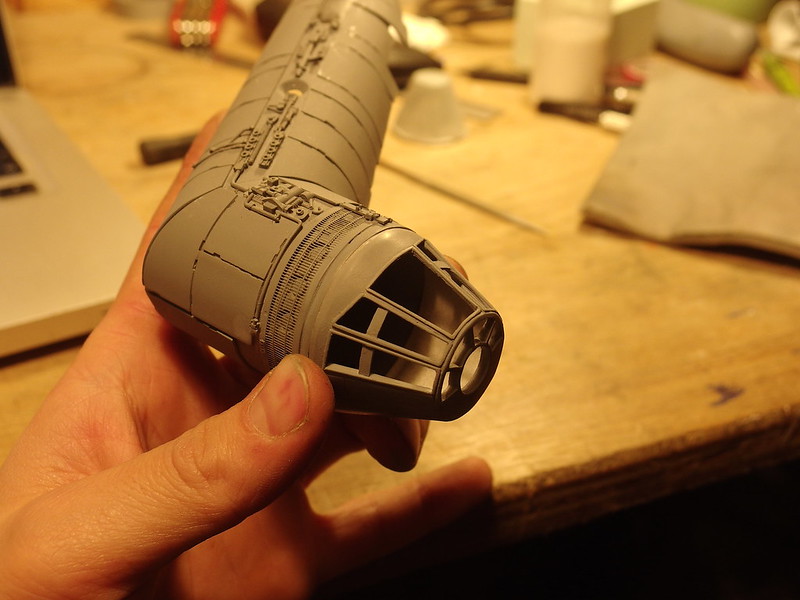

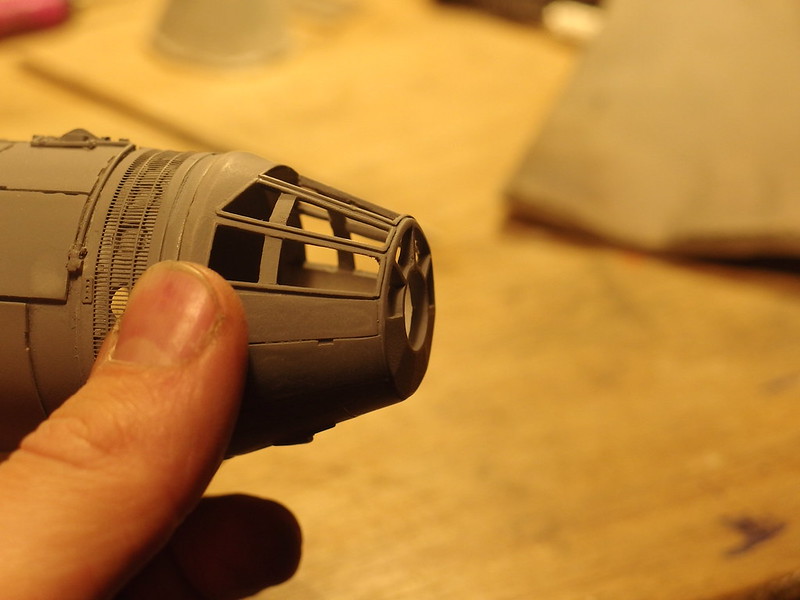
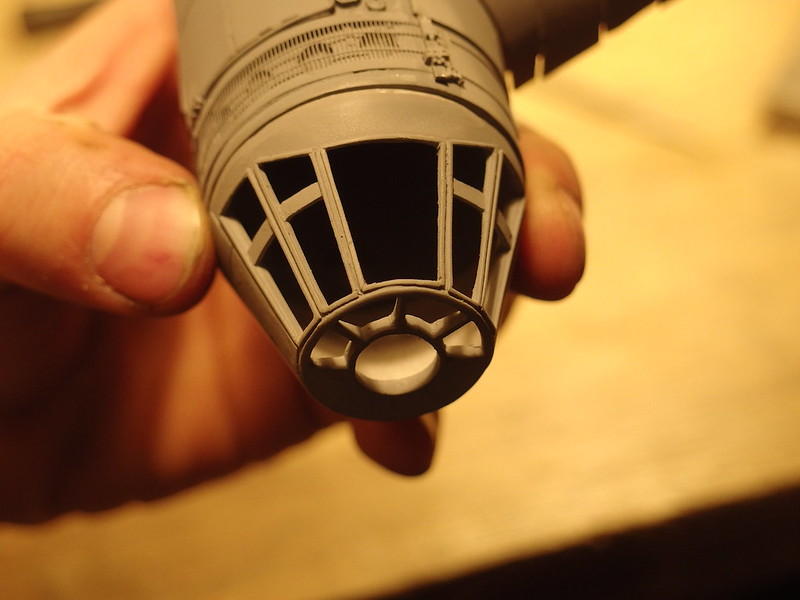
I'm wondering whether to design a half etch/ half resin cockpit, with the solid parts as resin and the frame canopy as brass etch? The resin has give in it, but it's waaay more brittle than styrene, I had at least three struts snap while I was thinning them out from the inside (They were around 1.7mm when they came out the mould, I needed them to be between 0.6 - 1mm to look effectively in-scale)
Archive&Future
Sr Member
Mk.III docking ring ready for moulding.
I decided the central hexagon really needed to be separate to emulate the shadows observable on the real Five Footer- I'll mould a piece which will nicely insert to the ring itself.
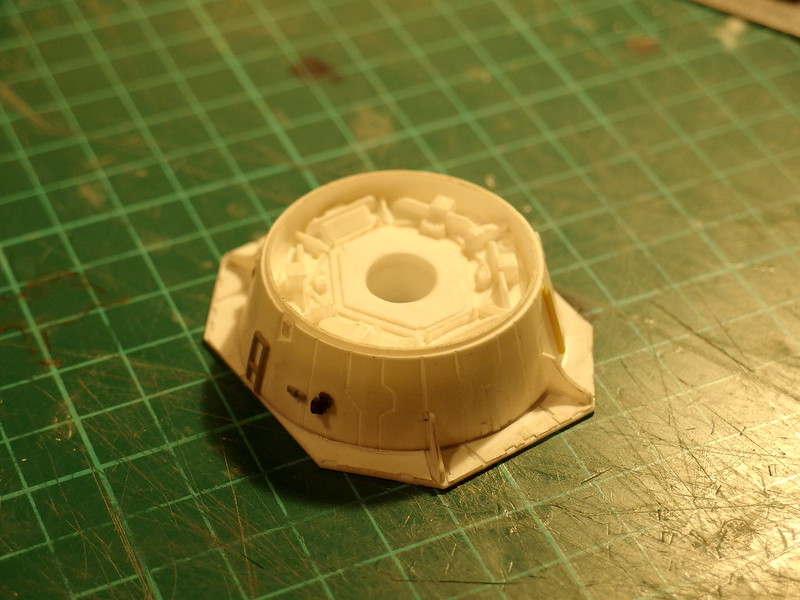
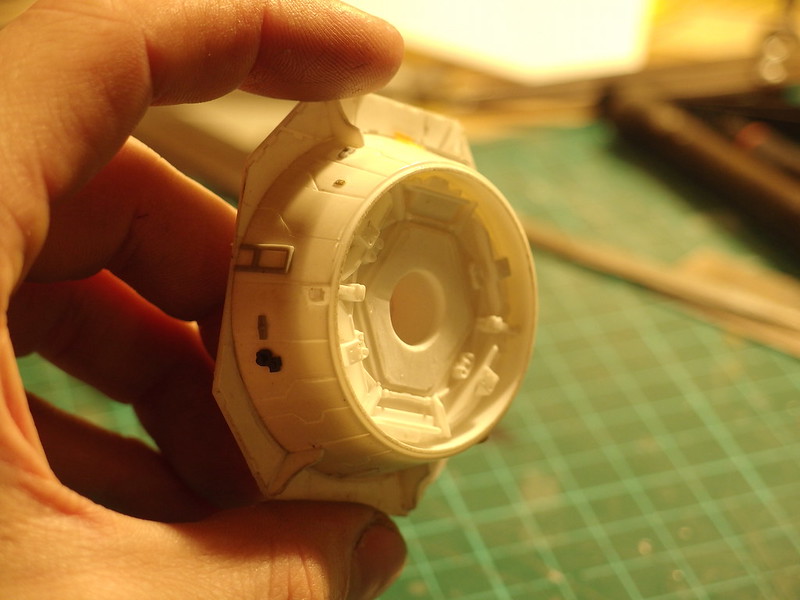
I decided the central hexagon really needed to be separate to emulate the shadows observable on the real Five Footer- I'll mould a piece which will nicely insert to the ring itself.
gt350pony66
Master Member
Outstanding! I'm glad you figured it all out, I'm going to presume you're happy with it. Looking forward to seeing it. So, tell me...if you care to that is...are you doing all this to put out your own kit for the world to enjoy? Or just for you? Hope that wasn't to huge of a question to answer at this time. We all love what you do HH :thumbsup
Mk.III docking ring ready for moulding.
I decided the central hexagon really needed to be separate to emulate the shadows observable on the real Five Footer- I'll mould a piece which will nicely insert to the ring itself.
https://farm5.staticflickr.com/4470/24215873238_a7f92b482d_c.jpg
https://farm5.staticflickr.com/4444/26292210159_4101b17c3c_c.jpg
Archive&Future
Sr Member
Outstanding! I'm glad you figured it all out, I'm going to presume you're happy with it. Looking forward to seeing it. So, tell me...if you care to that is...are you doing all this to put out your own kit for the world to enjoy? Or just for you? Hope that wasn't to huge of a question to answer at this time. We all love what you do HH :thumbsup
Thanks pal!
I'll be moulding the new docking rings with the intention of progressing my MPC Upgrade Kit into Mk.IIa, with the new rings but no other changed components (Hence only being Mk.IIa, rather than a full Mk.III kit)
Kitting up my full Falcon was never really an option truthfully, it's just too costly- I would have to charge absurd money to break even and for such an expensive resin kit it still wouldn't outshine the (comparatively cheaper) Bandai Falcon.
gt350pony66
Master Member
I kinda thought that might be the case, no worries though. love seeing your work non the less :thumbsup
Thanks pal!
I'll be moulding the new docking rings with the intention of progressing my MPC Upgrade Kit into Mk.IIa, with the new rings but no other changed components (Hence only being Mk.IIa, rather than a full Mk.III kit)
Kitting up my full Falcon was never really an option truthfully, it's just too costly- I would have to charge absurd money to break even and for such an expensive resin kit it still wouldn't outshine the (comparatively cheaper) Bandai Falcon.
crackerjazz
Sr Member
Hi Haystack Hair, I haven`t checked on your build in a while and I see this -- I'm blown away by how far you've progressed! Honestly, I thought you'd give up on it when the Bandai came out but I'm really glad you didn't. It's turning out beautifully and I admire your resolve. I see you've honed your skills to the point that you can build anything you wanted and I'm really envious! : )
Similar threads
- Replies
- 4
- Views
- 296
- Replies
- 1
- Views
- 195
- Replies
- 17
- Views
- 781