spidermanna
New Member
Having made a couple of these now I’ve come to the realization that it’s best to keep expectations low. Also, if I want to make more of these in the future, I need to: 1) Take more pictures of the more critical aspects of the build, especially of the stuff that is actually useful (like the diagrams and patterns); 2) Keep and reference the specific sources (from other sites and people) as I did a horrible job of that, and 3) Don’t take anything for granted. I know a lot of people, for example, buy pre-made white cotton flight suits and dye them to spec. That sounds easy but it isn’t. Also, can anyone tell exactly what color Boba Fett’s flight suit is? The one in ESB is kind of a bluish gray or maybe a grayish blue while in RotJ is more of a grayish beige or beigish gray but also has a tinge of light blue in it—its hard to tell. That makes it a pain to dye it. I went through numerous iterations before I finally just picked one and honestly, my results are going to be different than someone else’s based on a variety of conditions, such as water temp, quality, duration of soaking, size of the containers, etc. In the end, I figured out that you just had to get it close and the weathering would cover up the rest…
I used this pattern with white cotton twill fabric. I had to make the hip pockets and shin pockets separately from scratch and sew them on. I used Velcro for the centerline closing and added a Velcro opening along the lower mid so I could take the inevitable restroom break without having to remove the whole thing. I’ve seen other people make this into a two piece, which probably is not a bad idea in retrospect...
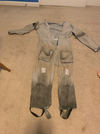
Here is a pic of the unmodified initial version--Its so clean and pretty--that will change. Later on, I will add Velcro on the bottoms of the leggings (where the spats are) and at the wrists. I got rid of the wrist ones as there was no room with those gauntlets on and I didn’t need them with the gloves I made. I also added an elastic girth band in the middle to retain my girlish figure…
This was the sucky part. I used 3 colors based on a tutorial from DentedHelmet.com (Flight Suit - Correct color for ROTJ Boba flight suit.) which consisted of Evening Blue, Pearl Gray, and Taupe (Beige) (plus also black and a drop of bleach. I scaled the size of the loads down and experimented with patches of cotton pillow cloth to try and zero in on the right combo. I am not lying when I said this took weeks to finally figure out something that was close… Also, I opted out of using the black as it would later make the fabric look purplish—I was very hesitant to use bleach—bleach doesn’t whiten fabric the way the adverts make it sound—it pinkens them. If you want fabric bleached, leave it out in the sun…)
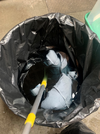
Small scale experiments in the kitchen sink messing with soaking times and concentrates. I think we got the blue tubs at Dollar Tree--super convenient. Everything was scaled down to like 1 gallon of water-size (maybe 2--I forget)...
Came up with literally dozens of combinations. In the end, I just picked one and hoped for the best, which I think was to use the recipe amounts in the website above with Beige and Gray, soak for 20 minutes, dip in the very watered down bleach solution, rinse, wash lightly, and then repeat with the blue for 5 minutes just to give it a tint of blue. Seemed to work—didn’t matter—it was close enough and I wasn’t making another one…
Always wondered when this extendable boat paddle that I had to have like 30 years ago would come in useful…The water was scalding hot
This was the result. I did notice that outside it looked more bluish gray and inside it looked more grayish beige. I guess that is what its supposed to look like? All the Velcro bits turned blue for some reason…
Did a lot of testing on some test fabric---ALWAYS make additional materials to test--Can't stress that enough! Tried to stay away from black acrylic as much as possible but it was hard to avoid. I mainly used burnt umber, elephant gray, black and even a few hints of blue to weather mainly around the shoulders, hips and shins. Used black along the edges of the pockets and “t-thirt” bit to accent. Figured the pants would be greasy from opening and closing all the time to pull out the multiple pairs of socks I keep in them to make them look puffy…
Colors are different outside vs inside. I also added elastic stirrups that I slide btwn layers of half socks to keep the legs tight and not rolling up over the spats. Also added Velcro on the knees for the knee pads after the fact as they tended to want to droop (cuz I keep skipping leg day)…
This is a fairly complicated strap with Velcro in several places to make it removeable…for absolutely no reason at all—just sort of ended up that way. Looks good when its tied though…
I should have taken a better picture. Maybe during the next show I will do a suit up…
The spats were about as easy as anything to make and then dinge the hell out of…
I think the take away on this one is: Airbrushed acrylic paints are your friends. I ended up ‘painting’ a lot of the grime on, washing it lightly, and then repainting it on. I am guessing that if I did this over and over again, eventually it would just stay in. If anyone knows how to clean the smell out of it, please share cuz after a few time, this thing gets pretty nasty and Febreze only goes so far…
If the pattern for the flak vest looks like an oversized T-shirt with cutoff sleeves, it’s because that is exactly what it is. I traced out a T-shirt pattern and tweaked it a bit knowing I would add the half-moon shaped sleeves later on. The vest itself is nylon with a thick layer of batting on the inside to give it some volume. Notice that the bottom is folded in folded in. This will be important later… (I have the new(er) iPhone, BTW, that one died on me...very sad...)
The back has to be oversized to allow for it to fold over itself and is held into place with internally mounted Velcro. I like the way the sleeves turned out…
I used a similar process for dying this as I did for the flight suit, except its just a very light gray. All coloring is done via airbrush which is just accenting around the edges and chest area/sleeves with gray to give it a dirty, but not overly dirty look—more like carbon scoring. Holes for the metal rod that holds the jetpack up and upper straps were carefully marked, cut, and reinforced to make sure they didn’t fray…
This is actually the same color as the above pic but different lighting. Lighting is a crazy thing--that's actually a lie--these are separate vests. I made two because the first was too small, so i took all the mistakes from the first and made a second one and in the process, forgot what colors I specifically dyed it! So I just went with a light gray--the first one looked better in terms of color but the second one fit better and looked WAY better in terms of sewing. The holes are just ringlets added again with a punch tool to keep the vest from fraying--pretty standard for making these. You can see the indents from the armor. I don’t like the look of the armor sitting on the vest—I want it clinging to it, like it’s a part of the vest. When I do the Armor tutorial, you will see how I bent the edges in slightly…
This is a Mannavation that I am very proud of. Instead of the waste belt being a seatbelt from an airline that drops down over your waste over time, my waste belt is held in place with Velcro and strapped to the vest…
Then, its folded over itself with Velcro in the front and back to hold it in place. When you put it on, your handler lashes it to the jetpack harness and hides it under the belt. As a result, form-fitting vest with belt that never falls. Also note how there are No Parking signs that match the armor in the front. This is to keep the armor plates pinned to the vest tightly. The cutout over the left breast plate is for the readout counter in the front which I will cover when I do the armor…eventually (I am running out of stuff to do…
And here is a close-up of what it looks like when its folded over and I am not in it. The battery pack for the display just rests in the crease of the belt fold…
Close up of the area under the sleeves where the screws and washers are mounted and the Velcro used to held up the Wookie Scalps. Velcro is a God-Send!
The dickey thingee was pretty easy to make—its lust a long segment attached to a ring with some decorative sewed lines. The necky bit also has quilter’s batting in it to give it volume and make your neck sweat—a lot. That is why it is imperative that this thing be removable since its going to need to be washed a lot. This is actually the second one—on the first, the ringlet was too small and kept popping out. I solved this by making it wider and adding Velcro on the inside to attach to the vest in the back to keep it from popping out. Has not been a problem since. Also, instead of clipping it in the back, I used—you guessed it—velcro…
And that’s that…the bulk of the soft bits. Biggest issue was the dying and the weathering but I think they came out alright. Hope you enjoyed. Let me know if you have any questions--love to share my experience and help folks overcome problems cuz that is what this is all about.
Almost done with these…