You are using an out of date browser. It may not display this or other websites correctly.
You should upgrade or use an alternative browser.
You should upgrade or use an alternative browser.
Replacement Parts for the Hasbro Black Series T-47 (Snow Speeder)
- Thread starter spudkopf
- Start date
spudkopf
New Member
Sorry for the slow response, been through some personal issues recently and lost a little focus. Be happy to share just drop me a PM.Fantastic work
I would be very grateful if you could please share your files with us, because I am also waiting to improve the SnowSpeeder but I haven't got your skilld. Is it possible?
Cheers
marcuspaine
New Member
Hey! i was just looking to get these files ive looked everywhere for them and just wondering if you could share them with me. Thank you
spudkopf
New Member
G'day
Here is a long overdue update to my project thread.
I finally got my printer up and running last week and have been busy resurrecting this somewhat stalled project and being me I have also decided to expand the scope of the project works.
So.....

The above was modelled in half a day or so and is as close as I can guestimate to the hero model details.
In the following images are the results of my first prototyping efforts, there have been a few minor detail tweaks since these were prined which are currently printing, but it was pleasing to see that my models were more or less spot on for fitment.


The above where printed on a PLA printer and the quality is passable but ideally they'd benefit greatly if printed in resin.
So has any body removed the right hand cannon rear as I can't quite sus' this out, once removed I can then modify the right hand model to suit.
Cheers David
Here is a long overdue update to my project thread.
I finally got my printer up and running last week and have been busy resurrecting this somewhat stalled project and being me I have also decided to expand the scope of the project works.
So.....
The above was modelled in half a day or so and is as close as I can guestimate to the hero model details.
In the following images are the results of my first prototyping efforts, there have been a few minor detail tweaks since these were prined which are currently printing, but it was pleasing to see that my models were more or less spot on for fitment.
The above where printed on a PLA printer and the quality is passable but ideally they'd benefit greatly if printed in resin.
So has any body removed the right hand cannon rear as I can't quite sus' this out, once removed I can then modify the right hand model to suit.
Cheers David
Last edited:
spudkopf
New Member
Ok worked out how the left hand side is connected, with the removal best achieved by the use of a knife


I have tweaked the design to make the left and right sides more or less universal, this will result with the left one being a three part design, and the right a two parter, which will all become clearer once I make some renders and take some progress shots.
I also need to add a detail tweak that I have missed due to my reliance on the Hasbro parts as my primary reference source.
Update to follow soon, but I’m getting mighty close to finalising the cannon replacement parts at least.
As for progress on the fillet infills for the underneath, my initial modelling in its current iteration makes for a good starting point, but I need to do some quite substantial rework to make them usable.
spudkopf
New Member
Just a quick design update for the rear cannon component, I found a slightly clearer reference, which has allowed me to refine some details and add some missing ones. However at the same time this reference suggests that the Skywalker cannons use what looks to be tank track for some of the details, similar to what I modelled earlier on.

One of the details that needed to be refined due to my reliance on the Hasbro tooling was the fact that there are seven veins on the forward part of the canon base and not eight as they modelled it.

Doing a test print now and will post the results soon.
Cheers
One of the details that needed to be refined due to my reliance on the Hasbro tooling was the fact that there are seven veins on the forward part of the canon base and not eight as they modelled it.
Doing a test print now and will post the results soon.
Cheers
spudkopf
New Member
A little progress update.
I have more or less settled upon the final design elements, that said I may still explore the tank track look as an alternative version as well.
The incorporation of the separate left and right end plugs had the consequence of creating a noticeable reduction in the print quality over that of a solid end.
Fortunately the combination of a tight fit tolerance and the robust attachment of the rear portions seems to negate some of the need for a mechanical connection at the front, however with that said the best solution would seem to be to return to dedicated left and right versions with their own specific forward mechanical fitment.
Another fortunate outcome is that with a minor change the rear fitment method of the left cannon works perfectly well with that of the right.
Incorporated mechanical locator for left cannon component.

Incorporated mechanical locator for right cannon component.

Common rear fitment cut-out.

Following are some trial shots of the current design using a flat solid end set in place.


I am also very much a noob at the whole 3D printing game, being only a week into this at this point, so it's been a pretty steep learning curve with that aspect of the project also, and I'm still trying to find the optimum slicer setting to produce the best print outcomes.
Still working on the infills for the underneath as well as some screw caps for those five exposed screw heads as well.
Cheers
I have more or less settled upon the final design elements, that said I may still explore the tank track look as an alternative version as well.
The incorporation of the separate left and right end plugs had the consequence of creating a noticeable reduction in the print quality over that of a solid end.
Fortunately the combination of a tight fit tolerance and the robust attachment of the rear portions seems to negate some of the need for a mechanical connection at the front, however with that said the best solution would seem to be to return to dedicated left and right versions with their own specific forward mechanical fitment.
Another fortunate outcome is that with a minor change the rear fitment method of the left cannon works perfectly well with that of the right.
Incorporated mechanical locator for left cannon component.
Incorporated mechanical locator for right cannon component.
Common rear fitment cut-out.
Following are some trial shots of the current design using a flat solid end set in place.
I am also very much a noob at the whole 3D printing game, being only a week into this at this point, so it's been a pretty steep learning curve with that aspect of the project also, and I'm still trying to find the optimum slicer setting to produce the best print outcomes.
Still working on the infills for the underneath as well as some screw caps for those five exposed screw heads as well.
Cheers
Attachments

spudkopf
New Member
Now that the main design work on the cannon components is complete (well mostly), I switched from my test print media from PLA + to a different brands Matte Concrete Grey PLA to see how the results differ. First up the post print shrinkage seems to be slightly more on the new filament, as a consequence the fit is not as tight as with previous prints, but it is not overly loose either and hold their place with the friction fit quite adequately.


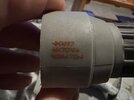
While waiting for all the components to to cycle through the printing queues I thought I'd tackle a replacement decal design for the Aurabesh stencils located on each of the rear cannon parts. As these are not overly clear it took me a little while to decipher some of the letters but once I realised what it was meant to say it was quite easy to duplicate.


BTW, the stencil states LASER TARGET CONTROL if your interested")
Revised cannon locator plugs for the top and screw covers for the underneath are currently printing, while post fitment update soon.
Cheers David
While waiting for all the components to to cycle through the printing queues I thought I'd tackle a replacement decal design for the Aurabesh stencils located on each of the rear cannon parts. As these are not overly clear it took me a little while to decipher some of the letters but once I realised what it was meant to say it was quite easy to duplicate.
BTW, the stencil states LASER TARGET CONTROL if your interested
Revised cannon locator plugs for the top and screw covers for the underneath are currently printing, while post fitment update soon.
Cheers David
Attachments
spudkopf
New Member
G'day
Getting a successful test print of the infills for the underneath is proving difficult, as I need a protype print to be able to tweak and test fit, this part of the project temporarily stalled.
So why trying to nut the above out, I decided to do a bonus part, in the form of a right hand cannon base that is designed to fitted when the speeder is displayed with the access / damage panel removed. This alternate part will allow for a much better visual than the straight cut panel on would.


Printing a test now, hopefully my generally accurate measurements will be spot on the first time round, if so I should be able to post pictures of a test fit in a couple of hours.
Cheers
Getting a successful test print of the infills for the underneath is proving difficult, as I need a protype print to be able to tweak and test fit, this part of the project temporarily stalled.
So why trying to nut the above out, I decided to do a bonus part, in the form of a right hand cannon base that is designed to fitted when the speeder is displayed with the access / damage panel removed. This alternate part will allow for a much better visual than the straight cut panel on would.
Printing a test now, hopefully my generally accurate measurements will be spot on the first time round, if so I should be able to post pictures of a test fit in a couple of hours.
Cheers
spudkopf
New Member
Due to the scarcity of really decent close up images, coupled with the apparent fact that the speeder cannon details specifically in regards to the narrow rings on both the rear and forward cannon mounts appear to vary from example to example, I have had to strike a generic middle ground with a generous helping of artistic license mixed in to arrive my design of these replacements.The parts look awesome. I’ve not researched the snowspeeder on the RPF. I assume all those pieces came from model kits. That was one of the coolest ships ever. Even if it was ill equipped to take on an imperial walker.
If I could find and undisputable clear reference for the screen used Skywalker speeder, then I'd happily re-model my CADs models to try and be faithful to the original as I could.. The closest I found is here, looking closely many of the details appear to have been resin cast, which is evident by the numerous bubbles, this has also softened the details enough to make there true origin far less determinable .
The most photographed example (me included) is the one with the missing panel, and this one appears to use a waffle type pattern in the two recesses, while Luke's seem quite different, it may have used inverted 1/72 scale tank tracks, however this just might be a artifact caused by the resin casting, and is something I just can't verify.
It also appears that Hasbro have used the stencils of the missing panel example as the ZZ script looks to be different and only on the one side of Luke's speeder and probably due to it possibly only ever in camera from the right.
Following is my recreation of the Hasbro used ZZ markings, suitably roughened to mimic a stencil application (no idea what it says, there is some suggestion it may be derived from Hebrew).
When I took my own reference pictures of a speeder, apart from the relatively restricted access which curtailed true close-ups, I never envisioned that I have such a large scale model to work on or that when I did get my hands on it that there would be visual details due to the result of manufacturing processes that would erk me so much that I'd be forced to try and rectify them. Through affordable 3D printing into the mix and here we are.
Any way back to the project in hand, I found a few clearance issues with my first print and other areas where I'd given too generous one at the detriment of detail, second print was closer but revealed new collision points, hopefully third times a charm (now printing).
Cheers
spudkopf
New Member
What's that old saying... 9th times a charm
I've had to make some quite generous allowances to accommodate the complex topography of the bay details, trying best not to impact upon the visual goal too much, the result is by no means perfect, however I think some clever weathering/shading should go a long way to hiding a multitude of sins.

The following are some images of the almost final version in place.


A small amount of ghosting has progressively crept into the prints, this appears to be related to internal structure influences and I need to research on how to try and eliminate this in my prints. I welcome any suggestions on a fix from any Cura guru's out there.
Cheers
I've had to make some quite generous allowances to accommodate the complex topography of the bay details, trying best not to impact upon the visual goal too much, the result is by no means perfect, however I think some clever weathering/shading should go a long way to hiding a multitude of sins.
The following are some images of the almost final version in place.
A small amount of ghosting has progressively crept into the prints, this appears to be related to internal structure influences and I need to research on how to try and eliminate this in my prints. I welcome any suggestions on a fix from any Cura guru's out there.
Cheers
spudkopf
New Member
I think I'm finally at the stage where I can lock down the design for the cannon replacement components as final (baring finding a definitive reference for the details on the Skywalker speeder that is). I just need to neaten up the component file names a little, but will soon explore the uploading options available.
 Next hurdle with these parts is to finish, paint and install. Thus far I have not found a canned paint in a colour close to that of the base colour of the speeder. Hasbro chose to use a darker grey plastic for all the cannon parts, but all references I can find suggest that the colouration should be uniform with that of the rest of the speeder.
Stay tunned....
Cheers
Stay tunned....
Cheers
spudkopf
New Member
............... yet another minor change, geared towards ease of install and along positive part location being the main objectives here, I'm quite surprised I'd not thought of doing this from the start, however again this may have been a direct influence of the original Hasbro part design.


Printing now, but may need to tweak a little as I may have been just a little to cautious with the clearances, ultimate aim is to have the tightest fit possible.
Will update soon.
Cheers
Printing now, but may need to tweak a little as I may have been just a little to cautious with the clearances, ultimate aim is to have the tightest fit possible.
Will update soon.
Cheers
Last edited:
Similar threads
- Replies
- 3
- Views
- 1,530
- Replies
- 3
- Views
- 846