Redbuttons built projects!

redbutton

Sr Member
RPF PREMIUM MEMBER
After the smooth beginning of doing a custom saber - I've embarked on a ESB saber.
I got a 2 cell from the UK complete with a RED BUTTON and glass eye. I also came with these nifty rubber/circuit covers over the contact pins.
Next came a replica 3 cell of which I'm using the bottom. I also picked up a more accurate red button to which I added a spring to back it up (Tom's idea).
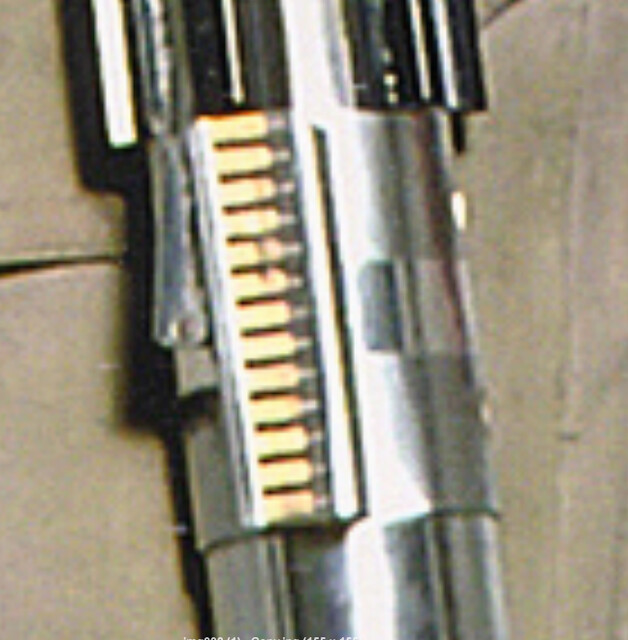
Someone started an ESB saber as you'll notice holes are drill for the grips and a kobold/D ring. I managed to pick up a Otis Elevator circuit board for the clamp card.
Cutting the clamp card is tricky but a lot of fun! I just got some grips and the Kobold/D ring from Roy. I started to cut the lenght down.
Thanks for looking! Steve
DSCN3204.jpgDSCN3221.JPGDSCN3220.jpgDSCN3218-1.jpgDSCN3217.JPGDSCN3215.JPGDSCN3211.JPGDSCN3210.JPGDSCN3209.JPGDSCN3223.jpg
 
Last edited:
Re: Starting an ESB saber!

That clamp card looks great, how did you go about finding it?

19171443366_aeb05979da_z.jpg


I've noticed Roy's and slothfurnace's are squared edge, but in this image it looks rounded like yours.

What does the spring behind the button do?
 
Re: Starting an ESB saber!

The very first batches that Slothfurnace made were also more round . . . it's very hard to determine without a doubt just from the few available 'close-up' pictures what was used by the propmakers ... some show squared edges others such as above make them appear more round ... so for me ... if you use a vintage board with gold and silver fingers, such as that Otis board, for your ESB lightsaber ... you're good to go ... on set :)

Chaim
 
Re: Starting an ESB saber!

Hey, nice Graflex.
When you found a board which has the 13 goldfingers you can be happy as Chaim said. They are hard to find and nowadays the goldfingers are smaller than in the old days.
The spring under the red button is the best solution to hold the red part from these replica buttons in place. I myself use the spring from inside the glass eye which is very tough.

Have fun with your build.
 
Re: Starting an ESB saber!

How did you go about cutting your Otis board? What tools did you use?
 
Re: Starting an ESB saber!

Tom and I just keep a eye out on ebay searching for otis elevator circuit boards. The button replaced the the glass eye on this ESB saber the spring is from a Leika (not sure I'm spelling to right) flash. The spring supports the button - you can actually push it down and it pops back up like the top one.

- - - Updated - - -

Thanks!

- - - Updated - - -

Thanks, I did think about the spring from the glass eye. I think it's cool that you did - it looks like a tough thing to do! Nice.
 
Re: Starting an ESB saber!

Well. I use the little X-Acto razor saw set with that little bitty miter box. Worked really good for cutting the grips down too. Still have to notch them out.
I did see someone used the same miter/saw in another thread. Hope this helps.
 
Re: Starting an ESB saber!

Hi, Just working with adding the grips and drilling out the holes for the screws. It's very hard actually but lots'o fun!!!
DSCN2189.JPG
 
Re: Starting an ESB saber!

Great looking build :thumbsup I had no idea the origin of the circuit board. I've learned so much from the RPF.

I very much would like to build a Luke ANH lightsaber. Questions; Is the difference between the 2 cell & 3 cell GRAFLEX just the length of the battery compartment? Is the diameter the same?
 
Re: Starting an ESB saber!

redbutton how did i miss this thread!? looks great buddy, great choice of parts!
 
Re: Starting an ESB saber!

Questions: Is the difference between the 2 cell & 3 cell GRAFLEX just the length of the battery compartment? Is the diameter the same?

Indeed a 2 cell batteryholder is much shorter than a 3 cell . . . the diameter is the same though . . . if you're very talented and crafty you could extend a 2 cell by cutting it in half and adding a new center piece, which will need to be chromed or chrome painted afterwards, inbetween about 6 cm in length and of course the exact diameter and weld them together or perhaps JB Weld whichever your skills allow . . . it's still a quick and dirty solution to keep a G R A F L E X text on the bottom, though it will say 2 Cell, and maintain the functional parts to put it back together on the clamp . . . since loose 3 Cell bottoms are quite rare to find these days, though on occassion I see them pass on ebay.

Chaim
 
Re: Starting an ESB saber!

Indeed a 2 cell batteryholder is much shorter than a 3 cell . . . the diameter is the same though . . . if you're very talented and crafty you could extend a 2 cell by cutting it in half and adding a new center piece, which will need to be chromed or chrome painted afterwards, inbetween about 6 cm in length and of course the exact diameter and weld them together or perhaps JB Weld whichever your skills allow . . . it's still a quick and dirty solution to keep a G R A F L E X text on the bottom, though it will say 2 Cell, and maintain the functional parts to put it back together on the clamp . . . since loose 3 Cell bottoms are quite rare to find these days, though on occassion I see them pass on ebay.

Chaim


Awesome. Thank you!
 
Re: Starting an ESB saber!

Thanks! I started to drill pilot screw holes in the grips/base and a grip popped off. So what I did was get some warm water and run my finger across
the epoxy wait a minute or two and THEN scrape off the old epxoy with a butter knife. Worked like a charm. Came off very clean! Next I used a paper
towel and some rubbing alcohol to clean the tube. I re-applied the expoxy and grip. Still drying. However, I did start pilot hole in the grips with
a rubber mallet and a roofing nail. This should help when I drill pilot holes thru the Graflex base. Hopefully I'll drill out the hole and get those screws in
soon!
 
Re: Starting an ESB saber!

DSCN2257.JPGDSCN2269.JPGDSCN2272.JPGDSCN2273.JPGDSCN2279.JPGDSCN2280.JPG
I finally completed ESB saber with two real red buttons an otis elevator card, some metal tape. The D ring was lots of fun with the rivets and all. I got a rivet gun at an estate sale for 5 bucks - a sweet savings there - and they turned out really cool with the clip. I have some little rubber covers for the prongs, you will see these as little black circles over the well, prongs. They come off easily. Cutting grips was fun too - a dremel for that. all and all a great little project. Now it's on to a ANH saber!
 
Last edited:
Re: Starting an ESB saber!

You finished it! It looks great. This saber was my first saber build, and I'm about to revisit it soon. Great job!
 
Last edited:
Re: Starting an ESB saber!

Hi, I started a GK blaster after I finished ANH saber(pictures to come) And it's going well. I got a bracket set from @SoloHold and a resin cast of a compac scope from @Admata.
I cut down and ground out the Derlin adapter to fit the Flash Hider. Next I got some weaver 1" brackets on gunbroker.com - well another set of rings on ebay the first set was missing a screw. I'll add more pictures later.
DSCN2289.JPGDSCN2290.JPGDSCN2291.JPGDSCN2292.JPGDSCN2293.JPGDSCN2295.JPGDSCN2296.JPG
 
Last edited by a moderator:
Re: Starting an ESB saber!

your son really got you hooked didn't he!! i love seeing stuff like this, father son team, good going guys!
 
This thread is more than 7 years old.

Your message may be considered spam for the following reasons:

  1. This thread hasn't been active in some time. A new post in this thread might not contribute constructively to this discussion after so long.
If you wish to reply despite these issues, check the box below before replying.
Be aware that malicious compliance may result in more severe penalties.
Back
Top