You are using an out of date browser. It may not display this or other websites correctly.
You should upgrade or use an alternative browser.
You should upgrade or use an alternative browser.
Our Collective 5-Foot Millennium Falcon Build
- Thread starter Studio Kitbash
- Start date

SK,
Solid construction and alignment demonstrated in those views. Inboard Pontoon bridge and armor on skin will fatten her up depending how you designed that joint. Regardless, so will the height of the side rails top and bottom and kit parts that decorate the edges.
Now check jaw box width & length relative to plan view toe-in and toe-out. This includes side armor thickness and slope plus any included start of side wall vertical drop to disc.
Wow, structure sure looks well rigged. Congratulations.
OLD SKOOL RULEZ
bwayne64
Master Member
Copycat ! Wait what....... ; )
Intelligent observationCopycat ! Wait what....... ; )
(Need to re-read my input more often. Meant this as a complement. You provided a teaching moment regarding skills from the past.)
Last edited:
bwayne64
Master Member
That's ok, I figured that. That's why I always put the smiley face, when I say something that might be misconstrued. People are so sensitive on the interwebs. In real life people can see your expression when you talk, and know you're joking. Oh well first world problems, lol.Intelligent observation
(Need to re-read my input more often. Meant this as a complement. You provided a teaching moment regarding skills from the past.)
So, if you're ever wondering how to feel "really smart" and "really stupid" at the same time, have I got a lesson for you!
Remember the old carpenter's adage, "Measure twice, cut once"?
On the Falcon, my approach has been:

Here's the forward section of chipping plate for the port underside mandible.
Which you'll need/want to make sure your mandible pit holes are in the right location.
Then derive perfection from there.
Oh, and also: remember how many times to measure and mark and manage before you commit? That goes for marking port and starboard sides too, especially since you'll be turning this thing over again and again throughout the build.
So here's a classic blunder I've made, despite everything:

Yes, that's right side up. Yes, the port mandible holes are in the wrong location, as are the starboard mandible holes. That's because I marked the mandibles, but somehow had them "switched" in my mind when I started cutting the holes, and it took me three days to figure why I was so far "off".
So here's the fix, which is currently still in process:
1.) Fill the hole with the disc you cut out of it

2. Brace support it from underneath, completely

3. Putty like crazy

4. After the first layer is dry, a full day later, sand like heck

5. Then putty some more

6. Wait a full day for that to dry (that's today)... and while you're waiting, make your son a Shield of Gondor for his Lord of the Rings museum day show-and-tell...

When he asks why he can't hold it and play with it, explain patiently that the epoxy and paint are still drying!
Remember the old carpenter's adage, "Measure twice, cut once"?
On the Falcon, my approach has been:
- Get every possible measurement you can find
- Analyze them
- Compare them
- Average them
- Proportionalize them
- Bandai PG convert them
- Choose your own number
- Measure it twice
- Measure it twice more
- Measure it again
- Once more, buddy
- Then make your cut
- Then do it right, since you screwed up the first one
Here's the forward section of chipping plate for the port underside mandible.
Which you'll need/want to make sure your mandible pit holes are in the right location.
Then derive perfection from there.
Oh, and also: remember how many times to measure and mark and manage before you commit? That goes for marking port and starboard sides too, especially since you'll be turning this thing over again and again throughout the build.
So here's a classic blunder I've made, despite everything:
Yes, that's right side up. Yes, the port mandible holes are in the wrong location, as are the starboard mandible holes. That's because I marked the mandibles, but somehow had them "switched" in my mind when I started cutting the holes, and it took me three days to figure why I was so far "off".
So here's the fix, which is currently still in process:
1.) Fill the hole with the disc you cut out of it
2. Brace support it from underneath, completely
3. Putty like crazy
4. After the first layer is dry, a full day later, sand like heck
5. Then putty some more
6. Wait a full day for that to dry (that's today)... and while you're waiting, make your son a Shield of Gondor for his Lord of the Rings museum day show-and-tell...
When he asks why he can't hold it and play with it, explain patiently that the epoxy and paint are still drying!
Attachments
Last edited:
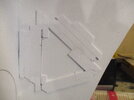
Repair work...

New hole located...

Rough cut...

Still have some underside shaving/trimming/sanding to do...

All better now...

Not quite perfect yet, but getting very very serviceable... Nothing is glued on here, just test fitting to see if things line up.
Getting there!
New hole located...
Rough cut...
Still have some underside shaving/trimming/sanding to do...
All better now...
Not quite perfect yet, but getting very very serviceable... Nothing is glued on here, just test fitting to see if things line up.
Getting there!
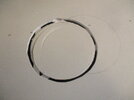
The joys of circle cutting...drill, cut, grind, curse, file, and whew!
Do you know of a ready-made "conical glass bottle" that has a 3" diameter that is perfectly round (i.e., not a Coke bottle, which has fluting/ridges)?Excellent recovery!
Sandpaper around the neck of a conical glass bottle works well for truing up circular holes.
Much like a tapered reamer, which has to be one of my favorite tools.
Thanks!
Bjorn
Sr Member
Ha, you make a good point. Not many I'd suggest. Had honestly forgotten how large these holes are.
Though, I think some larger Champagne bottles are just over 3.25". Probably not the most economical method.
And might be a tad strange waltzing into your local liquor store with a vernier in hand.
Though, I think some larger Champagne bottles are just over 3.25". Probably not the most economical method.
And might be a tad strange waltzing into your local liquor store with a vernier in hand.
SK,
My favorite small to medium size hole trimmer is a tapered reamer per Bjorn’s advice.
Larger holes I use a hole saw with a hand drill. The diameter used is slightly undersized if needed. Finish with a Dremel sanding drum. Sanding drums in the larger sizes are also good for this.
Biggest problem with hole saws is finding the correct center in the beginning. Rework is common.
I was missing a piece on this one. Thanks!
That Harrow green and SeaLab orange is going to bleed through your paint job... But that other green stayed nice and PUT! ; o) What kind of glue ARE YOU using over there Read? Hmmm??? LOL Looks great! Broke my own rule and I peeked, ugh!
Similar threads
- Replies
- 11
- Views
- 1,091