Nostromo Costumes

Very nice Yuri......are those trousers a light blue or a light green?....it's a little hard to tell on my screen!
..................
...........
.........
 
Yeah, the blue seems to be an item of "screen look" versus actual colour. Richie's photos show it was actually a seafoam green (at least for Ash) but on my TV it looks blue. I would prefer blue. :)

Charlie
 
I got the jackets back from the screen printer today.

WOW.

IMAG0374.jpg


IMAG0371.jpg


IMAG0376.jpg


$22 total. For all three. I was shocked. :) The lettering is a bit smaller than my original jacket

IMAG0377.jpg


but not the point I'm at all about to complain.

Charlie
 
Slight update: I've talked with some of the makers here on the RPF about the soft parts. They are just a little too pricey for my budget right now. Of course, I'm not on a strict timeline, so I'm going to branch out and do some experimentation. I'm planning on going ahead and getting the patches I will need (since I have the jackets, I can get them finished). In the meantime, I'm going to play around with patterns and see what I can do with some premade and then modified clothing. Hopefully I will find a local tailor who can help out with that. If I am really lucky, some of the dickies clothing might already come in a very close match to the blue I want. If that is the case, it saves me trying to dye match clothing. There is a store near my house that deals with a lot of work clothing; I'm going to try to swing by there tomorrow and get some hands on research. :)

Charlie
 
Well I have been able to do a little bit of work. And I do mean a little bit :)

IMAG0393.jpg


I'm going to use these for the side bits on the belt buckles. They are caps for 9V batteries. Extremely thin and light weight; they installed on the terminals in bulk packaging to prevent the batteries shorting together.

I used a razor knife blade and shaved off the raised numbers and letters (as well as I could; getting between the terminal caps was tough).

IMAG0392.jpg


Once that was done I spray painted them white.

IMAG0395.jpg


They are dry now, and I did a test fit. Three should line up along the side nicely, leaving room for a 1" pin to be mounted on the right side and a 1" W-Y wing sticker to go underneath that. I'm planning on using CA glue (Super Glue) to hold the caps on. Like I said, very thin and lightweight. Shouldn't be an issue. I left the back a little rough, and I will rough the areas of the buckle to make sure there is a good adhesion surface. I have an idea on how to securely mount the pin, but I need to wait for it to arrive.

In the meantime, I made another hat. I love hats, wear them all the time. With all the compliments I've been getting on my Nuka-Cola hat (see my Fallout thread) I made a same style W-Y hat. I got a dark blue flex fit hat and put a light blue set of wings on the front.

IMAG0396.jpg


They are ironed on for right now; I'm going to have them sewn down. I may end up dying the wings a darker blue, or at least get rid of the white background. It stands out a lot, but I'm not sure if it will be too much with the same wings on the jacket and shirt.

On the back of the hat, I had my name (kind of) embroidered and put a set of the small wings (in this case green).

IMAG0397.jpg


I still have my Brett hat; I would have put a Nostromo patch on this one, but the Brett/trucker style hat has a larger crown. The patches fit. The flex-fit hats feel better and fit better on my head, but the brow won't allow the larger Nostromo patch, so I used the W-Y wings. I think it will be a nice conversation piece if nothing else. :)

Charlie
 
I got some fun stuff in the mail yesterday. :)

IMAG0400.jpg


These are nice patches. They came from Intergalactic. As with the patch comparison thread, they are definitely nice quality and a good screen match. Here's a shot with my older patches that I got from Starbase Atlanta.

IMAG0401.jpg


Since I don't have a massive amount of free time, I decided to work on the belt buckles next. I removed the straight pin from the back of one engineering and one navigation pins. The puncture pins were just epoxied onto the backing, so it was easy to get them off. The engineering one just came off when I used pliers to rotate; the navigation I had to use a razor knife and pry the epoxy up. End result:

IMAG0402.jpg


I sanded the back of the pin and the front of the buckle to rough up the surfaces just a bit. Then to give it just a little bend, I bent the pins ever so slightly around a curve. I actually used a glass jelly jar as the surface for the curve. Once that was done, I used CA glue (super glue) and put each symbol in the upper right corner. I just eyeballed the fitting, but I tried to keep an even spacing. I used a set of grips to hold the pins in place while the glue was drying. It didn't take too long, about 10 min.

IMAG0403.jpg


Once that was done I added the 3 small white bits. (see my previous post). I just roughed the back with sandpaper, eyeballed it again, and glued them in place.

IMAG0404.jpg


I went and repaint just a bit with some white paint by hand; this cleared up some damaged spots and made a bit better coating. Then I added a bit of dark metallic paint to simulate the dark spot that I saw on the movie buckles. Once that was done I used my W-Y wing template and printed out a very small (1.15" wide) set of wings on transparent shipping labels. I cut those out and added them to bottom of the symbols. I *think* this is roughly what they did on the movie buckles. It's possible they had just the W-Y wing; for practical purposes I had to leave a bit of the sticker on the edges.

IMAG0407.jpg


I'm happy with how they came out. I also got some fitting done today. I've got sizes for the fiancee and mines shirts so that is good. Also fitted the jackets; looks like we will both be wearing green. (The Greek M65 fit her better than the blue US Navy one). The blue one is going to be a surprise gift to my stepdaughter. She's mentioned she thinks the outfits are pretty cool, so I'm going to go ahead and have the jacket made up for her. Need to get a few more patches though. :)

Hopefully I can find a tailor and get down to the real hard work soon!

Charlie
 
Really nice work going on here. Thanks for the computer screen file you sent.

More than welcome!

A few updates: I've actually been working on the costume, thought it may not seem like it. I've purchased a few more items: the piping is purchased and weathered. By weathered, I mean I pre-wetted the piping in plain water. I then used a mixture of water and bleach (about 2/3 water to 1/3 bleach) and placed the wetted piping in it, and let it soak for just a few minutes. Rinsed it off and then ran it through the washer and dryer. This faded out the pink; it wasn't a uniform washout but it wasn't meant to be.

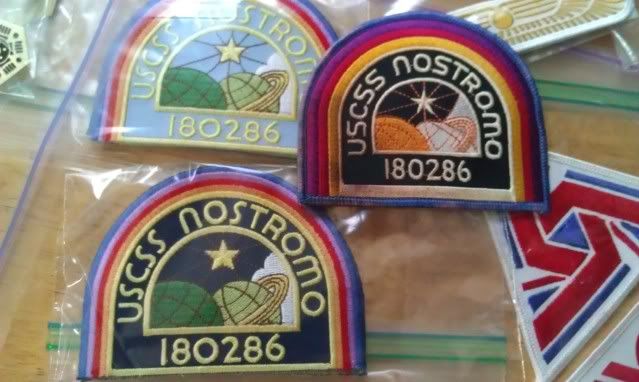
I ordered my girl's shoes and I found a place selling a 100 count of 1/4" aluminum post screws for $15. Even with shipping, it beats out the $0.80 EACH that Lowes wanted. I also found the material I used for the tubing!! Since a picture is worth a thousand words:

IMAG0408.jpg


I'll have more details on how to put it on the shoes when I get the shoes in and start work. I also got the rings (white plastic, 1/2" diameter).

So, as far as some major work goes....I bought a new jacket. The Greek ones are good, and fit my GF fine. They are a bit tight on me...so I was looking at some stuff at my local Army surplus. Of course, I can't find something that actually fits, but I managed to find a black M65. Crazy. It's a large, but came with the liner and was in great shape. It's a tad big, but not amazingly so. I think it looks good. First thing I did was apply a rinse of Rit Colour Remover. I did it stove top; it wasn't enough to remove the colour by any means (esp with the military dye job) but it did "lighten" the black, making it appear a bit more worn, and left a few greyish spots. It was then into the wash with a small amount of detergent and bleach. Then just washed twice. Then to the dryer. (All of this with the nylon liner removed). Overall, instant aging without compromising the jacket. Yay. I'm going to take it to the screen printers this week for NOSTROMO on the back. I'm thinking off-white or grey lettering (or maybe...just maybe a teal blue) and this time I'm going to make the letters a lot larger. The best thing I will be able to wear this a lot. The liner and extra space allow me to wear layers for actual winter, and then removing the liner lets me wear in reasonably warm temps too.

Speaking of patches, if you take the blue W-Y wing patch from Intergalactic and put bleach on it, it turns PINK! Yes, I was trying to weather the same way I did my old set. It didn't work out so well. (Different patch run I guess, or a different manufacturer). However, my girl loves pink, so her jacket wings, and probably shirt are going to be pink. It's not screen accurate, but I like the look, she likes the look, and that's pretty much all I really care about. :)

IMAG0410.jpg


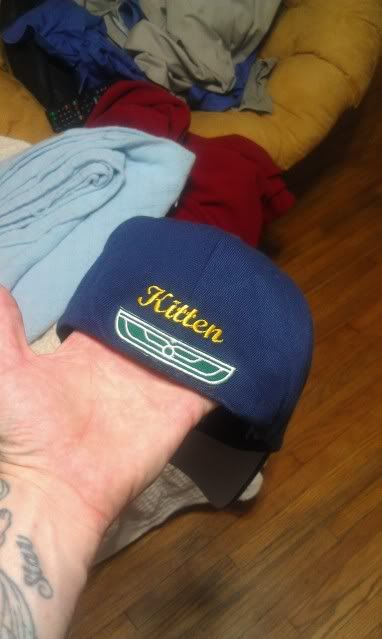
Since I was placing around with bleach and dye and the new blue patches, I decided to see if I could really screw them up. So I tried bleaching and then redying them. Result: not bad, if I say. One of the "darker" blue will go on my jacket. The other is now on my hat. I like the look better than before. Excuse the cell phone camera pictures (without and with flash):

IMAG0417.jpg


IMAG0416.jpg


I'm not sure if I will use regular blue, dark blue, or one of the extra gold wings on my shirt. We'll see when they come in.

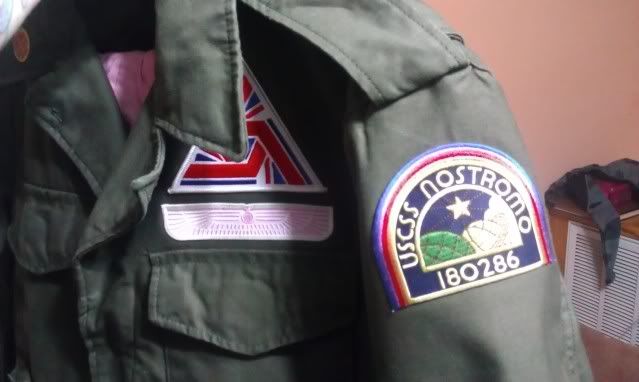
I don't like iron on patches, but for now it was a good way to get them placed. I'm going to drop the jackets off at an alternation place next to the dry cleaners just to get the patches sewn down. Here is her jacket, my black jacket, and my older blue jacket for comparison:

IMAG0415.jpg


Recapping, dark blue ship patches on each shoulder for each jacket. I have the blue wings with the American patch above it. (I will be putting an engineering pin through the center part, ala Brett when it's sewn down). I also have (you can't see it) a small set of black wings on the right breast pocket flap.

Her jacket has her pink wings with the British symbol above on the left side. She has the yellow Nostromo lettering on the back.

I'm hoping to get the piping placed on at the same time as the patches. Depending on when the lacing for the sleeves shows up, I may do it all in one shot, but probably not as I will be slammed at work by the end of the month.

I did stop by my local retailer for pants and shirts. Unfortunately, no go for those. Looks like I will be ordering them online. :(

With some luck, I will have the shoes done by the end of the week. Shirts and pants are the next big ticket items (as well as the lettering for the black jacket). Oh, I also managed to get a green quilted jacket liner. Dead on for what Lambert wears. :) I don't need it, but it was super cheap at the store so I couldn't say no. More updates to follow...

Charlie

EDIT: I forgot to mention, I also weathered the ships patches on MY jacket. Same as the piping. Water and bleach mix, soak it for a bit, rinse off thoroughly. Her jacket patches are unweathered. Overall, her jacket does look at lot newer than mine, but they both look "properly" aged to the individual elements of the jackets.
 
Last edited:
One other little item I managed to get; I won't post a pic of it cause I'm not sure of the RPF policy, but I got a copy of Fiesta, Vol 11 No 2. It's in awesome shape. Yep, it's Parker's magazine. :) I'm hoping I get some hi rez scans done of the covers and make up one to carry around. I'd like to put the "original" on display with my other props.

Charlie
 
Charlie, your first "slapped together" version was good, but it looks like you're really going all out on these. Looking great, can't wait to see the finished pictures of you and your lady wearing them.
 
One other little item I managed to get; I won't post a pic of it cause I'm not sure of the RPF policy, but I got a copy of Fiesta, Vol 11 No 2. It's in awesome shape. Yep, it's Parker's magazine. :) I'm hoping I get some hi rez scans done of the covers and make up one to carry around. I'd like to put the "original" on display with my other props.

Charlie

Once the excuse for buying porn magazines was "it contains interesting articles!"... now it's "it was seen in that movie!"

When you scan the cover in hi-res I'm sure many here will be very thankful if you could share it with all of us. :thumbsup
 
Back
Top