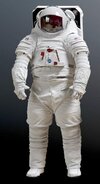
Just starting to get specs and materials together for my next project, the NASA xEMU Spacesuit.

I had finished a big project last month and have been wondering what to tackle next, when Adam Savage posted this video and got me really fired up about doing this:
While his project is more admittedly "inspired by" than "replication", I was really intrigued by the wooden frame and spandex method of creating a base for fiberglassing and combined with the tip about cheap Chinese lazy Susan bearings, wow no reason not to get this done. So credit where it is due, thanks for the tips.
The xEMU is still in development, so details may change as the project progresses but I feel NASA and ILC are at a point where the major things are nailed down. So this will likely won't be "100% spot on" but as close as can be managed at this point. Shooting for Halloween 2022, but if I have to take a pass and go for 2023 instead no worries.
I'll post materials and links here in the first post so that others can get their hands on them if someone else wants to do this as well.
(below list is a WIP)
HARD COMPONENTS
Bearings (exempt equatorial) 10.08US $ 16% OFF|4/6/8/10/12/14/16 Inches Design Lazy Susan Aluminum Ball Bearing Turntable Bearings Swivel Plate|Swivel Plates| - AliExpress
Equatorial Bearings 104.5US $ 5% OFF|1pcs 24inch 600mm Lazy Susan Round Turntable Bearings Brackets|round bracket|bracket bearingbracket l - AliExpress
Visor - Will have to make custom bucks and have vacuformed locally.
SOFT COMPONENTS
Outer TMG Cloth White 210 Denier Coated Nylon Oxford Fabric (2/3rds the weight I used for my Apollo suit)
Attachments
Last edited: