My not-so-budget Jack Sparrow build

Since I won't have access to brass ager until Thursday, I figured I'd give dropping the brass ring in water overnight a try. Hoping for some good results.

So I finished painting the small white parts of the bottom half and then applied a brown and then black wash. I also made some progress on the white pieces of the top half.

DSC00988.jpg


In waistcoat news, I think I've finally gotten the correct color. Here it is with the breeches on top. the quilt on the far left side is kind of a slightly faded navy blue if that helps at all.

DSC00987.jpg


DSC00986.jpg


I'm a little bit concerned that it's still a bit too purple, but at this point I've run out of options. I don't have another week to waste dying it over and over again.
 
For Halloween I think those are more than adequate. Most people trying to do this for Halloween would be wearing either crappy generic "pirate costume" out of a bag from Iparty, or jeans, and still wearing the vest from the bag with the shirt attached. If you want to 'fix' your vest later, you can either remake it, or if you save the money, I'd go with Yordreem's waistcoat. Most SA one out there and the price is pretty reasonable.
 
I'm not doing this FOR Halloween though. I will wear it again on that day, but this is for the pirates in the park day at Disneyland, where there will undoubtedly be other good Jack Sparrows that I don't want to utterly show me up and make my costume look like a rubies creation.

Anyways, I finally got the problem with the waistcoat nailed down, I just have to fix the pattern and then make the thing.
 
Re: Jack Sparrow on a budget

please can you tell me what cost is that jack is wearing please and have you found any on the net ?

thank you
 
Re: Jack Sparrow on a budget

To get this look:

2671528.jpg

2628827.jpg


WOW i really really like that costume everything just looks right !!! i cant wait to get started on mine again !!! i dont think i'm going to get the wig to look anything like you guys not even sure where to start with it !!! :wacko:wacko
 
OK, compass progress pics and then I can put an end to this incredibly long day.

DSC00992.jpg


DSC00996.jpg


DSC00997.jpg


DSC00999.jpg


Basically all I have to do now is glue the latch nub and hinge/ring permanently into the bottom half, then glue the two halves of the bottom together, fill and paint the last bit of 'ivory', give the bottom piece one more wash of black, brown, and bamboo, mask off the dial and clear coat the bottom, then glue the hinge into the top half. Should take a few more hours of work.

The waistcoat pattern is finished and the buttons weathered, it's ready to be cut out and sewn together. I may even be creeping slowly toward figuring out a solution for the boot uppers. I now have 6 days to finish the costume and write a paper for school. Getting used to that kind of schedule though, it feels like I haven't rested in a year.
 
Thanks for the compliment!

So I've been working almost nonstop on the costume, only thing stopping me was a little bit of sleep and writing a research paper that's due in 5 hours. (I really wish that paper were closer to being done right now, just popped on here to update to give my brain a rest.)

The compass is done.

My Yordreem wig arrived yesterday, it looks fantastic.

I figured out the upper pattern for my boots and have now cut and stitched all the pieces. I'm currently in the middle of gluing the shaft piece onto the right boot.

The waistcoat pattern is completely finished and all pieces cut. The buttons are blackened and have a slight patina, the ammonia didn't do quite as good a job as I had hoped, but they're OK. I've installed one pocket so far.

My main concern for the costume is that I won't be able to do the million button holes on the waistcoat in time. If worst comes to worst, I can wear it to the park without button holes and put them in later. Oh, and I'm also still waiting on my gold and silver tooth paint to arrive, but its not the end of the world if it doesn't get here in time.
 
Re: Jack Sparrow on a budget

I went with Black Pearl for the pants, and I'm glad I did, I love the way they turned out. But more on that after I finish my first belt and take a progress picture. For now, I really wanted to post the first part of my boot progress. I'm sorry there aren't very many pictures, there were some places I definitely could have taken more, but I was kind of into it. If you are planning on copying my method and want to see something that I mentioned but didn't have enough pictures of, just let me know and I'll try to get some when I do the other boot. Also, the flash kills the color of the suede, but it looks to me like the same mustardy yellow leather used on the CABoots.

I started with a pair of western/motorcycle type boots from HH. I had to cut off the boot straps and remove the bound edge and zipper from the shaft.
DSC02314.jpg


Then I sanded one of them down so the glue would do it's job.
DSC02316.jpg


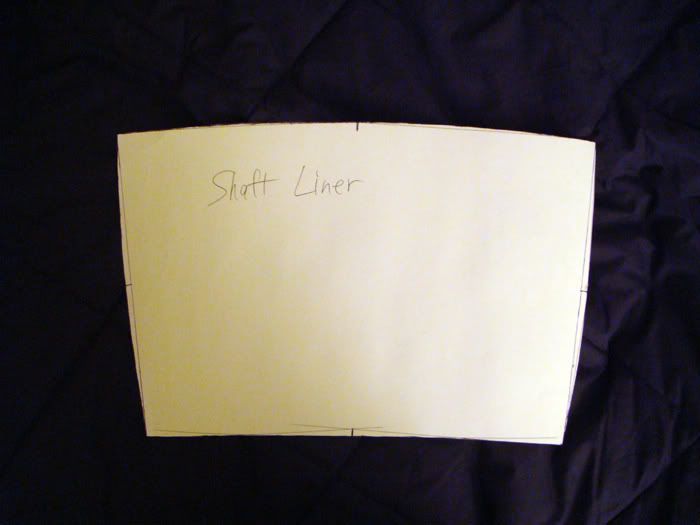
That was the easy part, then it got a lot harder. I did all of this sort of on the fly, so it wasn't perfect, but I'm making it work now in the later stages. I cut out most of the shaft, leaving only the back and front to work with. I Put the boot on, then pulled my foot half way out. When my foot was stretching the ankle open the farthest it had to for me to still be able to get my foot in and out, but not make it loose, I measured around the outside and got about 15.5 inches. I then made a pattern for the shaft liner with that measurement as the bottom, my calf measurement as the top, and a height of 11 inches so it would almost reach my knee. I had to make the sewn edges a curve to allow my calves to fit inside the boot, then I used a leather sewing awl to stitch the two sides together. I used leather weld to glue down the seam allowances on the bad side of the leather (outside in this next shot) and then glued and stitched the liner piece to the top of the existing shaft front and back. The lines drawn on the boot are rough approximations of where the outside shaft piece will go down to (jagged line) and where the piece on the foot would go to (smooth line).
DSC02319.jpg


So then I made up a pattern for the boot shaft, which took a good deal of time and will probably be the hardest part of the whole project. I cut that out of the leather and sewed up the back seam, glued down the seam allowances on the inside this time, and then bit by bit starting at the heel glued down the bottom edge to the boot, leaving about a half inch from the heel/sole so that I could glue the edges in more precisely once it was together. Then I worked my way up. In retrospect, this was a pain in the a** and I might start a little higher next time, work my way down, and then back up from the starting point. I used a mixture of leather weld and barge rubber cement for this step. I have a lot of faith in leather weld, but barge came so highly recommended I figured it would probably be in my best interest to use it. Some places though, I just couldn't get to to apply the stuff on both sides and let it sit for 15 minutes. That's where the leather weld was really useful. The stuff looks and works pretty much exaclty like elmer's glue, but it works really well on leather. So I glued in the whole of the original boot shaft and then went back down, glued the edges down to the sole, used a bone folder to tuck them in nicely, and then trimmed with an xacto knife.
DSC02321.jpg


I'm currently in the middle of gluing the bottom edge of the shaft liner piece to the shaft all the way around, then I'll use barge to glue the seam allowances of the back seams together all the way up the boot. Then I'll glue the top edges together, and the shaft will be done.


Hello Risu! I'm so glad I found this post. I am a newbie to this forum, but not to JS costuming. I've decided to go the SmithCamaro route and make my own boots this year. (Rented from a Theater for the last 3 years at 80.00 a pop!:sick)

I found some shoes exactly as Smith portays in the tutorial. I just started to make my templates for the shoes, but I was wondering if you can offer me some tips or even help me through this. I could PM you if thats easier or even call you. I think your boots turned out awesome!

Thanks
Chris
 
Tell you what, next time I take some pictures, I'll take some of my patterns. I don't think it'll be as easy as blowing up the images, printing, and cutting them out, but they should at least give you a starting point.

Also, the thing I've learned about the boots: Make the cuff two layers of leather glued together for stability, and get a piece of thin tooling leather and make another piece that goes down inside between the shaft and the liner piece that runs up the whole height of the boot. It'll give way more stability and keep the boots standing up. These ones already slouch like they've been broken in for years.

Pics would be great. I'm getting ready for Halloween and starting my prepping a little early this year. So when you say "cuff" do you mean the bell that comes down or the whole shaft for the 2 pieces? Sith indicates to use 2 pieces too, but i figured on using a strap underneath the bell to hold up the boots. Where would you put the tooling leather? Sides L,R or Back F,B?

Thanks
 
I'm at school right now so I can't post the pics, it'll make more sense once I do, but I'll try to explain without them. Using my boots as an example, I cut 4 pieces, the liner, the shaft, the cuff/bell, and the upper. The liner is the piece that I've glued to the top of the original boots. the shaft is the piece that goes on the outside of that and goes from the top of the boot all the way down and tucks into the heel. The tooling leather piece (1-2 oz.) should be cut to the same shape as the shaft piece (except maybe trim it so it doesn't cover the heel) and stitched up the back the exact same way. Then the tooling piece would be glued over the original boot and liner piece the way the shaft piece is on mine. After the tooling piece is in place, you'd then glue the shaft piece over the top of that, completely covering it up. The tooling piece would then be hidden inside the boot and give it way more rigidity.

My solution is going to be the same, a couple of 1/2" wide straps with tiny buckles tightened up and buckled under the bell cuff above my calves.
 
No problem on the pics. Whenever you get time. The only difference is, I don't have a boot. Its a shoe being converted. Exactly like SithCamaro's tutorial
Untitled Document
So, I don't have a liner option. But I like the idea of a leather piece to hold them up. Take a look at the sith version. It says to use 2 piece of suede and glue together. Not sure about that or if its really neded if I am using the strap to hold them up. Thoughts?
 
Suede leather is generally softer and two layers won't hold themselves up once you've got the cuff on it. Tooling leather holds its shape better. I found SithCamaro's tutorial to be almost useless. Pretty much all it did was put the idea in my head and recommend barge rubber cement, which is good stuff but takes way too long to apply. My first boot was done with a mix of barge and leather weld, the second will be all leather weld. One of my main goals with documenting this boot project was to help other people figure out all the details that he barely even touched on, like getting the pieces shaped right.

Anyways, here are the pics. It should be noted that my upper is not symmetrical because of the shape of the boots. It'll change depending on your base shoes. (Red lines are changes I made when cutting the pieces out but didn't fix the pattern.)

DSC01010.jpg


DSC01011-1.jpg


DSC01012-1.jpg


DSC01013-1.jpg
 
SEVEN! HOURS!

DSC01016.jpg


That's how long it took me to GLUE DOWN this one piece! Right now I'm feeling pretty much screwed. If I want to finish my waistcoat and the other boot I'm not going to be able to sleep until after Disneyland, so about 94 consecutive waking hours. (didn't get to sleep last night) FML. Here are a couple of pics, sorry they're blurry.

DSC01015.jpg


DSC01017.jpg
 
I didn't know you did the cuff/bell separate from the shaft. I was thinking of doing the 1 piece shaft/cuff with a slit down the back of the shaft. For the shaft, did you have it sewn shut in the back or how did you do that? What does the tooling leather look like? I'm visioning thin strips that I could glue inside the shaft. This is getting confusing now. :(

How did you template the piece over the front of the boot? I'm struggling with making this part. Do I hold the tongue of the shoe up while tracing? I will get some pics online to show you what I'm working with.

All those hours will be worth it in the end. They look awesome!
I hear about the sith tutorial. It gave me the idea, but didn't show the detail.
 
Yea, the cuff and the shaft are separate pieces. I sewed up the back of all the pieces and also made a line of stitch around the hem of the cuff and the edge of the upper. Tooling leather is a natural undyed leather that you can buy in any thickness. You can get it at Tandy leather factory. A word of advice though, I've been a professional leather worker for over a year with years of leather working experience before that and this project has been HARD for me. I'd say one of the hardest things I've ever attempted. I don't know why the general opinion of boot modding is "oh yea, it's pretty easy." It's not. The exaggerated shape of my base boots didn't help, I'm sure.

The upper pattern is just by eye. It took a lot of guess work to figure that one out, and it took effort to make it line up properly while gluing it down just because the leather has to stretch to such a huge degree to get around the sides. From now on I'll just buy leather and boot soles and make the damn things from scratch, it'll be a heck of a lot easier.
 
Back
Top