Helpful Nerd
Sr Member
In January of 2015 I started building my "old parts / junk parts" Hellboy Mecha-Glove prop replica. Here's the old build thread:
On Hand Materials, Old Parts, Junk Parks Hellboy Mecha-Glove Build
In 2016 I upgraded my mecha-glove. Working on this prop on and off for the past four years has taught me a lot, mostly that I need to be more patient. But, since I started this prop I've gained new skills, for example, I got into 3D printing and 3D modeling. My modeling skills are now good enough to create models of parts to upgrade this prop.
I've received lots of great compliments in the past at various conventions about my glove and my Rasputin cosplay. However, I was never 100% happy with my mecha-glove and about a year ago I decided to do a v3 upgrade and get this prop to the point where I'm truly happy with it.
A couple weeks ago I tore down my glove into all it's parts and decided that I'm going to do a complete rebuild.
This thread will be all about my v3 glove and everything I'm doing to put it together. This time there will be lights and I will get the "spinning gear" portion to turn in some motorized fashion.
The goal is to have this final build finished in time for DragonCon this year, but I'm also not going to rush this build.
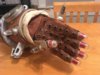
My mecha-glove still won't be super screen accurate and I will still be using some off the shelf items. But this build is going to be mostly 3D printed parts and other parts that are close enough for me and way better than the previous glove. For example, this time around the fingertips will be glass and not plastic round bottom cigar tubes. While that was a creative solution I am trying to make this final version nicer and more accurate even though it won't be screen accurate.
I'll post some pictures from this new build shortly. In the meantime here are a couple pics of my Rasputin cosplay and the most recent pictures of my glove before I broke it down into parts and


On Hand Materials, Old Parts, Junk Parks Hellboy Mecha-Glove Build
In 2016 I upgraded my mecha-glove. Working on this prop on and off for the past four years has taught me a lot, mostly that I need to be more patient. But, since I started this prop I've gained new skills, for example, I got into 3D printing and 3D modeling. My modeling skills are now good enough to create models of parts to upgrade this prop.
I've received lots of great compliments in the past at various conventions about my glove and my Rasputin cosplay. However, I was never 100% happy with my mecha-glove and about a year ago I decided to do a v3 upgrade and get this prop to the point where I'm truly happy with it.
A couple weeks ago I tore down my glove into all it's parts and decided that I'm going to do a complete rebuild.
This thread will be all about my v3 glove and everything I'm doing to put it together. This time there will be lights and I will get the "spinning gear" portion to turn in some motorized fashion.
The goal is to have this final build finished in time for DragonCon this year, but I'm also not going to rush this build.
My mecha-glove still won't be super screen accurate and I will still be using some off the shelf items. But this build is going to be mostly 3D printed parts and other parts that are close enough for me and way better than the previous glove. For example, this time around the fingertips will be glass and not plastic round bottom cigar tubes. While that was a creative solution I am trying to make this final version nicer and more accurate even though it won't be screen accurate.
I'll post some pictures from this new build shortly. In the meantime here are a couple pics of my Rasputin cosplay and the most recent pictures of my glove before I broke it down into parts and